27
ASSEMBLY AND INSTALLATION
inVENTer PAX standard set
•
Installation and operating instructions
TIP:
Fit the sealing tape only immediately prior to installing the weather protection hood. This
prevents the complete swelling of the sealing tape which makes the installation easier.
TIP:
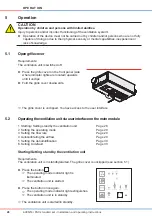
The tabs to clip in the weather protection hood cover on each side have different
distances. When fitting the cover, the the with the greater distance are facing to the top.
Ö
The Pax weather protection hood is mounted.
►
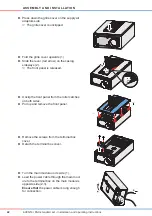
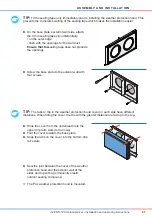
On the base plate’s exterior wall side, attach
the 9 mm sealing tape circumferentially
• on the outer edge.
• flush with the openings for the wall duct.
Ensure that the
sealing tape does not protrude
the openings.
►
Screw the base plate to the exterior wall with
four screws.
►
Hook the cover from the underneath into the
upper drip rail’s slots (red arrows).
►
Fold the cover towards the base plate.
►
Snap the tabs on the cover into the bottom drip
rail’s slots.
►
Seal the joint between the cover of the weather
protection hood and the exterior wall at the
sides and top with a permanently elastic
outdoor sealing compound.


