SECTION 10—ELECTRONICS
82
NOTE: If replacing the exact same joystick then proceed to STEP 6. If installing a different
joystick, call Technical Services for assistance.
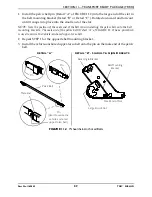
7. Slide the new or existing joystick mounting tube through the mounting bracket to the
desired position.
8. Turn the adjustment lock lever to secure the joystick mounting tube into the mounting
bracket.
9. Connect the joystick connector to the controller connector.
10. Install the rear shroud. Refer to Removing/Installing the Wheelchair Shrouds on
11. Secure joystick cable in place with new tie wraps.
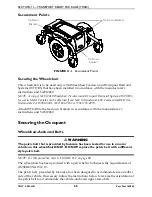
FIGURE 10.4
Removing/Installing/Repositioning MK6i Joystick
Routing/Securing Motor Cables
NOTE: For this procedure, refer to FIGURE 10.5 on page 84.
NOTE: This procedure applies to both sides of the wheelchair.
1. If necessary, place two 5-inch blocks under the base frame so that all six wheels are
suspended above work surface.
2. Press down on the front head tube to move the walking beam, allowing access to the
spring cylinder.
Washer
NOTE: Joystick not shown.
Hex Head
Mounting Screw
Adjustment Lock
Lever
Mounting
Bracket
Joystick Mounting Tube
Arm Tube
Mounting Bracket (Threaded Plate)
Secure Joystick Cable Here


