background image

SECTION 6—USING STANDING, STAND ASSIST, TRANSPORT AND TRANSFER ONE-

PIECE STYLE SLINGS

Part No 1023891-K

21

Patient Slings

FIGURE 6.3   

Attaching the Slings to the Stand Up Lift - Standing Sling

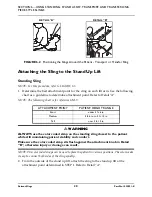
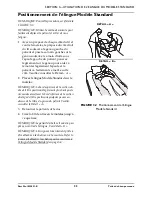
3. Make sure of the following:

• The sling is wrapped around the outside of each lift arm.

• The closest color coded strap to the patient is used to maintain stability and 

comfort.

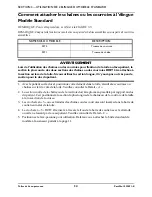
• Get-U-UP, Reliant 350 and Reliant 440 - The color coded strap sits flush against the 

attachment knob. Refer to Detail “B”. Roze - The color coded strap is fully seated 
on the attachment hook. Refer to Detail “B”.

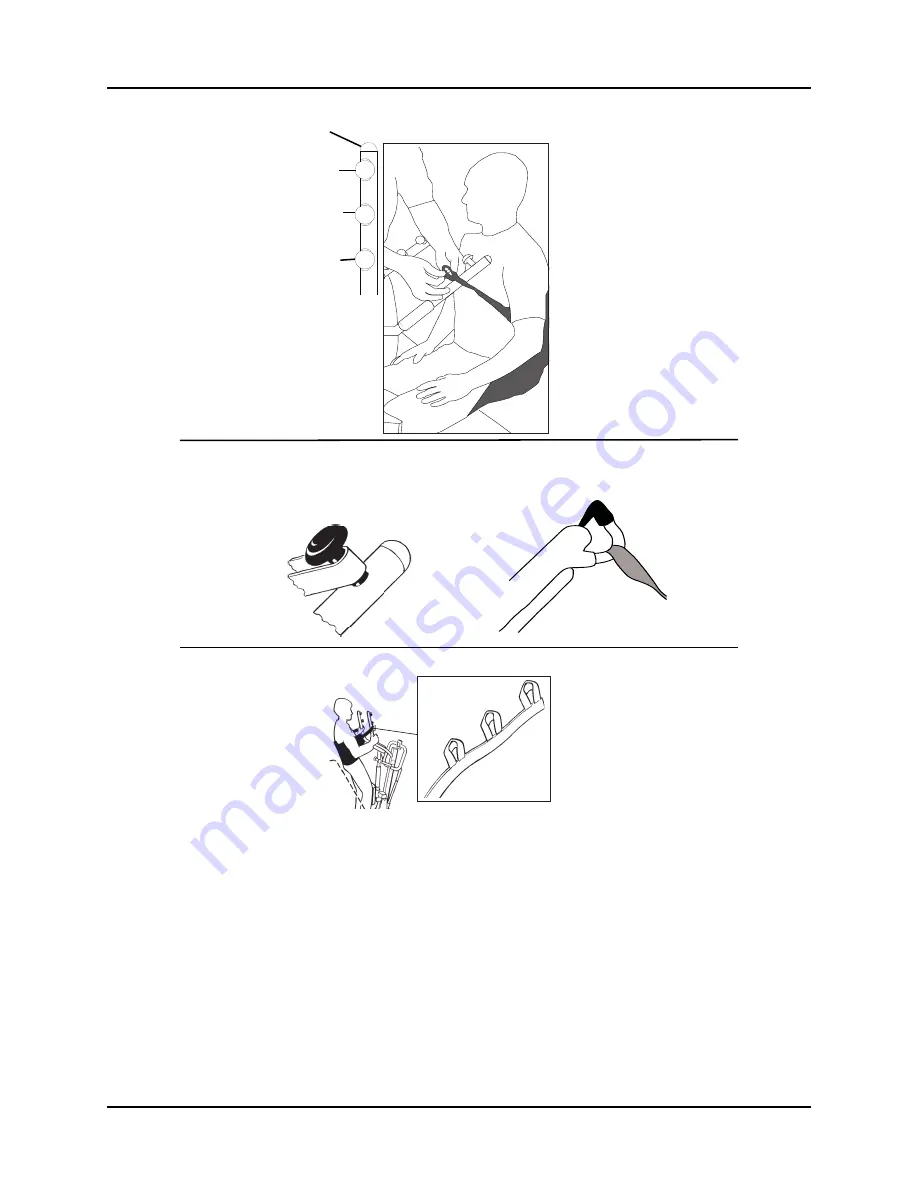
• The same color coded strap is used on each side of the standing sling. Refer to 

Detail “C”.

• The same attachment point is used on each lift arm.

DETAIL “A” 

DETAIL “B” 

DETAIL “C” 

Lift Arm

Tall

Medium

Short

Roze Attachment

Get-U-Up,

Reliant 350 and Reliant 440 

Attachment

Содержание ONE-PIECE FABRIC Series

Страница 1: ...s manual must be given to the user of the product USER BEFORE using this product this manual MUST be read and saved for future reference For more information regarding Invacare products parts and serv...

Страница 2: ...E UNABLE TO UNDERSTAND THE WARNINGS CAUTIONS OR INSTRUCTIONS CONTACT A HEALTHCARE PROFESSIONAL DEALER OR TECHNICAL PERSONNEL BEFORE ATTEMPTING TO USE THIS EQUIPMENT OTHERWISE INJURY OR DAMAGE MAY OCCU...

Страница 3: ...ent Lift 11 SECTION 4 USING FULL BODY COMFORT AND HEAVY DUTY ONE PIECE STYLE SLINGS 12 Positioning the Sling 12 Attaching the One Piece Style Sling to the Patient Lift 14 SECTION 5 USING DIVIDED LEG U...

Страница 4: ...tended use as set out in this document and all maintenance service requirements and laundering instructions are followed While the expected service life might be exceeded if the product is carefully u...

Страница 5: ...one assistant The use of one assistant is based on the evaluation of the health care professional for each individual case Bed rails may be used to minimize patient movement during sling positioning A...

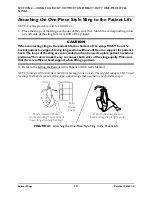
Страница 6: ...oose stitching Bleached torn cut frayed or broken slings are unsafe and could result in injury Discard immediately DO NOT alter slings When connecting slings equipped with color coded straps to the pa...

Страница 7: ...N ONLY BE USED WITH Polyester Sling 9805 9805P Lifts Polyester Sling With Commode Opening Polyester Mesh Sling Polyester Mesh Sling With Commode Opening Strap Kit Chain Kit ONE PIECE FABRIC SLING DESC...

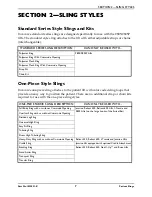
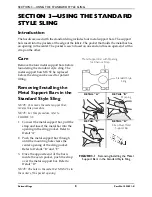
Страница 8: ...port Bars in the Standard Style Sling NOTE To remove the metal support bar reverse this procedure NOTE For this procedure refer to FIGURE 3 1 1 To insert the metal support bar pull the strap and inser...

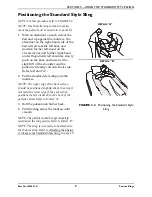
Страница 9: ...slight lift of the shoulder and the patient will easily roll onto their side Refer to Detail A 2 Put the standard style sling onto the mattress NOTE The upper edge of the back section should be positi...

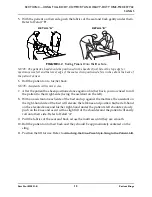
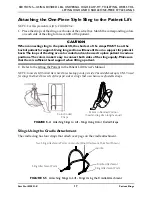
Страница 10: ...to Detail A 2 The short section of chain or strap will be placed parallel to the patient s back This will position the longer section of chain or strap from the waist to the mid section of the thigh 3...

Страница 11: ...anging to different lengths DO NOT disconnect the O rings of the chains from the swivel bar Position BOTH the O rings and additional chain link onto the hooks of the swivel bar NOTE The straps can be...

Страница 12: ...NOTE The top edge of the sling fabric should be slightly above the patient s head The bottom edge of the sling fabric should then be a few inches above the back of the patient s knees 3 With one assi...

Страница 13: ...gain on his her back you now need to roll the patient to their right side facing the assistant on the left 8 With an assistant on each side of the bed and up against the mattress the assistant on the...

Страница 14: ...s back The loops of the sling are color coded and can be used to place patient in various positions The colors make it easy to connect both sides of the sling equally Make sure that there is sufficien...

Страница 15: ...more difficult Support ranges from upper back to beneath the thighs These slings can be positioned with the patient seated or lying flat FIGURE 5 1 Sling Styles Positioning the Sling NOTE For this pro...

Страница 16: ...ld be parallel to the patient s upper arms and be positioned between the top of the patient s head and the base of the spine NOTE For the Toileting Sling the back of the sling should be parallel to th...

Страница 17: ...ions The colors make it easy to connect both sides of the sling equally Make sure that there is sufficient head support when lifting a patient 2 Refer to the Lifting the Patient in the Patient Lift Ow...

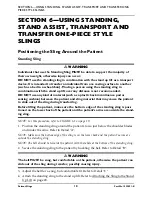
Страница 18: ...ause the patient to slide out of the sling during transferring Before lifting the patient make sure the bottom edge of the standing sling is posi tioned on the lower back of the patient and the patien...

Страница 19: ...spine and the patient s arms are outside the transport or transfer sling NOTE For this procedure refer to FIGURE 6 2 on page 20 1 Position the transport transfer sling behind the patient Make sure th...

Страница 20: ...erence ONLY WARNING ALWAYS use the color coded strap on the standing sling closest to the patient while still maintaining patient stability and comfort Make sure the color coded strap sits flush again...

Страница 21: ...e patient is used to maintain stability and comfort Get U UP Reliant 350 and Reliant 440 The color coded strap sits flush against the attachment knob Refer to Detail B Roze The color coded strap is fu...

Страница 22: ...t as a guideline to determine attachment point Refer to Detail A NOTE The following chart is for reference ONLY WARNING ALWAYS use the color coded strap on the sling closest to the patient while still...

Страница 23: ...f the sling Refer to Detail B of FIGURE 6 5 NOTE The top and bottom colored straps do not have to be the same NOTE If necessary adjust the attachment point of the sling to each lift arm 5 Once a stabl...

Страница 24: ...on date DO NOT return products to our factory without our prior consent C O D shipments will be refused please prepay shipping charges LIMITATIONS AND EXCLUSIONS THE FOREGOING WARRANTY SHALL NOT APPLY...

Страница 25: ...l utilisateur de ce produit UTILISATEUR AVANT d utiliser ce produit ce manuel DOIT tre lu puis conserv pour r f rence future Pour de plus amples renseignements sur les produits les pi ces et les servi...

Страница 26: ...COMPRENDRE LES MISES EN GARDE LES AVERTISSEMENTS ET LES DIRECTIVES COMMUNIQUER AVEC UN PROFESSIONNEL DE LA SANT UN DISTRIBUTEUR OU UN TECHNICIEN QUALIFI AVANT DE TENTER D UTILISER CET QUIPEMENT SINON...

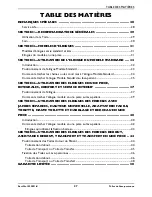
Страница 27: ...UNE PIECE INTEGRALES CONFORT ET SERVICE INTENSIF 37 Positionnement de l lingue 37 Comment attacher l lingue mod le en une pi ce au l ve patient 39 SECTION 5 UTILISATION DES ELINGUES DES MODELES AVEC...

Страница 28: ...qu dans ce document et que toutes les instructions d entretien de maintenance et de nettoyage soient respect es Un produit utilis et entretenu soigneusement peut durer plus longtemps que pr vu Dans le...

Страница 29: ...toute la proc dure plusieurs fois sous supervision avec un individu en bonne sant jouant le r le du patient M me si Invacare recommande que deux pr pos s soient pr sents pour toute pr paration au soul...

Страница 30: ...pendant le transfert Apr s chaque lessive selon les instructions sur l tiquette de la toile inspectez les toiles pour vous assurer qu il n y ait pas d usure de d chirures ou de d cousures Des toiles j...

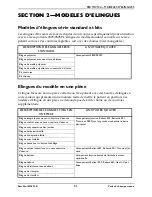
Страница 31: ...ue polyester L ves patients 9805 9805P Elingue polyester avec ouverture d aisance Elingue de maille polyester Elingue de maille polyester avec ouverture d aisance Kit courroies Kit cha nes DESCRIPTION...

Страница 32: ...suivez cette proc dure en sens inverse REMARQUE Pourcetteproc dure ser f rer la FIGURE 3 1 1 Pour ins rer la barre de soutien en m tal tirez sur la courroie pour permettre la barre de passer travers...

Страница 33: ...nt va facilement se mettre sur le c t Veuillez consulter le D tail A 2 Placez l elingue Mod le Standard sur le matelas REMARQUE Le bord sup rieur de la section du dos doit tre positionn l g rement plu...

Страница 34: ...vec le patient sur le dos et positionn correctement dans la toile tendre les courroies ou cha nes sur le lit c t de la toile Veuillez consulter le D tail A 2 La section courte de la cha ne ou de la co...

Страница 35: ...les joints toriques des cha nes du support pivotant Places LES DEUX joints toriques et le lien addi tionnel de la cha ne sur les crochets du support pivotant NOTE Les courroies peuvent tout simplemen...

Страница 36: ...E STANDARD Toiles de L ve personne 36 Part No 1023891 K FIGURE 3 4 Comment attacher l elingue Mod le Standard au l ve patient R glable Filet Verdun Extr mit Ouverte du Crochet en S loign e du Patient...

Страница 37: ...du patient Veuillez consulter le D tail A REMARQUE L extr mit ferm e ou l ouverture p rin ale de la toile avec la poign e de positionnement doivent faire face au patient lorsqu elles sont pli es REMA...

Страница 38: ...inf rieur de la section du si ge positionn quelques pouces au dessus de l arri re des genoux du patient 6 Retourner le patient sur le c t REMARQUE Les pr pos s vont inverser leur r les 7 Une fois le p...

Страница 39: ...des codes couleurs qui peuvent tre utilis es pour positionner le patient dans diverses positions Avec les couleurs il devient facile de placer les deux c t s de la toile au m me niveau Assurez vous q...

Страница 40: ...uels l enl vement de l lingue pourrait s av rer plus difficile Le point de support va depuis la partie sup rieure du dos jusqu au dessous des cuisses Ces lingues peuvent mises en place avec le patient...

Страница 41: ...erceau L arri re de la toile doit tre parall le aux avants bras du patient et entre le haut de la t te du patient et le bas de la colonne vert brale REMARQUE Pour l lingue pour Toilette L arri re de l...

Страница 42: ...o curera tr s peu ou pas de soutien du tout au dos du patient Les boucles de la toile ont des codes couleurs qui peuvent tre utilis es pour positionner le patient dans diverses positions Avec les coul...

Страница 43: ...ne Elingues qui utilisent la fixation berceau L lingue berceau a quatre courroies qui s attachent des broches sur la fixation Berceau Veuillez consulter FIGURE 5 5 FIGURE 5 5 Elingues qui utilisent la...

Страница 44: ...et le mat riel de la toile ce qui pourrait faire glisser le patient hors de la toile pendant le transfert Avant de soulever le patient assurez vous que le bord inf rieur de la toile station debout es...

Страница 45: ...rez vous que le bord inf rieur de la toile station debout est plac au bas de la colonne vert brale du patient et que les bras du patient sont l ext rieur de la toile station debout REMARQUE Pour cette...

Страница 46: ...EMENT MISE EN GARDE Utilisez TOUJOURS la bande code couleurs de la toile station debout qui se trouve le plus proche du patient e qui permet de conserver la stabilit et le confort du patient Assurez v...

Страница 47: ...TRANSFERT EN UNE PIECE Part No 1023891 K 47 Toiles de L ve personne FIGURE 6 3 Fixation des Toiles au L ve personnes Toile station debout D TAIL A D TAIL B D TAIL C Soulevez le Bras Grande Taille Tai...

Страница 48: ...Transport ou Toile de Transfert REMARQUE Pour cette proc dure se r f rer la FIGURE 6 4 and FIGURE 6 5 1 Identifiez les meilleurs points d attaches de la toile de transport sur chaque bras de l appare...

Страница 49: ...le D tail B de FIGURE 6 4 on page 48 Veuillez consulter le D tail B de FIGURE 6 5 La m me bande code couleurs du bas est utilis e sur les deux c t s de la toile de transport REMARQUE Les bandes coule...

Страница 50: ...produits notre usine sans autarisation pr alable de notre part Les envois contre enboursements C O D seront refus s veuillez s il vous pla t pr payer les frais d envoi LIMITATIONS ET EXCLUSIONS LA GA...

Страница 51: ...be ser entregado al usuario encargado del producto Usuario ANTES de utilizar este producto se DEBE leer este manual y conservarse para referencia futura Para obtener m s informaci n sobre productos re...

Страница 52: ...EN CASO DE DUDA RESPECTO DE LAS INSTRUCCIONES PRECAUCIONES O ADVERTENCIAS COMUN QUESE CON UN PROFESIONAL DE LA SALUD T CNICO O DISTRIBUIDOR ANTES DE UTILIZAR EL EQUIPO ESTA RECOMENDACI N ES ESENCIAL A...

Страница 53: ...ionamiento de la eslinga est ndar 62 Atadura de la honda de una sola pieza del estilo a la elevaci n paciente 64 SECTION 5 USO DE ESLINGAS DE PIERNAS DIVIDIDAS UNIVERSALES ELEVADAS DE F CIL COLOCACI N...

Страница 54: ...se detalla en este documento y siempre que se sigan todas las instrucciones de mantenimiento requerimientos de servicio y lavado Si bien es posible superar la vida til esperada si el producto se util...

Страница 55: ...cuada y una persona capaz de actuar como paciente A pesar de que Invacare recomienda que dos asistentes ayuden en todos los procedimientos de elevaci n y en los procedimientos de transferencia hacia y...

Страница 56: ...para la espalda o coj n para sentarse entre el paciente y el material del cabestrillo que pudiera causar que el paciente se deslice fuera del cabestrillo durante la transferencia Despu s de cada lava...

Страница 57: ...poli ster con apertura para orianl Eslinga de malla de poli ster Eslinga de malla de poli ster con aperturra para orinal Conjunto de correas Conjunto de cadenas DESCRIPCI N DE LA ESLINGA DE TELA DE UN...

Страница 58: ...estilo NOTA Para quitar el metal apoye la barra invierten este procedimiento NOTA Para este procedimiento consulte la FIGURA 3 1 1 Para insertar la barra met lica de soporte jale la correa permitiendo...

Страница 59: ...costado Consulte el ejemplo D tail A 2 Ponga la honda est ndar del estilo sobre el colch n NOTA El borde superior de la tela del cabestrillo lo m s cercano a la cabeza del paciente debe estar levemen...

Страница 60: ...olocar en forma paralela a la espalda del paciente Esto colocar la secci n m s larga de cadenas o correas desde la cintura hasta la mitad del muslo 3 Los ganchos S de los extremos de las cadenas o cor...

Страница 61: ...desconecte los anillos O de las cadenas de la barra de pivote Coloque AMBOS anillos O y el enlace de cadena adicional en los ganchos de la barra de pivote NOTA Las correas pueden ajustarse con facili...

Страница 62: ...stado del paciente Consulte el ejemplo A NOTA El extremo cerrado o apertura para aseo personal del cabestrillo con la manija de colocaci n debe estar frente al paciente cuando se doble NOTA El borde s...

Страница 63: ...sobre la parte posterior de las rodillas del paciente 6 Gire al paciente de costado NOTA Los asistentes intercambiar n de lugar 7 Luego de que el paciente se ha colocado una vez m s de espaldas ahora...

Страница 64: ...n codifica dos por color y pueden usarse para colocar al paciente en diversas posiciones Los colores facilitan la conexi n de ambos lados del cabestrillo por igual Aseg rese de que haya soporte de ca...

Страница 65: ...osenqueresultam sdificultosoretirarlaeslingadelpaciente Elsoporteseextiendedesde el dorso superior hasta debajo de los muslos Estas eslingas pueden colocarse con el paciente sentado o acostado FIGURA...

Страница 66: ...ela a la parte superior de los brazos del paciente y debe colocarse entre la parte superior de la cabeza del paciente y la base de la columna NOTA Para la Eslinga de Ba o La parte posterior del cabest...

Страница 67: ...e Al usar la secci n larga no habr soporte para la espalda del paciente Los lazos del cabestrillo est n codifica dos por color y pueden usarse para colocar al paciente en diversas posiciones Los color...

Страница 68: ...os para pacientes 68 Part No 1023891 K Eslingas con hamaca adosada La eslinga con hamaca tiene cuatro correas que se adosan con ganchos FIGURA 5 5 Eslingas con hamaca adosada Lazo de la cuna Punto de...

Страница 69: ...e pie junto con elevador para ponerse de pie por ning n motivo NO use ning n tipo de material como almohadilla pl stica para la espalda o coj n para sentarse entre el paciente y el material del cabest...

Страница 70: ...porte Modelos R134 y R136 de lo contrario podr an producirse lesiones NO use ning n tipo de material como almohadilla pl stica para la espalda o coj n para sentarse entre el paciente y el material del...

Страница 71: ...al y para asistencia en posici n vertical Fijaci n del cabestrillo al elevador para ponerse de pie Cabestrillo para ponerse de pie NOTA Para este procedimiento consulte la FIGURA 6 3 1 Determine el me...

Страница 72: ...erior del elevador para ponerse de pie conecte el cabestrillo para ponerse de pie en el punto de conexi n determinado en el PASO 1 Consulte el ejemplo A FIGURA 6 3 Fijaci n de las Telas a las Aumentar...

Страница 73: ...FIGURA 6 5 1 Determine el mejor punto de fijaci n para el cabestrillo para transporte en cada brazo de elevaci n Use la siguiente tabla como pauta para determinar el punto de fijaci n Consulte el eje...

Страница 74: ...FIGURA 6 4 on page 73 Consulte el ejemplo B de FIGURA 6 5 La misma correa codificada por color inferior se usa en cada lado del cabestrillo de transporte NOTA Las correas codificadas por color superio...

Страница 75: ...orizaci n de devoluci n NO devuelva productos a nuestra f brica sin el nuestro previo consentimiento Los env os C O D pago contra entrega ser n rechazados pague previamente los cargos de env o LIMITAC...

Страница 76: ...o L4Z 4G4 Canada 800 668 5324 2018 Invacare Corporation All rights reserved Republication duplication or modification in whole or in part is prohibited without prior written permission from Invacare T...

Отзывы:

Похожие инструкции для ONE-PIECE FABRIC Series