background image

15

This Procedure includes the following:

Swingaway Footrest Assembly Installation

Swingaway Footrest Height Adjustment

Heel Loop Replacement

Elevating Legrest Assembly Installation

Adjusting the Elevating Legrest Assembly

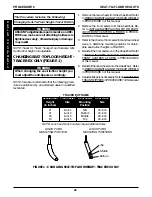
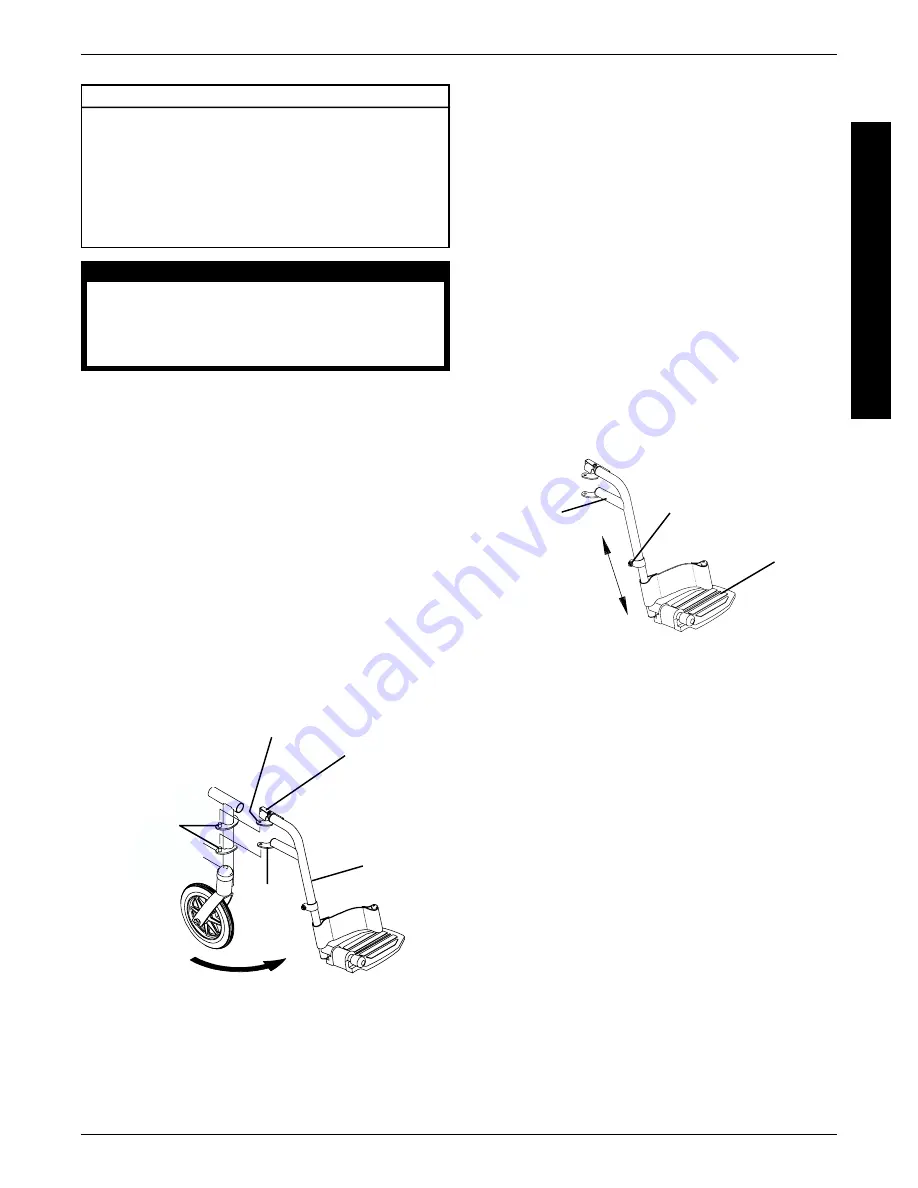
SWINGAWAY FOOTREST HEIGHT
ADJUSTMENT (FIGURE 2)

NOTE: Release the footrest locking mechanism and lift
the footrest off of the hinge pins. Lay the assembly on a
flat surface to simplify this procedure.

1. Remove impact guards and/or calf strap, if necessary.

2. Loosen, but do not remove the bolt and locknut that

secure the lower footrest assembly to the upper foot-
rest support.

3. Reposition the lower footrest assembly to the desired

height.

4. Securely tighten the bolt and locknut.

5. Repeat this procedure for the other footrest, if neces-

sary.

6. Replace impact guards and/or calf strap, if necessary.

WARNING

After ANY adjustments, repair or service and
BEFORE use, make sure all attaching hardware
is tightened securely - otherwise injury or dam-
age may result.

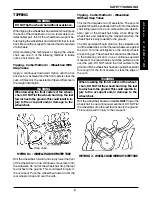
SWINGAWAY FOOTREST ASSEMBLY
INSTALLATION (FIGURE 1)

1. Turn the footrest to the side (open footplate is per-

pendicular to wheelchair).

2. Install the hinge plates on the footrest onto the hinge

pins on the wheelchair frame.

3. Push the footrest towards the inside of the wheel-

chair until it locks into place.

NOTE: The footplate will be on the inside of the wheel-
chair when locked in place.

4. Repeat this procedure for the other footrest assembly.

5. To release the footrest, push the footrest release le-

ver inward, rotate footrest outward.

Swingaway

Footrest

Assembly

Hinge

Plate

FIGURE 1 - SWINGAWAY FOOTREST

ASSEMBLY INSTALLATION

Footrest
Release

Lever

Hinge Plate

Hinge Pins

FIGURE 2 - SWINGAWAY FOOTREST HEIGHT

ADJUSTMENT

Upper

Footrest

Support

Bolt and

Locknut

Lower

Footrest

Assembly

HEEL LOOP REPLACEMENT
(FIGURE 3)

NOTE: Heel loops are not available on Invacare MG
wheelchairs.

1. Loosen, but do not remove the bolt and locknut that

secure the lower half of the footrest to the swingaway
footrest assembly.

2. Remove the lower footrest assembly.

3. Remove the phillips screw and locknut that secure

the heel loop to the footrest.

4. Slide heel loop over cane of the footrest assembly.

5. Replace heel loop.

6. Reverse STEPS 1-5 to reassemble.

NOTE: When securing the heel loop to the footrest as-
sembly, tighten the phillips screw and locknut until the
spacer is secure.

F

R

O

N

T

R

I

G
G

I

N

G

S

PROCEDURE 1

FRONT RIGGINGS

Содержание 9758

Страница 1: ...UTY EXTRAWIDE TRACER TRANSPORT INVACARE MG R R R R Owner s Operator And Maintenance Manual DEALER THIS MANUAL MUST BE GIVENTOTHE USER OF THEWHEELCHAIR USER BEFORE USINGTHISWHEELCHAIR READTHIS MANUALAN...

Страница 2: ...ENT WITHOUT FIRST READING AND UNDERSTANDING THIS MANUAL IF YOU ARE UNABLE TO UNDERSTAND THE WARNINGS CAUTIONS AND INSTRUCTIONS CONTACT A HEALTHCARE PROFESSIONAL DEALER OR TECHNICAL PERSONNEL IF APPLIC...

Страница 3: ...NG FLIP BACK ARMREST 17 PROCEDURE 3 SEAT AND BACK 18 FOLD DOWN BACK TRACER TRANSPORT ONLY 18 REPLACING BACK UPHOLSTERY 18 REPLACING THE SEAT UPHOLSTERY 18 ADJUSTING SEAT WIDTH 18 PROCEDURE 4 REAR WHEE...

Страница 4: ...S InvacarerecommendsthatwheelchairusersNOTbetransportedinvehiclesofanykindwhileinwheel chairs As of this date the Department of Transportation has not approved any tie down systems for transportation...

Страница 5: ...es greater than 9 o DO NOT attempt to move up or down an incline with a water ice or oil film DO NOT attempt to ride over curbs or obstacles Doing so may cause your wheelchair to tip over and cause bo...

Страница 6: ...NG Invacare DOES NOT recommend the use of its wheelchairs as a weight training apparatus In vacare wheelchairs have NOT been designed or tested as a seat for any kind of weight training If occupant us...

Страница 7: ...n forward out of the wheelchair any further thanthelengthofthearmrests Makesurethecastersare pointingintheforwardpositionwheneveryouleanforward This can be achieved by advancing the wheelchair and the...

Страница 8: ...sition the front casters so that they are extended as far forward as possible and engage wheel locks DO NOTATTEMPTTOREACHOBJECTSIFYOUHAVE TO MOVE FORWARD IN THE SEAT OR PICK THEM UP FROM THE FLOOR BY...

Страница 9: ...elchair frame when lifting the wheelchair and stabilizing the wheelchair when the wheelchair is being lowered to the ground The first assistant should stand on the sidewalk and turn the wheelchair so...

Страница 10: ...ends orderingtheSeatPositioningStrapasanadditional safeguard for the wheelchair user Do not attempt to lift a wheelchair by lifting on any removable detachable parts Lifting by means of any removable...

Страница 11: ...ery is attached until the wheelchair is fully open 4 Engage both wheel locks open the footrest legrest for clearance and transfer into the wheelchair Refer to TRANSFERRING TO AND FROM OTHER SEATS in t...

Страница 12: ...ing Legrest Permanent 8x1 inch Solid Rubber Standard 8x1 1 4 inch Composite Urethane N A Push to Lock 8 x 1 inch Solid Rubber Standard 8x1 1 4 inch Composite Urethane Vinyl Lightweight Black Standard...

Страница 13: ...ires check for proper inflation CAUTION As with any vehicle the wheels and tires should be checkedperiodicallyforcracksandwear andshouldbereplaced WHEELLOCKS PROCEDURE7 Donotinterferewithtireswhenroll...

Страница 14: ...s are pneumatic recommended tire pressure is listed on the side wall of the tire 3 The wheels and tires should be checked periodically for cracks and wear and should be replaced when necessarybyyourau...

Страница 15: ...chair 2 Install the hinge plates on the footrest onto the hinge pins on the wheelchair frame 3 Push the footrest towards the inside of the wheel chair until it locks into place NOTE The footplate will...

Страница 16: ...e the calfpad turn the calfpad towards the inside of the wheelchair Phillips Screw Spacer Locknut Bolt and Locknut Heel Loop FIGURE 3 HEEL LOOP REPLACEMENT 1 Place legrest assembly on the outside of t...

Страница 17: ...w insert into new rear armrest tube align ing the mounting holes Arm Socket Armrest Release Button Armrest Front Tube Washer Spacer Armrest Rear Tube Nut FIGURE 1 REMOVING OR REPLACING STANDARD ARMRES...

Страница 18: ...bereplaced 2 Remove the four 4 screws and locknuts that se cure the insert tube to the lower wheelchair frame FIGURE 2 REPLACING BACK UPHOLSTERY Seat Upholstery This Procedure Includes the Following F...

Страница 19: ...EPS a d to assemble the upper mounting hardware f Reverse STEPS 1 5 in REMOVING LOWER MOUNTING HARDWARE in this section of the manual to reassemble the wheelchair Spacer Crossbrace FIGURE 6 ALL REMOVA...

Страница 20: ...G INSTALLING THE REAR WHEELS Locknut Axle Spacer Hex Screw Dust Cap Rear Wheel TRANSPORT Axle Mounting Hole Handrim FIGURE 2 REPLACING REAR WHEEL HANDRIM Button Screw REPLACING REPAIRING REAR WHEEL TI...

Страница 21: ...ONT CASTERS AND FORKS F R O N T C A S T E R S PROCEDURE 5 FRONT CASTERS Washer 8 inch Fork Hex Screw Locknut Front Caster Washer FIGURE 2 REPLACING FRONT CASTERS a Tip back the wheelchair to floor b P...

Страница 22: ...ROCEDURE 4 of this manual 6 Adjustanti tippersasnecessary RefertoADJUSTIING THEANTI TIPPERSinPROCEDURE7ofthismanual WARNING When changing the seat to floor height you must adjust the anti tippers acco...

Страница 23: ...8 inches non adjustable A N T I T I P P E R S W H E E L L O C K S FIGURE 1 ANTI TIPPER LENGTH Top Position Anti tipper Length 1 Depress the release buttons and insert the anti tip pers with the anti t...

Страница 24: ...l and the wheel lock shoe is between 5 32 and 5 16 inches 3 Securely tighten the bolt and locknut 4 Engage wheel lock and push against the wheel chair and determine if wheel lock engages the wheel loc...

Страница 25: ...cer Locknut Step Tube End Cap 2 Position the socket mount on the wheelchair frame as shown in FIGURE 2 3 Secure the socket mount to the wheelchair frame with the two 2 back upholstery screws FIGURE 2...

Страница 26: ...elevate legrests swingfrontriggingsasideand orflipupfootplates so they are out of the way BEFORE placing feet firmly on the floor when entering or exiting the wheelchair This will permit individuals t...

Страница 27: ...l Adjustment Holes Mounting Holes 3 4 inch FLOOR Anti Tipper Arm 6 Repeat STEPS 4 5 until the bottom of the wheels of the triangular assembly measure approximately 3 4 inch from the floor 7 Secure the...

Страница 28: ...m whom you purchased your Invacare product In the eventyoudonotreceivesatisfactorywarrantyservice pleasewritedirectlytoInvacareattheaddressatthe bottom of the back cover Provide dealer s name address...

Отзывы: