
For more information regarding Invacare products, parts, and services, please visit www.invacare.com
Part No 1145752
1
Shower Chairs
Shower Chairs
SAVE THESE INSTRUCTIONS
NOTE:
Check
ALL
parts
for
shipping
damage.
If
shipping
damage
is
noted,
DO
NOT
use.
Contact
carrier/dealer
for
further
instruction.
WARNING
• DO NOT install or use this equipment without first reading and understanding these instructions. If you are unable to
understand the Warnings, Cautions or Instructions, contact a healthcare professional, dealer or technical personnel
before attempting to use this equipment - otherwise, injury or damage may occur.
• All four leg tips MUST be in contact with shower/tub floor at all times.
• ALWAYS inspect the shower chair to ensure that it is properly positioned and stable before using. DO NOT use if
shower chair is wobbly or unstable.
• Ensure that the snap buttons fully protrude through their respective adjustment holes.
• Check leg tips for rips, tears, cracks or wear. If any of these conditions exist, replace leg tips IMMEDIATELY.
• Users with limited physical capabilities should be supervised or assisted when using the shower chair.
• The shower chair is not to be used as a transfer bench, transfer device or climbing device.
• Exercise caution when assembling the chair to avoid pinching.
• After ANY adjustments, repair or service and BEFORE use, make sure that all attaching hardware and parts are secure.
• Ensure that all four chair legs are adjusted to the same height, and that all height adjustment buttons protrude fully
through adjustment holes before use.
• ALWAYS observe the weight limit on the labeling of your product. Check that all labels are present and legible. Replace
if necessary.
ACCESSORIES WARNING
• Invacare products are specifically designed and manufactured for use in conjunction with Invacare accessories. Accesso-
ries designed by other manufacturers have not been tested by Invacare and are not recommended for use with Invac-
are products.
Shower Chair Models
Assembling the Shower Chair
NOTE:
Not
all
procedures
apply
to
all
chair
types.
Refer
to
the
chair
type
to
verify
if
the
procedure
applies
before
attempting
any
procedure.
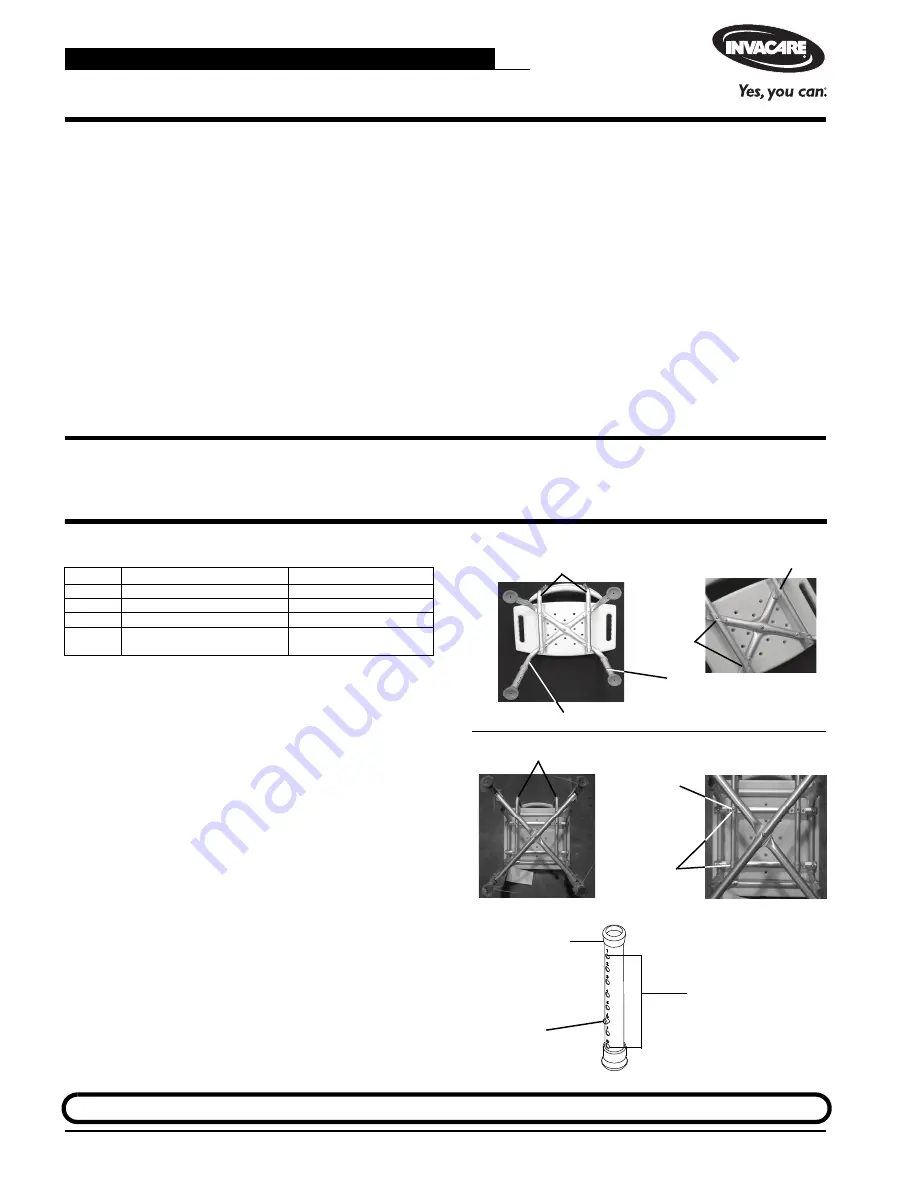
NOTE:
For
this
procedure,
refer
to
FIGURE 1.
• For
models
96
‐
2
(DETAIL
“A”)
or
9785
‐
1
and
9785
‐
2
(DETAIL
“B”):
1. Put
the
shower
chair
on
its
side
on
a
flat,
stable
surface.
2. Press
the
snap
buttons
on
the
back
support
tubes
and
slide
the
back
support
tubes
into
the
back
support
brackets
on
the
leg
frame
until
both
snap
buttons
are
fully
engaged
inside
the
holes
in
the
back
support
brackets.
NOTE:
Two
audible
“clicks”
will
be
heard.
Installing/Adjusting the Leg Extensions
NOTE:
For
this
procedure,
refer
to
FIGURE 1
and
FIGURE 2.
1. Install
the
leg
extension
onto
the
leg
(FIGURE 1)
.
2. Press
the
snap
button
and
slide
leg
extension
up
or
down
to
desired
adjustment
hole
(FIGURE 2).
3. Ensure
the
snap
button
protrudes
fully
through
the
adjustment
holes
of
the
leg
extension.
NOTE:
There
will
be
an
audible
click
when
the
snap
button
fully
engages.
4. Repeat
STEPS
1
‐
3
for
the
other
legs.
NOTE:
Make
sure
that
all
four
legs
are
adjusted
to
the
same
height.
FIGURE 1
Assembling the Shower Chair
FIGURE 2
Installing/Adjusting the Leg Extensions
Assembly, Installation and Operating Instructions
MODEL
DESCRIPTION
WEIGHT LIMITATION
91-2
Shower Chair
315 lb (143 kg)
96-2
Shower Chair with Back
315 lb (143 kg)
9981
Folding Shower Chair with Back
250 lb (114 kg)
9785-1
9785-2
Bariatric Shower Chair with Back
Bariatric Shower Chair with Back
700 lb (318 kg)
700 lb (318 kg)
DETAIL “A” - MODEL 91-2 AND 96-2
Back Support Tubes
Snap Button
Back Support
Brackets
DETAIL “B” - MODEL 9785-1 AND 9785-2
Back Support Tubes
Snap Button
Back Support
Brackets
Leg
Leg
Extension
Height Adjustment
Holes
Snap Button
Leg Extension