


SceneStation Installation and Programming Guide
Programming Examples
| 73
Example 6: Change the Indicator Color for a Preset
This example demonstrates how to change the “active” and “inactive” indicator colors for a preset
and how to add a flashing pattern for the button.
The following procedure will change the indicator colors of Preset 3 to show a bright red color when
the preset is active and a dark green color when the preset is inactive. Any button assigned to
operate Preset 3 will display these colors. Also, a slow blinking flash pattern will be assigned to the
preset, causing the indicator to blink slowly when active.
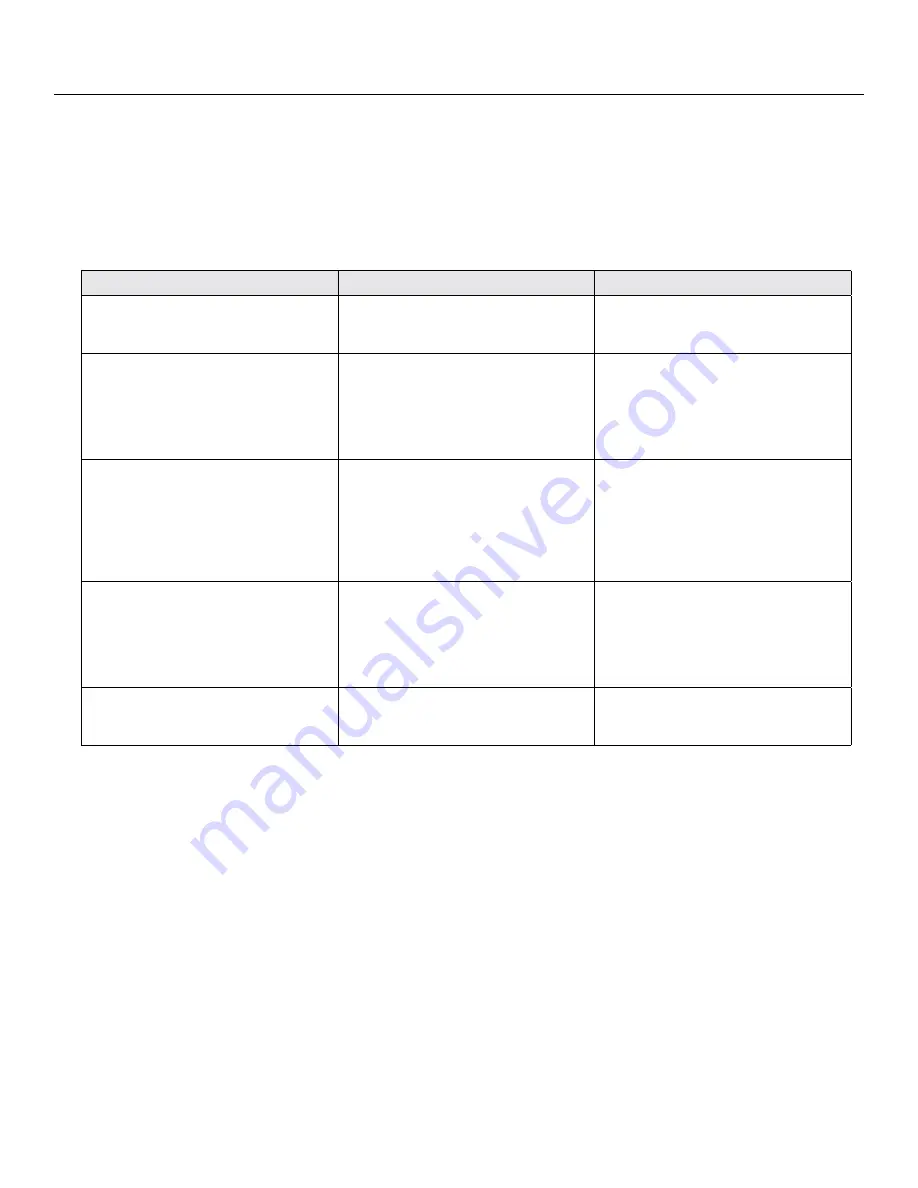
Action
Using SceneStation Studio
Using the Programmer’s Remote
Select the first Preset to be edited. In this
example, we’ll edit Preset 5.
Open the station editor window and click
the Presets tab. Then, click on Preset 5
in the list.
Press
EDIT
, and enter two-digit Preset
number, “
05
”. Then, press
INDICATOR
.
Change the preset’s “active” color to
Bright Red.
Select the color “Red” from the Active
Button pop-up menu. Select “100%”
from the brightness pop-up menu.
Use the
RIGHT
and
LEFT
arrows to
select the Red color and use the
UP
and
DOWN
arrows to change the brightness
to 100%. Note that the top LED on the
station shows the active color for the
preset.
Change the preset’s “inactive” color to
Dark Green.
Select the color “Green” from the Inactive
Button pop-up menu. Select “25%” from
the brightness pop-up menu.
Press “
2
” to switch to editing the inactive
color. Use the
RIGHT
and
LEFT
arrows
to select the Green color and use the
UP
and
DOWN
arrows to change the bright-
ness to 25%. Note that the center LED
on the station shows the inactive color for
the preset.
Change the preset’s flash pattern to
“blinking slowly”.
Select “Slow” from the Button Flash
pop-up menu.
Press “
3
” to switch to editing the flash
pattern. Use the
RIGHT
and
LEFT
arrows to select one of several available
flashing patterns. Note that the bottom
LED on the station shows the flash
pattern for the preset.
Store the changes.
Click on the
Sync
button to send the
changes to the station, or use the
File >
Save
menu to save the changes to a file.
Press
ENTER
to save the Preset after
adjusting the Preset’s indicator colors.
When this procedure is completed, any button on the station that is displaying the preset will appear
with the chosen colors and flash pattern.
Содержание SceneStation
Страница 12: ...6 Introduction SceneStation Installation and Programming Guide...
Страница 16: ...10 Installation SceneStation Installation and Programming Guide...
Страница 20: ...14 Hardware Configuration SceneStation Installation and Programming Guide...
Страница 50: ...44 Using SceneStation Studio SceneStation Installation and Programming Guide...
Страница 54: ...48 Using the Front Panel Snapshot Feature SceneStation Installation and Programming Guide...
Страница 72: ...66 Using the Programmer s Remote SceneStation Installation and Programming Guide...
Страница 81: ...SceneStation Installation and Programming Guide Programming Examples 75...
Страница 82: ...76 Programming Examples SceneStation Installation and Programming Guide...
Страница 84: ...78 Appendix A Pairing The Programmer s Remote SceneStation Installation and Programming Guide...
Страница 88: ...82 Appendix B IR Code Specifications SceneStation Installation and Programming Guide...
Страница 94: ...88 Appendix D Self Test Mode SceneStation Installation and Programming Guide...
Страница 96: ...90 Appendix E Warranty Information SceneStation Installation and Programming Guide...