background image

Server System Features 

Intel

® 

Server System R1000EP Service Guide 

45 

Replacing the Backplane 

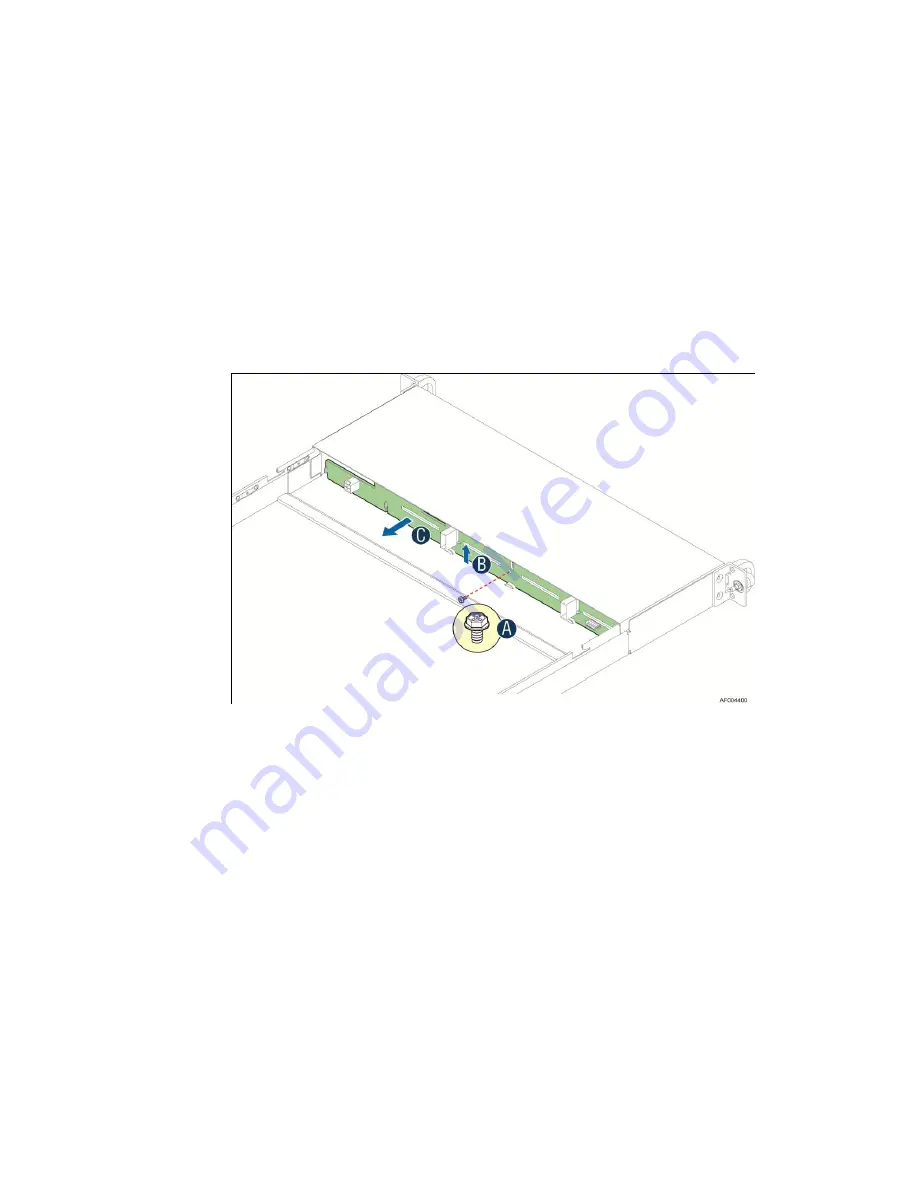
Removing the Backplane 

1.


Remove all hot-swap drive carriers, regardless of whether or not a drive is installed in 
the carrier. 

2.


Disconnect all cables from the backplane. 

3.


Remove the screw (see letter 

A

). 

4.


Pull up the backplane (see letter 

B

). 

5.


Remove the backplane from the server chassis (see letter 

C

). 


Figure 72. Removing the backplane 

Installing the Backplane 

1.


Remove all hot-swap drive carriers, regardless of whether or not a drive is installed in 
the carrier. 

2.


Hold the backplane only by the edges. Do not push or pull on any components on the backplane. 
Position the backplane in place at the front of the server system (see letter 

A

). 

3.


Slide the backplane into the server system guides (see letter 

B

). 

4.


Secure the backplane with the screw as shown (see letter 

C

). 

Содержание R1000EP series

Страница 1: ...Intel Server System R1000EP Family Service Guide A Guide for Technically Qualified Assemblers of Intel identified Subassemblies Products Order Number G66781 001...

Страница 2: ...ntel may make changes to specifications and product descriptions at any time without notice Intel server boards contain a number of high density VLSI and power delivery components that need adequate a...

Страница 3: ...http www intel com support motherboards server sb cs 010770 htm Consignes de s curit Lisez attention toutes les consignes de s curit et les mises en garde indiqu es dans ce document avant de suivre t...

Страница 4: ...ent damage can result Electrostatic discharge ESD and ESD protection ESD can damage disk drives boards and other parts We recommend that you perform all procedures in this chapter only at an ESD works...

Страница 5: ...g through the BIOS Setup screens performing a BIOS update and resetting the password or BIOS defaults The back of this manual provides technical specifications regulatory information LED Decoder getti...

Страница 6: ...lies Needed 12 System Reference 12 Cable Routing 12 For system with 4 x 3 5 hard drive bay 13 For system with 8 x 2 5 hard drive bay 14 Fan Connections 15 Removing and Installing the Front Bezel 16 Re...

Страница 7: ...g and Removing the Intel Remote Management Module 4 34 Installing the Intel RMM4 Lite 34 Install the Intel RMM4 NIC 34 Removing the Intel RMM4 Lite 35 Removing the Intel RMM4 NIC 35 Installing the Int...

Страница 8: ...A Technical Reference 52 Power Supply Input Voltages 52 Power Supply Output Voltages 52 System Environmental Specifications 52 Appendix B Regulatory and Compliance Information 54 Appendix C Getting He...

Страница 9: ...22 Removing the System Cover 17 Figure 23 Installing the System Cover 18 Figure 24 Removing the Air Duct 18 Figure 25 Installing the Air Duct 19 Figure 26 Removing Processor Heatsink 20 Figure 27 Inst...

Страница 10: ...RAID Module RMS25JB0x0 37 Figure 59 Connecting Cable between the RAID Module and Drives Backplane 38 Figure 60 Installing the Intel RAID Smart Battery 38 Figure 61 Removing the Intel RAID Smart Batte...

Страница 11: ...of Tables Table 1 Server System References v Table 2 Intel Server System R1000EP Feature Summary 1 Table 3 Hard Disk Drive Options 9 Table 4 BIOS Setup Keyboard Command Bar 49 Table 5 Power Supply Out...

Страница 12: ......

Страница 13: ...B D E 2 DIMMs per channel for channel C F three channels per processor socket Support for 800 166 1333 1600 MT s ECC Registered RDIMM or Unbuffered UDIMM LVDDR3 or DDR3 memory No support for mixing o...

Страница 14: ...ilities Security Trusted Platform Module Optional Server Management Integrated Baseboard Management Controller IPMI 2 0 compliant Support for Intel Server Management Software Intel Remote Management M...

Страница 15: ...system If you are near the system you can also use the Quick Reference Label provided on the inside of the chassis cover to assist in identifying components Figure 2 Intel Server System R1000EP Compo...

Страница 16: ...w Integrated LED F System Status LED B NMI Button recessed tool required for use G Power Button w Integrated LED C NIC 1 Activity LED H Hard Drive Activity LED D NIC 3 Activity LED I NIC 4 Activity L...

Страница 17: ...Features Intel Server System R1000EP Service Guide 5 Server Board Components This section helps you identify the components and connectors on the server board Figure 7 Server Board Connector and Compo...

Страница 18: ...Fault LED B System ID LED J System Fan 2 Fault LED C POST Code Diagnostic LEDs K System Fan 1 Fault LED D 5V Stand By LED L CPU 2 Fault LED E CPU 2 Fan Fault LED M CPU 1 Fault LED F System Fan 5 Fault...

Страница 19: ...ault and blue when activated by button or software C POST Code Diagnostic LEDs on the server board change color or state off green red and amber according to the POST sequence D The 5V STBY LED on the...

Страница 20: ...l not boot These pins should be selected on 1 2 for normal system operation C ME Force Update J1L7 If pins 2 3 are selected the ME Force Update Mode is enabled These pins should be selected on 1 2 for...

Страница 21: ...e carrier and with different maximum number of hard disk drives see Table 4 for details Table 3 Hard Disk Drive Options Intel Server System Supported Hard Drive Type Maximum Hard Drive Number R1304EP...

Страница 22: ...his server system Slimline DVD ROM Drive AXXSATADVDROM Slimline DVD RW Drive AXXSATADVDRWROM Note For a complete list of supported peripherals go to http serverconfigurator intel com Bezel The front b...

Страница 23: ...omponents Rear View Advanced Management Options Intel Remote Management Module 4 The Intel Remote Management Module 4 plugs into a dedicated connector on the server board and provides additional serve...

Страница 24: ...eference All references to left right front top and bottom assume the reader is facing the front of the chassis as it would be positioned for normal operation Note The Intel Server System R1208EP2SHFN...

Страница 25: ...Server System Features Intel Server System R1000EP Service Guide 13 For system with 4 x 3 5 hard drive bay Figure 16 Cable Routing 4 x 3 5 HDD...

Страница 26: ...d drive bay Note To activate the port SCU1 4 7 on the server board a proper Intel RAID C600 Upgrade Key must be installed For instructions see Intel RAID C600 Upgrade Key Installation Guide Note An op...

Страница 27: ...tures Intel Server System R1000EP Service Guide 15 Fan Connections Use the figures below to determine the proper fan connections Figure 18 System Fan Order Figure 19 Connecting the Fan Power Cables to...

Страница 28: ...d of front bezel from rack handle see letter A 3 Rotate the front bezel anticlockwise to release the latches on the right end from the rack handle see letter B Figure 20 Removing the Front Bezel Insta...

Страница 29: ...ver Before removing the top cover power down the server and unplug all peripheral devices and the power cable s Note A non skid surface or a stop behind the server system may be needed to prevent the...

Страница 30: ...ling the System Cover Removing and Installing the Air Duct Always operate your server system with the air duct in place The air duct is required for proper airflow within the server system Removing th...

Страница 31: ...cessor socket with captive fasteners Using a 2 Phillips screwdriver loosen the four screws located on the heatsink corners in a diagonal manner using the following procedure 1 Using a 2 Phillips screw...

Страница 32: ...ce the risk of electrostatic discharge ESD damage to the processor by doing the following 1 Touch the metal chassis before touching the processor or server board Keep part of your body in contact with...

Страница 33: ...Plate 3 Install the Processor Take the processor out of the box and remove the protective shipping cover see letter A Orient the processor with the socket so that the orientation notches on the proce...

Страница 34: ...ee letter A 2 Align heatsink fins to the front and back of the chassis for correct airflow Airflow goes from front to back of chassis see letter B Each heatsink has four captive fasteners and should b...

Страница 35: ...ts Make sure the clips at either end of the DIMM socket s are pushed outward to the open position see letter A 2 Holding the DIMM by the edges remove it from its anti static package Position the DIMM...

Страница 36: ...Removing Hot swap Hard Drive Caution If you don t install all drives empty drive bays must be occupied by carriers with plastic drive blank provided to maintain proper system cooling Installing a Har...

Страница 37: ...Hard Disk Drive as option Break off the tab on the HDD interface bracket see letter d1 Install the HDD interface bracket from top Secure the bracket with three screws as shown see letter d2 Slide the...

Страница 38: ...out see letter B Figure 38 Installing Hard Disk Drive Removing 2 5 HDD carrier 2 Remove the four screws securing the plastic drive blank from the 2 5 HDD carrier see letter C Disengage the plastic dr...

Страница 39: ...into the chassis then push in the lever to lock it into place see letter F Figure 41 Installing Hard Disk Drive Inserting 2 5 HDD assembly Removing and Installing the PCI Riser Assembly Removing the P...

Страница 40: ...hooks on the back edge of the riser assembly with the slots on the back of the chassis then press straight down into riser socket Figure 43 Installing PCI Riser Assembly 2 Connect any cables to add in...

Страница 41: ...ard from the riser card connector see letter B Figure 45 Removing a PCI Add In Card Note Make sure that all empty add in card slots have filler panels installed Replacing a PCI Riser Card Caution PCI...

Страница 42: ...move from the riser card from riser assembly see letter B Figure 46 Removing the PCI Riser Card Installing a PCI Riser Card 1 Place the riser card onto the riser assembly see letter A 2 Secure the ris...

Страница 43: ...gure 48 Installing the Plastic Guide to the Optical Drive 2 Insert the optical drive into chassis opening and push all the way until it stops see letter B 3 Connect the cables as shown see letter C Fi...

Страница 44: ...I O Expansion Module 1 Squeeze the sides of the filler panel to disengage it from the server system back panel and remove it see letter A 2 Secure the screw adapter the position shown below Position t...

Страница 45: ...Removing an I O Expansion Module 3 Remove the screw adapter the position shown below see letter C Installing and Removing the Intel RAID C600 Upgrade Key Installing the Intel RAID C600 Upgrade Key Loc...

Страница 46: ...the module and the connector on server board then press to install Figure 54 Installing the Intel RMM4 Lite Install the Intel RMM4 NIC 1 Push out and remove the metal cover on the chassis where the N...

Страница 47: ...the Intel RMM4 Lite Pull up the RMM4 Lite module to remove it from the mother board Removing the Intel RMM4 NIC 1 Remove the one screw as shown see letter A 2 Remove the module out of the server syste...

Страница 48: ...r system documentation 3 Insert the three barrel standoffs into the matching holes in the server board Figure 57 Installing the Barrel Standoff 4 Attach the RAID to the matching server board connector...

Страница 49: ...d and plug the cable into connector at the inside edge of the adapter Note To prevent throughput problems Use the cables provided or use the shortest possible cable Do not use cables longer than one m...

Страница 50: ...tails see Intel RAID Smart Battery User s Guide 2 Locate the BBU bracket inside the chassis Align the tabs on the plastic battery holder with mounting holes on the BBU bracket see letter A 3 Slide the...

Страница 51: ...of service turn off all peripheral devices connected to the system turn off the system by pressing the power button and unplug the AC power cord from the system or wall outlet The power supply can be...

Страница 52: ...nd push all the way until it clicks into place see letter B Figure 64 Installing the power supply module If no power supply is to be installed install the filler panel into the power supply cage Figur...

Страница 53: ...l the Power supply into the system as shown in letter A and secure the screws as shown in letter B Figure 67 Installing the Power Supply Unit Installing and Removing the Server Board Removing the Serv...

Страница 54: ...Service Guide 3 Lift the server board from the server system see letter B Figure 68 Removing the Server Board Installing the Server Board 1 Place the server board into the server system see letter A 2...

Страница 55: ...acturer s instructions Advarsel Lithiumbatteri Eksplosionsfare ved fejlagtig h ndtering Udskiftning m kun ske med batteri af samme fabrikat og type Lev r det brugte batteri tilbage til leverand ren Ad...

Страница 56: ...tery from its package and being careful to observe the correct polarity insert it in the battery socket Note You will need to run the BIOS Setup to restore the configuration settings to the BIOS varia...

Страница 57: ...ter B 5 Remove the backplane from the server chassis see letter C Figure 72 Removing the backplane Installing the Backplane 1 Remove all hot swap drive carriers regardless of whether or not a drive is...

Страница 58: ...nect cables to backplane please refer to Cable Routing Installing and Removing the Rack Handles Installing the Rack Handles Align the rack handle with the two holes on the side of the server system an...

Страница 59: ...s Intel Server System R1000EP Service Guide 47 Removing the Rack Handles Remove the two screws holding the rack handle in place and remove the rack handle from the server system as shown Figure 75 Rem...

Страница 60: ...ialized and the USB keyboard activated key presses will not be read by the system When the Setup Utility is entered the Main screen is displayed initially However serious errors cause the system to di...

Страница 61: ...or a value field s pick list The selected item must then be activated by pressing the Enter key Select Menu The left and right arrow keys are used to move between the major menu pages The keys have no...

Страница 62: ...system For instructions on removing the system cover see Removing the System Cover 3 Locate the Password Clear jumper block at board 4 Move the jumper from the normal operation position that is Passw...

Страница 63: ...Server Utilities Intel Server System R1000EP Service Guide 51 8 Power up the system The BIOS defaults settings are now restored and can be reset by going into the BIOS setup...

Страница 64: ...B 4 5A System Environmental Specifications The following table defines the system level operating and non operating environmental limits Table 6 System Environmental Limits Summary Parameter Limits Op...

Страница 65: ...echnical Reference Intel Server System R1000EP Service Guide 53 Parameter Limits ESD 15KV except I O port 8KV per Intel Environmental test specification System Cooling Requirement in BTU Hr 600W Max T...

Страница 66: ...m R1000EP Service Guide Appendix B Regulatory and Compliance Information Please refer to the Server Products Regulatory and Safety document for the product regulatory compliance reference The document...

Страница 67: ...searchable knowledgebase to search for product information throughout the support site 2 If you are still unable to obtain a solution to your issue send an email to Intel s technical support center u...

Страница 68: ...some information may be found by accessing BIOS and going through the Server Management menu System Information Baseboard PBA TA AA Example 123456 789 can be found on the white sticker label on the b...

Страница 69: ...hermal solution Heat sink examples 1U Passive w air ducting Active w fan and so on Memory Manufacturer Part Number DRAM Part Number On Intel tested list Add in adapters Example NICs Management Adapter...

Страница 70: ...003 Service pack 1 OEM CD Manufacturer Version Language version English Arabic Chinese Simplified Service Pack Level or Kernel Revision Distribution OEM Retail Intel RAID Controller Example SRCU42E RA...

Страница 71: ...Appendix D Intel Server Issue Report Form Intel Server System R1000EP Service Guide 59 Detailed description of issue Troubleshooting tried Steps to replicate the issue...

Страница 72: ...f yes please provide a brief description below Do you have systems already purchased that are not being delivered to your customers because of this issue If yes please provide a brief description belo...

Отзывы: