background image

Intel® Server Board S2600TP and Intel® Compute Module HNS2600TP Product Family 


35 


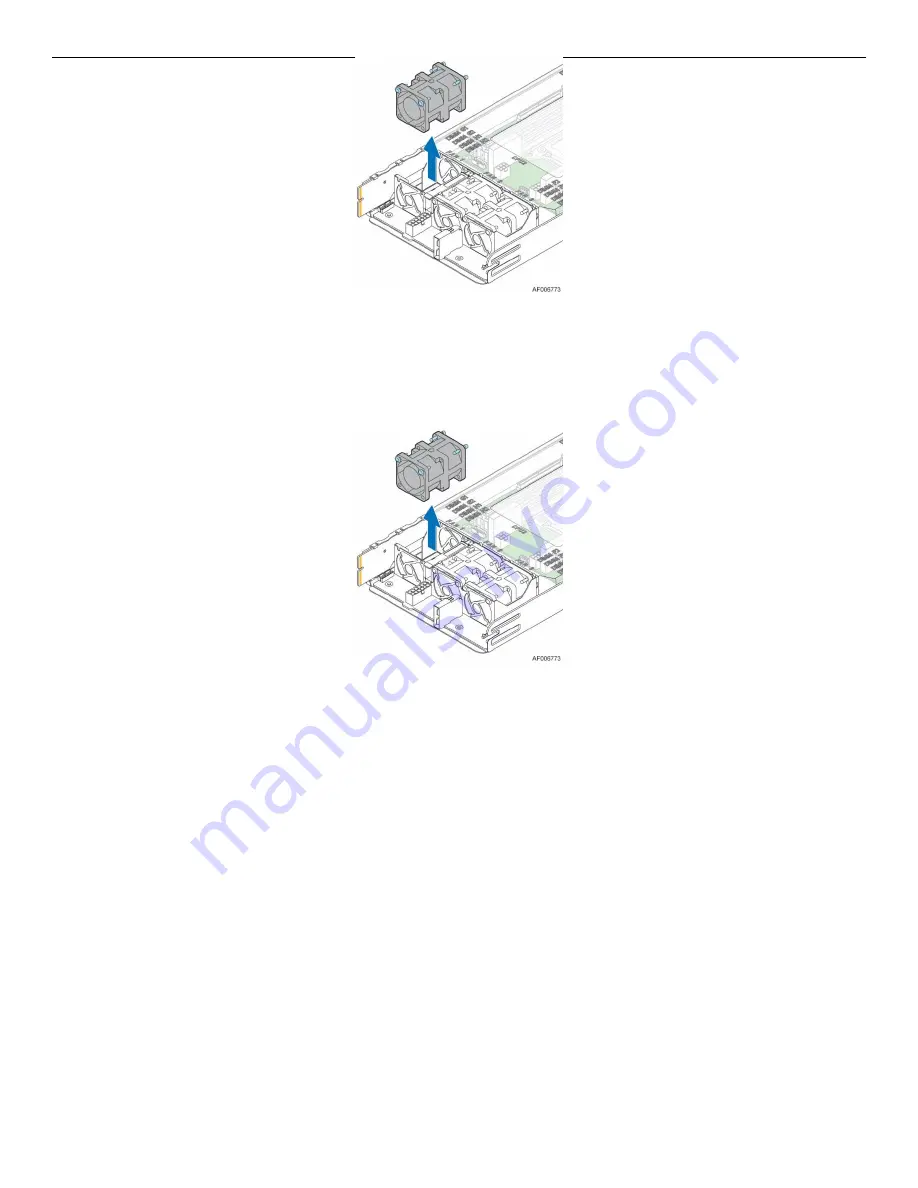
Figure 70. 

Removing the Fan 

2.17.2


Installing the Fan


1.


Place the fan into the fan bracket. 

2.


Connect the fan cable to the connector on the power docking board. 


Figure 71. 

Installing the Fan


2.18


Replacing the Backup Battery 

The lithium battery on the server board powers the RTC for up to 10 years in the absence of power. When the 
battery  starts  to  weaken,  it  loses  voltage,  and  the  server  settings  stored  in  CMOS  RAM  in  the  RTC  (for 
example, the date and time) may be wrong. Contact your customer service representative or dealer for a list 
of approved devices. 

Warning: 

Danger  of  explosion  if  battery  is  incorrectly  replaced.  Replace  only  with  the  same  or  equivalent 

type  recommended  by  the  equipment  manufacturer.  Discard  used  batteries  according  to  manufacturer's 
instructions. 


Advarsel: 

Lithiumbatteri – Eksplosionsfare ved fejlagtig håndtering. Udskiftning må kun ske med batteri af 

samme fabrikat og type. Levér det brugte batteri tilbage til leverandøren. 


Advarsel: 

Lithiumbatteri  –  Eksplosjonsfare.  Ved  utskifting  benyttes  kun  batteri  som  anbefalt  av 

apparatfabrikanten. Brukt batteri returneres apparatleverandøren. 


Varning: 

Explosionsfara  vid  felaktigt  batteribyte.  Använd  samma  batterityp  eller  en  ekvivalent  typ  som 

rekommenderas av apparattillverkaren. Kassera använt batteri enligt fabrikantens instruktion. 


Содержание HNS2600TP series

Страница 1: ...S2600TP Product Family and Intel Compute Module HNS2600TP Product Family Service Guide A document providing instruction on installation and removal of subassemblies Revision 2 1 May 2016 Intel Server...

Страница 2: ...Intel Server Board S2600TP and Intel Compute Module HNS2600TP Product Family This page is intentionally left blank...

Страница 3: ...mpute Module HNS2600TP Product Family i Document Revision History Date Revision Number Modifications January 2015 1 0 First Preliminary version December 2015 2 0 Applied new format May 2016 2 1 Added...

Страница 4: ...ded here is subject to change without notice Contact your Intel representative to obtain the latest Service Guide The products and services described may contain defects or errors known as errata whic...

Страница 5: ...n unter http support intel com support motherboards server sb cs 010770 htm Consignes de s curit Lisez attention toutes les consignes de s curit et les mises en garde indiqu es dans ce document avant...

Страница 6: ...e provide some ESD protection by wearing an anti static wrist strap attached to chassis ground any unpainted metal surface on your server when handling parts ESD and handling boards Always handle boar...

Страница 7: ...hat are shipped with the board or that may be required to update the compute module This includes information for navigating through the BIOS Setup screens performing a BIOS update and resetting the p...

Страница 8: ...r Duct 10 2 3 2 Installing the Air Duct 11 2 4 Removing and Installing the Processor 11 2 4 1 Removing the Processor Heatsink 11 2 4 2 Installing the Processor 12 2 4 3 Installing the Processor Heatsi...

Страница 9: ...g Board 32 2 15 2 Installing the Power Docking Board 33 2 16 Replacing the SAS PCIe SFF ComboPower Docking Board 33 2 16 1 Removing the SAS PCIe SFF Combo Power Docking Board 33 2 16 2 Installing the...

Страница 10: ...16 Figure 24 Removing the PCIe Riser Assembly Step 1 16 Figure 25 Removing the PCIe Riser Assembly Step 2 17 Figure 26 Removing the Filler Panel from the PCIe Riser Assembly 17 Figure 27 Installing th...

Страница 11: ...7 Installing the Intel Storage Upgrade Key 27 Figure 58 Removing the Bridge Board 28 Figure 59 Installing the Bridge Board 29 Figure 60 Removing the SAS PCIe SFF Combo Bridge Board 29 Figure 61 Instal...

Страница 12: ...0TP Product Family 10 List of Tables Table 1 Intel Server Board S2600TP Product Family Feature Set 1 Table 2 Intel Compute Module HNS2600TP Product Family Feature Set 3 Table 3 BIOS Setup Keyboard Com...

Страница 13: ...ver Board S2600TP Product Family Feature Set Feature Description Processor Support Two LGA2011 3 Socket R3 processor sockets Support for one or two Intel Xeon processors E5 2600 v3 v4 product family M...

Страница 14: ...o Integrated 2D video graphics controller 16MB DDR3 memory On board storage controllers and options Ten SATA 6Gb s ports two of them are SATA DOM compatible RAID Support Intel Rapid Storage RAID Techn...

Страница 15: ...er and carrier kit in riser slot 2 to support an Intel I O Expansion Module optional Note Riser slot 3 and 4 cannot be used with the bridge board installed Compute Module Board Four types of bridge bo...

Страница 16: ...res Figure 4 HNS2600TP24R HNS2600TP24SR Compute Module Back Panel Features 1 3 Power Docking Board Features Label Description A 2x7 pin fan control connector B 8 pin connector for fan 1 C 2x6 pin Mini...

Страница 17: ...d edge connector to the backplane B USB 2 0 Type A connector C 2 pin 5V power D AHCI SATA0 DOM port connector E 2x40 pin card edge connector to the baseboard slot Figure 7 Bridge Board Features Label...

Страница 18: ...T Code Diagnostic LEDs on the server board change color or state off green red and amber according to the POST sequence The Status LED on the back panel shows the overall health of the system green bl...

Страница 19: ...IOS is corrupted an onboard backup copy of the BIOS can be loaded using the BIOS Recovery Jumper To load the backup BIOS image move the jumper from pins 1 2 default to pins 2 3 and power on the system...

Страница 20: ...tel Remote Management Module 4 Lite together with the dedicated management port on the IOM carrier sitting in the riser slot 2 provides a dedicated web server for viewing server information and remote...

Страница 21: ...nti static wrist strap and conductive foam pad recommended 2 1 2 System Reference All references to left right front top and bottom assume that the reader is facing the front of the chassis as it woul...

Страница 22: ...2 3 Removing and Installing the Air Duct Always operate your compute module with the air duct in place The air duct is required for proper airflow within the compute module 2 3 1 Removing the Air Duct...

Страница 23: ...e the thermal interface material Use gloves to avoid sharp edges 2 4 1 Removing the Processor Heatsink The heatsink is attached to the server board or processor socket with captive fasteners Using a 2...

Страница 24: ...following 1 Touch the metal chassis before touching the processor or server board Keep part of your body in contact with the metal chassis to dissipate the static charge while handling the processor...

Страница 25: ...old key at the corner of the processor see letter C Carefully place Do NOT drop the CPU into the socket Caution The pins inside the CPU socket are extremely sensitive Other than the CPU no object shou...

Страница 26: ...r Remove the Cover 5 Close the Load Plate Carefully lower the load plate down over the processor Figure 20 Installing the Processor Close the Load Plate 6 Lock down the LoadPlate a Push down on the lo...

Страница 27: ...Phillips screwdriver start with screw 1 and engage screw threads by giving it two rotations and stop see letter C Do not fully tighten 5 Proceed to screw 2 and engage screw threads by giving it two r...

Страница 28: ...of the DIMM into the socket see letter C When the DIMM is inserted push down on the top edge of the DIMM until the retaining clips snap into place see letter D Make sure the clips are firmly in place...

Страница 29: ...y Step 2 3 Remove the filler panel from the PCIe riserassembly Figure 26 Removing the Filler Panel from the PCIe Riser Assembly 4 Insert the PCIe add in card into the riser slot see letter C Figure 27...

Страница 30: ...lling the PCIe Riser Assembly Step 1 6 Fasten the two screws see letter E Figure 29 Installing the PCIe Riser Assembly Step 2 2 6 2 Removing a PCIe Add in Card 1 Loosen the two screws see letter A Fig...

Страница 31: ...bly Step 2 3 Remove the PCIe add in card from the riser slot see letter C Figure 32 Removing the PCIe Add in Card 4 Insert the filler panel to the PCIe riser assembly Figure 33 Inserting the Filler Pa...

Страница 32: ...Ie Riser Assembly Step 1 6 Fasten the two screws see letter E Figure 35 Installing the PCIe Riser Assembly Step 2 2 7 Replacing the PCIe Riser 2 7 1Removing the PCIe Riser 1 Loosen the two screws see...

Страница 33: ...slot see letter C Figure 38 Removing the PCIe Add in Card 4 Remove the PCIe riser from the riser assembly bracket see letter E by loosening the two screws see letter D Figure 39 Removing the PCIe Ris...

Страница 34: ...acket 2 Insert the PCIe add in card into the riser slot see letter C Figure 41 Installing the PCIe Add in Card 3 Insert the PCIe riser assembly into the riser slot 1 on the server board see letter D F...

Страница 35: ...ssembly see letter B by loosening the two screws see letter A Figure 44 Removing the Bracket from the IOM Riser and Carrier Assembly 3 Install the IO module to the IOM riser and carrier assembly by ti...

Страница 36: ...talling the IOM Riser and Carrier Assembly 2 8 2Removing an IO Module 1 Loosen the four screws see letter A and pull out the IOM riser and carrier assembly see letter B Figure 49 Removing the IOM Rise...

Страница 37: ...rrier assembly into the riser slot 2 on the server board see letter H and fasten with the four screws see letter I Note If you do not install the IOM riser and carrier assembly a filler panel must be...

Страница 38: ...connector on the server board see letter D 7 Push down the cable as required see letter E and make sure that the connectors are not stressed Figure 55 Connecting the M 2 SATA Cable 2 10 Installing an...

Страница 39: ...torage Upgrade Key 2 11 1 Installing the Intel Storage Upgrade Key 1 Remove the Intel Storage Upgrade Key from its package 2 Locate the storage upgrade key connector on the server board next to the ri...

Страница 40: ...screws see letter A on the bridge board 2 Straightly lift up the bridge board to remove it from the server board see letter B Figure 58 Removing the Bridge Board 2 12 2 Installing the Bridge Board 1...

Страница 41: ...ge Board 2 13 Replacing the SAS PCIe SFF Combo Bridge Board 2 13 1 Removing the SAS PCIe SFF Combo Bridge Board 1 Remove the six screws see letter A on the bridge board 2 Straightly lift up the bridge...

Страница 42: ...ge Board 2 14 Replacing the Server Board 2 14 1 Removing the Server Board 1 Remove the air duct See Removing the Air Duct 2 Remove the processors and the memory DIMMs if there are any See Removing the...

Страница 43: ...e Server Board 2 14 2 Installing the Server Board 1 Carefully lower the server board into the compute module so that the rear I O connectors of the server board align with and are fully seated into th...

Страница 44: ...Assembly Step 1 and Installing the PCIe Riser Assembly Step 2 7 Install the IOM riser and carrier assembly to the riser slot 2 if there is any See Installing the IOM Riser and Carrier Assembly 8 Insta...

Страница 45: ...he power docking board with the four screws see letter B 3 Connect all cables to the power docking board Figure 67 Installing the Power Docking Board 2 16 Replacing the SAS PCIe SFF Combo Power Dockin...

Страница 46: ...ubber bumper is in the mounting hole see letter B 3 Secure the power docking board with the five screws see letter C 4 Connect all cables to the power docking board 5 Install the bridge board For inst...

Страница 47: ...ative or dealer for a list of approved devices Warning Danger of explosion if battery is incorrectly replaced Replace only with the same or equivalent type recommended by the equipment manufacturer Di...

Страница 48: ...battery on the server board 2 Gently press the metal clip as shown to release the battery see letter A 3 Remove the battery from the plastic socket see letter B Figure 72 Replacing the Backup Battery...

Страница 49: ...he System Update Package will include full system update instructions 3 2 Using the BIOS Setup Utility This section describes how to access and navigate the embedded F2 BIOS Setup utility This utility...

Страница 50: ...es a mechanism for backing out of any field When the Esc key is pressed while editing any field or selecting features of a menu the parent menu isre entered When the Esc key is pressed in any submenu...

Страница 51: ...following to display Load Optimized Defaults Yes No If Yes is highlighted and Enter is pressed all Setup fields are set to their default values If No is highlighted and Enter is pressed or if the Esc...

Страница 52: ...nux operating systems This utility can also be executed remotely through a secure network connection using a Telnet Client and Terminal Services in Windows or using a Telnet Client and Remote Shell un...

Страница 53: ...econd 80 lbs to 100 lbs Vibration unpackaged 5 Hz to 500 Hz 2 20 g RMS random Shock and vibration packaged ISTA International Safe Transit Association TestProcedure 3A ESD 12 KV except I O port 8 KV p...

Страница 54: ...NS2600TP Product Family 42 Appendix B Regulatory and Compliance Information Refer to the Server Products Regulatory and Safety document for the product regulatory compliance reference The document can...

Страница 55: ...ing systems Server and chassis accessory parts list for ordering upgrades or spare parts A searchable knowledgebase to search for product information throughout the support site If you are still unabl...

Отзывы: