

The Micromate is shipped with the
internal battery electronically
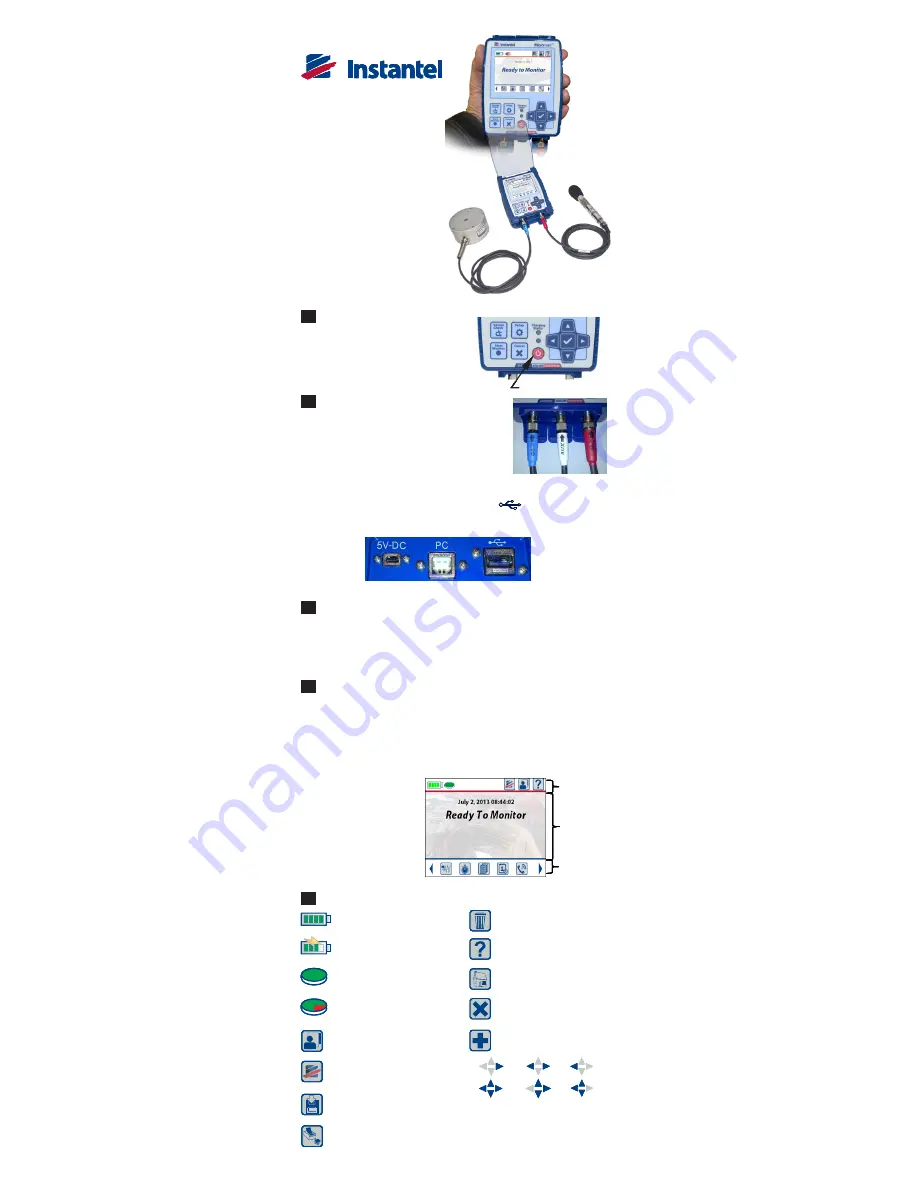
disconnected. Press and hold the
Power Button for five seconds to
turn the unit on.
1
Power Button
Turn the Micromate On
The Micromate display is a touch sensitive resistive display. This
provides the ability to use your finger, with or without gloves, to access
menus. In addition to the touch screen, the Micromate also supports
six function keys and four arrow keys for navigating through menus.
The keys can be used in combination with the touch screen providing
additional flexibility.
3
Accessing the Micromate Menus
The screen functionality has been divided into three sections (see the
picture below). The icons in section #1 are context sensitive and will
change depending on the currently open screen. Section #2, the main
display section, will display the current state of the unit as well as user
changeable data. Selecting a menu in this section will either allow for
toggling through the options or will open a new screen for editing.
When editing numbers, use the Up and Down arrow keys or use a
finger to swipe up and down in the
Section #3
Section #2
Section #1
Micromate LCD
4
highlighted box. To select
a different item, use the
Left and Right arrow
keys or simply touch the
desired entry. Section #3
provides short cuts to the
most commonly used
functions or menus within
the Micromate program.
2
Micromate Connectors
Connect the Geophone and Microphone to the
bottom of the Micromate unit. If using other
devices, such as remote alarms or wire triggers,
connect these to the Aux connector. Connectors
and cables are color coded.
The Charger, Computer and supported USB devices are connected to
the top of the Micromate unit. These connectors are from left to right:
5V-DC (mini USB), PC Port (USB A ) and (USB) port. NOTE:
Use the 5V-DC port to connect to external power and charge the
battery. Only the 5V-DC port allows for battery charging.
5
Compass Keys
Data exists in the direction of
the highlighted key. Use a
finger swipe or use the arrow
keys to view.
Instantel Information
Battery Charge Level
Charger Connected
Available Memory
75% Free Memory
Save Information
Print Events
Delete
Context Sensitive Help
Return to Home screen
Cancel
Add Operator Name
Section #1 - Context Sensitive Icons
Owner Information
The World’s Most Trusted
Vibration Monitor.
®
Micromate
Quick Reference Guide
www.instantel.com
®
The Micromate is shipped with the
internal battery electronically
disconnected. Press and hold the
Power Button for five seconds to
turn the unit on.
1
Power Button
Turn the Micromate On
The Micromate display is a touch sensitive resistive display. This
provides the ability to use your finger, with or without gloves, to access
menus. In addition to the touch screen, the Micromate also supports
six function keys and four arrow keys for navigating through menus.
The keys can be used in combination with the touch screen providing
additional flexibility.
3
Accessing the Micromate Menus
The screen functionality has been divided into three sections (see the
picture below). The icons in section #1 are context sensitive and will
change depending on the currently open screen. Section #2, the main
display section, will display the current state of the unit as well as user
changeable data. Selecting a menu in this section will either allow for
toggling through the options or will open a new screen for editing.
When editing numbers, use the Up and Down arrow keys or use a
finger to swipe up and down in the
Section #3
Section #2
Section #1
Micromate LCD
4
highlighted box. To select
a different item, use the
Left and Right arrow
keys or simply touch the
desired entry. Section #3
provides short cuts to the
most commonly used
functions or menus within
the Micromate program.
2
Micromate Connectors
Connect the Geophone and Microphone to the
bottom of the Micromate unit. If using other
devices, such as remote alarms or wire triggers,
connect these to the Aux connector. Connectors
and cables are color coded.
The Charger, Computer and supported USB devices are connected to
the top of the Micromate unit. These connectors are from left to right:
5V-DC (mini USB), PC Port (USB A ) and (USB) port. NOTE:
Use the 5V-DC port to connect to external power and charge the
battery. Only the 5V-DC port allows for battery charging.
5
Compass Keys
Data exists in the direction of
the highlighted key. Use a
finger swipe or use the arrow
keys to view.
Instantel Information
Battery Charge Level
Charger Connected
Available Memory
75% Free Memory
Save Information
Print Events
Delete
Context Sensitive Help
Return to Home screen
Cancel
Add Operator Name
Section #1 - Context Sensitive Icons
Owner Information
The World’s Most Trusted
Vibration Monitor.
®
Micromate
Quick Reference Guide
www.instantel.com
®
All manuals and user guides at all-guides.com
all-guides.com