background image

Installing your cooktop

Note

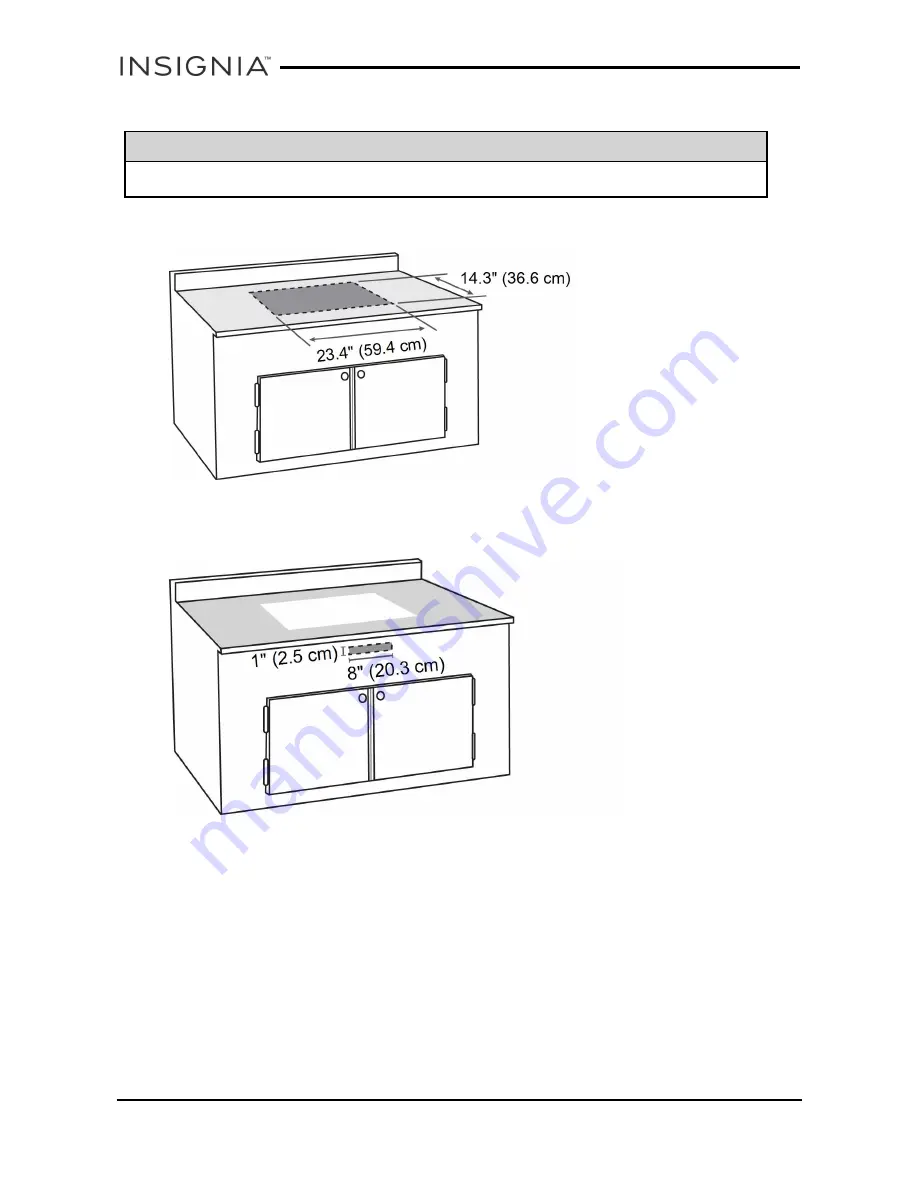
When cutting, use tools that are appropriate for your counter and cupboard.

1. Cut a 23.4 × 14.3 in. (59.4 × 36.6 cm) hole into the top of your counter.

2. Cut a 8 × 1 in. (20.3 × 2.5 cm) hole into the front of your cupboard to vent

your cooktop.

www.insigniaproducts.com

12

NS-IC2ZBK7

Содержание NS-IC2ZBK7

Страница 1: ...Before using your new product please read these instructions to prevent any damage USER GUIDE Induction Cooktop NS IC2ZBK7...

Страница 2: ...ur cooktop 11 Positioning your cooktop 11 Installing your cooktop 12 Using your cooktop 14 Checking pan compatibility 14 Using touch controls 14 Cooking with your cooktop 14 Using the timer 16 Locking...

Страница 3: ...areas near units until they have had sufficient time to cool 3 To protect against fire electric shock and injury to persons do not immerse cord plugs or the cooktop in water or other liquid 4 Close s...

Страница 4: ...moving an appliance containing hot oil or other hot liquids 18 Household Use Only 19 Do not cook on a broken cooktop If the cooktop should break cleaning solutions and spills may penetrate the broken...

Страница 5: ...teel or aluminium or place a non metal pad less than 4 7 in 12 cm thick on the heating plate 10 Warning People with heart pacemakers should consult a doctor Only use the appliance after confirming tha...

Страница 6: ...er moving the cookware the cooking area remains hot for a period of time Do not touch it and be careful of scalding caused by the high temperature 22 This appliance is not intended for use by persons...

Страница 7: ...over causes smoking and greasy spillovers that may ignite 31 Storage on appliance Flammable materials should not be stored near surface units 32 Caution Do not store items of interest to children in c...

Страница 8: ...wer levels and 3 hour timer for versatile use l Feather touch controls for easy operation l Temperature protection and child lock provide added safety Package contents l Induction Cooktop l Fan covers...

Страница 9: ...r cooktop Works Does not work Cast iron iron steel stainless steel enameled iron Glass ceramic aluminum copper and other non magnetic materials l Use a pan with a flat bottom l Use pans with a 4 7 in...

Страница 10: ...onnectors into the holes next to the fans until you hear a click Note The connectors are different sizes If they don t fit in the holes turn the fan cover 180 3 To install the cooktop into your counte...

Страница 11: ...5 cm from the edge of any walls or cabinets l An available power outlet under your counter Caution To eliminate the risk of burns or fire by reaching over heated surface units cabinet storage space lo...

Страница 12: ...ools that are appropriate for your counter and cupboard 1 Cut a 23 4 14 3 in 59 4 36 6 cm hole into the top of your counter 2 Cut a 8 1 in 20 3 2 5 cm hole into the front of your cupboard to vent your...

Страница 13: ...he cut is centered and 1 in 2 5 cm from the surface of your counter 4 Carefully place the cooktop into the hole in your counter Note Before installing your cooktop make sure that the fan covers are at...

Страница 14: ...If it clings it will usually work with your cooktop See Cookware compatibility on page 9 for more information Using touch controls l Touch the controls with the ball of your finger not the tip The con...

Страница 15: ...an on the cooktop the display shows U for 10 seconds to indicate a pan is required 5 Press TEMP to enter temperature mode then press or to select the temperature you want Level 1 2 3 4 5 6 7 8 9 10 11...

Страница 16: ...ments Press and hold to adjust by 10 minute increments 3 When the countdown is done the cooktop beeps until you press TIMER to turn off the timer Reviewers please confirm how you turn off the timer Lo...

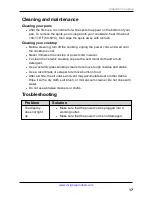
Страница 17: ...To clean the ceramic cooktop wipe with a soft moist cloth and a mild detergent l Use a ceramic glass cooktop cleaner to remove tough residue and stains l Use a razor blade or scraper to remove burnt o...

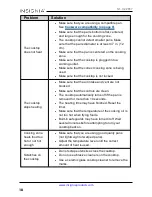
Страница 18: ...e not blocked l Make sure that the controls are clean l The cooktop automatically turns off if the pan is removed for more than 10 seconds l The heating time may have finished Reset the timer l Make s...

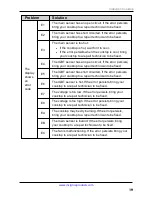
Страница 19: ...BT sensor has short circuited If the error persists bring your cooktop to a repair technician to be fixed E6 The IGBT sensor is hot If the error persists bring your cooktop to a repair technician to b...

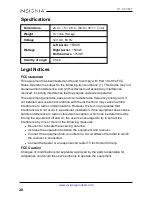
Страница 20: ...harmful interference to radio communications However there is no guarantee that interference will not occur in a particular installation If this equipment does cause harmful interference to radio or...

Страница 21: ...he Product at no charge with new or rebuilt comparable products or parts Products and parts replaced under this warranty become the property of Insignia and are not returned to you If service of Produ...

Страница 22: ...any part of the Product including the antenna l Display panel damaged by static non moving images applied for lengthy periods burn in l Damage due to incorrect operation or maintenance l Connection t...

Страница 23: ...WARRANTIES OF AND CONDITIONS OF MERCHANTABILITY AND FITNESS FOR A PARTICULAR PURPOSE ARE LIMITED IN DURATION TO THE WARRANTY PERIOD SET FORTH ABOVE AND NO WARRANTIES WHETHER EXPRESS OR IMPLIED WILL AP...

Страница 24: ...00 Mexico www insigniaproducts com INSIGNIA is a trademark of Best Buy and its affiliated companies Distributed by Best Buy Purchasing LLC 7601Penn Ave South Richfield MN 55423U S A 2017Best Buy All r...

Отзывы: