background image

57

 NS-40D510NA15 Insignia 40" LED TV

www.insigniaproducts.com

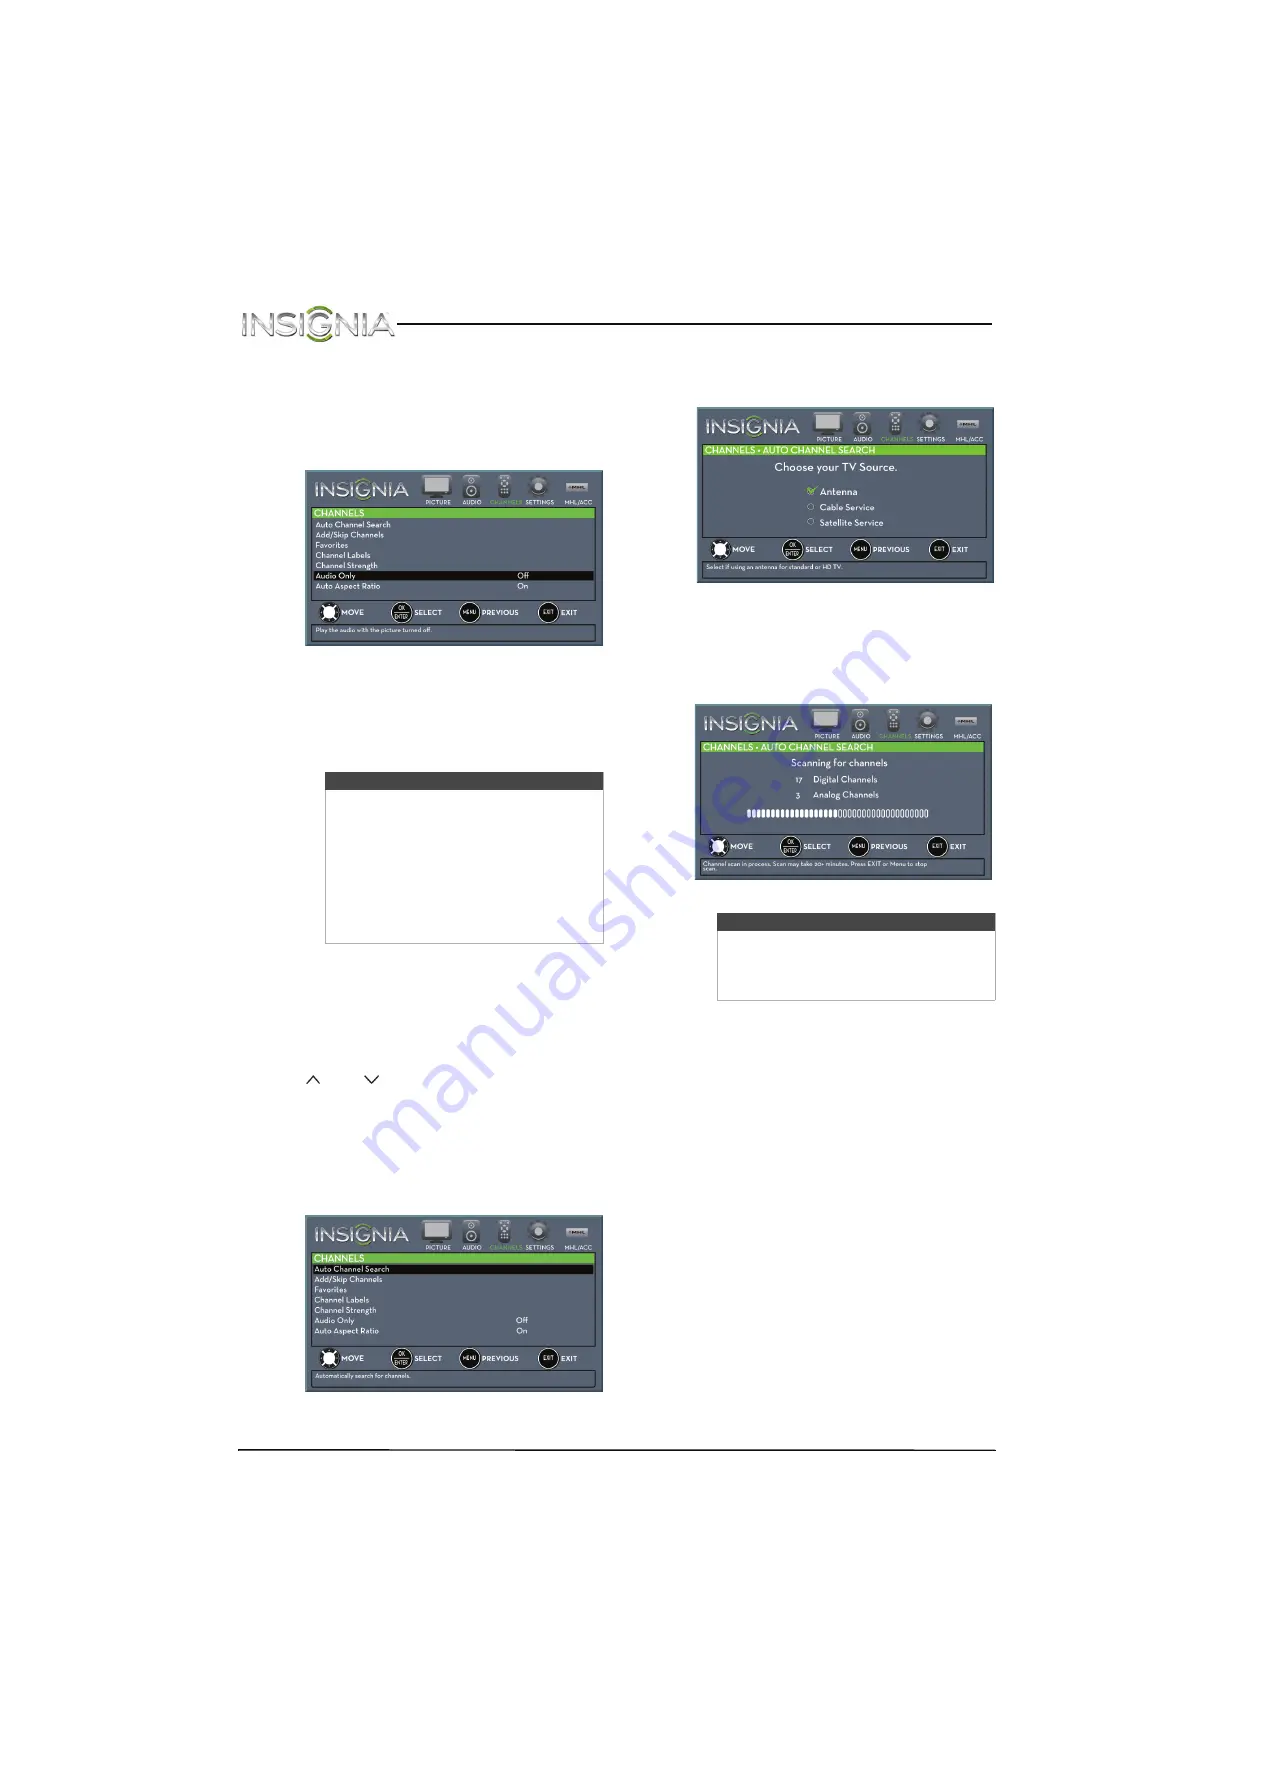
Play TV audio only

You can turn off the picture on your TV and listen to 
the program audio only.

1

Press 

MENU

. The on-screen menu opens.

2

Press 

W

 or 

X

 to highlight 

CHANNELS

, then press 

T

 or 

ENTER

. The 

CHANNELS

 menu opens.

3

Press 

S

 or 

T

 to highlight 

Audio Only

, then 

press 

ENTER

.

4

Press 

S

 or 

T

 to select 

On

.

5

Press 

MENU

 to return to the previous menu, or 

press 

EXIT

 to close the menu.

Change channel settings

Automatically scan for channels

When you scan for channels, your TV searches for 
channels with signals and stores the channel 
information in the channel list. When you press 

CH

 or 

CH

, your TV goes to the next or 

previous channel in the channel list.
If the TV signal source changes, for example you 
change from an outdoor antenna to cable TV (no 
box), you need to scan for channels.

1

Press 

MENU

. The on-screen menu opens.

2

Press 

W

 or 

X

 to highlight 

CHANNELS

, then press 

T

 or 

ENTER

. The 

CHANNELS

 menu opens.

3

Press 

S

 or 

T

 to highlight 

Auto Channel Search

then press 

ENTER

. The 

CHANNELS · AUTO 

CHANNEL SEARCH

 screen opens.

4

Press 

S

 or 

T

 to highlight 

Antenna

Cable 

Service

, or 

Satellite Service

, then press 

ENTER

.

A

If you select 

Antenna

, your TV scans for 

available channels. The scan may take 
several minutes. 

Notes

• The picture turns off in about five 

seconds.

Audio Only

 works only when the 

input source is TV, and your TV is 
receiving a broadcast signal.

• To exit audio only mode, press any 

button. When you exit audio only 
mode, the 

Audio Only

 option is 

automatically reset to 

Off

.

Note

You can press 

EXIT

 to stop the auto 

channel search, but you will need to run 
the auto channel search again to create a 
channel list.

Содержание NS-40D510NA15

Страница 1: ...NS 40D510NA15 UserGuide 40 LED TV Before using your new product please read these instructions to prevent any damage...

Страница 2: ...9 Left side jacks 10 Back 11 Remote control 12 What connection should I use 13 Connect a cable or satellite box 14 HDMI best 14 DVI same as HDMI but requires an audio connection 15 Component video be...

Страница 3: ...e video input source 40 On screen menu overview 41 Navigate the menus 41 Select a channel 42 Adjust the volume 42 View channel information 42 Use a Roku Streaming Stick 43 Connect and use 43 Switch ba...

Страница 4: ...rd 61 Lock control buttons 62 Block unrated TV 62 Set parental control levels 63 Download rating information 64 Use closed captioning 65 Turn closed captioning on or off 65 Select the analog closed ca...

Страница 5: ...insigniaproducts com INlink CEC compatible device 79 Specifications 81 Program universal remote controls 82 Common universal remote control codes 82 Legal notices 83 One year limited warranty Insignia...

Страница 6: ...ome excited while watching a program especially on a larger than life TV Make sure that you place or install the TV where it cannot be pushed pulled over or knocked down Make sure that you route all c...

Страница 7: ...or splashing and no objects filled with liquids such as vases should be placed on the apparatus WARNING Electric shock hazard To reduce the risk of fire or electric shock do not remove any cover or ex...

Страница 8: ...he lead in wire to an antenna discharge unit size of grounding conductors location of the antenna discharge unit connection to grounding electrodes and requirements for the grounding electrode Note to...

Страница 9: ...Vudu Amazon Instant Video Pandora PBS and many more Operate the Streaming Stick with your TV remote or a mobile device it s that simple Just plug the Streaming Stick into the purple MHL port on your T...

Страница 10: ...ll the stand 1 Carefully place your TV face down on a cushioned clean surface to protect the screen from damages and scratches 2 Align the TV stand to the TV Notes If you plan to wall mount your TV do...

Страница 11: ...6 Insignia 40 LED TV www insigniaproducts com 3 Secure the TV stand to the TV with the four provided M4 20 mm screws Screw type Screw length of screws M4 20 mm 4...

Страница 12: ...face to protect the screen from damages and scratches 2 If the TV stand is attached remove the four screws that secure the stand to the TV then remove the stand 3 Remove the wall mount screws from the...

Страница 13: ...that came with the wall mount bracket for information about which screws to use and how to correctly hang your TV Notes The length of the wall mount screws vary depending on the wall mount bracket you...

Страница 14: ...e on screen menu For more information see Navigate the menus on page 41 2 INPUT Press one or more times to select the video input source you want then wait a few seconds Your TV switches to the source...

Страница 15: ...page 44 For more information about Roku see Connect a Roku Streaming Stick on page 23 and Use a Roku Streaming Stick on page 43 2 HDMI 1 ARC DVI Connect an HDMI device to this jack For more informati...

Страница 16: ...age 16 21 or 26 OR Connect the video for an AV composite video device to the Y VIDEO jack For more information see AV composite video good on page 17 22 or 27 4 L and R audio Connect the audio for a c...

Страница 17: ...t source then press ENTER See Selectthe videoinput source on page 40 13 return TV Press toreturn to the previous channel Press to replay the last 10 seconds of video 14 S T W X TV menus Press to navig...

Страница 18: ...ve HDMI HDMI video audio Better than composite or coaxial Component video requires an audio connection Better than coaxial AV composite video requires an audio connection Good Coaxial video audio Conn...

Страница 19: ...g cable from the cable wall jack to the cable in jack on the cable or satellite box 3 Connect an HDMI cable not provided to one of the HDMI jacks on the side of your TV and to the HDMI OUT jack on the...

Страница 20: ...udio cable not provided to the PC DVI AUDIO IN jack on the back of your TV and to the AUDIO OUT jacks on the cable or satellite box 6 Plug your TV s power cord into a power outlet turn on your TV then...

Страница 21: ...out jacks on the cable or satellite TV box 5 Plug your TV s power cord into a power outlet turn on your TV then turn on the cable or satellite box 6 Press INPUT to open the INPUT SOURCE list 7 Press S...

Страница 22: ...urn on your TV then turn on the cable or satellite box 5 Press INPUT to open the INPUT SOURCE list 6 Press S or T to highlight AV then press ENTER Notes Cables are often color coded to match color cod...

Страница 23: ...cable or satellite box 4 Plug your TV s power cord into a power outlet turn on your TV then turn on the cable or satellite box 5 Press INPUT to open the INPUT SOURCE list 6 Press S or T to highlight T...

Страница 24: ...ot bundle the coaxial cable with the power cord or other cables If the antenna is not installed correctly contact qualified service personnel to correct the problem If the signal level for a channel i...

Страница 25: ...VD or Blu ray player is turned off 2 Connect an HDMI cable not provided to one of the HDMI jacks on the side of your TV and to the HDMI OUT jack on the DVD or Blu ray player 3 Plug your TV s power cor...

Страница 26: ...ayer 4 Plug your TV s power cord into a power outlet then turn on your TV and DVD or Blu ray player 5 Press INPUT to open the INPUT SOURCE list 6 Press S or T to select Component then press ENTER Note...

Страница 27: ...documentation that came with the player 5 Press INPUT to open the INPUT SOURCE list 6 Press S or T to select AV then press ENTER Notes Cables are often color coded to match color coded jacks The yello...

Страница 28: ...message appears Your Roku Streaming Stick s menu opens The message may take about 20 seconds to appear OR If your TV is turned off turn on your TV Press home Your Roku Streaming Stick s menu opens Not...

Страница 29: ...MHL enabled device 4 If your TV is turned on press ENTER when a message appears Your MHL enabled device s menu opens OR If your TV is turned off turn on your TV Press home Your MHL enabled device s m...

Страница 30: ...the game console 3 Plug your TV s power cord into a power outlet then turn on your TV 4 Turn on the game console then set it to the correct output mode For more information see the documentation that...

Страница 31: ...th the console 5 Press INPUT to open the INPUT SOURCE list 6 Press S or T to select Component then press ENTER Note Cables are often color coded to match color coded jacks Note Your game console may r...

Страница 32: ...the INPUT SOURCE list 6 Press S or T to select AV then press ENTER Notes Cables are often color coded to match color coded jacks The yellow video connector on the AV cable connects to the green Y VID...

Страница 33: ...e of the HDMI jacks on the side of your TV and to the HDMI OUT jack on the computer 3 Plug your TV s power cord into a power outlet then turn on your TV and the computer 4 Press INPUT to open the INPU...

Страница 34: ...of your TV and to the AUDIO OUT headphone jack on the computer 5 Plug your TV s power cord into a power outlet then turn on your TV and the computer 6 Press INPUT to open the INPUT SOURCE list 7 Press...

Страница 35: ...ck of your TV and to the AUDIO OUT headphone jack on the computer 4 Plug your TV s power cord into a power outlet then turn on your TV and the computer 5 Press INPUT to open the INPUT SOURCE list 6 Pr...

Страница 36: ...ter you plug in the USB flash drive and want to switch back to the drive press INPUT to open the INPUT SOURCE list press S or T to select USB Photos then press ENTER The PHOTOS menu opens Caution Do n...

Страница 37: ...more information see Select the audio out mode on page 56 Warning Loud noise can damage your hearing When using headphones use the lowest volume setting on your headphones that still lets you hear th...

Страница 38: ...the optical AUDIO IN jack on the digital speaker system or sound bar 3 Plug your TV s power cord into a power outlet then turn on your TV 4 Turn on the digital speaker system or sound bar then set it...

Страница 39: ...on the analog speaker system or sound bar 3 Plug your TV s power cord into a power outlet then turn on your TV 4 Turn on the analog speaker system or sound bar then set it to the correct source For m...

Страница 40: ...fer to the documentation that came with your devices for connection information Just remember to use the best connection types available for the best picture and sound For information about connection...

Страница 41: ...ower connector on the back of your TV 2 Connect the other end of the cord to a power outlet Cautions Your TV should only be operated from the power source indicated on the label Always unplug the AC p...

Страница 42: ...t the remote control towards the remote sensor on the front of your TV For the location of the remote sensor see Front on page 9 Cautions Batteries should not be exposed to excessive heat such as suns...

Страница 43: ...acific Alaska Hawaii Atlantic or Newfoundland then press ENTER MENU or W 8 Press S or T to highlight Daylight Saving then press X to access the setting 9 Press S or T to select On if your viewing area...

Страница 44: ...x is connected A message asks how you connected the cable box to your TV Select HDMI Component or AV then press ENTER if you connected a cable box to your TV using one of these cables Read the message...

Страница 45: ...he power cord is connected to a power outlet 2 Press power to turn on your TV The power indicator turns off 3 Press power again to turn off your TV Your TV enters standby mode and the power indicator...

Страница 46: ...ns on your screen Menu items that are not selectable are grayed out The screens shown in this manual are for explanation purposes and may vary from the actual screens on your TV Press MENU to open the...

Страница 47: ...te channel list see Set up a favorite channel list on page 59 Adjust the volume Press VOL or VOL to increase or decrease the volume Press MUTE to turn off the sound Press MUTE again to turn the sound...

Страница 48: ...to access your Roku Streaming Stick Your stick s menu opens 3 Use the following buttons to navigate on your Roku Streaming Stick Note You can purchase a Roku Streaming Stick at www bestbuy com www bes...

Страница 49: ...d device to your TV For connection instructions see Connect an MHL enabled device on page 24 A message tells you the device is connected 2 Press ENTER to access your MHL enabled device Your device s m...

Страница 50: ...Press W or X to highlight SETTINGS then press T or ENTER The SETTINGS menu opens 3 Press S or T to highlight INlink then press ENTER The SETTINGS INlink menu opens 4 Press S or T to highlight INlink...

Страница 51: ...ted devices when you turn off your TV then press ENTER 6 Press MENU to return to the previous menu or press EXIT to close the menu Turn TV Auto Power On on or off TV Auto Power On automatically turns...

Страница 52: ...On your TV s remote control controls the connected audio receiver s volume or Off your TV s remote control does not control the connected audio receiver s volume then press ENTER 6 Press MENU to retu...

Страница 53: ...want to connect to then press ENTER 7 Press MENU to return to the previous menu or press EXIT to close the menu Open an INlink compatible device s root menu You can open an INlink compatible device s...

Страница 54: ...n displays folder names and photo files stored on the USB flash drive in a thumbnail index with the first folder or file highlighted A control bar appears at the bottom of the screen 3 To navigate the...

Страница 55: ...u can press S T W or X to pan the photo EXIT to return to the thumbnail index MENU to return to the PHOTOS menu View favorite photos After you create your favorite photo list you can browse among your...

Страница 56: ...s S or T to highlight an option then press ENTER You can select Repeat Repeats the slideshow when it reaches the end You can select On or Off Shuffle Displays the slideshow photos in random order You...

Страница 57: ...inely detailed picture Adjusts the brightness and contrast and lowers the sharpness for a more realistic picture This selection is good for watching the highest quality video such as Blu ray Discs DVD...

Страница 58: ...ss You can select On or Off Reset Picture Settings Resets all picture settings to factory mode 4 Press W or X to adjust the option or press S or T to select a setting 5 Press MENU to return to the pre...

Страница 59: ...Press MENU to return to the previous menu or press EXIT to close the menu Set the power on picture mode You can set the picture mode your TV uses when you turn it on 1 Press MENU The on screen menu op...

Страница 60: ...DIO then press T or ENTER The AUDIO menu opens 3 Press S or T to highlight an option then press ENTER to access the option You can select Sound Mode Selects the sound mode You can select Standard Bala...

Страница 61: ...d to the AUDIO OUT jack Audio Out Fixed Select this option to use the remote control that came with the home theater system sound bar or external speaker system you connected to the AUDIO OUT jack to...

Страница 62: ...urce changes for example you change from an outdoor antenna to cable TV no box you need to scan for channels 1 Press MENU The on screen menu opens 2 Press W or X to highlight CHANNELS then press T or...

Страница 63: ...oaxial cable Read the message then press ENTER to start the channel scan VHF channels only C If you select Satellite Service a message asks how you connected the satellite box to your TV Select HDMI C...

Страница 64: ...r X to highlight CHANNELS then press T or ENTER The CHANNELS menu opens 3 Press S or T to highlight Favorites then press ENTER The CHANNELS FAVORITES screen opens 4 Press S T W or X to highlight the c...

Страница 65: ...ct a character then press W or X to move to the previous or next character position Repeat this step to enter additional characters You can enter as many as 11 characters 6 When you have completed the...

Страница 66: ...SETTINGS then press T or ENTER The SETTINGS menu opens 3 Press S or T to highlight Parental Controls then press ENTER The Enter Password screen opens 4 Press the number buttons to enter the four digi...

Страница 67: ...MENU to return to the previous menu or press EXIT to close the menu Block unrated TV Some TV programs such as news and sports shows are not rated When Block Unrated TV is turned on TV programs that d...

Страница 68: ...nce strongly suggested TV MA Mature audiences only U S TV content ratings All All ratings are blocked FV Fantasy violence L Strong language S Sexual situations V Violence D Suggestive dialog U S movie...

Страница 69: ...ng is blocked 9 Press MENU to return to the previous menu or press EXIT to close the menu Download rating information If the program you are viewing has downloadable rating information you can downloa...

Страница 70: ...to close the menu Use closed captioning Closed captioning displays a text version of the TV program audio or displays information provided by the broadcaster Turn closed captioning on or off 1 Press M...

Страница 71: ...previous menu or press EXIT to close the menu Select the digital closed captioning mode Digital channels usually have one or more closed captioning modes The CC1 mode usually displays a text version...

Страница 72: ...N DIGITAL CC SETTINGS menu opens with Style highlighted 5 Press ENTER then press S or T to select Custom 6 Press S or T to highlight an option then press ENTER You can select Size Selects the font siz...

Страница 73: ...atically set by the TV signal source then press ENTER 7 Press S or T to highlight Time Zone then press ENTER A menu opens 8 Press S or T to select your time zone then press ENTER You can select Easter...

Страница 74: ...urn off the sleep timer select Off 6 Press MENU to return to the previous menu or press EXIT to close the menu Adjust menu settings Select the menu language Your TV can display the on screen menu in E...

Страница 75: ...ted to them and turned on Your TV uses this information to determine what options you can select on the INPUT SOURCE list when you press INPUT 1 Press MENU The on screen menu opens 2 Press W or X to h...

Страница 76: ...to reset or No to not reset then press ENTER If you select Yes your TV turns off then turns on again The TV SETUP wizard opens 6 Go through the TV SETUP wizard For more information see Turn on your TV...

Страница 77: ...ith the firmware update the firmware update starts automatically Otherwise a screen opens with instructions about how to download the update Follow the instructions then press ENTER While your TV inst...

Страница 78: ...e that the antenna or cable TV is connected correctly and securely See Connect a cable or satellite box on page 14 or Connect an antenna or cable TV no box on page 19 Adjust the brightness See Adjust...

Страница 79: ...em Solution Dotted lines or stripes appear on the screen Make sure that the antenna or cable TV is connected correctly and securely See Connect a cable or satellite box on page 14 or Connect an antenn...

Страница 80: ...l signal strength on page 60 The audio cable s you are using may be bad Try a new set Poor picture Make sure that the room is not too bright Light reflecting off the screen can make the picture diffic...

Страница 81: ...ower Make sure that the power cord is correctly connected to your TV and a power outlet Unplug the power cord wait 60 seconds then plug the cord back in and turn on your TV Other devices for example a...

Страница 82: ...you ran the TV setup wizard Reset your TV to the factory defaults then select Home Use Mode on the What is your viewing environment screen See Restore settings to the defaults on page 71 Problem Solut...

Страница 83: ...ion My TV isplaying the audio from a connected device but is not displaying the video Make sure that the cables are securely connected Make sure that you are using an MHL cable An MHL cable may be dif...

Страница 84: ...an Insignia device it may not be compatible with your TV My TV s remote control does not control the device Make sure that there are no obstructions between the remote control and the remote control s...

Страница 85: ...for example turn the volume knob or press a button Audio Receiver is automatically set to On To prevent this from happening turn off the INlink feature See Turn INlink on or off on page 45 Problem So...

Страница 86: ...Clear QAM HDMI 2 side E EDID compliant HDCPcompliant MHL enabled and Roku Ready HDMI 2 MHL jack Component video 1 back Composite video 1 back Sharedwith component Y Shared audio component and composi...

Страница 87: ...emote control has a code search feature run a code search to identify a code that matches your TV See your universal remote control s instructions for details If your universal remote control has a Le...

Страница 88: ...dard Television Receiving Apparatus Appareil de r ception t l vision ordinaire Canada BETS 7 NTMR 7 IC Statement This device complies with Industry Canada licence exempt RSS standard s Operation is su...

Страница 89: ...the county where the original purchase was made What does the warranty not cover This warranty does not cover Customer instruction education Installation Set up adjustments Cosmetic damage Damage due...

Страница 90: ...SIGNIA is a trademark ofBest Buy and its affiliated companies Registered in some countries Distributed by Best BuyPurchasing LLC 7601 Penn Ave South Richfield MN 55423 U S A 2014 Best Buy All rights r...

Отзывы: