


8.18.15 06627C © Inovonics, 2015 - www.inovonics.com
EN1243 EchoStream
®
Wireless Smoke/Heat
Detector
Installation Instructions
1 Overview
The EN1243 EchoStream wireless smoke/heat detector is a wireless,
battery-powered photoelectric smoke detector. The detector includes a
built-in sounder for alarm alerts, a visual status LED, a smoke and heat
sensor, a back tamper, and an Inovonics transmitter. Under normal (non-
alarm) conditions, the LED flashes once every eight seconds while the
EN1243 monitors the surrounding conditions. When the EN1243 detects
smoke or heat, the LED lights, the built-in sounder beeps loudly and the
alarm signal is transmitted. When the EN1243 detects an inactive smoke or
heat sensor a tamper message will be transmitted.
Note:
The EN1243 EchoStream wireless smoke/heat detector is intended
for use as a supplemental residential fire alarm device, and is only UL listed
to provide localized functional annunciation.
1.1
Inovonics Contact Information
If you have any problems with this procedure, contact Inovonics technical
services:
• E-mail: [email protected]
• Phone: (800) 782-2709; (303) 939-9336
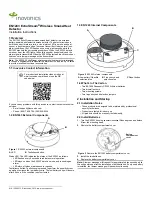
1.2 EN1243 External Components
Figure 1
EN1243 external components
Status LED: The LED indicates the status of the EN1243 as follows:
• LED flashes every 8 seconds to indicate normal operation.
• LED stays on when the EN1243 detects smoke, and is sending an
alarm.
• LED stays off when maintenance is required.
Test/silence button: Test/silence is pressed to perform the sensitivity test,
as well as to silence the low battery chirp. The low battery chirp will resume
after 24 hours if the condition is not corrected.
1.3 EN1243 Internal Components
Figure 2
EN1243 internal components
1.4 What’s In The Carton
• Two BAT604 Panasonic CR123A lithium batteries.
• Two drywall anchors.
• Two mounting screws.
• Two frequency band selection jumpers.
2 Installation and Startup
2.1 Installation Notes
• These products are designed to be maintained by professional
security technicians.
• Products are tested for indoor use.
• All products should be manually tested weekly.
2.2 Install Batteries
1.
Turn the EN1243 housing counterclockwise fifteen degrees and detach
it from the mounting base.
2.
Remove the battery compartment cover.
Figure 3
Remove the EN1243 battery compartment cover
3.
Install the two batteries.
4.
Replace the battery compartment cover
Note:
A tamper message will transmit for approximately ten seconds while
the unit powers up after the installation of both batteries. If only one battery
is installed, the tamper message will transmit continuously.
For product and installation videos visit us at
www.inovonics.com/videos or use the QR
code below.
A
LED
B
Test/silence button
B
A
A
Low battery/CleanMe
selection pins
B
Frequency band
selection pins
C
Reset button
A
B
C
Battery
compartment
cover