INSTRUCTION
i
Read this instruction before installation
and wiring of the product
SE10F24
Valve actuator for 3-point control
SE10F24 is a valve actuator designed for control of AB Industrietechnik
valves. For more info, see the product sheet of each valve. The actua-
tor can also be combined with other brands of valves using adapter
kits. The actuator can be operated manually.
Technical data
Supply voltage
24 V AC ±15 %, 50/60 Hz
Control signal
3-point
Power consumption
Max. 8 W
Stroke
10...30 mm
Stroke time
3 s/mm
Force
1000 N
Ambient temperature
0...50°C
Storage temperature
-40...80°C
Ambient humidity
10...90 % RH
Dimensions
198 x 266 x 133 mm
Protection class
IP54
Installation
If the valve stem adaptor and valve throat adaptor are not already mount-
ed on the valve, mount them. Pull the valve stem out as far as possible.
Remove the locking bolt (U-bolt) from the actuator yoke. Insert the valve
stem into the yoke and make sure that the stem adaptor engages the hole
in the angled iron of the actuator drive spindle.
The groove in the valve throat adaptor must be made to line up with the
U-bolt mounting holes on the actuator. If the spindle needs moving in or
out for this to happen, depress the central part of the manual button and
turn it clockwise for the actuator spindle to extend, and anti-clockwise for
it to retract (see Manual override). When the valve is in the correct posi-
tion, insert the U-bolt. Tighten the bolt nuts until the valve is firmly gripped.
Disassembly in reverse order.
Mounting positions
90º
90º
Wiring
24 V AC
1
2
3
1
2
3
G2 G1
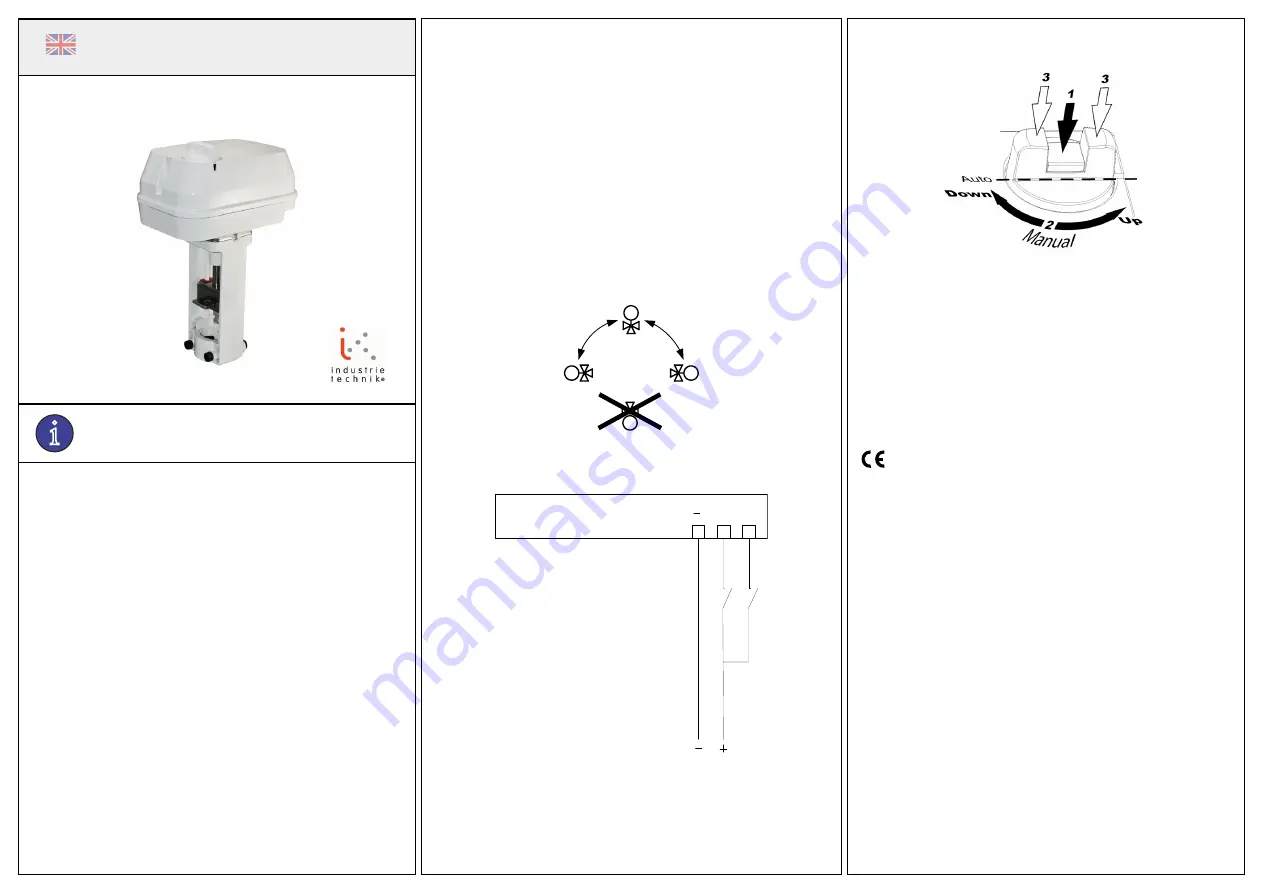
G1 closed = Actuator spindle extending
G2 closed = Actuator spindle retracting
Stroke and endpoint calibration
Stroke and endpoint calibration is not necessary due to a construction
utilizing endpoint stops. When the valve reaches the endpoint, a force is
generated. Once the force of the actuator reaches a predefined level, the
limit switch automatically halts the drive motor.
Manual override
To manually set the valve position, first depress the central part of
the button until it clicks and remains depressed (1 in the figure). This
disengages the gears and also cuts the power to the motor. Then the
valve position can be changed manually by turning the button (2 in
the figure). Clockwise rotation will extend the drive rod and anti-clock
-
wise will retract it.
To reconnect power, set the button so the flats are in line with the
cutout in the edge of the cover, Auto position. Then press on the outer
parts of the button (3 in the figure). The central depressed part will
pop out re-engaging the gears and reconnecting the power.
Low Voltage Directive (LVD) standards
This product conforms to the requirements of the European Low Volt-
age Directive (LVD) 2006/95/EC through product standards EN60730-
1:2000 and EN60730-2-8:2002.
EMC emissions & immunity standards
This product conforms to the requirements of the EMC Directive
2004/108/EC through product standards EN60730-1:2000 and
EN60730-2-8:2002.
RoHS
This product conforms to the Directive 2011/65/EU of the European
Parliament and of the Council.
Contact
AB Industrietechnik Srl
Via Julius Durst, 70 - 39042 Bressanone (BZ) - Italy
Tel. +39 0472/830626 - Fax +39 0472/831840
www.industrietechnik.it - [email protected]
SE10F24
11916B OCT
15
EN
1


