


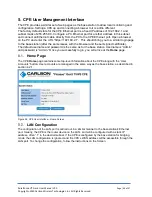


RuralConnect® Gen3 User Manual V1.0
Page | 44 of 57
Copyright
©
2020 Carlson Wireless Technologies, Inc. All Rights Reserved.
6.
Field-Testing and Installation
Professional Installers
RuralConnect
®
radios and antennas can only be installed by professionally trained personnel.
Antenna Height and RF Exposure Warnings
RuralConnect
®
installations must adhere to all local, state, and federal regulations. Failure to follow
those guidelines could result in costly fines, damage to the equipment, and/or inadequate RF
protection for end users. Per ETSI regulations, antennas used with fixed TV Band devices may not
be more than 30 meters above ground level, or 250 meters above average terrain. All persons are
required to maintain at least a 40 cm distance from the device; additional hardware may be required
to ensure that separation. All regulatory compliance requirements related to the installation and
operation of RuralConnect
®
devices are the sole responsibility of the operator.
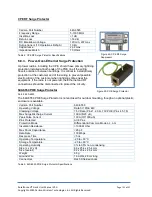
Outdoor Unit (ODU)
RuralConnect
®
Gen3 radio uses external antennas that operate over
the entire UHF band (470 MHz to 790 MHz). Speak to your Indigo
Sales Representative about the antenna selection available.
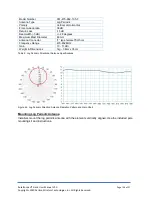
Clients connect to a Base Station via a UHF radio signal. Due to the
unique propagation characteristics of signals in the UHF band, good
connections are generally possible even if there is a non-line-of-
sight path to the Base Station. Once a link to the Base Station is
established, clients provide local network access via a standard
Ethernet connection.
The top plate of the ODU has one or more RF ports, while the
bottom plate has an Ethernet port. Client Stations also have LEDs to
indicate signal strength.
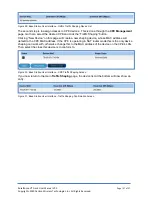
6.3.1. Mounting the ODU
Installers will use pole/wall mounting kit (part #: 900-7220) to install the RuralConnect
®
ODU. Most
installs will mount the unit directly behind or below the antenna, with grounded inline surge
protection.
The mounting bracket allows installation using poles with a diameter up to 50mm.
Using the 900-7220 mounting kit, follow the below instructions for pole
mounting the RuralConnect
®
ODU:
1. Attach the mounting flanges to the enclosure using the 10-
32 x 20mm
” Bolts, and Nylock
®
hex nuts.
2. Tighten the hex nuts to a maximum of 2.71Nm.
Do not
over tighten!
3. Position the enclosure on the pole.
4. Place the U-Bolts around the pole and slide the pipe
flanges over them with the serrated sides facing the pole.
5. Apply an anti-seizing compound to the threads of the U-
Bolts.
6. Slide the mounting flanges (now attached to the enclosure)
over the U-Bolts and secure those using the 8mm lock
washers and 8mm hex nuts.
7. Tighten the 8mm nuts.
Do not over tighten!
Figure 42: Pole-mounted
RuralConnect® Gen3 Unit
Figure 43: ODU Mounting Kit