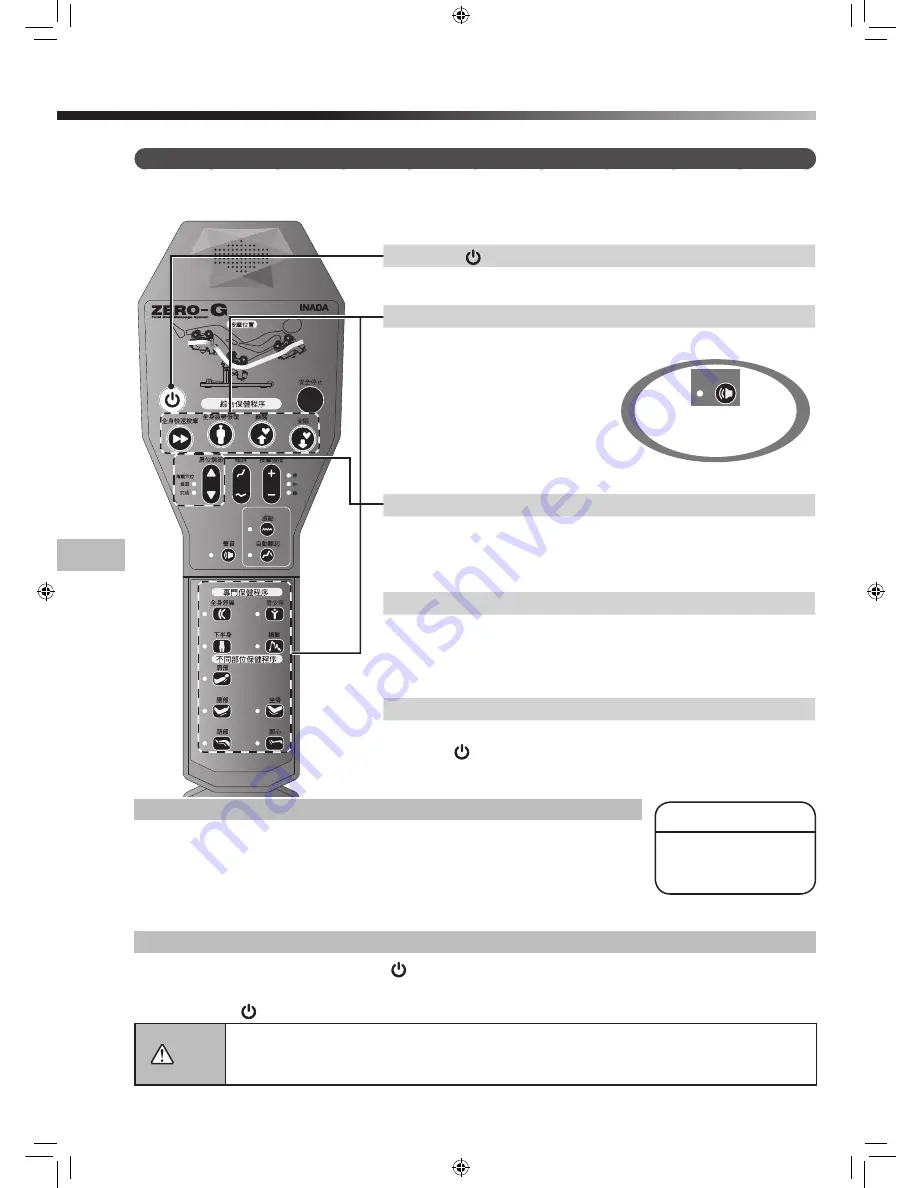
inada HCP-G900 Скачать руководство пользователя страница 42

15

၍ଷ

︻操作方法︼

1 按下   按鈕。

如果連續 5 分鐘未按下任何按鈕,將自動關閉電源。

2 選擇您想要的程序。

將椅背放倒至 

零重力角度為

止。之後,指壓穴位檢索顯示燈
會亮起,表示正在搜尋穴位。

【注意】

請坐進按摩椅深處,以最輕鬆的姿
勢,將頭部放在靠枕上。身體與座
椅之間有空隙的話,將無法正確找
到穴位。

ᖑॲ

選擇按摩程序時,
按下聲音按鈕會
有語音介紹。

3 可以調整肩部位置。

指壓穴位檢索完畢後,檢索指示燈會閃爍一段時間。此時可以進
行肩部位置的調整。若不須調整,請不用做任何動作。

(腳底按摩程

序中,不會偵測肩部位置。

4 開始按摩程序。

指壓穴位檢索完成後,「檢索完成」的燈號會亮起,然後展開按
摩程序。
程序進行中,可隨時調節按摩的強度。

5 結束按摩程序。

程序結束後,按摩珠回到收納位置(腳部)

。之後椅背會豎直,遙

控器 

 按鈕。

按摩珠進行收納時,電源指示燈會呈綠燈閃爍。

注意

●若覺得按摩過於刺激,請根據本操作手冊減弱刺激程度。如調整後依舊感覺刺激過大,請立即停止使用,並向封底記載之

客戶服務中心進行諮詢。

→若覺得過於刺激卻仍繼續使用,可能導致受傷。

●請勿將手或腳伸入升降部位、椅背等可動位置。使用前,請先摘下髮夾、項鍊、手錶、手鐲、戒指等堅硬物體。
●按摩腿部時,腿或腳從腳架中拔出後,請勿強行再把腿或腳放入其中。

操作方法

程序變更說明

您可以不必等待現行按摩程序結束,就能切換進行其他的按摩程序。
不過,如果連續使用機器到達 30 分鐘,即使按摩程序未結束,本機器也會暫停按摩。

中途停止按摩程序說明

如果要中途停止按摩程序,請按遙控器的 

 按鈕。當按摩珠收納動作結束後,本機器會停止運行。

緊急狀況

感覺機器動作出現異常時

,請即刻按下 [ 安全停止 ] 按鈕。機器將立刻停止運轉。確認

安全後,再按下 

 按鈕。當按摩珠收納動作結束後,本機器會停止運行。


開始進行按摩

按下任何一個程序按鈕,選擇您需要的按摩方式後,本機器將依照既定項目為您進行按摩。

何謂零重力角度?

這是模擬無重力狀態下的
姿勢,減輕筋骨負擔的斜
躺角度。

按摩中欲更換為其他按摩程序時

首先,按摩珠會移動到第一次程序中偵測到的肩部位置。如果肩部位置有偏差,請於檢索指示
燈閃爍期間調整肩部按摩珠的位置。

(腳心按摩程序中,不會偵測肩部位置。

Содержание HCP-G900

Страница 1: ...atigue We hope the INADA ZERO G will be a valued partner in your daily health preservation for many years to come HCP G900 Operating Manual Warranty card provided separately Please read this Operating...

Страница 2: ...MEMO...

Страница 3: ...PTION 5 BEFORE USE 7 POSITION ADJUSTMENT 11 AFTER USE 13 PROGRAMS SELECTION 14 HOW TO OPERATE 15 TROUBLESHOOTING 17 REGULAR MAINTENANCE FOR SAFETY 18 FAQ 19 CARE AND STORAGE 20 CUSTOMER SERVICE AND WA...

Страница 4: ...outlet have a proper outlet installed by a qualified electrician This product uses on a normal Alternating Current AC circuit and has a grounding plug that looks like the plug illustrated in the figur...

Страница 5: ...result if the chair tips over Do not sit down on the chair when it is in the reclined position Any sudden impact on the footrest could cause damage to the mechanism Also an accident or injury may res...

Страница 6: ...the chair If there is a power outage or the possibility of a power outage stop operation immediately and turn the main power switch to OFF Unplug the power plug from the wall outlet Accident or injury...

Страница 7: ...Program Massage programs developed through joint university research By using programs developed to accurately find the correct shiatsu point and to stimulate at the correct intensity order and for th...

Страница 8: ...Leg Rest 8 Remote Controller 9 Remote Controller Stand 0 Back Cover a Wheels b Main Power Switch c Power Connector d Cord Connector e Power Cord f Plug g Carrying belt h Headrest sheet i Active Area j...

Страница 9: ...the operation has finished Healthcare Program Buttons You can select full body massage courses Special Program Buttons You can select specialized courses that differ from conventional massages Each Re...

Страница 10: ...not install the chair in an area of high humidity such as a bathroom or sauna Install on a flat level surface only Do not use in areas of high debris or dust content Do not use where the ambient tempe...

Страница 11: ...correctly they may come out during use which is dangerous Always check the screws Installation screw long L shaped Wrench Screw hole Insert Clasp Installation location The chair is very heavy so be ca...

Страница 12: ...and to the armrest which removed from the chair Curled cord Operating Guide Tighten Remote Controller Stand Installation screw short L shaped Wrench Installation screw hole Securely fasten the remote...

Страница 13: ...ON If the main power switch is turned ON while the rollers are stopped partway they will automatically return to the starting position leg section and then stop Warning Do not use with any type of tra...

Страница 14: ...d using the Velcro on the back of the headrest Adjust the small headrest to match the position of your head before starting the massage Correct headrest position Behind the head back of the head Behin...

Страница 15: ...sed Remove the pads Velcro Pad Remove the Velcro from the side of the pads left and right Turn over the pads from under the feet Install the headrest Remove the entire pad Remove just the back pad Rem...

Страница 16: ...o standby power will be consumed Caution Be sure to turn the main power switch to OFF after every use and to unplug the power plug from the wall outlet An accident or injury may result if children or...

Страница 17: ...am Unique program developed for children aged 14 years or over Low stimulation short course massage Full Stretch Program This program pleasantly stretches your full body from neck to feet Low Body Rev...

Страница 18: ...on If you feel the massage is too strong reduce the stimulation according to this Operating Manual If you still feel the massage is too strong stop using the chair and contact the vendor details on ba...

Страница 19: ...sm more intense Makes the mechanism less intense The intensity of the rollers at the start of each program is Medium Cancel Button The following 2 operations can be cancelled during massage Cancel Vib...

Страница 20: ...he main power switch OFF and wait for a while before switching the main power switch ON again The button of the remote controller and the program button flash Set the main power switch located at the...

Страница 21: ...produces a burnt smell abnormal sound or vibration The auto timer function does not work in some cases Other failures If you find anything listed on the left stop using and unplug the power cord from...

Страница 22: ...er Perform the following Attach the pads Set the intensity to Lo using the Intensity button With the methods above you can make the massage more gentle Does the reclining seat back move automatically...

Страница 23: ...and Covers Soak a piece of soft cloth in lukewarm water in which a small amount of mild detergent has been added Then thoroughly wring it out before cleaning off any spots or grime Caution The fabric...

Страница 24: ...will stock service parts except fabric of this product for at least six years after terminating the production of this model Service parts refer to those necessary for maintaining the intended perfor...

Страница 25: ...m W D H Approx 33 inch 50 63 inch 47 28 inch W D H The depth and height figures in represent the dimensions when fully reclined and with the leg rest flat Weight Approx 81 kg 178 lb Outer Covering Syn...

Страница 26: ...MEMO...

Страница 27: ...3D 1 4 5 7 11 13 14 15 17 18 19 20 21 22 INADA ZERO G HCP G900...

Страница 28: ...1 AC 5 6...

Страница 29: ...2 100 240V 38 OFF 14 2...

Страница 30: ...3 30 30...

Страница 31: ...4 INADA ZERO G 77 8 8 4 4 5 13 14 14...

Страница 32: ...5 1 2 1 2 3 4 5 6 7 8 9 0 a b c d e f g h i j k l l 2 1 2 2 1 3 8 4 9 d f e c b j 7 k 6 i a 0 5 g h...

Страница 33: ...6 3 1 4 8 2 5 0 9 a 6 7 b...

Страница 34: ...7 40cm 1 40cm 40 1m 100kg 1cm2 3 0kg L 2 2...

Страница 35: ...8 T T...

Страница 36: ...9 L L...

Страница 37: ...10 OFF...

Страница 38: ...11...

Страница 39: ...12...

Страница 40: ...13 ON OFF...

Страница 41: ...14 14 1 f 13...

Страница 42: ...15 1 5 2 3 4 5 30...

Страница 43: ...16 2...

Страница 44: ...17 OFF ON 5 1 5cm 1 5cm...

Страница 45: ...18 3 1 30 5 3000 3000...

Страница 46: ...19 150cm 180cm...

Страница 47: ...20...

Страница 48: ...21 1 2 17 18 1 2 3 4 5 6...

Страница 49: ...22 HCP G900 100 240V 90W 50 60Hz 30 5 17 184 500 2cm 4 2cm 145cm 4 4 5 15 30 110 152 84cm 127 160 cm 118 70 cm 81kg L...

Страница 50: ......

Страница 51: ......

Страница 52: ...iyahara Yodogawa ku Osaka 532 0004 Japan Manufactured by FAMILY CO LTD 2 1 3 Nishi Miyahara Yodogawa ku Osaka 532 0004 Japan Manufactured by FAMILY CO LTD 532 0004 2 1 3 Made in JAPAN DATE OF ISSUE da...

Отзывы: