background image

29

IMPERIAL TRUCK MOUNTED VACUUM TANKER MANUAL

disassembly. 

Changing rotor vanes includes the following general steps:

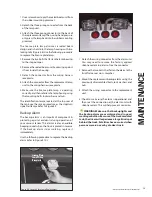
1. Drain and remove the oil tank from the pump.

2. Remove the oil pump (Note: on some pumps the 

oil pump and mounting fl ange may be removed 
as one unit - see your OEM instructions).

. Remove the oil pump mounting fl ange or housing. 

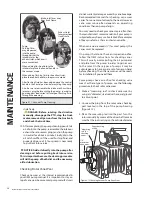
IMPORTANT: The rotor bearings will usually 

remained pressed into the mounting fl ange upon 
removal. Be careful when pulling the bearings free 
of the rotor shaft that the rotor does not fall down 
inside the pump housing. It may be necessary to 
provide a means of support for the rotor, such as 
a block of wood under the rotor shaft.

4. Remove the end plate from the pump.

5. Remove  old  vanes  and  replace  with  new  vanes 

that have been dipped in oil.

IMPORTANT: Always replace vanes in sets.

6. Before reassembling, inspect the rotor bore, bearings, 

seals, and gaskets, and replace as necessary. Seals 
should be soft and pliable, gaskets should not be 

of the rotor.

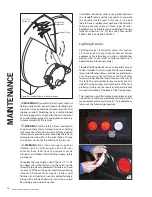
4. Place a scriber mark on the rod at the level of the 

plug tap-hole. 

5. Next,  manually  turn  the  rotor  so  that  the  blunt 

point of the measuring rod drops into one of the 
rotor slots. Make another mark on the measuring 
rod at the level of the tap-hole, and then measure 
the difference between the two marks on the rod. 

The  difference  between  the  two  marks  on 
the  measuring  rod  can  be  up  to  ¼”  before  the 
rotor  vanes  must  be  replaced  (Figure  4.12). 

6. After checking the vane wear, replace the plug in 

the checking port and tighten it.

IMPORTANT: Be sure to replace the plug in the 

vane wear checking port after performing a check. 
Failure to replace the plug will result in lower pump 
vacuum and suction capacity of the tank. 

Replacing Rotor Vanes

When  changing  the  rotor  vanes  in  your  vacuum 
pump,  follow  the  specific  instructions  in  your 
OEM  pump  manual. This  is  essential  because  the 
procedure for changing vanes varies based on the 
pump design and the manufacturer.
The procedure outlined below provides a general 
overview of the process of replacing vanes. 

If  you  are  replacing  rotor  vanes  with  the  pump 
mounted  to  the  truck,  use  the  appropriate  safety 
precautions  as  outlined  below  and  in  the  safety 
section of this manual beginning on page 5.

DANGER

Stop  the  truck  motor,  remove  all 

persons from the truck cab, and chock the truck 
tires  before  servicing  any  component  under 
the  truck;  this  includes  changing  rotor  vanes. 
Contact  with  a  rotating  mechanism  can  cause 
entanglement  that  can  lead  to  death.  A  truck 
that begins to roll is a crushing hazard that can 
lead to death.

WARNING:  Wear  protective  gloves,  eye 

protection, and appropriate clothing when working 
with sewage effl uent or septage. These materials 
may contain hazardous chemicals, disposed of 
through the drain, which can cause severe injury 
or even death due to contact. These effl uents also 
contain bacteria that can be a source of infection, 
especially if exposed to open cuts or sores.

IMPORTANT: When replacing rotor vanes, be 

sure to have replacement gaskets, O-rings, and 
seals on hand in case any of these items should 
need  replacing  and/or  be  damaged  during 

MAINTENANCE

s

n

o

i

t

i

d

n

o

C

g

n

i

t

a

r

e

p

O

r

a

e

W

e

n

a

V

h

g

i

H

4

.

4

e

l

b

a

T

d

n

a

e

f

il

e

n

a

v

e

c

u

d

e

r

ll

i

w

w

o

l

e

b

s

n

o

i

t

i

d

n

o

c

e

h

T

g

n

i

k

c

e

h

c

r

a

e

w

e

n

a

v

t

n

e

u

q

e

r

f

e

r

o

m

e

t

a

t

i

s

s

e

c

e

n

t

s

u

d

li

o

s

r

o

,t

s

u

r

,

d

n

a

s

.

g

.

e

(

r

i

a

e

k

a

t

n

i

n

i

t

i

r

g

e

n

i

F

)

s

e

l

c

i

t

r

a

p

*

n

o

i

t

a

r

e

p

o

n

i

s

l

a

v

r

e

t

n

i

g

n

o

l

y

n

a

M

n

e

h

w

s

a

.

g

.

e

(

*

n

o

i

t

a

r

e

p

o

.

g

H

h

g

i

h

f

o

s

l

a

v

r

e

t

n

i

y

n

a

M

.)

e

c

n

a

t

s

i

d

t

a

e

r

g

a

t

c

u

d

o

r

p

t

fi

l

o

t

d

e

r

i

u

q

e

r

g

n

i

p

m

u

d

e

r

u

s

s

e

r

p

f

o

e

s

u

t

n

e

t

s

i

s

n

o

C

li

o

n

o

y

r

d

p

m

u

p

e

h

t

g

n

i

n

n

u

R

r

e

r

u

t

c

a

f

u

n

a

m

y

l

n

o

e

s

u

(

p

m

u

p

n

i

li

o

g

n

o

r

w

e

h

t

g

n

i

s

U

)

p

m

u

p

r

u

o

y

n

i

li

o

d

e

d

n

e

m

m

o

c

e

r

s

t

a

e

h

r

e

v

o

p

m

u

p

e

h

t

h

c

i

h

w

n

i

n

o

i

t

a

u

t

i

s

y

n

A

e

c

n

a

n

e

t

n

i

a

m

g

n

i

h

s

u

lf

p

m

u

p

c

i

d

o

i

r

e

p

f

o

k

c

a

L

s

a

h

r

e

t

a

w

r

e

t

f

a

e

c

n

a

n

e

t

n

i

a

m

g

n

i

h

s

u

lf

p

m

u

p

f

o

k

c

a

L

p

m

u

p

e

h

t

d

e

r

e

t

n

e

e

c

i

h

t

i

w

n

e

z

o

r

f

s

i

t

a

h

t

p

m

u

p

a

e

g

a

g

n

e

o

t

g

n

i

t

p

m

e

t

t

A

)

t

u

o

p

m

u

p

e

h

t

g

n

i

w

a

h

t

e

r

o

f

e

b

(

n

o

i

t

a

r

e

p

o

y

t

u

d

y

v

a

e

h

r

o

s

u

o

u

n

i

t

n

o

c

r

o

f

d

e

t

a

r

s

p

m

u

p

:

e

t

o

N

*

s

n

o

i

t

i

d

n

o

c

e

s

e

h

t

e

l

d

n

a

h

n

a

c

)

s

p

m

u

p

d

e

l

o

o

c

d

i

u

q

il

s

a

h

c

u

s

(

.

y

li

d

a

e

r

e

r

o

m

Содержание TMV-1500

Страница 1: ...ate of Purchase OPERATING INSTRUCTION MANUAL FOR TRUCK MOUNTED VACUUM TANKERS MANUFACTURED BY IMPERIAL INDUSTRIES INC WAUSAU WI WARNING Study this manual before operating or maintaining your vacuum tanker and any of its components You must understand and follow the instructions in this manual otherwise you and or others can be seriously injured DO NOT operate this equipment if you have not read an...

Страница 2: ...ons operation maintenance and trouble shooting Each sectioninthismanual isclearlyidentifiedtohelpyou easily find the information you need Thesafetyalertsymbolwillidentifyimportant safetymessages Whenyouseethissymbol carefully read the message that follows The information in this manual covers IMPERIAL Truck MountedVacuumTankers and IMPERIALTruck Mounted Portable Sanitation Service Tanks It is impo...

Страница 3: ...Pressure Control Handle 14 Vacuum Pump Operation 14 Loading the Tank 14 Mechanics of pneumatic transport transfer by means of vacuum 15 Unloading 16 Hydraulic Components 16 Hoist Vacuum Tankers 16 Wash Down Systems 17 Cold Weather Operation 18 MAINTENANCE 19 Moisture Trap Secondary Shutoff 19 Final Filter 20 Primary Shutoff 20 PTO 22 PTO Driveline 22 Right Angle Gear Box 22 Captured Mounting Brack...

Страница 4: ...icates a hazard or unsafe practice that if not avoided will result in death or serious injury WARNING Indicates a hazard or unsafe practice that if not avoided could result in death or serious injury CAUTION Indicates a hazard or unsafe practice that if not avoided could result in minor injury Precautionary statements dealing with machine safety are preceded by the signal words NOTICE and IMPORTAN...

Страница 5: ...ia which can be a source of infection especially if exposed to open cuts or sores Safety Precautions for Entering Tanks DANGER DO NOT enter a transport septic or holding tank without first cleaning and providing adequate ventilation to the interior of the tank Sewer gas is deadly if inhaled in addition it depletes the oxygen in a confined space which can cause asphyxiation DANGER DO NOT enter a tr...

Страница 6: ...eath DO NOT remove shields from the unit except when servicing then replace immediately WARNING The truck s cornering and braking abilities are reduced when the tank is loaded Drive at a reasonable speed with a loaded tank reduce speed on rough or hilly terrain before making an anticipated stop and when cornering WARNING Make certain everyone is clear of the tanker truck and the immediate area bef...

Страница 7: ...itation Service Units Table 2 2 Vacuum Tankers Model Actual Gallon Capacity Overall Length Tank Diameter Max Cab to Axle Total Gross Weight TMV 1500 1 507 163 54 125 15 824 TMV 2000 1 932 148 66 109 20 286 TMV 2100 2 107 155 66 116 22 124 TMV 2300 2 283 167 66 128 23 972 TMV 2500 ALUM 2 500 179 66 140 23 000 TMV 2500 2 458 179 66 140 25 809 TMV 3000 2 942 179 72 128 30 891 TMV 3200 3 150 191 72 14...

Страница 8: ...e factory predetermined setting Thepressurereliefvalveontruckmountedvacuum tankers is factory set at 10 psi The pressure relief valve on portable sanitation service units is factory set at 5 7 psi When the pressure relief valve opens to release excess air it creates a hissing sound that you should be able to hear Listen for this sound and if the valve does not open at the specified pressure as lis...

Страница 9: ...nents Through the Tank Air line Access Hatch Vacuum Tank Sight Eye Assembly Work Light Assembly Load Dump Valves Access Clean out Hatch Vacuum Pump Tool Box Oil Catch Muffler Mounting Springs Formed Skid Rubber Sill Pressure Relief Valve Vacuum Pressure Gauge Vacuum Relief Valve ...

Страница 10: ... of the rear valves Stand off to the side of the valve to prevent possible injury from the direct flow of releasing pressure 2 After purging the tank of air loosen the setscrew located near the top of the pressure relief valve Rotate the inner cylinder clockwise one to two revolutions to reduce the setting at which the valve opens Retighten the setscrew after making the adjustment Run the vacuum p...

Страница 11: ...n subjecting it to heavy use Properly dispose of the used oil Do Not reuse it Furthermore anytime that you notice that water has collected in the oil catch muffler dry out the vacuumpumpinterior usingtheprocedureoutlined on page 15 PTO Drive Your Truck Mounted Vacuum Tanker is equipped with a power take off PTO drive for powering your vacuum pump An OEM manual for the particular drive on your vacu...

Страница 12: ...n range from near 200o F to over 300o F depending on the make and model of pump and on the working conditions Contact with a hot vacuum pump can cause severe burns OPERATION Load and Dump Valves Imperial vacuum tankers are available with either manual or automatic load and dump valves Automatic valves may be air hydraulic or electric operated On manual valves use the handle mounted to the valvetoo...

Страница 13: ...V 0 5 1 s u l l e T a e r t i V 0 5 1 O S I F L E 0 5 1 s i l l e t y l o P 0 5 1 s i l e t y l o P s p m u P m u u c a V t r o p s a M e p y T d n a r B r e h t a e W d l o C r e h t a e W m r a W l i O p m u P m u u c a V t r o p s a M W 0 1 W 0 2 n o c o m A 2 3 n o c o m A 8 6 n o c o m A s l i O T o b r u T l l e h S 2 3 T o b r u T 8 6 T o b r u T l i O r o s s e r p m o C c e l o n o M 0 0 ...

Страница 14: ... the engine rpm IMPORTANT Do Not over grease the pump bearings Over greasing can cause damage to the seals Vacuum Pressure Control Handle On most vacuum pressure pumps locating the controlhandleinthecenterofitstravelwillcausethe pump to operate in a neutral free flow mode Toobtaineithervacuumorpressure movethehandle either clockwise or counterclockwise according to the instructions in your OEM pum...

Страница 15: ...ndle In addition both attainable vacuum and pumping height decrease at higher altitudes This is because atmospheric pressure decreases with height Therefore there is less pressure at hand to load your tank Table 3 4 lists the percentage loss of attainable vacuum for every 1000 foot rise in elevation over sea level While it is necessary to create enough vacuum to handle pumping height product weigh...

Страница 16: ...age the PTO before closing the valve to avoid pressure buildup in the system Hydraulic Components Imperial Truck Mounted Vacuum Tankers are available with a variety of hydraulic operated and driven components Some of these components include hydraulic hoists hydraulic hatches and hydraulic pump drives Use the toggle switch mounted inside the truck cab to actuate the hydraulic components on your va...

Страница 17: ...the hydraulic cylinder It also allows the ability to vary the speed of cylinder movement When moving the control lever increasingly more in the direction of actuation the speed of movement increases Usually smallertrucksdonothaveanaircompressor system and will therefore have a cable control installed Onthesetrucks usethelevercontrolinside the truck cab to actuate the hoist cylinder In addition sin...

Страница 18: ...you are sure it is primed with water Starting or running thepumpdrywillcausescoringofthemechanical seal resulting in damage to the pump NOTICE Do Not allow water to freeze inside the pump Do not attempt to start the pump if water has frozen inside it Freezing water can damage your pump Take the truck into a warm area and allow the pump the thaw out Cold Weather Operation Use the following guidelin...

Страница 19: ...ed at the bottom of the moisture trap On frame mounted moisture traps check for collected liquid by viewing through the sight eye To drain liquid remove the cover In addition to checking for liquid inspect the ball seat and the fasteners every 2 weeks Check all moisture trap fasteners and tighten as necessary Driving the truck with an empty tank causes vibration that over time can loosen fasteners...

Страница 20: ...veline Right Angle Gearbox Woods Coupling Vacuum Pressure Pump Figure 4 1 Vacuum Pump Driveline Lubrication Locations Note see the maintenance subsections in this manual for specific lubricant types and lubrication intervals Lubrication Locations lubrication points Final Filter Clean the final filter as often as every day depending upon the lint content of the material being pumped Forexample lint...

Страница 21: ... e n o p m o C e c n a n e t n i a M d e r i u q e R l a v r e t n I e c n a n e t n i a M p a r T e r u t s i o M f o n o i t a l u m u c c a r o f k c e h C d i u q i l y l i a D r e t l i F l a n i F n e e r c s r e t l i f n a e l C y l i a D l a i r e t a m t n e t n o c t n i l h g i h g n i p m u p y l k e e W l a i r e t a m t n e t n o c t n i l w o l g n i p m u p f f o t u h S y r a m i...

Страница 22: ...ide of the vacuum pump on the vacuum pump mounting stand see figure 3 1 page 9 and figure 4 1 page 20 Depending on the style of truck frame and the size of vacuum tank there may beverylittleclearancetoaccessthefillplugontopof thegearbox Tochecktheoillevel useanimprovised dipstick a drinking straw works well inserted into the fill plug opening Before removing the dipstick place your finger on it to...

Страница 23: ...place the standoff wear plate promptly after it becomes worn through Prolonging operation of your vacuum tanker after the wear plate is worn out will damage the tank To inspect the wear plate stand outside the tank and look up through the rear hatch with the aid of a flashlight When the wear plate wears through a large hole will develop This will be readily apparent with a visual inspection Replac...

Страница 24: ... nut use two flat washers and one lock washer In addition aluminum tanks use a gasket between the standoff collar and the wear plate to separate the dissimilar metals used in the two It is a good idea to have a replacement gasket on hand when changing the wear plate on these types of tanks Replacement wear plates can be obtained through Imperial Industries Inc P O Box 1685 Wausau WI 54402 1685 Pho...

Страница 25: ...k of the replacement lamp Then using hand pressure only pressthelampbackintotherubbermounting grommet The license plate lamp also uses a sealed beam design and is held into the lamp housing with two lockingtabs Figure4 8 Usethefollowingprocedure to replace the license plate lamp 1 Removethetwoboltsthatfastenthelamphousing to the step bumper 2 Remove the sealed beam unit by pressing against it from...

Страница 26: ...pumps supplied by Imperial Industries If you have difficulty obtaining a manufacturer recommended oil contact Imperial Industries about its availability Some pump manufacturers recommend changing the oil weight for summer and winter operation If you have a manual drip oiler on your pump it is necessary to adjust the drip rate when changing to different weight oil Reference your OEM vacuum pump man...

Страница 27: ...er completing the above cleaning sequence usethecorrectsafetyproceduresandthenrotate the driveline slowly by hand Listen for a clicking sound as each rotor vane drops in its slot If not all of the vanes are sliding freely in the pump rotor slots repeat the above procedure until they do pump Grease the pump bearings every 4 hours of operation or daily Itisimportantnottoovergreasethepumpbearings Use...

Страница 28: ...y disengage the PTO stop the truck motor remove all persons from the truck cab and chock the truck tires 10 After completing the pump cleaning pour 4 to 8 oz of oil into the pump reassemble the intake or exhaust hose or access plug and run the pump in neutral for about a minute Finally drain the oil catch muffler of the used flushing fluid and properly dispose of it Your pump is now ready to put b...

Страница 29: ... the safety section of this manual beginning on page 5 DANGER Stop the truck motor remove all persons from the truck cab and chock the truck tires before servicing any component under the truck this includes changing rotor vanes Contact with a rotating mechanism can cause entanglement that can lead to death A truck that begins to roll is a crushing hazard that can lead to death WARNING Wear protec...

Страница 30: ...t l i o l l i F n a e l o o t t e s e t a r w o l f l i O r e l i o e h t f o e t a r p i r d e h t t s u j d a e R n o i t a c i r b u l g n i v i e c e r t n s i p m u p e h T g n i k r o w s i p m u p l i o e h t e r u s e k a m o t k c e h C p m u p n i d e s u t h g i e w l i o r o e p y t l i o t c e r r o c n I l i o d e d n e m m o c e r M E O h t i w p m u p n i l i o e c a l p e R h g i ...

Отзывы: