Immarsat ISatPhone Pro Скачать руководство пользователя страница 1

IsatPhone Pro Repair Partner Training – GMR Antenna & Antenna Cable Replacement 
Guide 

1.Parts needed for GMR Antenna & Antenna Cable Replacement 

Parts required for the replacement of the GMR Antenna & Antenna Cable are listed below: 

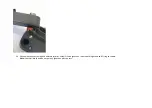
Antenna repair kit including RF cable   


Product Code 136609 

1.


Antenna assembly 

2.


Removable cover assembly 

3.


Antenna hinge support flange assembly 

4.


GMR cable 

5.


2 (M2.5 x 9) screws 

2.Tools needed for GMR Antenna & Antenna Cable Replacement 

The tools required in the replacement operation of the GMR Antenna & Antenna Cable are listed below. 

1.


Dust free ESD protected working area / ESD protected table 

2.


ESD jacket, ESD shoes and ESD gloves 

3.


Medium size flat head screwdriver 

4.


Small size flat head screwdriver 

5.


TX8 size screwdriver 

6.


Calibrated torque wrench with TX8 screw head 

7.


Parker O-Lube grease for the antenna hinge 

8.


Soft cloth for product cleaning 


Содержание ISatPhone Pro

Страница 1: ...a hinge support flange assembly 4 GMR cable 5 2 M2 5 x 9 screws 2 Tools needed for GMR Antenna Antenna Cable Replacement The tools required in the replacement operation of the GMR Antenna Antenna Cabl...

Страница 2: ...GMR Antenna Antenna Cable Replacement Instructions 1 Open the battery cover screw using a medium size flat headed screw driver Rotate the screw 90 degrees counter clockwise 2 Remove the battery cover...

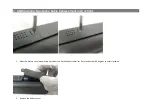
Страница 3: ...3 Remove the battery as shown 4 Remove the back cover screw M2 5 x 5 using TX8 size screwdriver...

Страница 4: ...5 Squeeze the back cover sides push the back cover with the heel of the head towards the battery compartment and lift...

Страница 5: ...e warranty sticker from screw number 1 Destroy and dispose of the sticker Remove 2 M2 5 x 9 screws shown in the diagram using TX8 size screwdriver 7 Remove the antenna hinge support flange This maybe...

Страница 6: ...n to slot on Antenna removable cover Bend screwdriver and remove Antenna removable cover Note Put removable cover in to trash It cannot be re used 9 Open the antenna cable connector using a small flat...

Страница 7: ...he GMR antenna and carefully thread the antenna cable through if using tweezers be careful not to damage the PCB 11 Check the antenna cable for visible wear damaged cables must be replaced 12 Remove 5...

Страница 8: ...13 Lift the B cover module gently from the A cover and turn the module round 14 Carefully release the 2 snaps and remover the PCB module from the B cover NB do not touch the display or window...

Страница 9: ...15 Open cable connector gently by using small flat headed screwdriver 16 Remove old cable from PCB module ensuring no damage fixing snaps on frame...

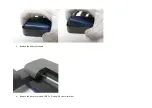
Страница 10: ...17 Pick a new cable and check that it is perfect 18 Push the cable through as shown...

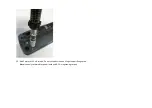
Страница 11: ...19 Close the connector properly...

Страница 12: ...20 Make a loop and push the cable through the hole from the top side of the frame Gently push the cable between snaps on the frame Do not use any sharp tools which may damage the cable...

Страница 13: ...21 Assemble PCB module on to A cover according to guiding pins 22 Assemble B cover assembly on A cover Guide cable through Antenna hinge insert...

Страница 14: ...23 Add 5 pieces M2 5 x 9 screws Do not yet add screws on Hinge support flange area Note Use only calibrated torque wrench and 0 3 Nm tightening torque...

Страница 15: ...24 Pick new Antenna assembly and add thin layer of Parker O Lube grease on red area of hinge shaft and O ring as shown Note Use small brush and do not put any grease on plastic parts...

Страница 16: ...cover Note Antenna must be 180 degrees open when it is assembled Otherwise it will damage antenna switch on PCB 26 Replace the connector according to picture below Use Guide cable on groove in Antenn...

Страница 17: ...ver on to antenna as shown 28 Press Removable cover properly against Antenna top cover because interface must be water proof Add thin layer of Parker O lube grease on top of Hinge shaft according to p...

Страница 18: ...5 x 9 screws Replace the warranty sticker with the replacement repaired sticker found in the repair kits Note Use only calibrated torque wrench and 0 3 Nm tightening torque and do not replace the war...

Страница 19: ...31 Press the back cover down onto the B cover and check that it snaps closed 32 Replace the M2 5 x 5 screw tighten using the TX8 torque screwdriver to 0 3Nm...

Страница 20: ...33 Replace the battery 34 Add the battery cover...

Страница 21: ...35 Close the battery cover screw using the medium flat head screwdriver...

Отзывы: