background image

User Manual

6

Device Installation

5.1 Installation

1.Select a right (firm&flat) place to install the device
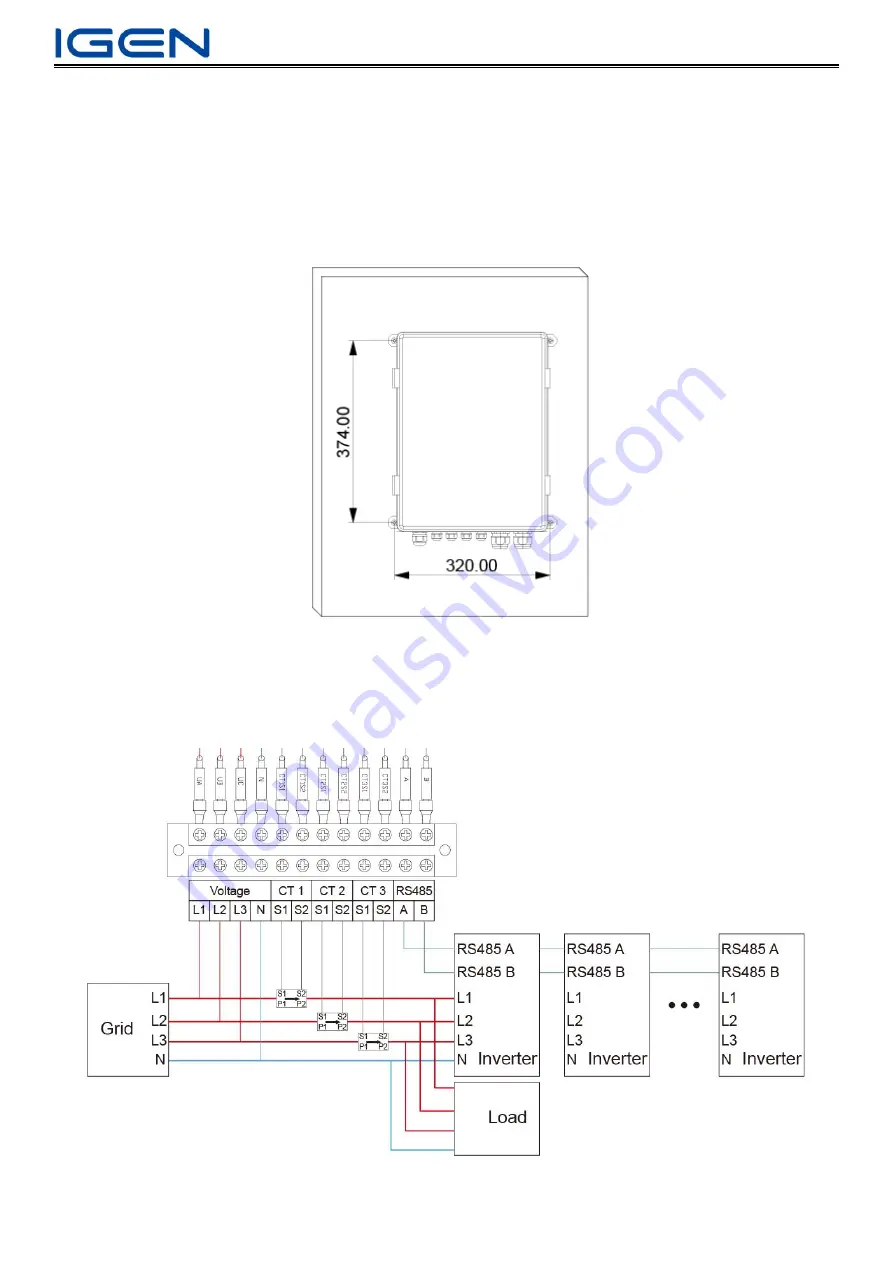
2. Determine the drilling hole positions according to hangers (Refer to Fig. 5.1)
3. Fix the device using expansion screws

Fig. 5.1 Installation Diagram (Unit: mm)

5.2 Device wiring

Содержание SAR-100

Страница 1: ...User Manual 1 Installation Instruction for Smart Anti rejection Box Model SAR 100...

Страница 2: ...5 1 Installation 6 5 2 Device wiring 6 Networking Configuration 8 6 1 WiFi Access 8 6 2 Ethernet Access 16 20 7 1 Anti rejection setup 20 Instruction for Indicator Light Dial Switch and Reset Button 2...

Страница 3: ...ata transmission via WiFi Ethernet Parameters Parameter Product Model SAR 100 Remote Communication 2 4G WiFi Ethernet Local Communication RS 485 No of Connections 5 10 Select according to the number o...

Страница 4: ...ct voltage sampling signal Specification AWG 12 18 105 600V Double core cable Use to connect CT signal Specification AWG 16 22 105 600V 3 2 Location The installation location must meet the following r...

Страница 5: ...User Manual 5 Anti rejection System Diagram If 485 link communication is not successful for some inverters please connect a 120 resistance with repeater and A B point of the last inverter...

Страница 6: ...nstallation 1 Select a right firm flat place to install the device 2 Determine the drilling hole positions according to hangers Refer to Fig 5 1 3 Fix the device using expansion screws Fig 5 1 Install...

Страница 7: ...phase CT connect to CT1 1 2 S phase CT connect to CT2 1 2 T phase CT connect to CT3 1 2 Phase sequence of CT should be consistent with the phase sequence of voltage sampling signal 1 2 cannot be rever...

Страница 8: ...do Not connect the cable when configuring the logger Select and connect AP XXXXXXXXX in the network list XXXXXXXXX means logger SN Step 3 Log in to logger WEB page Open a browser and enter 10 10 100...

Страница 9: ...ification enter your password and click Save Example choose WPA2 PSK as encryption mode AES as encryption algorithm password 1234578 Please remember the password Users can select encryption mode accor...

Страница 10: ...ng After AP encryption has been set you will be reminded again during network settings If the following prompt shows you can select AP encryption modification accordingly Step 8 Refresh the WEB page a...

Страница 11: ...o to setup guide page Click Start Step 10 Select Wireless connection and click Next Notice 1 Step 6 8 are for AP encryption If you will not select AP encryption skip step 6 8 click cancel in step 5 an...

Страница 12: ...elect router name and click Next refresh the page if no target router listed Notice 1 Router name and password do not support characters 2 5G WiFi is not supported 3 Router DHCP function ON 4 Router c...

Страница 13: ...ick Next Step 13 If allocating fixed IP address is not required select Obtain an IP address automatically Enable Recommended and click Next Step 14 If allocating fixed IP address is required select Di...

Страница 14: ...revious steps Step 15 2 If enhancing safety is not required click Next System will remind you to encrypt AP click Cancel Notice 1 If you select Hide AP AP will be hided automatically If you wish to op...

Страница 15: ...User Manual 15 Step 16 Click OK to complete WiFi configuration Step 17 Connect AP again according to the notification around 40s Log in to WEB page and check if the network is successful...

Страница 16: ...ction Enable Click Next Otherwise you can t connect to AP through mobile phone or computer for web page setting Step 2 If allocating fixed IP address is not required select Obtain an IP address automa...

Страница 17: ...Modification AP Encryption Modification is recommended If you already set AP encryption please refer to previous steps Notice 1 If you select Hide AP AP will be hided automatically If you wish to ope...

Страница 18: ...User Manual 18 Step 5 If enhancing safety is not required click Next System will remind you to encrypt AP click Cancel Step 6 Click OK to complete Ethernet configuration...

Страница 19: ...ting is completed you can enter the web page through two methods to set up anti rejection Method 1 Recommended If AP is visible connect AP via computer mobile and other devices Open a browser and ente...

Страница 20: ...he original value transmitted by the meter to the logger through RS485 is still the original value without ratio conversion so after adding the plant the meter data is still the original value in the...

Страница 21: ...h means inverter production is used for load and there is still 100W for grid tie Please Note If the inverter load power is less than min production power the surplus power will go on grid Step 2 1 If...

Страница 22: ...User Manual 22 Step 3 Click Restart Step 4 If the successful page is displayed it means the anti rejection setting is successful...

Страница 23: ...to router Light ON If not Light OFF 3 Configure to Ethernet and connect to router Light Flash If not Light Flash Communication status with logger and inverter 1 ON Fast Flash DIN Rail logger WiFi ETH...

Страница 24: ...is recommended to use SOLARMAN Smart Scan the QR code below to download or go to Android App Store searching for SOLARMAN Smart For web https home solarmanpv com SOLARMAN Smart If you are a distribut...

Страница 25: ...P Step 1 Registration Go to SOLARMAN Smart APP and click Register a new account and select E mail or Phone Number to register Step 2 Create a plant Click Add Now Choose Yes to select Create Plant By M...

Страница 26: ...xt Users need to enter plant information here click Done to complete Step 3 Add a logger Click Go to Add enter SN manually or scan bar code then click Add Step 3 1 Click Skip to return homepage and cl...

Страница 27: ...elect associated device if you will not change associated method click Done If you are going to change associated method click Manual selection Network configuration has been done at step 6 Click Late...

Страница 28: ...u can click Device directly Click Device Meter Meter configuration go to select Three phase System Grid click a blue arrow in CT direction and change to Energy Purchase Current ratio can set according...

Страница 29: ...il registration Tick T Cs and click Next Select Business Type enter Business Name select Business Area select Type and click Next If you already have an account click Click here to return to login pag...

Страница 30: ...lant information then click Save Step 3 Add a logger Click Add Data logger enter SN manually or scan bar code then click Done Step 3 1 If not click Done to return to Dashboard Click in the upper right...

Страница 31: ...a blue arrow in CT direction and change to Energy Purchase Current ratio can set according to CT specification e g If you choose 200 5A CT set current ratio as 200 5 Click Save to return to Devices pa...

Страница 32: ...r Manual 32 Contact IGEN Tech Co Ltd Add Block F4 China IoT International Innovation Park No 200 Linghu Avenue Wuxi Jiangsu P R China Tel 86 400 181 0512 Email info solarmanpv com Website www solarman...

Отзывы: