IEI Technology WAFER-ULT-i1 Скачать руководство пользователя страница 1


WAFER-ULT/ULT2-i1 3.5" SBC 

Page i

User Manual 


MODEL: 

WAFER-ULT/ULT2-i1 

3.5” SBC with Intel® 4

th

/5

th

 Generation Mobile Core™ i7/i5/i3 or 

Celeron® ULT SoC, Dual PCIe GbE, VGA, LVDS, iDP, USB 3.0, 

SATA 6Gb/s, PCIe Mini, iRIS-1010, HD Audio and RoHS 


Rev. 1.11 – July 28, 2016 

Содержание WAFER-ULT-i1

Страница 1: ...Page i User Manual MODEL WAFER ULT ULT2 i1 3 5 SBC with Intel 4th 5th Generation Mobile Core i7 i5 i3 or Celeron ULT SoC Dual PCIe GbE VGA LVDS iDP USB 3 0 SATA 6Gb s PCIe Mini iRIS 1010 HD Audio and...

Страница 2: ...WAFER ULT ULT2 i1 3 5 SBC Page ii Revision Date Version Changes July 28 2016 1 11 Added Figure 3 30 LAN Connector August 31 2015 1 10 Updated for R11 version July 9 2014 1 00 Initial release...

Страница 3: ...es arising out of the use or inability to use the product or documentation even if advised of the possibility of such damages This document contains proprietary information protected by copyright All...

Страница 4: ...ION Cautionary messages should be heeded to help reduce the chance of losing data or damaging the product NOTE These messages inform the reader of essential but non critical information These messages...

Страница 5: ...12 2 3 PACKING LIST 13 2 4 OPTIONAL ITEMS 14 3 CONNECTORS 16 3 1 PERIPHERAL INTERFACE CONNECTORS 17 3 1 1 WAFER ULT ULT2 i1 Layout 17 3 1 2 Peripheral Interface Connectors 18 3 1 3 External Interface...

Страница 6: ...Serial Port Connector RS 422 485 40 3 2 23 SMBus Connector 41 3 2 24 SO DIMM Slots 42 3 2 25 SPI Flash Connector 43 3 2 26 System Fan Connector 43 3 2 27 USB 2 0 Connector 44 3 3 EXTERNAL INTERFACE C...

Страница 7: ...0 4 10 INTEL AMT SETUP PROCEDURE 71 4 11 IPMI SETUP PROCEDURE 72 4 11 1 Managed System Hardware Setup 72 5 BIOS 73 5 1 INTRODUCTION 74 5 1 1 Starting Setup 74 5 1 2 Using Setup 74 5 1 3 Getting Help 7...

Страница 8: ...7 SAVE EXIT 108 5 8 SERVER MGMT 109 5 8 1 System Event Log 109 5 8 2 BMC Network Configuration 111 6 SOFTWARE DRIVERS 112 6 1 AVAILABLE SOFTWARE DRIVERS 113 6 2 SOFTWARE INSTALLATION 113 6 3 CHIPSET...

Страница 9: ...WAFER ULT ULT2 i1 3 5 SBC Page ix E WATCHDOG TIMER 144 F HAZARDOUS MATERIALS DISCLOSURE 147...

Страница 10: ...ternal DisplayPort Connector Location 27 Figure 3 11 IPMI LED Connector Location 28 Figure 3 12 iRIS Module Slot Location 29 Figure 3 13 Keyboard and Mouse Connector Location 30 Figure 3 14 LAN LED Co...

Страница 11: ...ng the Half size PCIe Mini Card into the Slot at an Angle 58 Figure 4 11 Securing the Half size PCIe Mini Card 58 Figure 4 12 DC 5V Jumper Location 59 Figure 4 13 AT ATX Power Mode Switch Location 60...

Страница 12: ...tup Options 122 Figure 6 15 LAN Driver Installation 123 Figure 6 16 LAN Driver Installation Complete 123 Figure 6 17 InstallShield Wizard Welcome Screen 124 Figure 6 18 Audio Driver Software Configura...

Страница 13: ...10 EC Debug Connector Pinouts 26 Table 3 11 Internal DisplayPort Connector Pinouts 27 Table 3 12 IPMI LED Connector Pinouts 28 Table 3 13 Keyboard and Mouse Connector Pinouts 30 Table 3 14 LAN LED Co...

Страница 14: ...able 3 30 USB 3 0 Port Pinouts 47 Table 3 31 Serial Port Pinouts 47 Table 3 32 VGA Connector Pinouts 48 Table 4 1 DC 5V Jumper Settings 59 Table 4 2 DC 5V Jumper Pinouts 59 Table 4 3 AT ATX Power Mode...

Страница 15: ...2 SATA Configuration 93 BIOS Menu 13 Intel R Rapid Start Technology 94 BIOS Menu 14 USB Configuration 95 BIOS Menu 15 iEi Feature 96 BIOS Menu 16 Chipset 97 BIOS Menu 17 System Agent SA Configuration...

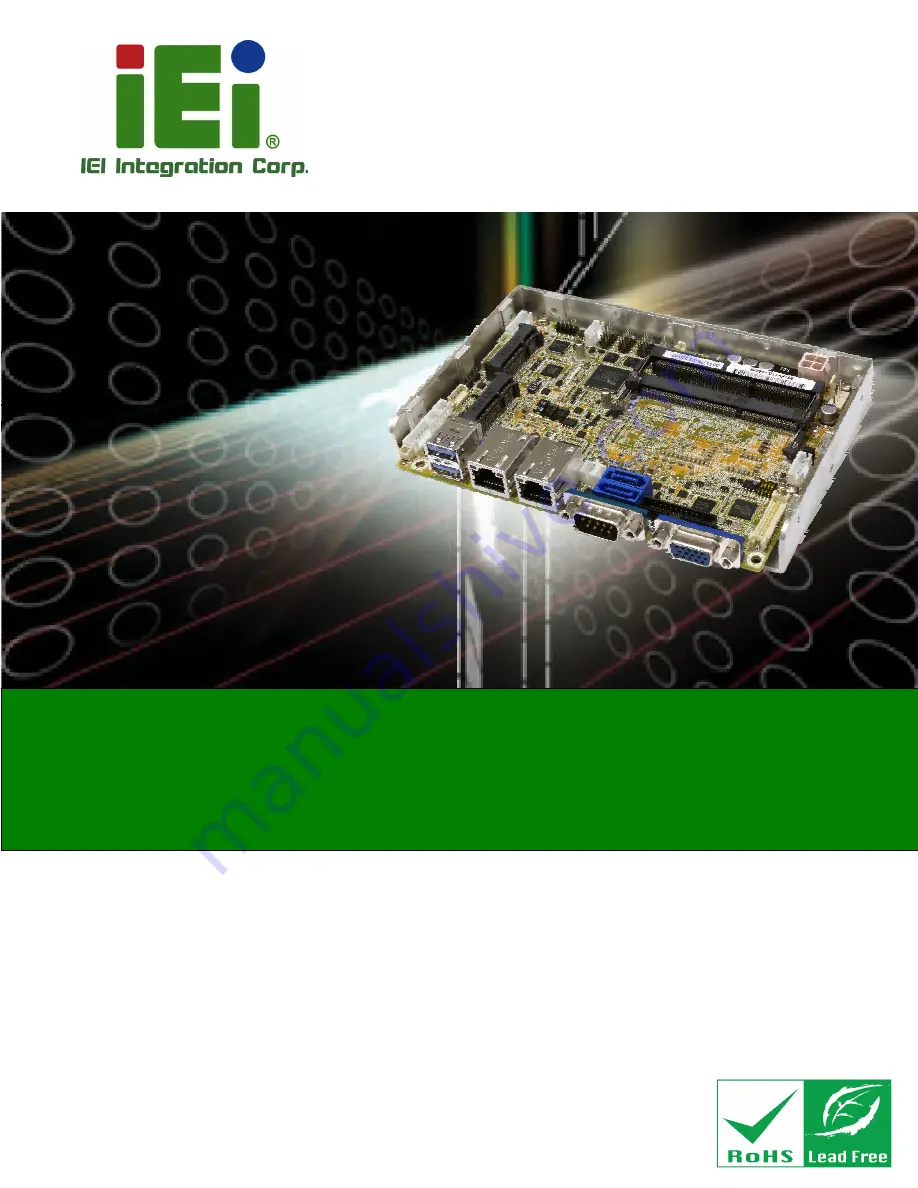
Страница 16: ...WAFER ULT ULT2 i1 3 5 SBC Page 1 Chapter 1 1 Introduction...

Страница 17: ...ith Intel AMT 9 0 support and the Intel I210 AT GbE controllers In addition the WAFER ULT ULT2 i1 includes VGA LVDS and iDP interfaces for triple independent display Two USB 3 0 on the rear panel two...

Страница 18: ...4 MB cache TDP 15W WAFER ULT i1 i5 R11 Intel Core i5 4300U 1 9 GHz dual core 3 MB cache TDP 15W WAFER ULT i1 i3 R11 Intel Core i3 4010U 1 7 GHz dual core 3 MB cache TDP 15W WAFER ULT i1 C R11 Intel C...

Страница 19: ...WAFER ULT ULT2 i1 3 5 SBC Page 4 1 5 Connectors The connectors on the WAFER ULT ULT2 i1 are shown in the figure below Figure 1 2 Connectors...

Страница 20: ...WAFER ULT ULT2 i1 3 5 SBC Page 5 1 6 Dimensions The main dimensions of the WAFER ULT ULT2 i1 are shown in the diagram below...

Страница 21: ...WAFER ULT ULT2 i1 3 5 SBC Page 6 Figure 1 3 WAFER ULT ULT2 i1 Dimensions mm...

Страница 22: ...WAFER ULT ULT2 i1 3 5 SBC Page 7 1 7 Data Flow Figure 1 4 shows the data flow between the system chipset the CPU and other components installed on the motherboard Figure 1 4 Data Flow Diagram...

Страница 23: ...MB cache TDP 15W Intel Celeron 2980U 1 6 GHz dual core 2 MB cache TDP 15W Memory Two 204 pin 1600 1333 MHz dual channel unbuffered DDR3L SDRAM SO DIMMs supported up to 16 GB Graphics Engine Intel HD...

Страница 24: ...an connector 4 pin wafer Front Panel One power HDD LED connector 6 pin wafer One power button connector 2 pin wafer One reset button connector 2 pin wafer Keyboard and Mouse One 6 pin wafer connector...

Страница 25: ...mption 12V 2 72A Intel Core i5 4300U on board SoC with two 8 GB 1600 MHz DDR3L SO DIMMs Operating Temperature 10 C 60 C Storage Temperature 20 C 70 C Operating Humidity 5 95 non condensing Dimensions...

Страница 26: ...WAFER ULT ULT2 i1 3 5 SBC Page 11 Chapter 2 2 Packing List...

Страница 27: ...ischarge Self grounding Touch a grounded conductor every few minutes to discharge any excess static buildup Use an anti static pad When configuring any circuit board place it on an anti static mat Onl...

Страница 28: ...r vendor the WAFER ULT ULT2 i1 was purchased from or contact an IEI sales representative directly by sending an email to 32sales ieiworld com The WAFER ULT ULT2 i1 is shipped with the following compon...

Страница 29: ...Item and Part Number Image iRIS 1010 module IPMI 2 0 adapter card with AST1010 BMC chip without KVM over IP function for PCIe Mini socket interface P N iRIS 1010 R10 RS 232 cable P N 19800 000300 200...

Страница 30: ...oard for IEI iDP connector P N DP HDMI R10 DisplayPort to VGA converter board for IEI iDP connector P N DP VGA R10 DisplayPort to DVI D converter board for IEI iDP connector P N DP DVI R10 DisplayPort...

Страница 31: ...WAFER ULT ULT2 i1 3 5 SBC Page 16 Chapter 3 3 Connectors...

Страница 32: ...3 1 Peripheral Interface Connectors This chapter details all the peripheral interface connectors 3 1 1 WAFER ULT ULT2 i1 Layout The figure below shows all the peripheral interface connectors Figure 3...

Страница 33: ...ebug connector 2 pin header CN5 Internal DisplayPort connector 20 pin box header DP1 IPMI LED connector 2 pin header ID_LED1 iRIS module slot iRIS module slot IPMI1 Keyboard and mouse connector 6 pin...

Страница 34: ...Panel Connectors The table below lists the connectors on the external I O panel Connector Type Label Ethernet connectors RJ 45 LAN1 LAN2 USB 3 0 ports Dual USB 3 0 port USB_CON1 RS 232 serial port Mal...

Страница 35: ...ee Figure 3 2 CN Pinouts See Table 3 3 The power connector is connected to an external power supply and supports 12V power input Power is provided to the system from the power supply through this conn...

Страница 36: ...the 5 V SATA power connectors to connect to SATA device power connections Figure 3 3 5 V SATA Power Connector Locations Pin Description 1 5V 2 GND Table 3 4 5 V SATA Power Connector Pinouts 3 2 3 Aud...

Страница 37: ...GND 9 FMIC1_R 10 FMIC1_L Table 3 5 Audio Connector Pinouts 3 2 4 Battery Connector CAUTION Risk of explosion if battery is replaced by an incorrect type Only certified engineers should replace the on...

Страница 38: ...em clock to retain the time when power is turned off Figure 3 5 Battery Connector Location Pin Description 1 VBATT 2 GND Table 3 6 Battery Connector Pinouts 3 2 5 Buzzer Connector CN Label SP1 CN Type...

Страница 39: ...uts 3 2 6 Chassis Intrusion Connector CN Label CHASSIS1 CN Type 2 pin header p 2 mm CN Location See 6Figure 3 7 CN Pinouts See Table 3 8 The chassis intrusion connector is for a chassis intrusion dete...

Страница 40: ...DIO1 CN Type 10 pin header p 2 mm CN Location See Figure 3 8 CN Pinouts See Table 3 9 The digital I O connector provides programmable input and output for external devices The digital I O provides 4...

Страница 41: ...nnector CN Label CN5 CN Type 2 pin header p 2 mm CN Location See Figure 3 9 CN Pinouts See Table 3 10 The chassis intrusion connector is for a chassis intrusion detection sensor or switch that detects...

Страница 42: ...supports HDMI LVDS VGA DVI and DisplayPort graphics interfaces with up to 3840x2160 resolution Figure 3 10 Internal DisplayPort Connector Location Pin Description Pin Description 1 5V 11 AUXP 2 LANE1N...

Страница 43: ...12 The IPMI LED connector is used to connect to the IPMI LED indicator on the chassis Figure 3 11 IPMI LED Connector Location Pin Description 1 ID_LED 2 ID_LED Table 3 12 IPMI LED Connector Pinouts 3...

Страница 44: ...DO NOT install other modules into the iRIS module slot Doing so may cause damage to the WAFER ULT ULT2 i1 3 2 12 Keyboard and Mouse Connector CN Label KB_MS1 CN Type 6 pin wafer p 2 mm CN Location See...

Страница 45: ...ULT2 i1 3 5 SBC Page 30 Figure 3 13 Keyboard and Mouse Connector Location Pin Description 1 VCC 2 Mouse Data 3 Mouse Clock 4 Keyboard Data 5 Keyboard Clock 6 GND Table 3 13 Keyboard and Mouse Connecto...

Страница 46: ...nnectors are used to connect to the LAN LED indicators on the chassis to indicate users the link activities of the two LAN ports Figure 3 14 LAN LED Connector Locations Pin Description 1 3 3V 2 LAN_LE...

Страница 47: ...LVDS Backlight Control Connector Location Pin Description 1 LCD_BKLTCTL 2 GROUND 3 12V 4 GROUND 5 BACKLIGHT ENABLE Table 3 15 LVDS Backlight Control Connector Pinouts 3 2 15 LVDS Connector CN Label LV...

Страница 48: ...LVDS_A_TX2 P 8 LVDS_A _TX2 N 9 LVDS_A_TXCLK P 10 LVDS_A _TXCLK N 11 LVDS_A_TX3 P 12 LVDS_A _TX3 N 13 GND 14 GND 15 LVDS_B _TX0 P 16 LVDS_B _TX0 N 17 LVDS_B _TX1 P 18 LVDS_B _TX1 N 19 LVDS_B _TX2 P 20...

Страница 49: ...CN Pinouts See Table 3 17 The PCIe Mini card slot enables a full size half size PCIe Mini card expansion module to be connected to the board Figure 3 17 PCIe Mini Card Slot Location Pin Description Pi...

Страница 50: ...BD 39 VCC3 40 GND 41 VCC3 42 N C 43 GND 44 N C 45 N C 46 N C 47 N C 48 1 5V 49 N C 50 GND 51 M SATA Detect 52 VCC3 Table 3 17 PCIe Mini Card Slot Pinouts 3 2 17 Power and HDD LED Connector CN Label CN...

Страница 51: ...r LED 4 GND 5 VCC HDD LED 6 HDLED Table 3 18 Power and HDD LED Connector Pinouts 3 2 18 Power Button Connector CN Label PWR_BTN1 CN Type 2 pin wafer p 2 mm CN Location See Figure 3 19 CN Pinouts See T...

Страница 52: ...onnector Pinouts 3 2 19 Reset Button Connector CN Label RST_BTN1 CN Type 2 pin wafer p 2 mm CN Location See Figure 3 20 CN Pinouts See Table 3 20 The reset button connector is connected to a reset swi...

Страница 53: ...TA 6Gb s Connectors CN Label SATA1 SATA2 CN Type 7 pin SATA drive connector CN Location See Figure 3 21 CN Pinouts See Table 3 21 The SATA drive connectors can be connected to SATA drives and support...

Страница 54: ...3 22 CN Pinouts See Table 3 22 The 10 pin serial port connector provides one RS 232 serial communications channel The COM serial port connector can be connected to an external RS 232 serial port devi...

Страница 55: ...outs 3 2 22 Serial Port Connector RS 422 485 CN Label COM4 CN Type 4 pin wafer p 2 mm CN Location See Figure 3 23 CN Pinouts See Table 3 23 This connector provides RS 422 or RS 485 communications Figu...

Страница 56: ...RS 422 Pinouts RS 485 Pinouts Table 3 24 DB 9 RS 422 485 Pinouts 3 2 23 SMBus Connector CN Label CN3 CN Type 4 pin wafer p 1 25 mm CN Location See Figure 3 24 CN Pinouts See Table 3 25 The SMBus Syste...

Страница 57: ...SMB_CLK 4 5V Table 3 25 SMBus Connector Pinouts 3 2 24 SO DIMM Slots CN Label DIMM1 DIMM2 CN Type 204 pin DDR3L SO DIMM slot CN Location See Figure 3 25 The SO DIMM slots are for installing the SO DIM...

Страница 58: ...le 3 26 The SPI flash connector is used to flash the SPI ROM Figure 3 26 SPI Flash Connector Location Pin Description 1 SPI_VCC 2 SPI_2N_CS 3 SPI_2N_MISO 4 SPI_2N_CLK 5 SPI_2N_MOSI 6 GND Table 3 26 SP...

Страница 59: ...3 27 System Fan Connector Location Pin Description 1 GND 2 12V 3 FANIO 4 PWM Table 3 27 System Fan Connector Pinouts 3 2 27 USB 2 0 Connector CN Label USB1 CN Type 8 pin header p 2 mm CN Location See...

Страница 60: ...iption 1 USB_VCC 2 GND 3 DATA 4 DATA 5 DATA 6 DATA 7 GND 8 USB_VCC Table 3 28 USB 2 0 Connector Pinouts 3 3 External Interface Connectors The figure below shows the external peripheral interface conne...

Страница 61: ...onnects to a local network Figure 3 30 LAN Connector Pin Description Pin Description 1 LAN_MDI0 7 LAN_MDI2 2 LAN_MDI0 8 LAN_MDI2 3 LAN_MDI1 9 LAN_MDI3 4 LAN_MDI1 10 LAN_MDI3 Table 3 29 LAN Pinouts 3 3...

Страница 62: ...tor COM1 CN Label COM1 CN Type DB 9 CN Location See Figure 3 29 CN Pinouts See Table 3 31 The serial port connects to an RS 232 serial communications device Pin Description Pin Description 1 DATA CARR...

Страница 63: ...9 CN Pinouts See Figure 3 32 and Table 3 32 The VGA connector connects to a monitor that accepts a standard VGA input Pin Description Pin Description 1 RED 2 GREEN 3 BLUE 4 NC 5 GND 6 GND 7 GND 8 GND...

Страница 64: ...WAFER ULT ULT2 i1 3 5 SBC Page 49 Chapter 4 4 Installation...

Страница 65: ...ic wristband can help to prevent ESD from damaging the board Self grounding Before handling the board touch any grounded conducting material During the time the board is handled frequently touch any c...

Страница 66: ...nd helps prevent ESD damage Place the WAFER ULT ULT2 i1 on an anti static pad o When installing or configuring the motherboard place it on an anti static pad This helps to prevent potential ESD damage...

Страница 67: ...DIMM Push the memory in at a 20 angle See Figure 4 1 Step 4 Seat the SO DIMM Gently push downwards and the arms clip into place See Figure 4 1 Step 0 4 4 iRIS 1010 Module Installation WARNING The iRIS...

Страница 68: ...ew for the iRIS 1010 Module Step 3 Insert into the slot at an angle Line up the notch on the module with the notch on the slot Slide the iRIS 1010 module into the slot at an angle of about 20 Figure 4...

Страница 69: ...LAN2 port to establish a network connection Please refer to Section 4 11 for IPMI setup procedures 4 5 Full size PCIe Mini Card Installation The PCIe Mini card slot allows installation of either a ful...

Страница 70: ...otch on the card with the notch on the slot Slide the PCIe Mini card into the socket at an angle of about 20 Figure 4 6 Figure 4 6 Inserting the Full size PCIe Mini Card into the Slot at an Angle Step...

Страница 71: ...n of either a full size or half size PCIe Mini card To install a half size PCIe Mini card please follow the steps below Step 1 Locate the PCIe Mini card slot See Figure 3 17 Step 2 Remove the retentio...

Страница 72: ...ze PCIe Mini card Install the previously removed standoff to the screw hole for the half size PCIe Mini card Figure 4 9 Figure 4 9 Installing the Standoff Step 5 Insert into the socket at an angle Lin...

Страница 73: ...f size PCIe Mini card Secure the half size PCIe Mini card with the retention screw previously removed Figure 4 11 Step 0 Figure 4 11 Securing the Half size PCIe Mini Card 4 7 System Configuration The...

Страница 74: ...l at DC 5V When the jumper is being closed the Backlight Voltage Level BIOS option in Chipset System Agent SA Configuration PCH IO Configuration Graphics Configuration LCD Control menu will be locked...

Страница 75: ...Figure 4 13 AT ATX Power Mode Switch Location Setting Description 1 2 ATX power mode default 2 3 AT power mode Table 4 3 AT ATX Power Mode Switch Settings 4 7 3 Clear CMOS Button To reset the BIOS re...

Страница 76: ...0 1024 x 768 60 Hz 24 bit Single 0011 1280 x 768 60 Hz 18 bit Single 0100 1280 x 800 60 Hz 18 bit Single 0101 1280 x 960 60 Hz 18 bit Single 0110 1280 x 1024 60 Hz 24 bit Dual 0111 1366 x 768 60 Hz 18...

Страница 77: ...monitor to select the correct voltage Jumper Label JP1 Jumper Type 3 pin header p 2 mm Jumper Settings See Table 4 5 Jumper Location See Figure 4 16 The LVDS voltage selection jumper allows setting t...

Страница 78: ...do not put the WAFER ULT ULT2 i1 directly on a surface that can not dissipate system heat especially the wooden or plastic surface It is highly recommended to run the WAFER ULT ULT2 i1 on a heat diss...

Страница 79: ...2 i1 to be mounted into a chassis please refer to Figure 1 3 for the detailed dimensions The user can design or select a chassis that has screw holes matching up with the holes on the heat sink enclos...

Страница 80: ...to an AT or ATX power supply WARNING Disconnect the power supply power cord from its AC power source to prevent a sudden power surge to the WAFER ULT ULT2 i1 Step 1 Locate the power cable The power ca...

Страница 81: ...dio connector on the WAFER ULT ULT2 i1 The audio kit consists of three audio jacks One audio jack Mic In connects to a microphone The remaining two audio jacks Line In and Line Out connect to two spea...

Страница 82: ...allation The WAFER ULT ULT2 i1 can be connected to a TFT LCD screen through the LVDS crimp connectors on the board To connect a TFT LCD to the WAFER ULT ULT2 i1 please follow the steps below Step 1 Lo...

Страница 83: ...to the installation manual that came with the TFT LCD screen Figure 4 22 LVDS Connector Step 3 Locate the backlight inverter connector The location of the backlight inverter connector is shown in Chap...

Страница 84: ...l and power cables To connect the SATA drive to the connectors please follow the steps below Step 1 Locate the SATA connector and the SATA power connector The locations of the connectors are shown in...

Страница 85: ...p 4 To remove the SATA cable from the SATA connector press the clip on the connector at the end of the cable Step 0 4 9 5 USB Cable Installation The WAFER ULT ULT2 i1 is shipped with a dual port USB 2...

Страница 86: ...USB connectors to the chassis Each of the USB 2 0 connectors has two retention screw holes To secure the connectors to the chassis please refer to the installation instructions that came with the chas...

Страница 87: ...one digit and one special character and be at least eight characters 4 11 IPMI Setup Procedure The WAFER ULT ULT2 i1 features Intelligent Platform Management Interface IPMI that helps lower the overal...

Страница 88: ...WAFER ULT ULT2 i1 3 5 SBC Page 73 Chapter 5 5 BIOS...

Страница 89: ...n as the system is turned on or 2 Press the DEL or F2 key when the Press DEL or F2 to enter SETUP message appears on the screen If the message disappears before the DEL or F2 key is pressed restart th...

Страница 90: ...ns for the highlighted item appears To exit the Help Window press ESC 5 1 4 Unable to Reboot after Configuration Changes If the computer cannot boot after changes to the system configuration is made C...

Страница 91: ...essor ID 306d4 Stepping F Number of Processors 2Core s 4Thread s Microcode Revision 16 GT Info GT3 600 MHz IGFX VBIOS Version 1032 Memory RC Version 2 4 0 1 Total Memory 4096 MB DDR3 Memory Frequency...

Страница 92: ...ay cause the system to malfunction Make sure that the settings made are compatible with the hardware Aptio Setup Utility Copyright C 2015 American Megatrends Inc Main Advanced Chipset Security Boot Sa...

Страница 93: ...res All Intel Virtualization Technology Disabled EIST Enabled Enabled for Windows XP and Linux OS optimized for Hyper Threading Technology and Disabled for other OS OS not optimized for Hyper Threadin...

Страница 94: ...system When combined with third party software Intel Virtualization technology allows several OSs to run on the same system at the same time Disabled DEFAULT Disables Intel Virtualization Technology...

Страница 95: ...ral Help F2 Previous Values F3 Optimized Defaults F4 Save Exit ESC Exit Version 2 17 1246 Copyright C 2015 American Megatrends Inc BIOS Menu 4 ACPI Settings ACPI Sleep State S1 CPU Stop Clock Use the...

Страница 96: ...nabled this requires additional firmware in the SPI device Select Screen Select Item Enter Select Change Opt F1 General Help F2 Previous Values F3 Optimized Defaults F4 Save Exit ESC Exit Version 2 17...

Страница 97: ...lp F2 Previous Values F3 Optimized Defaults F4 Save Exit ESC Exit Version 2 17 1246 Copyright C 2015 American Megatrends Inc BIOS Menu 6 F81866 Super IO Configuration 5 3 4 1 Serial Port n Configurati...

Страница 98: ...ess are automatically detected IO 3F8h IRQ 4 Serial Port I O port address is 3F8h and the interrupt address is IRQ4 IO 3F8h IRQ 3 4 5 6 7 9 10 11 12 Serial Port I O port address is 3F8h and the interr...

Страница 99: ...ess are automatically detected IO 2F8h IRQ 3 Serial Port I O port address is 2F8h and the interrupt address is IRQ3 IO 3F8h IRQ 3 4 5 6 7 9 10 11 12 Serial Port I O port address is 3F8h and the interr...

Страница 100: ...ess are automatically detected IO 3E8h IRQ 11 Serial Port I O port address is 3E8h and the interrupt address is IRQ11 IO 3E8h IRQ 3 4 5 6 7 9 10 11 12 Serial Port I O port address is 3E8h and the inte...

Страница 101: ...ss are automatically detected IO 2E8h IRQ 11 Serial Port I O port address is 2E8h and the interrupt address is IRQ11 IO 3E8h IRQ 3 4 5 6 7 9 10 11 12 Serial Port I O port address is 3E8h and the inter...

Страница 102: ...lts F4 Save Exit ESC Exit Version 2 17 1246 Copyright C 2015 American Megatrends Inc BIOS Menu 8 iWDD H W Monitor 5 3 5 1 Smart Fan Mode Configuration Use the Smart Fan Mode Configuration submenu BIOS...

Страница 103: ...fan start off temperature Use the or key to change the Auto mode fan start off temperature value Enter a decimal number between 1 and 100 Auto mode fan start PWM Use the or key to change the Auto mod...

Страница 104: ...rends Inc BIOS Menu 10 RTC Wake Settings Wake system with Fixed Time Disabled Use the Wake system with Fixed Time option to enable or disable the system wake on alarm event Disabled DEFAULT The real t...

Страница 105: ...sabled Console Redirection Settings COM4 Console Redirection Disabled Console Redirection Settings COM5 BMC Disabled Console Redirection Port IS Disabled iAMT SOL COM6 Pci Bus0 Dev22 Func3 Console Red...

Страница 106: ...EFAULT The target terminal type is ANSI Bits per second 115200 Use the Bits per second option to specify the serial port transmission speed The speed must match the other side Long or noisy lines may...

Страница 107: ...n Odd The parity bit is 0 if the number of ones in the data bits is odd Mark The parity bit is always 1 This option does not provide error detection Space The parity bit is always 0 This option does n...

Страница 108: ...Screen Select Item Enter Select Change Opt F1 General Help F2 Previous Values F3 Optimized Defaults F4 Save Exit ESC Exit Version 2 17 1246 Copyright C 2015 American Megatrends Inc BIOS Menu 12 SATA C...

Страница 109: ...l R Rapid Start Technology Select Screen Select Item Enter Select Change Opt F1 General Help F2 Previous Values F3 Optimized Defaults F4 Save Exit ESC Exit Version 2 17 1246 Copyright C 2015 American...

Страница 110: ...elect Change Opt F1 General Help F2 Previous Values F3 Optimized Defaults F4 Save Exit ESC Exit Version 2 17 1246 Copyright C 2015 American Megatrends Inc BIOS Menu 14 USB Configuration USB Devices Th...

Страница 111: ...Function Reboot and recover system automatically within 10 min when OS crashes Please install Auto Recovery API service before enabling this function Select Screen Select Item Enter Select Change Opt...

Страница 112: ...ed Defaults F4 Save Exit ESC Exit Version 2 17 1246 Copyright C 2015 American Megatrends Inc BIOS Menu 16 Chipset 5 4 1 System Agent SA Configuration Use the System Agent SA Configuration menu BIOS Me...

Страница 113: ...ry Display Auto DVMT Pre Allocated 256M DVMT Total Gfx Mem MAX LCD Control Select which of IGFX PEG PCI Graphics device should be Primary Display Or select SG for Switchable Gfx Select Screen Select I...

Страница 114: ...d by the internal graphic device The following options are available 128M 256M MAX Default 5 4 1 1 1 LCD Control Aptio Setup Utility Copyright C 2015 American Megatrends Inc Chipset LCD Control Primar...

Страница 115: ...option to select the LCD backlight control type Configuration options are listed below LED PWM DEFAULT CCFL Linear Backlight Voltage Level The Backlight Voltage Level option is available only when the...

Страница 116: ...trends Inc BIOS Menu 20 Memory Configuration 5 4 2 PCH IO Configuration Use the PCH IO Configuration menu BIOS Menu 21 to configure the PCH parameters Aptio Setup Utility Copyright C 2015 American Meg...

Страница 117: ...option to enable or disable the power saving function Disabled DEFAULT Power saving function is disabled Enabled Power saving function is enabled It will reduce power consumption when the system is of...

Страница 118: ...Copyright C 2015 American Megatrends Inc BIOS Menu 23 M_PCIE2 Configuration Menu PCIe Speed Auto Use this option to select the support type of the PCIe Mini slot The following options are available A...

Страница 119: ...sabled Enabled Azalia will be unconditionally Enabled Select Screen Select Item Enter Select Change Opt F1 General Help F2 Previous Values F3 Optimized Defaults F4 Save Exit ESC Exit Version 2 17 1246...

Страница 120: ...er on password and must be entered to boot or enter Setup In Setup the User will have Administrator rights The password length must be in the following range Minimum length 3 Maximum length 20 Adminis...

Страница 121: ...xit Version 2 17 1246 Copyright C 2015 American Megatrends Inc BIOS Menu 26 Boot Bootup NumLock State On Use the Bootup NumLock State BIOS option to specify if the number lock setting must be modified...

Страница 122: ...FAULT Boot from UEFI devices is disabled Launch PXE OpROM Disabled Use the Launch PXE OpROM option to enable or disable boot option for legacy network devices Disabled DEFAULT Ignore all PXE Option RO...

Страница 123: ...SC Exit Version 2 17 1246 Copyright C 2015 American Megatrends Inc BIOS Menu 27 Save Exit Save Changes and Reset Use the Save Changes and Reset option to save the changes made to the BIOS options and...

Страница 124: ...t Version 2 17 1246 Copyright C 2015 American Megatrends Inc BIOS Menu 28 Server Mgmt 5 8 1 System Event Log Use the System Event Log menu BIOS Menu 29 to configure system event log options Aptio Setu...

Страница 125: ...eatures enabled Erase SEL No Use the Erase SEL option to select an option for erasing SEL system event log No DEFAULT Do not erase SEL Yes On next reset Erase SEL on next reset Yes On every reset Eras...

Страница 126: ...ally or dynamically by BIOS or BMC Unspecified option will not modify any BMC network parameters during BIOS phase Select Screen Select Item Enter Select Change Opt F1 General Help F2 Previous Values...

Страница 127: ...WAFER ULT ULT2 i1 3 5 SBC Page 112 6 Software Drivers Chapter 6...

Страница 128: ...ed on the system Chipset Graphics LAN Audio USB 3 0 Intel AMT Installation instructions are given below 6 2 Software Installation All the drivers for the WAFER ULT ULT2 i1 are on the CD that came with...

Страница 129: ...please do the following Step 1 Access the driver list See Section 6 1 Step 2 Click Chipset Step 3 Locate the setup file and double click on it Step 4 When the setup files are completely extracted the...

Страница 130: ...cense Agreement Step 9 The Read Me file in Figure 6 3 appears Step 10 Click Next to continue Figure 6 3 Chipset Driver Read Me File Step 11 Setup Operations are performed as shown in Figure 6 4 Step 1...

Страница 131: ...e 116 Figure 6 4 Chipset Driver Setup Operations Step 13 The Finish screen in Figure 6 5 appears Step 14 Select Yes I want to restart this computer now and click Finish Step 0 Figure 6 5 Chipset Drive...

Страница 132: ...1 Step 2 Click Graphics and select the folder which corresponds to the operating system Step 3 Locate the setup file and double click on it Step 4 The Welcome Screen in Figure 6 6 appears Step 5 Clic...

Страница 133: ...r License Agreement Step 8 The Read Me file in Figure 6 8 appears Click Next to continue Figure 6 8 Graphics Driver Read Me File Step 9 Setup Operations are performed as shown in Figure 6 9 Step 10 On...

Страница 134: ...119 Figure 6 9 Graphics Driver Setup Operations Step 11 The Finish screen in Figure 6 10 appears Step 12 Select Yes I want to restart this computer now and click Finish Step 0 Figure 6 10 Graphics Dri...

Страница 135: ...tion 6 1 Step 2 Click LAN Step 3 Select the folder with the driver of correspondent LAN controller Step 4 Locate the Autorun file and double click on it Step 5 The Intel Network Connection menu in Fig...

Страница 136: ...r Welcome Screen Step 8 Click Next to continue Step 9 The License Agreement in Figure 6 13 appears Step 10 Accept the agreement by selecting I accept the terms in the license agreement Step 11 Click N...

Страница 137: ...een in Figure 6 14 appears Step 13 Select program features to install Step 14 Click Next to continue Figure 6 14 LAN Driver Setup Options Step 15 The Ready to Install the Program screen in Figure 6 15...

Страница 138: ...igure 6 15 LAN Driver Installation Step 17 The program begins to install Step 18 When the driver installation is complete the screen in Figure 6 16 appears Step 19 Click Finish to exit Step 0 Figure 6...

Страница 139: ...onds to the operating system Step 3 Double click the setup file Step 4 The InstallShield Wizard is prepared to guide the user through the rest of the process Step 5 Once initialized the InstallShield...

Страница 140: ...r installation process is complete a confirmation screen appears Figure 6 19 Figure 6 19 Restart the Computer Step 9 The confirmation screen offers the option of restarting the computer now or later F...

Страница 141: ...lease copy driver files to a local hard drive folder and run from there To install the USB 3 0 driver please follow the steps below Step 1 Access the driver list See Section 6 1 Step 2 Click USB3 0 St...

Страница 142: ...127 Step 7 Read the License Agreement Step 8 Click Yes to continue Figure 6 21 USB 3 0 Driver License Agreement Step 9 The Read Me file in Figure 6 22 appears Step 10 Click Next to continue Figure 6...

Страница 143: ...Step 12 Once the Setup Operations are complete click Next to continue Figure 6 23 USB 3 0 Driver Setup Operations Step 13 The Finish screen in Figure 6 24 appears Step 14 Select Yes I want to restart...

Страница 144: ...r LAN SOL driver Intel Management and Security Status Application Local Manageability Service LMS To install these Intel ME components please do the following Step 1 Access the driver list See Section...

Страница 145: ...in Figure 6 26 appears Step 7 Read the License Agreement Step 8 Click Yes to continue Figure 6 26 Intel ME Driver License Agreement Step 9 Setup Operations are performed as shown in Figure 6 27 Step 1...

Страница 146: ...131 Figure 6 27 Intel ME Driver Setup Operations Step 11 The Finish screen in Figure 6 28 appears Step 12 Select Yes I want to restart this computer now and click Finish Step 0 Figure 6 28 Intel ME Dr...

Страница 147: ...WAFER ULT ULT2 i1 3 5 SBC Page 132 Appendix A A Regulatory Compliance...

Страница 148: ...erference that may cause undesired operation This equipment has been tested and found to comply with the limits for a Class A digital device pursuant to part 15 of the FCC Rules These limits are desig...

Страница 149: ...WAFER ULT ULT2 i1 3 5 SBC Page 134 Appendix B B BIOS Options...

Страница 150: ...Auto 83 Serial Port Enabled 84 Change Settings Auto 84 Serial Port Enabled 85 Change Settings Auto 85 Serial Port Enabled 86 Change Settings Auto 86 CPU_FAN1 Smart Fan Control Auto Mode 88 Auto mode f...

Страница 151: ...eed Auto 103 Detect Non Compliance Device Disabled 103 Azalia HD Audio Enabled 104 Administrator Password 105 User Password 105 Bootup NumLock State On 106 Quiet Boot Enabled 107 UEFI Boot Disabled 10...

Страница 152: ...WAFER ULT ULT2 i1 3 5 SBC Page 137 Appendix C C Terminology...

Страница 153: ...ow amplitude signal represents a binary 0 while a high amplitude signal represents a binary 1 BIOS The Basic Input Output System BIOS is firmware that is first run when the computer is turned on and c...

Страница 154: ...ion software changes the bus to core frequency ratio and the processor core voltage FSB The Front Side Bus FSB is the bi directional communication channel between the processor and the Northbridge chi...

Страница 155: ...has transfer speeds up to 1 5 Gbps and the SATA II bus has data transfer speeds of up to 3 0 Gbps S M A R T Self Monitoring Analysis and Reporting Technology S M A R T refers to automatic status chec...

Страница 156: ...WAFER ULT ULT2 i1 3 5 SBC Page 141 Appendix D D Digital I O Interface...

Страница 157: ...and digital outputs are generally control signals that control the on off circuit of external devices or TTL devices Data can be read or written to the selected address to enable the DIO functions NO...

Страница 158: ...ting the digital port as input INT 15H AL low byte value AH 6FH Sub function AL 9 Set the digital port as OUTPUT BL Digital I O input value D 3 Assembly Language Sample 2 MOV AX 6F09H setting the digi...

Страница 159: ...WAFER ULT ULT2 i1 3 5 SBC Page 144 Appendix E E Watchdog Timer...

Страница 160: ...NT 15H is used to control the Watchdog Timer INT 15H AH 6FH Sub function AL 2 Sets the Watchdog Timer s period BL Time out value Its unit second is dependent on the item Watchdog Timer unit select in...

Страница 161: ...e system resets EXAMPLE PROGRAM INITIAL TIMER PERIOD COUNTER W_LOOP MOV AX 6F02H setting the time out value MOV BL 30 time out value is 48 seconds INT 15H ADD THE APPLICATION PROGRAM HERE CMP EXIT_AP...

Страница 162: ...WAFER ULT ULT2 i1 3 5 SBC Page 147 Appendix F F Hazardous Materials Disclosure...

Страница 163: ...nd lamps These components will be separately marked Please refer to below table Toxic or Hazardous Substances and Elements Part Name Lead Pb Mercury Hg Cadmium Cd Hexavalent Chromium CR VI Polybromina...

Страница 164: ...i1 3 5 SBC Page 149 RoHS RoHS Pb Hg Cd CR VI PBB PBDE O O O O O O O O O O O O O O O O O O O O O O O O O O O O O O O O O O O O O O O O O O O O O O O O O SJ T11363 2006 GB T 26572 2011 X SJ T11363 2006...

Отзывы: