background image

OPERATION MODE

p.33

- Present the proximity card to the LX006/SR.

- Place the fingerprint on the fingerprint scanner while red light is illuminated from

it

- Lift the fingerprint up when the red light from the scanner turns off.

- Place the fingerprint on the fingerprint scanner once again while the red light is il

luminated again.

- 3 beeps will be generated if the registration is successfully completed. If the finge

rprint registration is not successful, only Card ID is registered then beep sound is g

enerated 3 times.

- If you want to register more user cards, repeat the steps above.

- If you want to finish registration process, present the Master Card to return to th

e Reader Mode.

II.

RF Only:

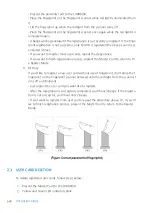
If you’d like to register a new user card without use of fingerprint, don’t place the f

ingerprint on the fingerprint scanner and wait until the red light from the scanner t

urns off automatically.

- Just present the user card you want like to register.

- After the registration is successfully completed, you’ll hear 3 beeps. If the registra

tion is not successful, you’ll hear only 2 beeps.

- If you’ want to register more user cards, repeat the procedure above. Or, if you’d l

ike to finish registration process, present the Master Card to return to the Reader

Mode

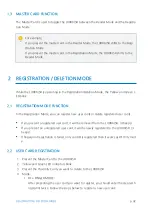
2.3

USER CARD DELETION

To delete registered user cards, follow steps below;

1.

Present the Master Card to the LX006/SR.

2.

Yellow and Green LED indicators blink.

Содержание LX006

Страница 1: ......

Страница 2: ...POINTS 1 CHECK POINTS BEFORE INSTALLATION 1 1 CABLE SELECTION 1 2 RECOMMENDED CABLE TYPE AND PERMISSIBLE LENGTH OF CABLE 1 3 READER CONNECTION 2 CHECK POINTS DURING INSTALLATION 2 1 TERMINATION RESIST...

Страница 3: ...CTION 2 RS485 COMMUNICATION PORT CONNECTION 2 1 RS485 COMMUNICATION PORT CONNECTION SINGLE CONNECTION 2 2 RS485 COMMUNICATION PORT CONNECTION MULTIPLE CONNECTION First you have to connect all RS485 po...

Страница 4: ...SELECTABLE USING THE SOFTWARE 2 1 Data format 2 2 Output timing 3 OUTPUT MODE 3 1 NORMAL OUTPUT MODE 3 2 EXTENSION OUTPUT MODE SET BY APPLICATION SOFTWARE 12 APPENDIX 1 Trouble Shooting 2 How to regis...

Страница 5: ...nt 6 1 Check if the status of the fingerprint is good 6 2 Place your fingerprint on the right position of the fingerprint scanner 7 I want to access with fingerprint only without card 7 1 Please check...

Страница 6: ...e user to the presence of importa nt operating and maintenance servicing instructions in the literature accompanying the ap pliance WARNING To reduce the risk of fire or electric shock do not expose t...

Страница 7: ...ay SAMSUNG is not liable for problems caused by unauthorized modifications or attempted repair 10 When cleaning do not spray water directly onto parts of the product Doing so may ca use fire or electr...

Страница 8: ...ety If the provided plug does not fit into your outlet consult an electrician for repla cement of the obsolete outlet 10 Protect the power cord from being walked on or pinched particularly at plugs co...

Страница 9: ...alled on flat wall or the door frame 1 1 Verification and 1 N Identification User can select operation mode between 1 1 Verification and 1 N Identification for hi s convenience RF Only Mode and RF FIN...

Страница 10: ...gister and delete IDs using Master Card without application software Also the master card is used to toggle the LX006 SR between the reader mode and the reg istration deletion mode Firmware Upgrade Us...

Страница 11: ...ry Data Memor y 256KByte Flash Memory32KByte SRAM User ID 10 000 User IDs Fingerprint User 1 000 2 000 4 000 Fingerprint Users Reader Data Output Format 26Bit Wiegand ABA Track II 34Bit Wiegand ABA Tr...

Страница 12: ...erating Humidity 10 to 90 Relative Humidity Non condensing Color Material Black Red Gray Silver Dark Gray Gold and Gold with Black Polycarbonate Weight Dimension W x H x T 230g 0 51lbs 69mm x 127mm x...

Страница 13: ...p 8 Scanner High Quality optical Sensor FAR False Acceptance Ratio 0 001 FRR False Reject Ratio 0 1 ESD Electro Static Discharge 8KV Verification Time Less than 1sec Identification Time Less than 2sec...

Страница 14: ...NG SUPPLIED PARTS 4 p 9 Please unpack and check the contents of the box If any of flowing items is missing please c ontact nearby contributor Optional accessories if purchased may be included in the p...

Страница 15: ...PRODUCT EXPLANATION 5 p 10 1 PANEL LAYOUT...

Страница 16: ...E I O PORT NAME SIGNAL NAME WIRE COLOR CON 1 Power 2PIN Connector Power 12V DC 12V Red Ground GND Black CON 2 In Output 6PIN Connector EX Input Wiegand DATA0 EX DATA0 ABA Track II Data I n Pink EX Inp...

Страница 17: ...ack II Clock Out White ERROR SIGNAL OUT ERROR SIGNAL O UT ABA Track II CLS Out Orange OK SIGNAL OUT OK SIGNAL OUT Orange with Black stripe TAMPER OUT TAMPER OUT Purple EX_LED_CONTROL EX_LED_CONTRO L B...

Страница 18: ...INSTALLATION TIPS CHECK POINTS 6 p 13 Please refer to information below to stably operate the LX006 SR 1 CHECK POINTS BEFORE INSTALLATION 1 1 CABLE SELECTION...

Страница 19: ...t 100m distance assume to using DC resistance of cable of 100 100m and the reader power is supplied from the ACU the voltage drop o f the GND wire will be 1V In this case the Wiegand data signal canno...

Страница 20: ...ION 2 1 TERMINATION RESISTOR Termination resistors are used to match impedance of the network to the impedance of the transmission line being used When impedance is mismatched the transmitted signal i...

Страница 21: ...there will be a current flow through the shield wire whe n the voltage level of both ends of shield wire is not equal and this current flow will create n oise and interfere to communications For the g...

Страница 22: ...INSTALLATION OF THE PRODUCT 7 p 17 1 WALL MOUNT DRAWING...

Страница 23: ...alize the system using the DIP switch on the rear of the product 1 Disconnect the power supply 2 Position the DIP switch on the rear of the product to ON upside and apply power to th e product 3 The p...

Страница 24: ...D SETTING LX006 SR can upload download user s information by application software and adjust setti ng values Communication ID is the unique communication address to recognize each LX00 6 SR in the sof...

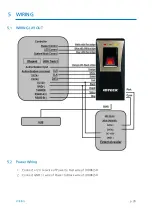
Страница 25: ...p 20 WIRING 5 WIRING 5 1 WIRING LAYOUT 5 2 Power Wiring 1 Connect 12V wire of Power to Red wire of LX006 SR 2 Connect GND wire of Power to Black wire of LX006 SR...

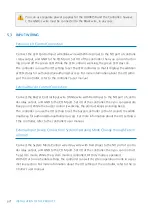
Страница 26: ...ite wire with Red stripe to the NO port of contro ller relay output and GND to the COM port Set I O of the controller then you can generate beep sound While the buzzer control is working the product k...

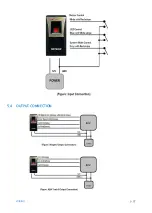
Страница 27: ...p 22 WIRING 5 4 OUTPUT CONNECTION...

Страница 28: ...l er Used for CLOCK when ABA Track II is output 3 The GND wire must be connected between the LX006 SR and the Controller Access Error Signal Connection Connect the Access Error Signal wire Orange wire...

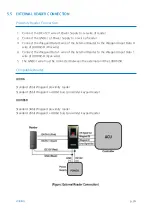
Страница 29: ...Input Data 0 wire of LX006 SR Pink wire 4 Connect the Wiegand Data 1 wire of the External Reader to the Wiegand Input Data 1 wire of LX006 SR Cyan wire 5 The GND wire must be connected between the ext...

Страница 30: ...ernal RS232 serial cable 1 Connect the RS232 serial cable between the stereo jack plug on the bottom of the LX0 06 SR and the COM1 or COM2 port of the Host Computer 2 Install and run the application s...

Страница 31: ...e The maximum of cable length can be shortened depending on communication s peed the type of communication cable and cable installing environment 2 2 RS485 COMMUNICATION PORT CONNECTION MULTIPLE CONNE...

Страница 32: ...onverter 3 Plug in the RS485 RS232 9 pin connector of the converter to the COM1 or COM2 Port of the PC 4 Install and run LX006 SR Application Software 3 TCP IP COMMUNICATION PORT CONNECTION For TCP IP...

Страница 33: ...p 28 TCP IP COMMUNICATION PORT CONNECTION...

Страница 34: ...ta stored in the Controller will be cleared and th e default setting values factory setting values will be reloaded Therefore the Initi alization should be performed by authorized person only It is st...

Страница 35: ...p 30 COMMUNICATION ID SETTING ted by the sum value of each switch set to ON position Communication ID can be set f rom 000 to 255 Please refer to the 7 4 COMMUNICATION ID SETTING for more detai ls...

Страница 36: ...lization becomes the master card After the Master Card is recognized the Green LED blinks with 3 beeps Fingerprint verification is not used for the Master Card 1 2 MASTER CARD CHANGE You can change th...

Страница 37: ...ION In the Registration Mode you can register new user cards or delete registered user cards If you present a registered user card it will be removed from the LX006 SR 4 beeps If you present an unregi...

Страница 38: ...h registration process present the Master Card to return to th e Reader Mode II RF Only If you d like to register a new user card without use of fingerprint don t place the f ingerprint on the fingerp...

Страница 39: ...D to the controller If a user fails to be authorized the LX006 SR transmits the error signal to the controller The error signal is not generated when using ABA Track II format 3 2 AUTHORIZATION If the...

Страница 40: ...t beeps and the Yellow LED blinks twice to indicate that th e presented card is unregistered or deleted 2 When an unregistered card is presented or a fingerprint is not verified an Access Error Signal...

Страница 41: ...PL EASE TRY AGAIN User card Fingerprint registration is failed 4 BEEPS ID DELETE D User card Fingerprint deletion successfully completed READER MODE X READER MODE The LX006 SR is in its normal status...

Страница 42: ...e the settings via the Application Software The default values for the basic settings are as follows 1 Operating Mode RF FINGER 2 Fingerprint Registration 1 ID 1 Finger Two Template 3 Output Format 26...

Страница 43: ...1 Data format 26 bit 34 bit SR Bit 1 Bit 1 From Bit 2 to Bit 13 From even parity Bit 2 to Bit 17 Bit 2 to Bit25 Bit 2 to Bit33 3 byte ID number 4 byte ID number Bit 26 Bit 34 From Bit 14 to Bit 25 Fr...

Страница 44: ...OUTPUT FORMAT p 39 2 ABA TRACK SELECTABLE USING THE SOFTWARE 2 1 Data format 2 2 Output timing 3 OUTPUT MODE...

Страница 45: ...p 40 OUTPUT MODE 3 1 NORMAL OUTPUT MODE 3 2 EXTENSION OUTPUT MODE SET BY APPLICATION SOFTWARE...

Страница 46: ...urs before mounting the LX006 SR on the wall You can use application software for initialization if the LX006 SR is a lready mounted on the wall 3 If the problem still remains after following the proc...

Страница 47: ...ller or damage on the communication port either on PC si de or on the controller side Solution 1 Please check the settings of the application software and the controller Check the controller s Communi...

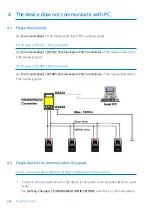
Страница 48: ...e line connection for communication In case of RS232 Check the RS232 Serial Jack Cable is correctly connected In case of RS485 When a multi drop communication doesn t work test one by one Communicatio...

Страница 49: ...p 44 How to register fingerprint 2 How to register fingerprint...

Страница 50: ...Errors keep occuring when registering a fingerprint 7 7 I want to access with fingerprint only without card 8 8 A fingerprint is not recognized 9 9 I want to register 2 fingerprints for 1 ID 1 IDs hav...

Страница 51: ...r card See Operation mode MASTER CARD registration mode for more information If the problem persists please contact service center 3 A buzzer keeps making sounds Bee 3 1 Check if the tamper switch is...

Страница 52: ...al and check i f the wiring is good In the case of RS485 communication See Communication RS485 Communication Port Connection of the manual and check i f the wiring is good 4 2 Please check if the comm...

Страница 53: ...contact service center 5 I want to access with card only without fingerprint 5 1 If you registered a fingerprint newly registered the ID without fingerprint See Operation mode Registration deletion mo...

Страница 54: ...t is not recognized 8 1 Please check the status of the fingerprint If something is attached to fingerprint fingerprint recognition may not work properly Remove it If a fingerprint has a scar fingerpri...

Страница 55: ...register 2 fingerprints for 1 ID 9 1 Please check if Dual Fingerprint Mode is set to USE If you use Dual Fingerprint Mode you can register 2 fingerprints for 1 ID just in case a finger print is injure...

Страница 56: ...received including interference that may caus e undesired operation This equipment has been tested and found to comply with the limits for a Class A Digital De vice pursuant to Part 15 of the FCC rul...

Страница 57: ...Gangseo Gu Seoul 157 030 Korea Tel 82 2 2659 0055 Fax 82 2 2659 0086 E mail webmaster idteck com Website www idteck com E Training Center http www idtecktraining com IDTECK Production Facility and RM...

Отзывы: