SP320E User Manual
Rev.1.2
11
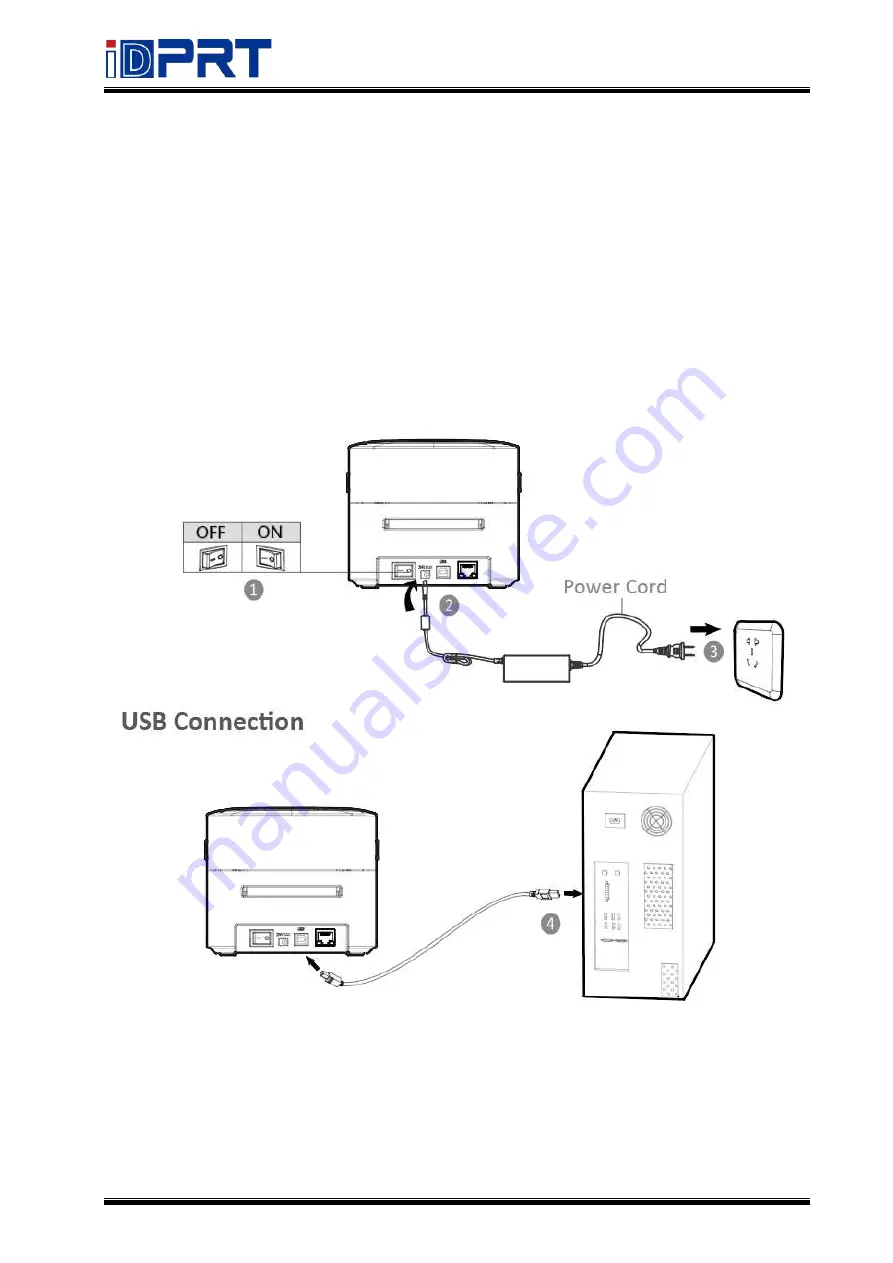
3.2 Power/USB Connection
1. Make sure the printer’s power switch is in the “off” position.
2. Connect the power cord to the printer.
3. Connect the other end of power cord to the outlet.
4.
Connect the USB cable to the printer and PC or connect the Ethernet cable to the printer and
PC.
(SP320E supports many various communicate interfaces,such as USB interface and Ethernet
interface.)
Содержание SP320E
Страница 9: ...SP320E User Manual Rev 1 2 5 1 2 Dimension Unit mm...
Страница 16: ...SP320E User Manual Rev 1 2 12...
Страница 19: ...SP320E User Manual Rev 1 2 15 Chapter 4 USB Interface PIN Signal Name 1 VBUS 2 D 3 D 4 GND...
Страница 24: ...SP320E User Manual Rev 1 2 20...
Страница 27: ...SP320E User Manual Rev 1 2 23...
Страница 30: ...SP320E User Manual Rev 1 2 26 5 Click Next...
Страница 36: ...SP320E User Manual Rev 1 2 32 3 Speed 4 Test...
Страница 37: ...SP320E User Manual Rev 1 2 33 5 Media Handling 6 Media Type...
Страница 38: ...SP320E User Manual Rev 1 2 34 3 Click Watermark it recommends to use BMP format...
Страница 39: ...SP320E User Manual Rev 1 2 35 4 Click Halftone Click Brightness to adjust the brightness...
Страница 42: ...SP320E User Manual Rev 1 2 38 3 Click Ports then select the port according to your needs...
Страница 43: ...SP320E User Manual Rev 1 2 39 4 Click Advanced to set the available time for the printer...
Страница 48: ...SP320E User Manual Rev 1 2 44 4 Type in the password of your computer...
Страница 50: ...SP320E User Manual Rev 1 2 46 8 Under Printer Scanner printer SP320E is available...
Страница 52: ...SP320E User Manual Rev 1 2 48 4 In the folder double click and choose Open in Terminal...
Страница 54: ...SP320E User Manual Rev 1 2 50 7 Type in sudo install and enter 8 The installation was successful...
Страница 55: ...SP320E User Manual Rev 1 2 51 9 Click System Settings Printers 10 Under Printers printer SP320E is available...
Страница 58: ...SP320E User Manual Rev 1 2 54 4 Click Next 5 Read and accept the license agreement then click Next...
Страница 59: ...SP320E User Manual Rev 1 2 55 6 Select Features and installation location then click Next 7 Click Install...
Страница 60: ...SP320E User Manual Rev 1 2 56 8 Click Finish...
Страница 64: ...SP320E User Manual Rev 1 2 60 7 Select the item shape then click Next 8 Edit the template size then click Next...
Страница 70: ...SP320E User Manual Rev 1 2 66 5 Click Next 6 Click Install...
Страница 72: ...SP320E User Manual Rev 1 2 68 11 3 Label Edit 1 Double click the icon 2 Click New to create a new template...
Страница 73: ...SP320E User Manual Rev 1 2 69 3 Set up the page according to your needs then click Set up...
Страница 75: ...SP320E User Manual Rev 1 2 71 6 Click Text then enter the text 7 Click Image then edit the pictures...
Страница 76: ...SP320E User Manual Rev 1 2 72 8 Finish all the settings then click Print 9 Preview the label to be printed...
Страница 80: ...SP320E User Manual Rev 1 2 76...


