background image

Part 2 - Configuration

40

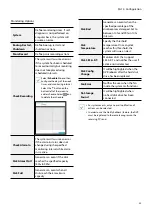
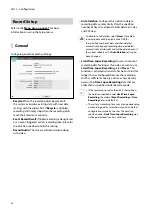
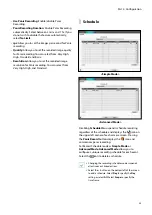
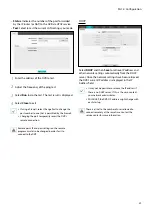
• 

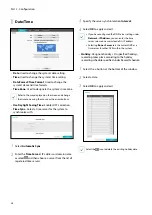
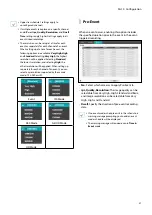
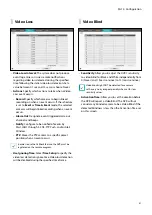
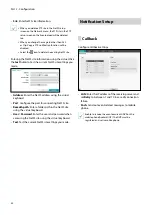
Daytime Setup

: Specify when daytime starts and 

ends. Adjust the time frame in 15-minute increments. 
Times outside the specified range will be assumed as 
nighttime by the system.

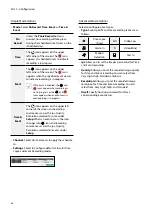
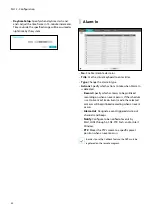
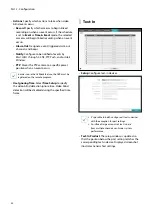
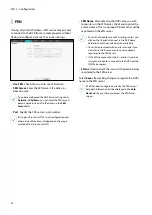
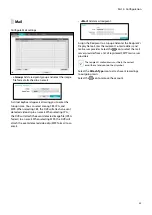
Alarm-In

• 

No.

: Enable / disable alarm-ins.

• 

Title

: Use the virtual keyboard to enter titles.

• 

Type

: Change the alarm-in type.

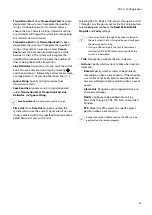
• 

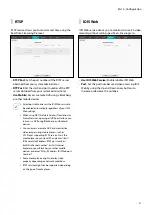
Actions

: Specify which actions to take when Alarm-In 

is detected.


Record

: Specify which cameras to begin linked 

recording on when an event occurs. If the schedule 
is set to Event or Time & Event mode, the selected 
cameras will begin linked recording when an event 
occurs.


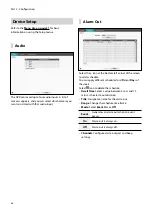
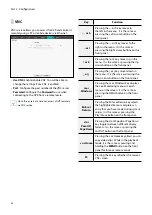
Alarm-Out

: Designate event-triggered alarm-out 

channels and beeps.


Notify

: Configure to be notified of events by 

Mail, LAN1 through 5, SNS, FTP, Push, and/or Alert 
Window.


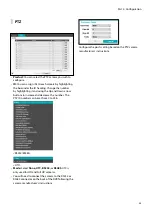
PTZ

: Moves the PTZ camera to a specific preset 

position when an event occurs.

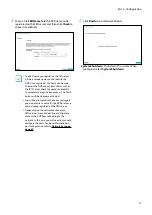
In order to use the Callback feature, the DVR must be 
registered on the remote program.

Содержание TR-4108

Страница 1: ...Digital Video Recorder Operation Manual TR 4108 TR 4116 TR 4108R TR 4116R...

Страница 2: ...viduals who are not familiar with its use seek technical assistance from their retailer regarding product installation and use If you need to disassemble the product for functionality expansion or rep...

Страница 3: ...g this equipment from the wall outlet and refer servicing to qualified service personnel under the following conditions A When the power supply cord or the plug has been damaged B If liquid is spilled...

Страница 4: ...CE AT THEIR OWN EXPENSE WARNING CHANGES OR MODIFICATIONS NOT EXPRESSLY APPROVED BY THE PARTY RESPONSIBLE FOR COMPLIANCE COULD VOID THE USER S AUTHORITY TO OPERATE THE EQUIPMENT THIS CLASS OF DIGITAL A...

Страница 5: ...espective owners The information in this manual is believed to be accurate as of the date of publication even though explanations of some functions may not be included We are not responsible for any p...

Страница 6: ...7 Context Menu Access 18 Video Recording 19 Panic Recording 19 Audio Recording 19 Video Recording Playback 19 All Channel Playback 19 Triplex Playback 20 Remote Control Buttons during Playback 20 Cont...

Страница 7: ...In 42 Camera Setup 44 General 44 PTZ 45 Device Setup 46 Audio 46 Alarm Out 46 Remote Control 47 Network Setup 47 General 47 LAN 48 FEN 50 RTSP 51 IDIS Web 51 VNC 52 NetFS 53 Notification Setup 54 Call...

Страница 8: ...2 Context Menu 63 Event Log Search 64 Record Table Search 65 Motion Search 67 Text In Search 68 Bookmarks 69 Clip Copy 69 Print 71 Overlapped Recording Search 71 Part 4 IDIS Web 72 Web Live Mode 74 We...

Страница 9: ...er the password and then select OK If you do not know the password click the button for guidance There is no default password for the admin account Select admin and then OK without entering a password...

Страница 10: ...t state the login icon is shown Monitor Selects the monitor between Main and Spot You can select the screen format and sequence monitoring of the selected monitor Display Used to change the screen lay...

Страница 11: ...ded in the page are deactivated If there are no video signals If the page contains covert cameras If the user does not have permission to view feeds from the cameras Camera Menu PTZ Allows you to cont...

Страница 12: ...atus icons Indicates remote control receptivity Indicates connection to the DVR from a remote program Indicates two way audio connection Indicates connection to the DVR using the VNC service Indicates...

Страница 13: ...layout Triplex The DVR supports the Triplex function monitoring recording and playing back at the same time Edit Group Edit Group lets you customize split screen pages in both Live and Search modes 1...

Страница 14: ...VR s front panel or remote control to display the PTZ camera selection window Select the camera you wish to control The icon will begin to flash on the selected camera s OSD window Use the Arrow butto...

Страница 15: ...anced Settings In PTZ mode select a camera Clicking Menu button and selecting Advanced PTZ loads the Advanced PTZ screen as shown below You can load the Advanced PTZ screen also by pressing the MENU b...

Страница 16: ...re navigate to Menu Display Main Monitor and enable Event Monitoring Event Monitoring remains in effect throughout the entire Linked Recording Time After that the DVR will return to the previous scree...

Страница 17: ...age 32 Fan Error Event is indicated when the cooling fan cannot reach a certain RPM or fails for longer than 50 seconds No Storage Found It will be highlighted when no recordable storage device has be...

Страница 18: ...status Possibility of damage within 24 hours Context Menu Access You can display the ContextMenu window by pressing the MENU button and then PLAY PAUSE button on the front panel Alternatively right cl...

Страница 19: ...rom Record Setup General applies to all Panic Recording videos Panic Recording will not take place if recording mode is not set to Recycle and the HDD has reached 100 of its capacity Audio Recording I...

Страница 20: ...h on page 62 Remote Control Buttons during Playback 1 Camera Button Displays the selected recording in full screen 2 Zoom Button Allows you to zoom in on a specific area of the recording 3 Layout Butt...

Страница 21: ...n Setup 8 Display Setup 2 Use the remote control s arrow buttons to select an option and then press the remote control s button or left click on the option using the mouse 3 Change the setting and the...

Страница 22: ...r to the Menu Use on page 21 for basic information on using the Setup menus General This Setup menu contains general system options Site Used to enter a description about the system s installation sit...

Страница 23: ...ne and Use Daylight Saving Time Export Exports the current system settings to a storage device connected to the system s USB port or the registered FTP site in NetFS You can designate a File Name for...

Страница 24: ...a event will be added to the log Wizard Lets you configure basic settings required for operating the system 1 Select the desired Setup Wizard option and click Next Select Cancel from any of the Wizard...

Страница 25: ...follows High Video Quality Priority Profile Standard Recording Profile Longer Recording Time Priority Profile Motion Event Record 30 ips Very high Very high 15 ips High Very High 5 ips Standard High C...

Страница 26: ...iguration and then click Test to test the system s current network configuration This test must be performed before proceeding to the next step If the DVR is on a network connected to a network that h...

Страница 27: ...the registration process The Finish button will then become activated You will be prompted with an error message if you do not enter a name for the DVR or enter a name already registered on the FEN se...

Страница 28: ...ver s IP address or domain name or select and then choose a server from the list of registered time servers 3 Specify the server synchronization Interval 4 Select OK to apply and exit If you have conf...

Страница 29: ...he virtual keyboard For more information on using the virtual keyboard refer to the Text Input via Virtual Keyboard on page 21 To delete a registered user or group select the icon on the right of the...

Страница 30: ...gram Covert Camera View May access covert cameras in Live and Search modes Search Clip Copy The user who has permission for Clip Copy can perform Clip Copy If the user does not have permission Clip Co...

Страница 31: ...function is not suppported on TR 4108 and TR 4116 recorders The DVR suppports function that records the same data on the two disks at the same time Up to two Mirrors are supported This function only...

Страница 32: ...move the disk during resynchronization otherwise the disk may be damaged Information Indicates if the installed disk is being used for mirroring or Resync purposes Select information about mirroring t...

Страница 33: ...active Disk Almost Full Generates an event if the disk reaches the specified capacity 80 to 99 Disk Full Generates an event when all disks reach their maximum capacity Disk Bad Generates an event when...

Страница 34: ...stored on the DVR for the specified number of days and then deleted automatically Expired recording data are deleted automatically at midnight and will be deleted even if the system reboots or the Au...

Страница 35: ...select from Very High High and Standard Schedule Simple Mode Advanced Mode Disabling Schedule On suspends schedule recording regardless of the schedule and displays the icon on the upper left corner...

Страница 36: ...ences as per the ips Quality Resolution selected for time under Setup When an event occurs the icon changes into icon and recording commences as per the ips Quality Resolution selected for events unde...

Страница 37: ...esolution will be applied When setting up separately for each channel of an event you can select any resolution supported by the camera mode 720 960 or HD Event 720 Mode 960 Mode Full HD Mode HD Mode...

Страница 38: ...Menu Use on page 21 for basic information on using the Setup menus Motion No Select which cameras to apply Motion Detection to Sensitivity Set daytime and nighttime sensitivity settings between 1 Low...

Страница 39: ...ber of blocks in order to trigger a Motion Detection event You may select a value between 1 and the number of blocks selected under Zone for daytime and nighttime each Zone View Allow you to observe h...

Страница 40: ...when Alarm In is detected Record Specify which cameras to begin linked recording on when an event occurs If the schedule is set to Event or Time Event mode the selected cameras will begin linked recor...

Страница 41: ...hrough 5 SNS FTP Push and or Alert Window PTZ Moves the PTZ camera to a specific preset position when an event occurs In order to use the Callback feature the DVR must be registered on the remote prog...

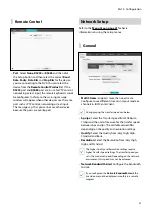
Страница 42: ...ic preset position when an event occurs In order to use the Callback feature the DVR must be registered on the remote program Use Ignoring Time Select Time Setup to specify the video blind detection i...

Страница 43: ...trol strings Time Out Once Time Out has been enabled the system will assume the end of a transaction if no new string is entered within the specified duration of time Select between 5 secs and 15 mins...

Страница 44: ...s Covert 1 hides its images but does display OSD information about the camera Setting a camera as Covert 2 hides its images as well as OSD information about the camera as if it has been deactivated co...

Страница 45: ...Up and Down arrow buttons to increase and decrease the number The PTZ ID number can be set from 0 to 256 RS232 RS485 UTC Mode Select None UTC RS232 or RS485 UTC is only used for HD and Full HD cameras...

Страница 46: ...the bottom left corner of the screen to add a schedule You can apply different schedules for different Days of the week Select icon to delete the schedule Dwell Time Select a value between 5 secs and...

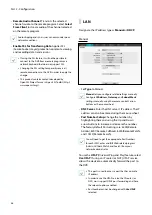
Страница 47: ...ing the Setup menus General Multi Stream Supports more than one stream Configure to use different streams in layout mode or channels in IDIS Center Client During playing the transfer speed can be low...

Страница 48: ...ngs manually Configure IP Address Gateway and Subnet Mask settings manually using the remote control s arrow buttons or the mouse wheel DNS Server Enter the DNS server s IP address The IP address can...

Страница 49: ...s remote connection Remote point IP and port settings on the remote program must also be changed in order for it to connect to the DVR DHCP Select DHCP and then Save to retrieve IP address and other n...

Страница 50: ...VR name you wish to register on the FEN server check and register the entered name This is a unique DVR name that will be registered on the FEN server You will not be able to save FEN settings unless...

Страница 51: ...Android devices You can access a remote DVR and monitor live video images using media players such as VLC Player supporting RTSP service Start the media player on your local PC and enter rtsp ID Pass...

Страница 52: ...s pressing the Up arrow button on the front panel or j Pressing the or j key moves down in the menu It is the same as pressing the Down arrow button on the front panel m or Windows Pressing the m or W...

Страница 53: ...nu Actions Notify FTP setting It is recommended that you use FileZilla and smallFtp servers This feature is supported only in the PASV passive mode of the FTP site Select the Use NetFS to use the NETF...

Страница 54: ...Address Enter the NetFS address using the virtual keyboard Port Configure the port for connecting NetFS site Remoth path Enter a folder path in the NetFS site using the virtual keyboard User Password...

Страница 55: ...ile JPEG format to an email When selecting MP4 the DVR will attach the event detected video clip MP4 format to an email Mail Add a mail recipient Assign the Recipient to a Group and enter the Recipien...

Страница 56: ...of registered SMTP mail server providers Address entered under Sender must be in the correct email format and include the symbol If user authentication is required by the SMTP server select Use and t...

Страница 57: ...dd a FTP site Site Display a list of the registered FTP sites Select an FTP site from the list If the Use setting of the NetFS site is set to other than ALL or Clip Copy you cannot select the FTP site...

Страница 58: ...f upload fails several times it deletes the images or video clips When the DVR boots it deletes all images and video clips even if they were not uploaded yet Schedule Select the icon at the lower left...

Страница 59: ...when audio communication is available between the DVR and a PC running IDIS Center via Ethernet The icon displays when VNC service is running Freeze Sequence The icon displays while in the Freeze mode...

Страница 60: ...beyond the edges of the monitor Main Monitor Configure monitor related settings Mode Select between Full Sequence and Cameo Sequence In the full sequence mode the DVR sequences through the cameras an...

Страница 61: ...cameras display sequentially on the Spot Monitor when in the single screen display format Selecting the box under the Camera toggles between On and Off You can adjust the display dwell time by select...

Страница 62: ...irst recorded image Go to the Last Displays the last recorded image Go to the Date Time Displays the Go to the Date Time screen 3 Bookmarks Add the current playback point to the bookmark list The maxi...

Страница 63: ...esignate a start point and an end point and copy the data in between Clip Copy Open up the Clip Copy Setup window for designating points A and B Print Print a selected image Status Allow you to check...

Страница 64: ...ondition You can uncheck the First and Last options at the top of the Event Log Search window and specify the search time frame manually Select First for From and Last for To to select the entire reco...

Страница 65: ...p the Record Table Search Setup window 1 2345 6 1 Record Table Display the current channel s recording information Recording date and time are shown on the top of the search window The indicator line...

Страница 66: ...gs based on date and time Specify the date and time and then select Go to jump to the corresponding video recording Clip Copy Clip a video segment and saves it Print Print the current playback image Z...

Страница 67: ...gnized In contrast Museum Search looks for changes in the specified area by using the From frame as a reference Museum Search therefore recognizes even minute deviations from the original From frame T...

Страница 68: ...he First and Last options and specify the search time frame manually Selecting button the bookmark list displays and the bookmark point you selected will be the starting date and time Channels Select...

Страница 69: ...Copy from the Search menu or press the remote control s CLIP COPY button for more 3 seconds while in Live or Playback mode to open up the Clip Copy setup window Specify the From and To settings A B Cl...

Страница 70: ...g Close does not cancel Clip Copy Once the process is complete you will be prompted with a confirmation window Press the remote control s CLIP COPY button for more 3 seconds while in Live or Playback...

Страница 71: ...o clock to 5 o clock changing the system s clock at 5 o clock to 3 o clock and then continuing to record until 6 o clock produces two recordings that overlap between 3 o clock and 5 o clock This resul...

Страница 72: ...rnet Explorer Ver 7 0 or above 32 Bit IDIS Web only works with Microsoft Internet Explorer and will NOT work with other browsers IDIS Web does not work in Microsoft Windows 8 metro UI 1 Launch Interne...

Страница 73: ...low websites to open windows without address or status bars Enable To use IDIS Web on Microsoft Windows Vista or above launch Internet Explorer by right clicking on the icon and selecting the Run as a...

Страница 74: ...places the selected camera in the first cell of the layout that will be changed 5 Click to print the current video screen using a printer connected to the computer 6 Click to save the current video s...

Страница 75: ...mission of audio to the remote locale via microphone Enables playback of audio from the remote locale on speakers Enables two way audio communication with the remote locale Disables audio transmission...

Страница 76: ...ter on the logo to check IDIS Web s version 3 Displays time information of the video recording from the remote DVR 4 Select the desired mode 5 Click to print the current video screen using a printer c...

Страница 77: ...calendar The time table at the bottom displays recording data information for the selected date Select a point in time to display video from that moment If multiple recordings are available for the s...

Страница 78: ...stem If no name is entered for the camera the name used at the remote locale is shown on the screen Enable Audio If audio was recorded with the video enabling this option plays audio upon playback lim...

Страница 79: ...E Event Monitoring 16 F FEN 49 L LAN 48 Login 9 M Motion Search 64 65 Mouse 22 O OSD 59 P Panic Recording 19 Pre Event 37 Print 71 R Recording 19 S Search 62 Storage 31 T Text In 42 Text In Search 68...

Страница 80: ...IDIS Co Ltd For more information please visit at www idisglobal com...

Отзывы: