background image

Part 2 - Configuration

45

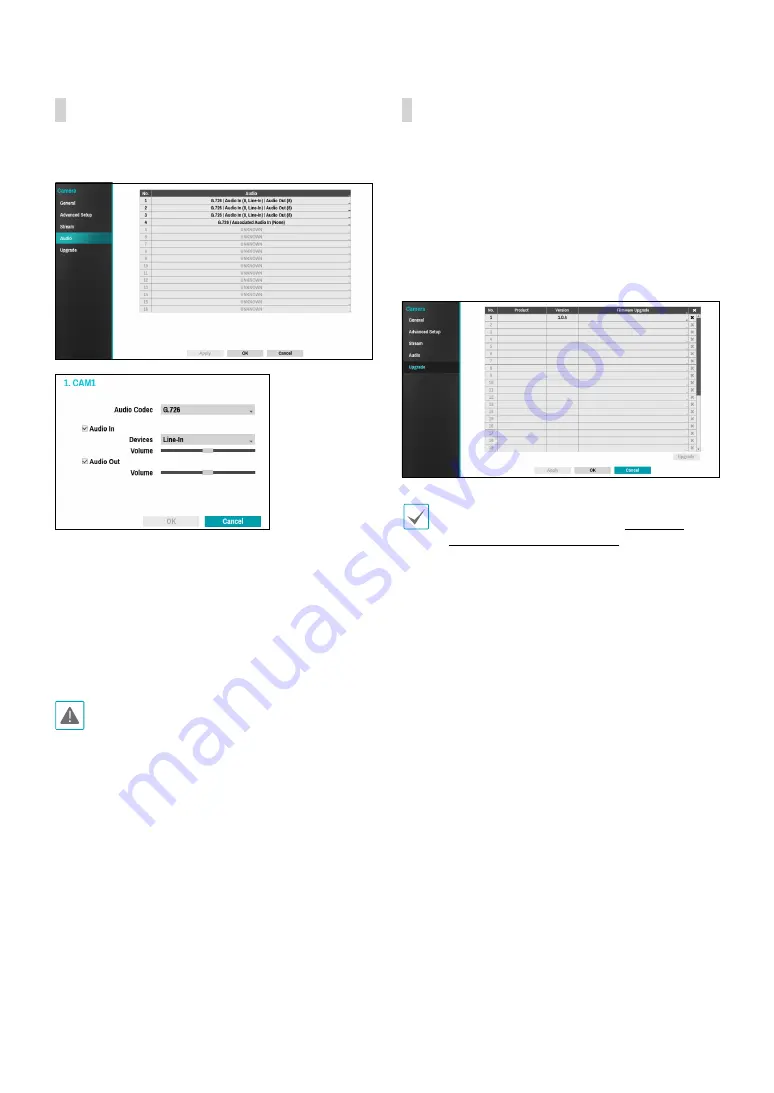
Audio

Configure audio recording settings for all cameras 
simultaneously.


Audio Codec: Select an audio codec. (G.711 u-Law, 
G.711 a-Law, or G.726)


Audio In: Select an audio input source (microphone 
or line-in) and then adjust the volume. 


Audio Out: Adjust the volume.


Associated Audio In: Associates the selected audio 
channel with the camera. It is supported by analog 
cameras only.

Cameras do not feature built-in audio amplifier units 
and therefore require the user to purchase a speaker 
system with a built-in amplifier separately.

Upgrade

When using NetFS, select Firmware Upgrade. You can 
select or USB port or NetFS. If not, you can only select 
USB port. Selecting Camera. 
Select USB port to display USB search window and then
select the corresponding upgrade package from the 
storage device connected to the NVR’s USB port. After 
selecting an upgrade package, select Apply to upgrade 
the camera. 


If an upgrade attempt fails, an upgrade failure 
message will be displayed. Refer to Error Code 
Types in the installation manual
 for more details.


The camera will reboot after the upgrade and then 
reconnect automatically.


Current software version is not checked when 
upgrading a network camera.

Содержание DR-3104P

Страница 1: ...Powered by Network Video Recorder Operation Manual DR 3104P DR 3108P DR 3116PS...

Страница 2: ...iar with its use seek technical assistance from their retailer regarding product installation and use If you need to disassemble the product for functionality expansion or repair purposes you must con...

Страница 3: ...efer servicing to qualified service personnel under the following conditions A When the power supply cord or the plug has been damaged B If liquid is spilled or objects have fallen into the equipment...

Страница 4: ...CE AT THEIR OWN EXPENSE WARNING CHANGES OR MODIFICATIONS NOT EXPRESSLY APPROVED BY THE PARTY RESPONSIBLE FOR COMPLIANCE COULD VOID THE USER S AUTHORITY TO OPERATE THE EQUIPMENT THIS CLASS OF DIGITAL A...

Страница 5: ...espective owners The information in this manual is believed to be accurate as of the date of publication even though explanations of some functions may not be included We are not responsible for any p...

Страница 6: ...a Registration Mode 18 Login 19 Live Menu 20 Zoom 22 PTZ Control 22 Event Monitoring 23 Covert Camera 23 Context Menu Access 24 Edit Group 24 Video Recording 25 Panic Recording 25 Audio Recording 25 V...

Страница 7: ...ade 45 Record Setup 46 General 46 Schedule 47 Pre Event 48 Event Setup 49 Video Analytics 49 Alarm In 52 Video Loss 53 Audio Detection 53 Recording Fail 54 Text In 54 Camera System 55 Face Detection 5...

Страница 8: ...t 67 Storage 68 Network 69 Part 3 Search 71 Time Lapse Search 71 Context Menu 75 Motion Search 75 Text In Search 76 Clip Copy 77 Print 78 Event Log Search 78 Thumbnail Search 79 Overlapped Recording S...

Страница 9: ...Setup Wizard only appears during initial booting When you login as an administrator account after initial booting you can use Wizard to go to Live menu and select Wizard 1 Select a system language Se...

Страница 10: ...Recording Profile High Longer Recording Time Priority Profile Standard Recording resolutions used under each recording method and record video quality setting are as follows HighVideo Quality Priority...

Страница 11: ...and then click Test to test the system s current network configuration This test must be performed before proceeding to the next step If the NVR is on a network connected to a network that has a DHCP...

Страница 12: ...Check the name s availability to complete the registration process The Finish button will then become activated You will be prompted with an error message if you do not enter a name for the NVR or ent...

Страница 13: ...tomatically Third Party Scan Used to manually scan for third party cameras that cannot be recognized by the auto scan feature Some functions may not be supported for the third party cameras depending...

Страница 14: ...N setting For more information on the WAN setting refer to WAN on page 61 Link local address Indicates the default IP address Manual Allows you to enter the IP address and other network settings manua...

Страница 15: ...ct Add Camera The device login window will appear 3 Enter a User ID and a Password for the selected camera Go To Camera Moves the focus automatically to the camera using the MAC address of camera in t...

Страница 16: ...registration other NVRs Registration X 1 Screen Position Registration Status Identifies the camera s position in the video display area A blue background indicates a camera that is available for regis...

Страница 17: ...a black background Screen Position Registration Info icon for cameras registered to another NVR is shown with a steady orange background on top of a grey screen Camera Menu Right click on the video d...

Страница 18: ...iagnosis Requirement message will be displayed In this case you can run Self diagnosis manually For more information refer to the Self Diagnosis on page 35 Camera Registration Mode While in Live mode...

Страница 19: ...the button next to the password field using the mouse This will bring up a virtual keyboard you can use to assign a password For more information on using the virtual keyboard refer to the Text Input...

Страница 20: ...ged in state the account ID is shown If in the logged out state the login icon is shown 2 Layout Used to change the screen layout to single screen corridor format 2x2 1 5 1 7 3x3 4x4 In order to use t...

Страница 21: ...f all cameras included in the page are deactivated If there are no video signals If the page contains covert cameras If the user does not have permission to view feeds from the cameras 9 Select Camera...

Страница 22: ...Select the camera you wish to control The icon will begin to flash on the selected camera s OSD window Use the Arrow buttons to pan and tilt the camera up down left and right You can also change the d...

Страница 23: ...he PTZ Tools window Event Monitoring When an event occurs the NVR automatically changes to the camera screen linking event monitoring and shows the icon on the system status area on the upper right po...

Страница 24: ...mation Select a network channel to display information about the selected channel s device Edit Group Rearrange the split screen layout Camera Registration Activate Camera Registration mode Login Logo...

Страница 25: ...c Recording videos Panic Recording will not take place if recording mode is not set to Recycle and the HDD has reached 100 of its capacity Audio Recording If the Record Audio option under Record Setup...

Страница 26: ...Layout Button Cycle through 1x1 corridor format 2x2 1 5 1 7 3x3 and 4x4 modes Context Menu While in Search mode press the remote control s button and then the Menu button to display the Context Menu w...

Страница 27: ...n Setup 9 Display Setup 0 Status Setup 2 Use the remote control s arrow buttons to select an option and then press the remote control s button or left click on the option using the mouse 3 Change the...

Страница 28: ...default You can edit the information using the virtual keyboard System ID Used to identify the NVR apart from other NVRs System ID is also used to control the NVR with the remote control The default S...

Страница 29: ...le list of 5 000 most recent system log entries For more information on types of system log entries refer to the System Log Types in the installation manual The icon appears next to log entries origin...

Страница 30: ...Server s IP address or domain name or select and then choose a server from the list of registered time servers 3 Specify the server synchronization Interval 4 Select OK to apply and exit If you have c...

Страница 31: ...user names passwords and email can be entered using the virtual keyboard For more information on using the virtual keyboard refer to the Text Input via Virtual Keyboard on page 27 To delete a registe...

Страница 32: ...and Search modes Search Clip Copy The user who has permission for Clip Copy can perform Clip Copy If the user does not have permission Clip Copy is not allowed but only search is allowed Setup System...

Страница 33: ...Disks that were used in different systems will show up as Other Select Information to check the saved data s time information or select Delete to erase the data Select Format to prepare the disk as a...

Страница 34: ...the disk reaches the specified capacity 80 to 99 Disk Full Generates an event when all disks reach their maximum capacity Disk Bad Generates an event when the specified percentage of the disk becomes...

Страница 35: ...ate and time FailOver Whene a problem is detected on the target device click the Run the failover button to resolve the problem Target Device Selects which device to run the failover Channels Select t...

Страница 36: ...evices and models contact your retailer The supported scan modes may vary depending on protocol selected Mode Select the scan mode Auto Scan LAN Lists any cameras in a LAN environment If Auto scan LAN...

Страница 37: ...e list and click the Add camera button a window for the network device will appear Select Skip to skip the authentication settings for the current network device and to display the Authentication wind...

Страница 38: ...a configure it for use in PTZ Mode PTZ Product Choose to select the model of installed PTZ device ID Choose to assign an ID to each PTZ device Choose to set up Baud Rate Data Bit Stop Bit and Parity o...

Страница 39: ...sed to tilt and pan the camera Zoom Zoom in and out Focus Adjust camera focus to far or near Speed Specify the camera s panning and tilting speed Test Select a pattern profile and then click Test to t...

Страница 40: ...ight or top to bottom Mechanical Automatically pans or tilts the camera Off Disables Auto Flip 0 Tilt Range Specify the camera s tilting range Restore Specify whether to restore the camera to its last...

Страница 41: ...LED lighting when motion is detected by the PIR sensor Also clicking auto allows the system to enable disable White LED mode automatically Black White Mode Display the images in greyscale for greater...

Страница 42: ...en that indicates whether the camera has been set up successfully or not White Balance Options Preset Use preconfigured white balance settings Auto Allow the system to adjust the white balance automat...

Страница 43: ...ing conditions There may be a difference in the way it functions depending on the camera model See the camera user s manual for details Focus Mode Used to change the focus movement format as Auto Manu...

Страница 44: ...Remote greater than 2x2 stream depending on the remote program s live screen layout Record Video Profile Set up 4 recording quality profiles Video Profile Select Live 1 Live 2 Remote or Custom availa...

Страница 45: ...er system with a built in amplifier separately Upgrade When using NetFS select Firmware Upgrade You can select or USB port or NetFS If not you can only select USB port Selecting Camera Select USB port...

Страница 46: ...n changed Limit Time Lapse Recording You can store event recording data for longer If you do not wish to use Limit Time Lapse Recording select Never This function is activated when data has been store...

Страница 47: ...he Panic Record button is pressed no recording will take place during the scheduled time frames on the scheduled days Time The icon appears on the upper left corner of the screen The icon appears at s...

Страница 48: ...unconfigured channels If multiple events take place on a specific channel and different Video Profile and Dwell Time settings apply highest settings apply to all event linked recordings Pre Event When...

Страница 49: ...l blocks using the Camera buttons You can use the mouse to drag the zone and then select clear or reverse the selection From the zone selection screen press the button on the remote control or right c...

Страница 50: ...llback feature the NVR must be registered on the remote program Ignoring Interval The system does not produce event log entries or issue remote notifications regarding motion detected for the time spe...

Страница 51: ...If the schedule is set to Event or Time Event mode the selected cameras will begin linked recording when an event occurs Alarm Out Designate event triggered alarm out channels each for the NVR and cam...

Страница 52: ...ect Time Setup to specify the tampering detection ignore time Tampering detection will be disabled during the specified time frame Alarm In No Enable disable alarm ins This option includes both local...

Страница 53: ...coders are connected Audio Detection No Select which cameras to apply Audio Detection to Sensitivity Set to between 1 Low and 5 High Activation Time Specify how long audio detection has to last in ord...

Страница 54: ...text in devices It s possible to batch configure all text in devices with the exception for port settings An influx of large amounts of text in data from multiple channels can hinder system performan...

Страница 55: ...ode the selected cameras will begin linked recording when an event occurs Alarm Out Designate event triggered alarm out channels each for the NVR and camera and beeps Notify Configure to be notified o...

Страница 56: ...ode the selected cameras will begin linked recording when an event occurs Alarm Out Designate event triggered alarm out channels each for the NVR and camera and beeps Notify Configure to be notified o...

Страница 57: ...re uploads event detected images or video clips to the FTP site when an event occurs Click the icon at the bottom of the list to add an FTP site FTP Enter the FTP site information using the virtual ke...

Страница 58: ...may not be uploaded to the FTP site The FTP notification is not supported for system events If upload fails several times the images or video clips are deleted When the NVR boots all images and video...

Страница 59: ...ansmits the selected channel s audio to the remote program Select Select From Client to stream audio of the channel selected on the remote program Audio skipping and sync issues can occur under poor n...

Страница 60: ...menu This is the same as pressing the Right arrow buttons on the front panel or k Press the or k key to move up in the menu This is the same as pressing the Up arrow button on the front panel or j Pre...

Страница 61: ...result is displayed 4 Select Close to exit If using a firewall select Change Port to change the port number to one that is permitted by the firewall Changing the port temporarily severs the NVR s remo...

Страница 62: ...erver s domain name instead of its IP address in the FEN Server field Port Specify the FEN server s port number If using an IP router or NAT port configuration and other network functions will depend...

Страница 63: ...Use Select the usage for the NetFS feature N A Disables the NetFS feature ALL Enables the NetFS feature Upgrade Allows you to use the upgrade file that was uploaded to the NetFS site Setup Allows you...

Страница 64: ...mails to a remote destination at specified intervals Callback Configure Callback settings Enter the IP address of the receiving server and set Retry to between 1 and 10 in case of connection failure M...

Страница 65: ...Address entered under Sender must be in the correct email format and include the symbol If user authentication is required by the SMTP server select Use and then enter the User and Password informati...

Страница 66: ...atus Date and Time Displays the date and time Camera No Displays the camera number on the upper left corner of the camera screen Title Displays the camera name on the upper left corner of the camera s...

Страница 67: ...rdless of the resolution supported by the monitor Resolution Select 1920 x 1200 1920 x 1080 1680 x 1050 1600 x 1200 Event Monitoring On With Event Monitoring enabled the camera screen linking event mo...

Страница 68: ...when the disk becomes 100 full For more information refer to the Monitoring on page 33 Fan Error Event is indicated when the cooling fan cannot reach a certain RPM or fails for longer than 50 seconds...

Страница 69: ...emperature range Bad Disk temperature higher than as designated by the user Generates a system event S M A R T N A A disk that does not support S M A R T Good A disk with normal S M A R T status Bad A...

Страница 70: ...Video Encoder indicates a video encoder is connected to the LAN port and shows how many cameras are connected Clicking the image displays the camera s channel number LAN Port Link indicates a camera o...

Страница 71: ...ou can select Control Area 2 Press MENU button once more to move the Control Area 3 In 2 seconds after moving the Control Area the Control Area becomes selected and the corresponding menu disappears 4...

Страница 72: ...ivates the middle screen section Use the arrow buttons to select a camera 3 Right Activates the control buttons on the right Use the arrow buttons to select Bookmark Play Calendar Search and other con...

Страница 73: ...ther to enable the original aspect ratio of video transmitted from the camera 4 Alarm Pressing this button while the alarm has been activated resets all NVR alarm outputs including the built in buzzer...

Страница 74: ...ecording from that date paused state Selected date is highlighted in orange 4 Event Search Selecting Event Search provides Motion Search and Text In Search options Motion Search Perform Motion Search...

Страница 75: ...information when selecting Refresh Recording Data Bar Colors Blue Time Lapse Recording Purple Event Recording Yellow Pre Event Recording Red Panic Recording Green Faulty recording due to a temporary...

Страница 76: ...gh Min Blocks The Min Blocks option is available with Motion Search only Once all the options have been configured select Search Select search results entry to display the video recording on the left...

Страница 77: ...hen select Continue to proceed While Clip Copy is in progress you can select Cancel to cancel the process or select Close to allow the window to run in the background Selecting Close does not cancel C...

Страница 78: ...of the screen to start playing back the recording Use the drop down menu above to load recordings from other cameras Selecting the specific event displays the screen to be stationary You can uncheck t...

Страница 79: ...ding If no camera is selected only the events with no linked recording camera are searched Thumbnail Search Select Search Mode Thumbnail Search to bring up the thumbnail Search window Click on the lef...

Страница 80: ...00 6 00 Segment 1 Segment 2 When searching overlapped video recordings you can choose a specific point in time or a time frame If you use the Go to the Date Time option and select a point within the...

Страница 81: ...rnet Explorer Ver 7 0 or above 32 Bit IDIS Web only works with Microsoft Internet Explorer and will NOT work with other browsers IDIS Web does not work in Microsoft Windows 8 metro UI 1 Launch Interne...

Страница 82: ...low websites to open windows without address or status bars Enable To use IDIS Web on Microsoft Windows Vista or above launch Internet Explorer by right clicking on the icon and selecting the Run as a...

Страница 83: ...e changed 5 Click to print the current video screen using a printer connected to the computer 6 Click to save the current video screen as an image file 7 Click TYPE 1 to configure rendering mode and O...

Страница 84: ...via microphone Enables playback of audio from the remote locale on speakers Enables two way audio communication with the remote locale Disables audio transmission If the remote locale connected to sup...

Страница 85: ...s version 3 Displays time information of the video recording from the remote NVR 4 Select the desired mode 5 Click to print the current video screen using a printer connected to the computer 6 Click...

Страница 86: ...ottom displays recording data information for the selected date Select a point in time to display video from that moment If multiple recordings are available for the selected point in time you can sel...

Страница 87: ...stem If no name is entered for the camera the name used at the remote locale is shown on the screen Enable Audio If audio was recorded with the video enabling this option plays audio upon playback lim...

Страница 88: ...toring 23 F FEN 62 I IDIS Web 81 88 L Live Mode 20 Login 19 M Motion Search 75 Mouse 28 O OSD 66 P Panic Recording 25 Pre Event 48 Print 78 PTZ Control 22 R Recording 25 Record Setup 46 S Search 71 St...

Страница 89: ...IDIS Co Ltd For more information please visit at www idisglobal com...

Отзывы: