background image

32

Menu Use

Information contained in this section (Menu Use) 
applies to all other instructions found throughout Part 
2 - Configuration.

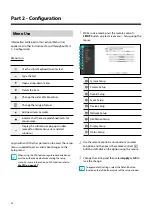
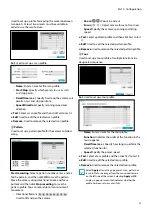
Menu Icon

Use the virtual keyboard to enter text.

Type the text.

Open a drop-down menu. 

X

Delete the item.

Change the order of table entries.

Change the range of values

.

Add new items or works.

Indicate that there are predefined items for 
convenience.
Display the submenu or pop-up window. 
(except for information, error and alert 
windows)

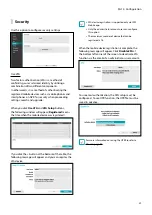
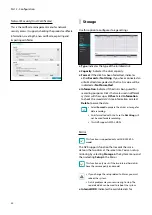
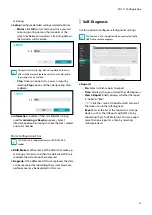
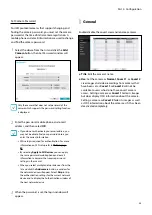
Login with an ID that has permission to access the setup 
menu is needed to access and make changes to the 
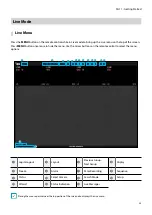
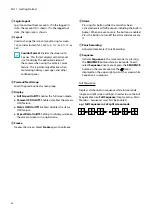
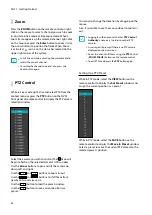
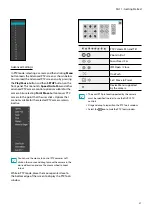
Setup menu.

When using Use 2FA feature, registered mobile device 
must be authenticated before entering the setup 
menu. For more information on 2FA function, refer to 

Use 2FA on page 39

.

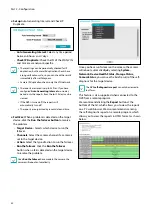
While in Live mode, press the remote control's 

SETUP

 button or select Live menu > Setup using the 

mouse.

1
2
3
4
5
6
7
8
9

1

System Setup

2

Camera Setup

3

Record Setup

4

Event Setup

5

Device Setup

6

Network Setup

7

Notification Setup

8

Display Setup

9

Status Setup

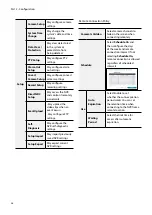
Use the remote control’s arrow buttons to select 
an option and then press the remote control’s 

$


button or left-click on the option using the mouse.

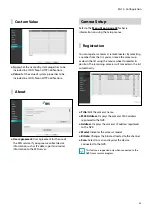
Change the setting and then select 

Apply

 or 

OK

 to 

save the change.

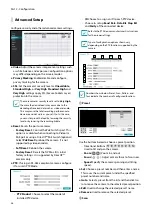
To apply default settings, select the Default button 
located on the left bottom corner of the setup window.

Part 2 - Configuration

Содержание DR-2504P-A

Страница 1: ...Powered by Network Video Recorder Operation Manual DR 2504P DR 2504P A DR 2508P DR 2516P DR 3516P...

Страница 2: ...uct installation and use If you need to disassemble the product for functionality expansion or repair purposes you must contact your retailer and seek professional assistance Both retailers and users...

Страница 3: ...have fallen into the equipment C If the equipment has been exposed to rain or water D If the equipment does not operate normally by following the operating instructions adjust only those controls tha...

Страница 4: ...INTERFERENCE AT THEIR OWN EXPENSE WARNING CHANGES OR MODIFICATIONS NOT EXPRESSLY APPROVED BY THE PARTY RESPONSIBLE FOR COMPLIANCE COULD VOID THE USER S AUTHORITY TO OPERATE THE EQUIPMENT THIS CLASS O...

Страница 5: ...not be included We are not responsible for any problems resulting from the use thereof The information contained herein is subject to change without notice Revisions or new editions to this publicati...

Страница 6: ...egistration Mode 20 Login 21 Live Menu 23 Zoom 26 PTZ Control 26 Dewarping Control Camera 28 Event Monitoring 28 Covert Camera 28 Context Menu Access 29 Edit Group 29 Video Recording 30 Panic Recordin...

Страница 7: ...General 56 Advanced Setup 56 Schedule 57 Pre Event 59 Smart Failover 59 Statistics 60 Event Setup 61 System Event 61 Camera System 62 Camera System_Audio Detection 62 Camera System_Camera Fan Error 63...

Страница 8: ...dule 73 Connector 73 Remote Control 74 Network Setup 74 General 74 IDIS Web 76 WAN 76 VIN 79 FEN 80 NetFS 81 RTSP 82 Firewall 82 NAT 83 Notification Setup 83 Schedule 83 Callback 84 Mail 85 Push 87 FT...

Страница 9: ...Event Log Search 103 Part 4 IDIS Web 104 Web Live Mode 106 Web Search Mode 108 Part 5 Appendix 111 NAT Function Example 111 Camera WebSetup Connection 112 IDIS Web Connection through IDIS Camera 112...

Страница 10: ...ired to find the password Otherwise you may not be able to find your password when you enter the incorrect information Setup Wizard Setup Wizard lets you configure basic settings required for operatin...

Страница 11: ...settings refer to the Date Time section under System Setup on page 34 3 Choose the desired Recording Method and click Next 4 Choose the desired Recording Quality and click Next Higher recording qualit...

Страница 12: ...Continuous Profile 1 Motion Profile 3 Continuous Profile 2 Motion Profile 4 Continuous Profile 3 Motion Continuous Profile 1 Profile 2 Profile 3 5 Choose the desired codec and click Next 6 Click Fini...

Страница 13: ...nformation about the router s UPnP function refer to the router s operation manual 4 Enter in the Device Name field the NVR name to be registered on the FEN server and then click Check to check its av...

Страница 14: ...stration refer to Registration on page 13 Camera Scan Button You can scan and search and register cameras that were not detected automatically or third party cameras Pressing the Scan button displays...

Страница 15: ...NVR scans for cameras falling under the specified address s range By specifying an IP address you can also specify which port to use with the Remote Admin feature It is recommended that the camera no...

Страница 16: ...can edit a csv file directly A column indicates camera number B column the camera MAC address C column the Video In port of the video encoder in the csv file C column indicates only for video encoder...

Страница 17: ...ed bitrates may not be lower than current stream settings You can change the bitrate by pressing the button at the bottom left Only the bitrate of the registered camera can be changed by checking the...

Страница 18: ...on a camera list entry Add Remove Camera Adds or removes the selected camera The Add Camera option is inactive if the camera has already been added to the screen Authentication Enter the necessary ca...

Страница 19: ...g up the camera menu Remove Camera Removes the registered camera Remove Device Removes the registered encoder Color Control Adjusts the camera s color settings Information Displays the camera s basic...

Страница 20: ...e new registered and changed cameras If Self diagnosis is processing Diagnosis Processing message will be displayed If Self diagnosis is failed Diagnosis Required message will be displayed In this cas...

Страница 21: ...ord field using the mouse This will bring up a virtual keyboard you can use to assign a password For more information on using the virtual keyboard refer to the Text Input via Virtual Keyboard on page...

Страница 22: ...ing the UPR file refer to User on page 36 You can reset the password using an encrypted UPR User Password Reset filename extension upr file It can be used as USB flash driver on local pc but not remot...

Страница 23: ...to hide the menu Use the Arrow buttons on the remote control to select the menu options 8 1 2 3 4 5 6 7 9 0 1 Login Logout 2 Layout 3 Previous Group Next Group 4 Display 5 Freeze 6 Alarm 7 Panic Reco...

Страница 24: ...o On Off Setting On displays video on the camera screen in its original ratio 5 Freeze Freezes the screen Select Freeze again to unfreeze 6 Alarm Pressing this button while the alarm has been activate...

Страница 25: ...tly from the record table Event Log Search Select Search Mode Event Log Search to search for event logs and play back associated event recordings Setup Used to access the Setup menu Wizard Launches th...

Страница 26: ...to pan and tilt the camera up down left and right Use the 1 2 3 4 5 6 and 1 2 3 4 5 6 buttons to zoom in out Use the 1 2 3 4 5 6 and 1 2 3 4 5 6 buttons to shift focus from nearby to far and vice ver...

Страница 27: ...are not available for the selected PTZ camera remain inactive You can use the mouse to control PTZ cameras Left click on the mouse and drag to move the camera in the desired direction and use the mou...

Страница 28: ...the upper right portion of the screen To use the Event Monitoring feature navigate to Display Setup Main Monitor and enable Event Monitoring Event Monitoring remains in effect throughout the entire Li...

Страница 29: ...VR and camera the microphone connected to the NVR will terminate automatically when the microphone on the remote is turned on The remote microphone takes priority Information Select a network channel...

Страница 30: ...uration option under Record Setup General has been configured Panic Recording will automatically terminate after the specified duration of time has elapsed For more information refer to the Record Set...

Страница 31: ...Lapse Search or Event Log Search 3 The selected search mode will be initiated For more information on data search refer to the Part 3 Search on page 95 Remote Control Buttons during Playback 1 Camera...

Страница 32: ...When using Use 2FA feature registered mobile device must be authenticated before entering the setup menu For more information on 2FA function refer to Use 2FA on page 39 1 While in Live mode press the...

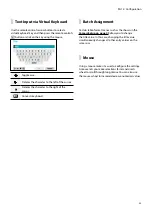
Страница 33: ...the right of the cursor Converts keyboard Batch Assignment Certain table format menus such as the shown in the Camera Setup on page 43 allow you to change the title value In this case changing the ti...

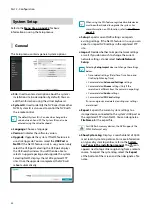
Страница 34: ...rmation on 2FA function refer to Use 2FA on page 39 Setup Exports current NVR settings or imports existing settings If the NetFS feature is in use you can export or import NVR settings in the register...

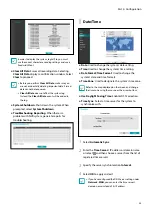
Страница 35: ...nerate reports for troubleshooting Date Time Date Used to change the system s date setting Time Used to change the system s time setting Date Format Time Format Used to change the system s date and ti...

Страница 36: ...2 Select a date 3 Select OK to apply and exit Select the icon to delete the existing holiday date User Use this option to register users and assign permissions 1 Select Group and enter a group name A...

Страница 37: ...ll groups and users except Group Administrator and User admin simultaneously A password entry is required to edit existing groups and users Group Administrator s permissions cannot be changed With the...

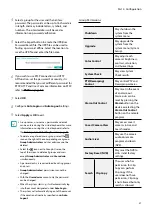
Страница 38: ...vent occurs May configure FTP settings Self Diagnosis May configure the NVR self diagnostic settings Setup Import May import previously saved NVR settings Setup Export May export current NVR settings...

Страница 39: ...evice was registered If you click the button at the bottom of the table the following message will appear and you can register the 2FA device 2FA device registration is supported only via IDIS Mobile...

Страница 40: ...ifferent systems will show up as Other Select Information to check the saved data s time information or select Delete to erase the data Select Format to prepare the disk as a storage for data recordin...

Страница 41: ...is supported only with DR 2504P A model RAID Broken When some of the HDDs that make up mirroring are in error and then the defective HDDs are replaced the data cannot be recovered Degrade If the defe...

Страница 42: ...resolve the problem Target Device Selects which device to run the failover Channels Select the camera channel if a camera is set to the target device Action Select the type of action to run the failov...

Страница 43: ...on on using the Setup menus Registration You can register cameras at remote locales By selecting a number from the list you can move the camera up or down the list using the mouse wheel to reorder its...

Страница 44: ...is allows the user to scan this camera easily When configuring a port the device may fail to scan if the port selected for the NVR and the port selected for the camera differ In this case you must reg...

Страница 45: ...ecting Apply to All Devices you can apply the same password mobile phone and e mail information to cameras that require password settings in the scan list When you select multiple network devices from...

Страница 46: ...orted by video encoders Soft Reset Reboots the camera Factory Reset Resets the NVR to all its initial factory settings It is supported by DirectIP cameras only PTZ If using an RS 485 compliant camera...

Страница 47: ...n record up to two minutes of movement Directional Buttons Used to tilt and pan the camera Zoom Zoom in and out Focus Adjust camera focus to far or near Speed Specify the camera s panning and tilting...

Страница 48: ...tilts the camera Off Disables Auto Flip 0 Tilt Range Specify the camera s tilting range Restore Specify whether to restore the camera to its last position or function Enabling this option restores th...

Страница 49: ...vot Enable this option and choose the direction of the pivot You can turn the image by 90 degree in the clockwise or counterclockwise direction This feature is particularly effective when monitoring h...

Страница 50: ...rk due to backlighting conditions and on images containing over exposed sections Greater the value clearer the image e g Dark parking lot entrances and gas station entrances at night Local Exposure co...

Страница 51: ...le for greater clarity in low lighting conditions On Off Enable disable Black White Mode Auto Allow the system to enable disable Black White Mode automatically Schedule Set up the Black White Mode sch...

Страница 52: ...a s temperature is lower than the heater operating temperature If Off the heater will not operate regardless of temperature Stream I Configure the camera s live and recording resolution codec picture...

Страница 53: ...ub stream at the same time It displays as below when recording on a network video recorder If the screen layout is less then 3x3 video profile main stream is displayed and if it is larger than 3x3 pro...

Страница 54: ...signated below until movement is detected again Sensor Mode Set the camera resolution to 16 9 4 3 Depending on the mode you have set the resolution that can be set in the stream section changes Audio...

Страница 55: ...rted for the cameras supporting Failover recording of SD memory card For cameras is in use by other NVRs or the newly registered cameras the Format option displays Other Please format the SD card to u...

Страница 56: ...is restored videos stored on the camera SD memory card can be recorded on the NVR Data from the camera SD memory card can not be recorded to the NVR if the recording failover service function is not s...

Страница 57: ...Mode Disabling Schedule On suspends schedule recording regardless of the schedule and displays the icon on the upper left corner of each camera screen Pressing the Panic Record button displays the ico...

Страница 58: ...he video profile selected for events under Setup Channel Select which cameras to apply the schedule to Settings Select to configure default recording profile values for Time Lapse and Event Recording...

Страница 59: ...e Smart Failover When the connection is recovered again Smart Failover Service enables the data recorded on SD memory card to record on NVR Smart Failover Depending on whether Recording Failover Servi...

Страница 60: ...ion as shown below Capacity Indicates the sum of all storage capacity in the camera group Click icon under Capacity tab to calculate the capacity and throughput by each group and display the remaining...

Страница 61: ...anic recording actions Check Recording The system will assume an error if the system has been scheduled to record normally but recording does not take place during scheduled intervals Select Schedule...

Страница 62: ...tive attempts RAID BROKEN It will be highlighted when the mirroring configuration is broken DR 2504P A model only Degrade It will be highlighted when one of the HDDs composing mirroring is in error DR...
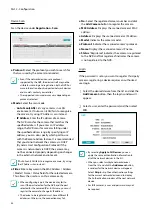
Страница 63: ...specific preset position when an event occurs Event Monitoring Selects the cameras to monitor when an event occurs In order to use the Callback feature the NVR must be registered on the remote progra...

Страница 64: ...e initial video loss was detected Set the value between 0 1 and 15 seconds or choose Never This is supported only when video encoders are connected Use Ignoring Time Select Time Setup to specify the t...

Страница 65: ...within a certain period of time after PIR events of the camera channels are detected Set the value between 1 sec and 5 secs or choose Never Ignoring interval setting does not affect the motion detect...

Страница 66: ...e blocks selected within the selection window and select all unselected blocks within the selection window Select All Select all blocks Clear All Clear all block selections Reverse All Clear all selec...

Страница 67: ...recording when an event occurs Alarm Out Designate event triggered alarm out channels each for the NVR and camera and beeps Notify Configure to be notified of events by Mail LAN1 through 5 Push HTTP...

Страница 68: ...value between 1 sec and 5 secs or choose Never Trip Zone Ignoring Time does not affect Trip Zone recording Daytime Setup Specify when daytime starts and ends Adjust the time frame in 15 minute increme...

Страница 69: ...toring Selects the cameras to monitor when an event occur In order to use the Callback feature the NVR must be registered on the remote program Video Analytics_Auto Tracking When the PTZ camera detect...

Страница 70: ...occurs Event Monitoring Selects the cameras to monitor when an event occurs Additional Event A list of events that occur in the camera system and other device Additional Event_Alarm In No Enable disa...

Страница 71: ...ates when the alarm in is deactivated Additional Event_Text In Setup Configure text in devices It s possible to batch configure all text in devices with the exception for source settings An influx of...

Страница 72: ...meras to begin linked recording on when an event occurs If the schedule is set to Event or Time Event mode the selected cameras will begin linked recording when an event occurs Alarm Out Designate eve...

Страница 73: ...nt occurs On Alarm out is always on Off Alarm out is always off Channels Configure alarm out port and beep settings Connector Click the icon at the bottom left corner of the screen to add a connection...

Страница 74: ...re Sockets Layer protection on remote viewing and recording data transmissions If using the SSL feature it will not be possible to connect to the NVR from a remote program or a network keyboard that d...

Страница 75: ...his is the same as pressing the Play Pause button on the front panel or the remote control Character Input Delete BackSpace Space They play the same role as a keyboard input Esc Press the Esc to escap...

Страница 76: ...ss type as IPv4_None IPv4_ IPv4_Manual IPv4_DHCP IPv6_None or IPv6_Link local IPv4_None Select None and then save to disable IPv4 mode IPv4_Manual Set Type to Manual Manual lets you configure related...

Страница 77: ...eature select Use UPnP If using an IP router or NAT UPnP service allows the device to automatically forward the port to the NVR This port is used to access a port that has a private IP address In orde...

Страница 78: ...plication you can easily enter the IP address using the QR code There is a limit to the number of users allowed to connect remotely at the same time Contact the service center for more information IPv...

Страница 79: ...s access to specific subnets It is not recommended unless you are a network expert DHCP Client Retrieves an IP address and other network settings automatically from a DHCP server Use NAT ROUTER VPN ET...

Страница 80: ...ns the and or symbol it might not be able to connect to the NVR from the IDIS Web program When registering NVR with the IDIS mobile application you can easily enter the IP address using the QR code FE...

Страница 81: ...sage for the NetFS feature N A Disables the NetFS feature ALL Enables the NetFS feature Upgrade Allows you to use the upgrade file that was uploaded to the NetFS site Setup Allows you to import or exp...

Страница 82: ...s access such as specific MAC address IP address and receiving network port of the NVR Select Use Firewall to activate firewall function Click the icon at the bottom of the list to set up a firewall r...

Страница 83: ...e It refers to a WAN Network Client or VIN Video In IP If the type of the rule is set to IPv4 or within the IPv4 scope enter the sending IP address Port If the type of the rule is set to port or withi...

Страница 84: ...ry Number of times to retry a callback event Dwell Wait time in seconds between retry attempts Long Term Retry Policy Use Configure long term policy to retry a callback event Retry Number of times to...

Страница 85: ...ng you to enter the Group name You can select between CBF and MP4 When selecting CBF the NVR will attach an event detected video clip to an email When selecting MP4 the NVR will attach the event detec...

Страница 86: ...out a test mail using the current settings Select SS TLS or STARTTLS depending a method of supporting a secure connection If you have configured the DNS Server setting under Network WAN you can enter...

Страница 87: ...en in the Network menu Upload File Select between CBF and MP4 When you select CBF the NVR will upload an event detected video clip to the FTP site When you select MP4 the NVR will attach an event dete...

Страница 88: ...ameters must be included when sending the http requests Click the Setup icon at a bottom right corner of the window When the following window appears click the button to set the HTTP attributes such a...

Страница 89: ...bottom of the screen in black Camera No Displays the camera number on the upper left corner of the camera screen Title Displays the camera name on the upper left corner of the camera screen Record Dis...

Страница 90: ...the camera screen linking event monitoring when an event occurs Supported resolutions may be restricted depending on the monitor 3840 x 2160 50 60Hz resolution is supported only in HDMI 2 0 monitor We...

Страница 91: ...Monitoring is reached and when the disk becomes 100 full For more information refer to the Video Analytics_Motion on page 66 Disk Partially Almost Full Disk Partially Full If the storage device is not...

Страница 92: ...an as designated by the user Generates a system event Temperature N A Unable to detect the disk s temperature Good Operating within normal temperature range Bad Disk temperature higher than as designa...

Страница 93: ...ted to the NVR Network Switch indicates a network switch is connected to the LAN port and shows how many cameras are connected Clicking the image displays the camera s channel number Clicking the imag...

Страница 94: ...support PoE The 4 channel model does not support VIDEO IN Ext Number of Connected Clients Indicates whether there are clients connected to the NVR via an external network and how many clients are con...

Страница 95: ...ress Menu once more to move the Control Area 2 In 2 seconds after moving the Control Area the Control Area becomes selected and the corresponding menu disappears 3 After selecting the desired Control...

Страница 96: ...lendar Search and other control buttons 4 Bottom Activates the bottom record table Use the arrow buttons to select a record table The error OSD OUT OF CODEC MEMORY is displayed when codec decoder is o...

Страница 97: ...OSD feature Status OSD On Off Enables disables the status OSD feature Aspect Ratio On Off Setting On displays video on the camera screen in its original ratio 4 Alarm Pressing this button while the al...

Страница 98: ...gh video recordings Playback controls have the same functions as their remote control counterparts Jog Shuttle Adjust the playback method and speed Jog shuttle s vertical indicator indicates the curre...

Страница 99: ...ideo recordings based on date and time Specify the date and time and then select Go to jump to the corresponding video recording Select a bookmark button on the right side to move to the saved bookmar...

Страница 100: ...s on the remote control or by dragging with the mouse to check recording data Display the latest update recording information when selecting Refresh Recording Data Bar Colors Blue Time Lapse Recording...

Страница 101: ...Clip Copy Select Clip Copy Clip Copy from the Search menu or press the remote control s CLIP COPY button while in Live or Playback mode to open up the Clip Copy setup window Specify the From and To s...

Страница 102: ...Clip Copy configures the storage range automatically based on the storage drive s capacity If there is insufficient space available on the selected storage device you will only be able to Clip Copy an...

Страница 103: ...s to include exclude specific system events such as Panic Record Check Recording Check Alarm In Disk Almost Full Disk Bad Disk Temperature Disk S M A R T Fan Error eSATA Disconnected and Disk Config C...

Страница 104: ...net Explorer Version 10 or later 32 bit Chrome Google Chrome 22 0 1229 0 or above 59 xxx or above recommended Edge 98 0 1108 43 or above 1 Launch the web browser and then enter the following informati...

Страница 105: ...llow websites to open windows without address or status bars Enable To use IDIS Web on Microsoft Windows Vista or above launch Internet Explorer by right clicking on the icon and selecting the Run as...

Страница 106: ...at will be changed 5 Click to print the current video screen using a printer connected to the computer 6 Click to save the current video screen as an image file 7 Click TYPE 1 to configure rendering m...

Страница 107: ...used at the remote locale is shown on the screen Enable Audio Enables audio transmission with remote locales Select to display buttons Enables transmission of audio to the remote locale via microphone...

Страница 108: ...tes of inactivity b a 3 4 1 2 0 5 6 7 8 9 1 Press to terminate IDIS Web 2 Place the mouse pointer on the logo to check IDIS Web s version 3 Displays time information of the video recording from the re...

Страница 109: ...ing from that date paused state Selected date is highlighted in orange Select TYPE 1 to enable time lapse search mode and search play back video recordings in chronological order In Time Lapse Search...

Страница 110: ...ystem If no name is entered for the camera the name used at the remote locale is shown on the screen Enable Audio If audio was recorded with the video enabling this option plays audio upon playback li...

Страница 111: ...es shown are for illustration purposes only and may not match the product 32EA PC WEB Setup IDIS Web IDIS Center program RTSP D i r e c t I P S w i t c h NVR WAN Ethernet 0 IP Address 10 0 125 211 Get...

Страница 112: ...html Enter the HTTP port number of the camera 16001 to have port forwarded IDIS Web Connection through IDIS Camera Access the IDIS Web of the camera which is internal VIN network from the PC Port For...

Страница 113: ...camera which is internal VIN network from the clients such as the IDIS Center program Port Forward through 2 routers NVR Port Number and Remote Port Number of the Camera Eth 0 WAN Port 11002 Eth 1 VIN...

Страница 114: ...6003 Eth 1 VIN IP IP address of the camera Eth 1 VIN Port Remote port number of the camera Approach Access RTSP function using media players such as VLC Player You can monitor live video images throug...

Страница 115: ...IDIS Co Ltd For more information please visit at www idisglobal com...

Отзывы: