background image

Part 1 – Introduction

11

Installation

Installation of this product does not require the use of 
special tools. 
For more information on other devices comprising the 
overall system, refer to their respective 

installation 

manuals

.

Product color and design may vary depending on the 
model.

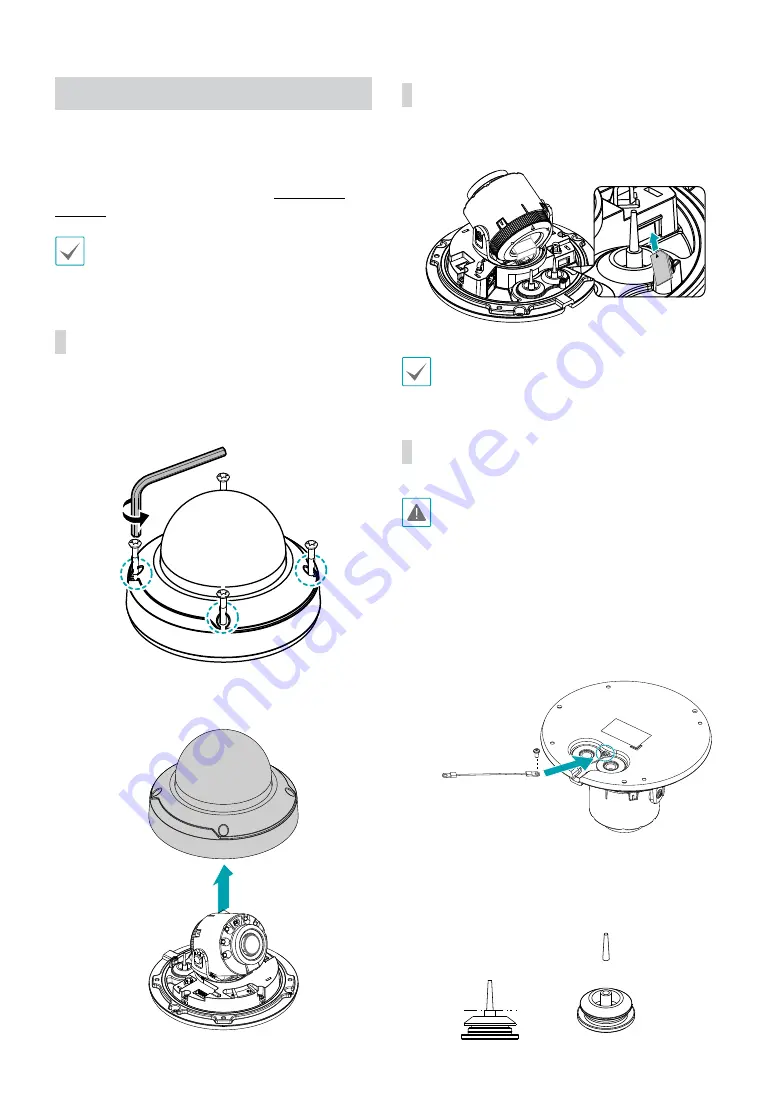
Removing the Dome Cover

Loosen the screws counterclockwise using the allen 
wrench provided with the product.

Remove the dome cover.

Inserting a SD Memory Card

Insert a SD memory card into the SD memory card slot 
with the 'micro SD' print facing upward.

micro

SD

micro

SD

Push the SD memory card until it disengages from the 
slot, and then pull it out.

Installation

 • Check the wall or ceiling to see if it needs to be 

reinforced. The camera may fall off if the wall or 
ceiling is not strong enough to support its weight.

 • Install the camera in a shaded area. If the camera 

is installed in direct sunlight, it may be affected 
adversely.

 • (If necessary) Attach one end of the safety wire (not 

provided) to the wall or ceiling, and the other end 
of the safety wire to the installation location on the 
camera body.

Safety Wire Screw (Provided)

Safety Wire (Not Provided)

Detach the protrusion part from the cable rubber 
along the dotted line.

Содержание DC-D4238HRA

Страница 1: ...Powered by Network Camera Installation Manual DC D4238HRA DC D4248HRA...

Страница 2: ...h explanation about some functions may not be incorporated The manufacturer is not responsible for any problems resulting from the use thereof The information contained herein is subject to change wit...

Страница 3: ...le system This will prevent damage to the equipment due to lightning and power line surges If thunder or lightning is common where the equipment is installed use a surge protection device 10 Overloadi...

Страница 4: ...to the environment or human health from uncontrolled waste disposal please separate this from other types of wastes and recycle it responsibly to promote the sustainable reuse of material resources H...

Страница 5: ...Reset 10 Lens 10 Installation 11 Removing the Dome Cover 11 Inserting a SD Memory Card 11 Installation 11 Angle Adjustment 13 Closing the Dome Cover 14 Dimension 15 Part 2 Camera Connection 16 With Di...

Страница 6: ...lity Remote monitoring via web browser or remote software Up to 10 simultaneous remote monitoring connections IP filtering HTTPS SSL IEEE 802 1X and configurable user authority levels for greater secu...

Страница 7: ...duct check inside the box to make sure all the following accessories are included Network Camera Terminal Blocks 2 ea Desiccant 3ea double sided tape 2ea Allen Wrench Quick Guide Screws and Anchors ea...

Страница 8: ...ry Reset Wall Ceiling Installation Hole Used to screw the camera in place on a wall or a ceiling Power DC12V Connect this to the power adapter A A type jack is used for the power adapter External diam...

Страница 9: ...t alarm input from an electrical switch the signal must be higher than 4 3V from an NC switch or less than 0 3V from an NO switch and must last for longer than 0 5 seconds SD Memory Card Slot Used to...

Страница 10: ...4 Once the device turns back on wait 5 seconds and then release the reset button 5 The device will go through the resetting process and reboot All camera settings will be restored to their factory de...

Страница 11: ...the micro SD print facing upward micro SD micro SD Push the SD memory card until it disengages from the slot and then pull it out Installation Check the wall or ceiling to see if it needs to be reinfo...

Страница 12: ...3 Pull the cable slightly and arrange the rubber as shown below To pass through a thin cable or more than two cables it is advised to finish it using silicon to make sure waterproofed perfectly Silico...

Страница 13: ...For more information refer to the Angle Adjustment Angle Adjustment The lens can be rotated along three axes 3 2 1 1 Lens Rotation 3 Horizontal Rotation 2 Vertical Rotation Lens Rotation Used to adjus...

Страница 14: ...ide the dome cover as shown below Check the location of the wall ceiling installation hole Wall ceiling installation hole Before closing the dome cover make sure that the gasket ring is securely fixed...

Страница 15: ...Part 1 Introduction 15 Dimension 155mm 100mm 104 4mm 46 3mm 5 9mm...

Страница 16: ...Out Alarm Out Sensor In Audio In Network DirectIP NVR makes it easy to use cameras without extra network configurations Each camera can be controlled via the DirectIP NVR setup menu without any PC Fo...

Страница 17: ...ite Compact microSD Memory Card Alarm Out Alarm In Audio Out Audio In Control the camera over the network from software installed on a computer Ideal for using the camera over the network from a remot...

Страница 18: ...h Make sure the lens is in focus Adjust the focus during daytime If there is too much light coming into the camera or the camera is picking up an overly bright light source adjust the camera s positio...

Страница 19: ...V 22 WIDE 9 5 TELE D 47 3 WIDE 19 3 TELE Min Illumination COLOR 0 1 lux F1 4 B W 0 lux IR LED ON Dynamic Range 120dB True WDR Electronic Shutter Speed Auto Manual 1 30 1 10 000 Anti Flicker Slow Shutt...

Страница 20: ...e SD memory card regularly and replace it whenever necessary microSD Logo is a trademark of SD 3C LLC I O Audio In Out Line in 1ea Line out 1ea Alarm In 1 TTL NC NO Programmable 4 3V NC or 0 3V NO thr...

Страница 21: ...IDIS Co Ltd For more information please visit at www idisglobal com...

Отзывы: