39
©Godiva Ltd. Our policy is one of continuous development. We therefore reserve the
right to amend specifications without notice or obligation.
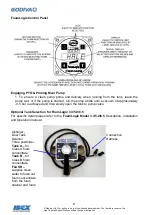
WET and DRY buttons
The WET (or DRY) button is used to position the air ratio control valve at the preset position
for the desired CAFS consistency. The WET button will open the valve to its WET preset
position, and the DRY button will close the valve to its DRY preset position.
The Smart Switch Panel will only open or close the valve within the operating range dictated
by the preset WET and DRY limits calibrated by the factory. The valve position bargraph
indicator will display one (1) bar on the bottom when the valve is positioned at the extreme
DRY position and all six (6) bars when the valve is positioned at the extreme WET position.
No valve movement beyond the WET/DRY limits is permitted. The system is only operational
when the compressor is engaged and the FoamLogix is turned on.
WET and DRY LEDs
The WET led flashes when the WET button is pressed and the valve is in transit to the WET
preset position. The WET LED lights steady when the valve is set to the preset WET position.
The DRY led flashes when the DRY button is pressed and the valve is in transit to the DRY
preset position. The DRY LED lights steady when the valve is set to the preset DRY position.
If the Compressor is engaged, pressing either the WET or DRY button will start the
FoamLogix and send the Air Ratio Control valve to its respective pre-set.
Note: the Air Ratio Control Valve can only be controlled when in CAFS mode.
Configure the WET and DRY presets
The operator can set the WET and DRY presets for desired CAFS consistency.
Run the water pump and select CAFS, open the branch nozzles.
Configure the WET preset
Press and hold the WET and DRY buttons simultaneously until the WET and DRY LEDs and
backlighting begin flashing (approximately three seconds). Release the buttons.
Use the OPEN and CLOSE buttons to position the valve for the desired wet CAFS
consistency.
Press and hold the WET button until the LEDs and backlighting stop flashing (approximately
two seconds).
The WET preset has been stored and the SPS panel is operating normally.
Configure the DRY preset
Press and hold the WET and DRY buttons simultaneously until the WET and DRY LEDs and
backlighting begin flashing (approximately three seconds). Release the buttons.
Use the OPEN and CLOSE buttons to position the valve for the desired dry CAFS
consistency.
Press and hold the DRY button until the LEDs and backlighting stop flashing (approximately
two seconds).
The DRY preset has been stored and the SPS panel is operating normally.
OPEN and CLOSE buttons
The OPEN (or CLOSE) button is used to position the valve at any point between the open
and closed preset positions. When the OPEN (or CLOSED) button is pressed the WET (or
DRY) LEDs will be turned OFF.
OPEN and CLOSE LEDs
The OPEN (or CLOSE) LED will light while the OPEN (or CLOSE) button is pressed. These
LEDs will normally be off.


