background image


I-7232D CANopen/Modbus RTU Quick Start User Guide (Version 1.1,March/2006, I-7232D)  -----

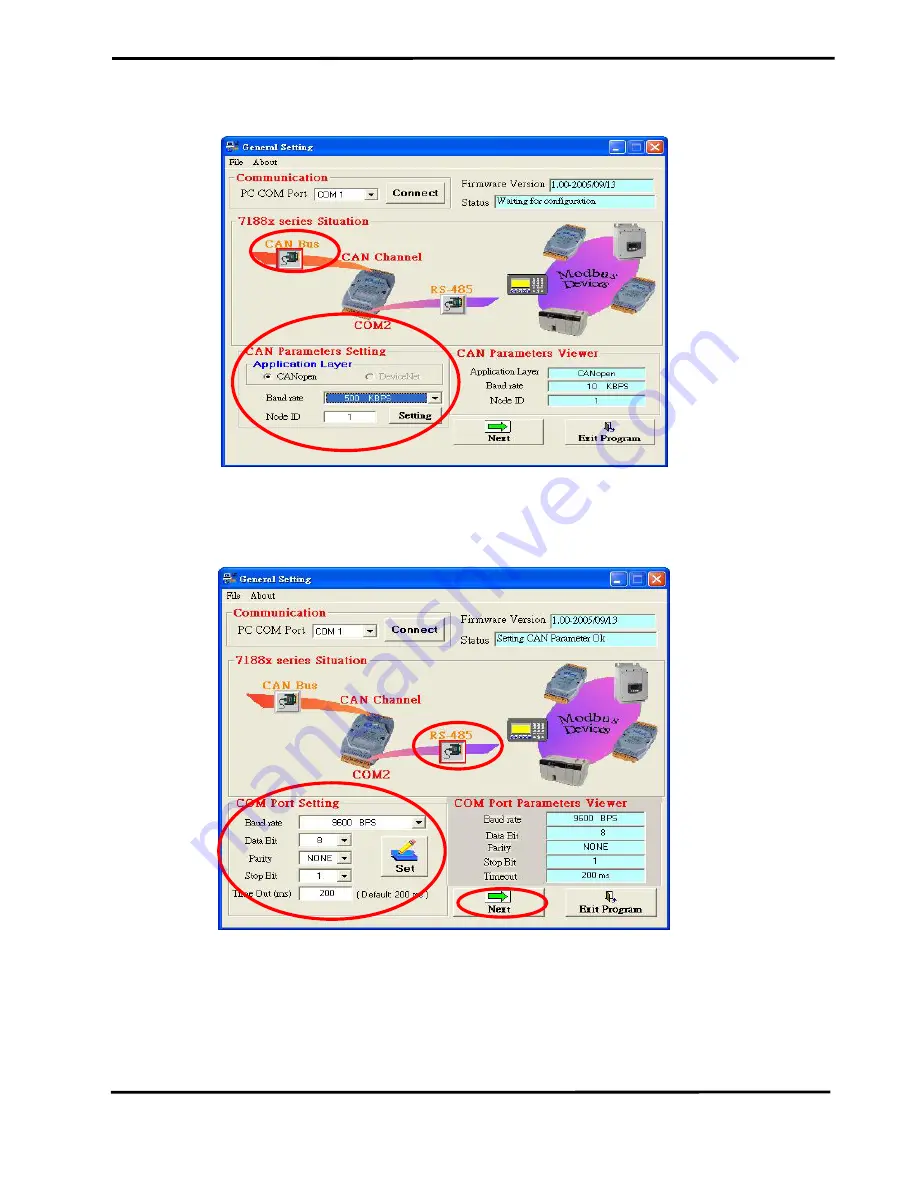
Step 6: Click the “CAN Bus” button to configure the CAN communication parameters 

for I-7232D. 


Step 7: Click the “RS-485” button to configure the RS-485 parameters for the 

CANopen/Modbus RTU gateway. These parameters need to match with the 

communication parameters of Modbus RTU modules.


Afterwards, click the 

“Next” button to next step. 


Step 8: You have to input the Modbus device NodeID, Relay Address, Register/Relay 

Address and Data Length for one Modbus device connected with I-7232D. 

These parameters are decided from this Modbus RTU device. Then click 

“ADD” button to save the parameters settings. Repeat the action described 

above if you have another Modbus device. When you finish these steps, 

please click “Next” button to next step. 

Содержание I-7232D

Страница 1: ...ns If users want to know more detail information about the I 7232D please refer to the I 7232D user manual in the product CD or download it from following web site http www icpdas com download can ind...

Страница 2: ...ps 3 125 K bps 9600 bps 4 250 K bps 19200 bps 5 500 K bps 38400 bps 6 800 K bps 57600 bps 7 1000 K bps 115200 bps Bypass CAN Bus Connector 7 segment LED RS 232 Port connect to PC Reserve for further u...

Страница 3: ...I 7232D CANopen Modbus RTU Quick Start User Guide Version 1 1 March 2006 I 7232D 3 4 How to Start...

Страница 4: ...ng the CANopen Modbus RTU Gateway Utility please connect the COM1 of the I 7232D with the available COM port of your PC Also connect the configured Modbus RTU modules with the COM2 of the I 7232D The...

Страница 5: ...ure will be displayed Then click the connect button Note When the CAN_MRU exe can t get the configuration information from the EEPROM it may response a Warning dialog as follows This situation may be...

Страница 6: ...atch with the communication parameters of Modbus RTU modules Afterwards click the Next button to next step Step 8 You have to input the Modbus device NodeID Relay Address Register Relay Address and Da...

Страница 7: ...nformation please select the instance number corresponding to this device and click the Delete button the device information will be removed Users can click on the PDO Information or Modbus Informatio...

Страница 8: ...7232D Step 10 Turn off the I 7232D and remove the wire between the Init pin and GND pin of the I 7232D Then power on the I 7232D When the I 7232D has finished the initialization the RUN LED on the I...

Отзывы: