manualshive.com logo in svg
background image

INSTRUCTION MANUAL

This device complies with Part 15 of the FCC Rules. Opera-
tion is subject to the condition that this device does not cause 
harmful interference.

iF3230D

 Series

VHF DIGITAL TRANSCEIVERS

iF4230D

 Series

UHF DIGITAL TRANSCEIVERS

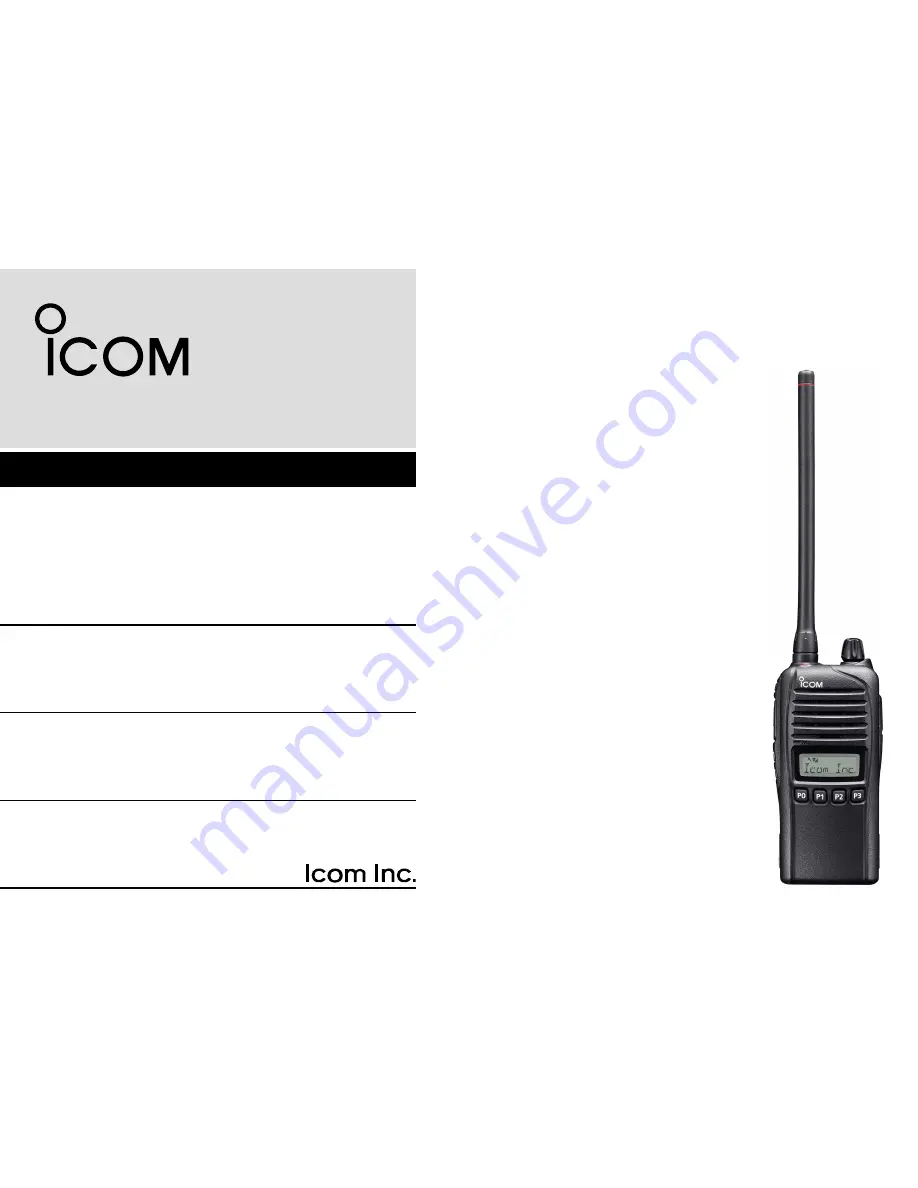
The photo shows the VHF 
transceiver (S type)

Содержание iF3230D Series

Страница 1: ...ith Part 15 of the FCC Rules Opera tion is subject to the condition that this device does not cause harmful interference iF3230DSeries VHF DIGITAL TRANSCEIVERS iF4230DSeries UHF DIGITAL TRANSCEIVERS T...

Страница 2: ...ury fire or electric shock VOICE CODING TECHNOLOGY The AMBE 2 voice coding Technology embodied in this product is protected by intellectual property rights including patent rights copyrights and trade...

Страница 3: ...ess may result in an accident CAUTION MAKE SURE the flexible antenna bat tery pack and jack cover are securely attached to the trans ceiver and that the antenna and battery pack are dry before attachm...

Страница 4: ...CAUTION Changes or modifications to this transceiver not expressly approved by Icom Inc could void your authority to operate this transceiver under FCC regulations PRECAUTIONS Continued BE CAREFUL Th...

Страница 5: ...mmable function keys 5 3 BASIC OPERATION 8 11 Turning power ON 8 Channel selection 9 Receiving and transmitting 10 User set mode 11 Priority A channel selection 11 4 BATTERY CHARGING 12 16 Caution 12...

Страница 6: ...24 Transmitting without an antenna may damage the transceiver Battery pack D D To attach the battery pack Slide the battery pack in the direction of the arrow q until the battery release button makes...

Страница 7: ...ack if it is attached q q Pinch the clip w w q and slide the belt clip in the direction of the arrow w q w Jack cover D D To attach the jack cover Attach the jack cover to the MIC SP jack q q q Tighte...

Страница 8: ...ndependently programmed by your dealer p 5 y DEALER PROGRAMMABLE KEYS P0 to P3 Desired functions can be independently programmed by your dealer p 5 u FUNCTION DISPLAY p 4 Displays a variety of informa...

Страница 9: ...ower decreases to a specified level low power is automatically selected t AUDIBLE ICON In the analog mode appears when the CTCSS DTCS squelch mute is released while holding down Monitor In the digital...

Страница 10: ...Private zone SCAN START STOP Push to start and cancel a scan When a scan is started with the Power ON Scan or Automatic scan function push this key to cancel it The cancelled scan re sumes after a pr...

Страница 11: ...played to elec tronically lock all programmable keys except the following Moni Lock Emergency Surveillance Siren Lone Worker Light and Shift For digital operation See the operating guide for details T...

Страница 12: ...ms may differ depending on the preprogram ming Hold down this key for 1 second again to exit the User Set mode ANNOUNCE Push to turn the Channel Announce function ON or OFF When this function is turne...

Страница 13: ...9 3 8 2 7 1 6 Side3 P0 P1 P2 P3 Side3 VOL e e When the PASSWORD indication does not clear after in putting 4 digits the input code number may be incorrect Turn the power off and start over in this cas...

Страница 14: ...rio B Rewrite ZONE TYPE To select the desired operating channel Push Zone then push CH Up or CH Down VOTING OPERATION The transceiver automatically starts scanning when a zone specified for the voting...

Страница 15: ...ignal 1 Pause briefly after pushing PTT 2 Hold the microphone 5 to 10 cm 2 to 4 inches from your mouth then speak at a normal voice level Transmitting notes D D Transmit inhibit function The transceiv...

Страница 16: ...d level or condition Selectable Set mode items are Backlight Beep ON OFF Beep Level Ringer Level SQL Level AF Min Level Mic Gain Battery Voltage Signal Moni Lone Worker and System Info Hold down User...

Страница 17: ...O NOT expose the battery to rain snow seawa ter or any other liquids Never charge or use a wet battery If the battery gets wet be sure to wipe it dry before using R DANGER NEVER incinerate used batter...

Страница 18: ...uing to charge the battery beyond the specified time limit may cause a fire overheating or the battery may rupture R WARNING NEVER insert the transceiver battery attached to the transceiver into the c...

Страница 19: ...socket can be used instead of the AC adapter Transceiver Battery pack Turn power OFF CAUTION NEVER connect the OPC 515L to a power source using reverse polarity This will ruin the battery charger Whit...

Страница 20: ...used instead of the AC adapter Transceiver Battery pack Turn power OFF CAUTION NEVER connect the OPC 515L to a power source using reverse polarity This will ruin the battery charger White line Black...

Страница 21: ...e power Status indicator each indicator independently functions OPC 656 DC power cable AC adapter No AC adapt er is supplied depending on the version Connect to a DC power supply 12 to 16 V at least 7...

Страница 22: ...he arrow e e e then close r Push the battery cover release hook until it makes a click sound t Fig 3 CAUTION When installing the batteries make sure they are all the same brand type and capacity Also...

Страница 23: ...direction of the arrow e e e then close r Push the battery cover release hook until it makes a click sound t Fig 3 CAUTION When installing the batteries make sure they are all the same brand type and...

Страница 24: ...D Slide the battery case s battery release button in the direction of the arrow q and then push the release button in the di rection of the arrow w The battery pack is then released q w NEVER release...

Страница 25: ...hone is located as shown in the dia gram above To maximize the readability of your transmit ted signal voice hold the microphone approximately 5 to 10 cm 2 to 4 inches from your mouth and speak in a n...

Страница 26: ...of the arrow until the base clip locks and makes a click sound Attach the battery pack p 1 e e Clip the belt clip to a part of your belt And insert the trans r r ceiver into the belt clip until the b...

Страница 27: ...the battery pack if it is attached p 1 w w e e Pinch the clip q and slide the base clip in the direction of the arrow w q w CAUTION HOLD THE TRANSCEIVER TIGHTLY WHEN HANGING OR DETACHING THE TRANSCEI...

Страница 28: ...imultaneously An AC adapter should be pur chased separately Charging time Approximately 3 hours for the BP 232WP BC 160 desktop charger BC 145S ac adapter For rapid charging of battery packs An AC ada...

Страница 29: ...MHz FA SC57U 430 470 MHz FA SC72U 470 520 MHz FA SC62V 150 160 MHz FA SC63V 155 165 MHz FA SC03U 380 430 MHz FA SC56VS FA SC57VS FA SC73US stubby antennas FA SC56VS 150 162 MHz FA SC57VS 160 174 MHz F...

Страница 30: ...guidelines DO NOT operate the radio without a proper antenna attached as this may damaged the radio and may also cause you to exceed FCC and IC RF exposure limits A proper antenna is the antenna supp...

Страница 31: ...isque d endommager la radio et causer une exposition sup rieure aux limites tablies par la FCC et d IC L antenne appropri e est celle qui est fournie avec cette radio par le fabricant ou une antenne s...

Страница 32: ...1 1 32 Kamiminami Hirano ku Osaka 547 0003 Japan A 7082D 1EX 0b Printed in Japan 2013 Icom Inc Printed on recycled paper with soy ink...

Отзывы: