background image

9

MEMORY OPERATION

9-11

Entering a group/memory name

You can assign a name of up to 16 characters to each 

channel group (00 ~ 99) and memory channel�

Example:

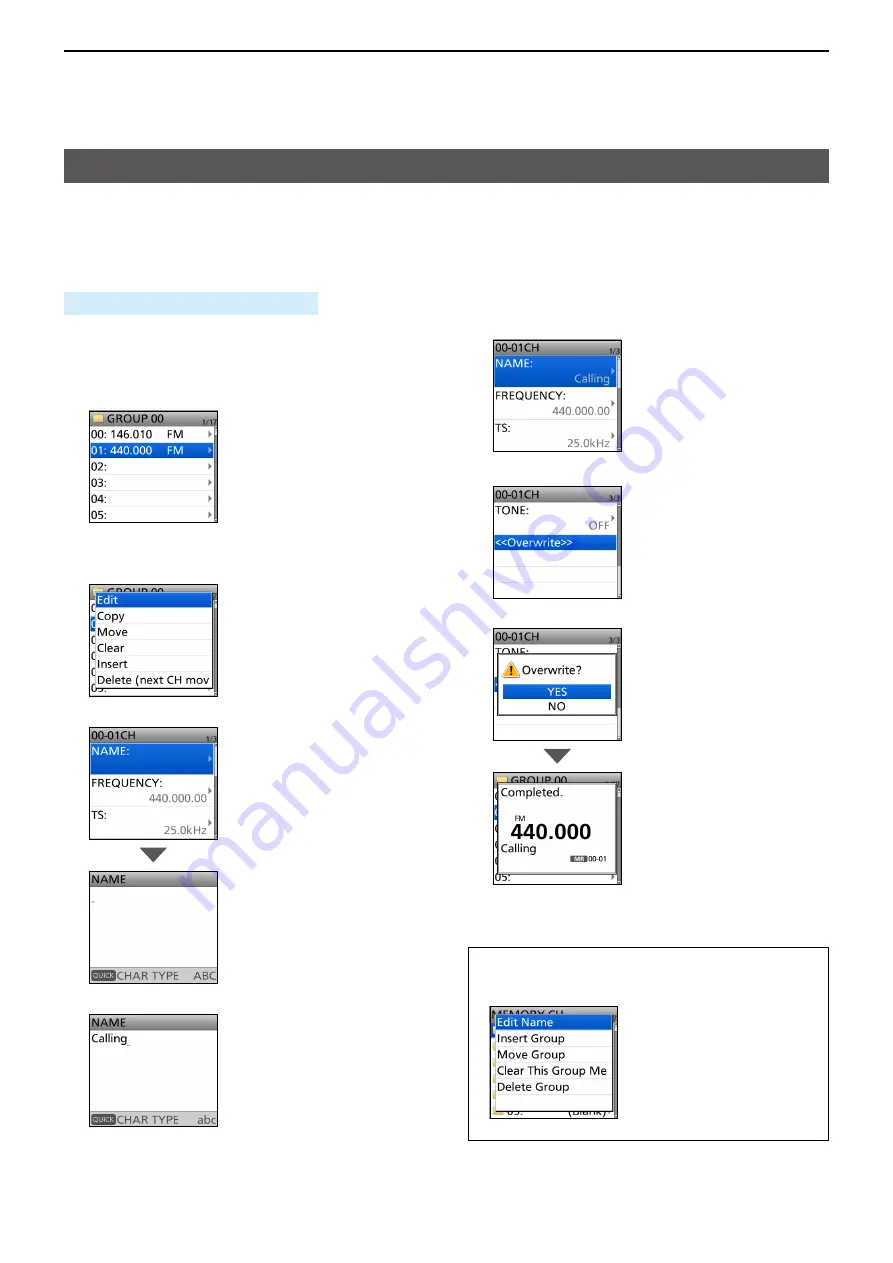
  Entering “Calling” as a Memory name to 

Channel 01 in Group 00�

[MENU] > MEMORY > 

Memory CH

1�  Push [MENU]�

2�  Select “MEMORY�”

3�  Select “Memory CH�”

4�  Select Group “00�”

5�  Select Channel “01�” 


L

DO NOT

 push [ENT]�

6�  Push [QUICK]�

7�  Select “Edit�” 

8�  Select “NAME�” 

9�  Enter a name� 


L

See page iii on how to enter characters�

10� After entering, push [ENT]� 

11� Select “<<Overwrite>>�” 

12� Select “YES�” 

 • Beeps sound, then returns to the Memory channel 

screen�

TIP:  To enter a group name

On the Memory Group list screen, select a group 

and push [QUICK], then select “Edit Name�”


 • The Group Name edit screen is displayed�

Содержание ID-52A

Страница 1: ...NSCEIVER ID 52A ID 52E 1 ATTACHING ACCESSORIES 2 USING a microSD CARD 3 BATTERY CHARGING 4 FM RADIO OPERATION 5 D STAR OPERATION ADVANCED 6 GPS OPERATION ADVANCED 7 VOICE TX FUNCTION 8 RECORDER FUNCTI...

Страница 2: ...sed in remote control operation serial communication using CI V About the DV Gateway function PDF type Instructions for the system requirements or operations to use the DV Gateway function Updating th...

Страница 3: ...n Advanced search screen Printing out the desired pages Click Find Ctrl F or Advanced Search Shift Ctrl F in the Edit menu to open the search screen This is convenient when searching for a particular...

Страница 4: ...o 9 space A a 123 0 to 9 space _ space TIP When the character type is ABC or abc and while entering a character push QUICK to select upper case or lower case letters Push QUICK To insert a text move t...

Страница 5: ...6 Normally 12 characters API52 DSTAR Comment ABC abc 123 43 The number of characters you can enter differs depending on the data extension and altitude settings Object Name Item name ABC abc 123 9 GPS...

Страница 6: ...Rotate DIAL to select a character then push ENT L LInformation To move the cursor forward push D pad To move the cursor backward push D pad To insert a character move the cursor to a place to enter t...

Страница 7: ...1 1 Section 1 Attaching the antenna 1 2 Attaching and detaching the battery 1 2 Attaching and detaching the belt clip 1 3 Attaching the hand strap 1 3 ATTACHING ACCESSORIES...

Страница 8: ...antenna TIP Third party high gain antennas may increase transceiver performance The optional AD 92SMA antenna connector adapter enables you to use antennas with a BNC connector p 17 2 NOTE Even when t...

Страница 9: ...is attached p 1 2 See the illustration below To attach the belt clip slide the belt clip in the direction of the arrow until the belt clip locks in place and makes a click sound To detach the belt cli...

Страница 10: ...saved on the microSD card onto a PC 2 5 D D About the microSD card s folder 2 5 D D Making a backup file on your PC 2 6 Importing or exporting a CSV format file 2 7 D D Importing 2 7 D D Exporting 2 8...

Страница 11: ...if you perform an All Reset You can save settings data as a new file or you can overwrite a current file D DSaving as a new file MENU SET SD Card Save Setting 1 Push MENU 2 Select SD Card in the SET m...

Страница 12: ...the SET menu 3 Select Save Setting 4 Select New File 5 Hold down CLR to delete the characters 6 Enter a file name and then push ENT L LSee page iii on how to enter characters 7 Select YES While saving...

Страница 13: ...in the SET menu 3 Select Load Setting 4 Select a data file to load into the transceiver 5 Select the loading content ALL Loads all Memory channels settings on the MENU screen and the Repeater List in...

Страница 14: ...mory folder The Your UR call sign memory in the csv format Gps folder The GPS logging data in the log format OpeningPicture folder The pictures in the bmp format that are used for the Opening Picture...

Страница 15: ...lder to copy a backup file then right click and then click Paste Copies the card data onto your PC Example Copying into the Backup folder on the C drive 6 To remove the card click the remove media ico...

Страница 16: ...4 or more characters If necessary rename them using 23 characters or less When exporting CSV format files using the CS 52 BE SURE the names are 23 characters or less Example Importing the Your Call si...

Страница 17: ...en L LThe file is named in the following format Your yyyymmdd_xx yyyy Year mm month dd day xx file number When you select the other items each file is named as shown below Memory CH Mch FM Radio Memor...

Страница 18: ...Connect 5 Select SD Card Mode The confirmation dialog is displayed 6 Select Yes NOTE Before connecting the transceiver in the SD Card mode to a PC with a USB cable a microSD card must be inserted L LI...

Страница 19: ...and the recording time on the microSD card MENU SET SD Card SD Card Info 1 Push MENU 2 Select SD Card in the SET menu 3 Select SD Card Info The free space and the recording time on the microSD card ar...

Страница 20: ...rapid charger 3 6 Connecting BC 202IP3L together 3 7 External DC power operation 3 7 About the optional battery case 3 8 D D Battery life 3 8 D D About the battery replacement 3 8 Specifications for t...

Страница 21: ...clean It s a good idea to clean them occasionally D DBattery icon The battery icon is displayed when the battery pack is attached to the transceiver Icon Battery status The battery is being charged T...

Страница 22: ...pack can be charged with the power ON p 3 7 L LTo connect see the illustration below The BP 273 battery case has no charging capability or socket Approximate charging time BP 271 3 hours BP 272 5 hou...

Страница 23: ...ting to a low output USB port Charging time may differ depending on the USB port The S meter may appear or the noise may occur due to the influence of the USB power supply s noise In that case unplug...

Страница 24: ...the charger s malfunction If the charging indicator blinks orange disconnect the power adapter from the charger and then reconnect it BE SURE to turn OFF the transceiver When the transceiver power can...

Страница 25: ...eiver to the rapid charger This may cause the charger s malfunction If the charging indicator blinks orange disconnect the power adapter from the charger and then reconnect it BE SURE to turn OFF the...

Страница 26: ...battery pack can be charged even if the transceiver is ON when Charging Power ON is set to ON default This operation may generate certain spurious signals and the S meter may appear or noise may be he...

Страница 27: ...reases the voltage to 5 5 V DC Approximately 100 mW of output power is possible using the case Also the transmit output power selection is disabled The transceiver meets IPX4 requirements for waterpro...

Страница 28: ...hes projections are not included D DBP 307 Li ion battery pack optional Voltage 7 2V Discharge Capacity 3050 mAh minimum Usable temperature range 20 C 60 C 4 F 140 F Charging temperature range 0 C 40...

Страница 29: ...Attenuator function 4 4 D D Setting a squelch level 4 5 D D Using the Monitor function 4 5 FM Radio memory 4 6 D D Using the FM Radio Memory 4 6 D D Add an FM Radio memory 4 6 D D Editing an FM radio...

Страница 30: ...g ON the FM Radio 1 Push QUICK 2 Select FM Radio ON Returns to the standby screen and the FM RADIO window is displayed is displayed Displayed when the FM Radio is ON TIP To turn OFF the FM Radio Push...

Страница 31: ...o Memory channels can be assigned to each group for easy memory management If you change the group other area channels can be selected 1 Push MR to select the Memory mode and the selected memory chann...

Страница 32: ...ignal is near the frequency or when a very strong electric field such as from a broadcasting station is near your location 1 Push QUICK 2 Select ATT 3 Select ON ATT is displayed Displayed when the Att...

Страница 33: ...elch level L LInformation Options OPEN AUTO default and LEVEL 1 LEVEL 3 LEVEL 1 is loose squelch for weak signals and LEVEL 3 is tight squelch for strong signals AUTO is an automatic level adjustment...

Страница 34: ...memory for easy memory management TIP The FM Radio memory contents described in this manual may differ from your transceiver s programmed memory D DAdd an FM Radio memory Step 1 Adding an FM Radio mem...

Страница 35: ...usable frequency range differs depending on the transceiver s version 3 After entering push ENT Step 4 Selecting the skip setting 1 Select SKIP 2 Select OFF or SKIP OFF You can select the memory in t...

Страница 36: ...he list MENU FM RADIO FM Radio Memory 1 Push MENU 2 Select FM Radio Memory in the FM RADIO menu 3 Select a group that includes the memory you want to edit 4 Select the memory to be edited L LDO NOT pu...

Страница 37: ...NOTE Deleted memories cannot be restored MENU FM RADIO FM Radio Memory 1 Push MENU 2 Select FM Radio Memory in the FM RADIO menu 3 Select a group that includes the memory you want to delete 4 Select...

Страница 38: ...Memory 1 Push MENU 2 Select FM Radio Memory in the FM RADIO menu 3 Select a group that includes the memory you want to move 4 Select the memory to be moved L LDO NOT push ENT 5 Push QUICK 6 Select Mo...

Страница 39: ...Select FM RADIO 3 Select FM Radio Memory 4 Select a group that includes the memory you want to set the skip setting on 5 Select the memory to be skipped L LDO NOT push ENT 6 Push QUICK 7 Select SKIP S...

Страница 40: ...ly the FM Radio functions 1 Push QUICK 2 Select FM Radio Mode The FM Radio mode screen is displayed TIP To cancel the FM Radio mode 1 Push QUICK 2 Select Normal Mode L LIn the exclusive FM Radio mode...

Страница 41: ...receiving the Auto Mute timer starts After the timer period ends you can listen to FM Radio again The FM Radio audio is muted when a signal is received during a sweep by the Band Scope function Earpho...

Страница 42: ...king a reflector 5 14 D D Linking to a reflector 5 15 D D Using a reflector 5 16 D D Reflector Echo testing 5 16 D D Requesting repeater information 5 16 Message operation 5 17 D D Entering a TX messa...

Страница 43: ...correct 5 44 D STAR OPERATION ADVANCED IMPORTANT The repeater list described in this manual may differ from your transceiver s preloaded contents Although Japanese repeaters are used in the setting e...

Страница 44: ...The scan also stops on Simplex signals The Near Repeater scan searches for output repeater frequencies of nearby repeaters by using your location and the repeater s location if it is entered in the R...

Страница 45: ...push ENT 3 Select Repeater List 4 Select the repeater group where your access repeater is listed TIP When you select an FM repeater When an FM repeater is in your transceiver s repeater list you can s...

Страница 46: ...nal the repeater may not receive your signal because the repeater s output power is higher than your transceiver s and your signal does not reach the repeater TIP The DR scan scans the simplex frequen...

Страница 47: ...y take a few minutes depending on your operating environment If you have difficulties receiving we recommend that you try a different location L LIf your own location is not being received the last re...

Страница 48: ...DR screen 2 Push D pad to select FROM and then push ENT 3 Select TX History 4 Select the TX History DV or TX History FM TX History DV Displays the TX History of the DV repeaters TX History FM Displays...

Страница 49: ...m RX History When you receive a call repeater or caller station data is saved in RX History Select the destination from the record p 5 10 To select from TX History When you make a call the destination...

Страница 50: ...reen you can select the repeater to make a gateway call to Example Making a Gateway CQ call to the Hirano repeater from the Kirkland IA repeater 1 Hold down DR for 1 second to display the DR screen 2...

Страница 51: ...TO and then push ENT 3 Select Your Call Sign 4 Select a destination name or call sign Returns to the DR screen and the selected name is displayed in TO TIP After selecting a destination you can selec...

Страница 52: ...ering UR The destination station call sign can be directly entered Example Directly entering the call sign JM1ZLK 1 Hold down DR for 1 second to display the DR screen 2 Push D pad to select TO and the...

Страница 53: ...ct Direct Input RPT 4 Enter a call sign of up to 8 characters including spaces L LSee page iii on how to enter characters 5 After entering push ENT Returns to the DR screen and JP3YDH A is displayed i...

Страница 54: ...us screen When the POSITION setting p 5 34 is set to Approximate on the repeater list the direction data is not displayed if the distance to the repeater is less than 5 kilometers L LIf there is no po...

Страница 55: ...ector and you can hear other stations that are connected to the reflector CAN AUS USA UK D STAR reflector system Reflector Access repeater D DUnlinking a reflector Before trying to link to another ref...

Страница 56: ...or and select the reflector type reflector number or module letter 6 Push ENT Returns to the DR screen and Link to Reflector and REF030CL are displayed in TO 7 Hold down PTT to link to the Reflector U...

Страница 57: ...to select TO and then push ENT The TO SELECT screen is displayed 2 Select Reflector The REFLECTOR screen is displayed 3 Select Echo Test Returns to the DR screen and Echo Test and E are displayed in...

Страница 58: ...nsmitting a message You can transmit a preset TX message by pushing PTT in the DV mode First select a TX message which also turns ON the Message Transmission function MENU SET My Station TX Message 1...

Страница 59: ...ntered TX message JAPAN TOM from TX message memory number 1 1 Push MENU 2 Select My Station in the SET menu 3 Select TX Message 4 Select a TX Message memory number L LDO NOT push ENT 5 Push QUICK 6 Se...

Страница 60: ...lay The received data is displayed in the Name Display mode Delete Deletes the selected RX history Delete All Deletes all RX history 3 Push ENT Displays the RX history detail screen L LPush D pad to v...

Страница 61: ...X HISTORY or the detail screen push QUICK then select Delete or Delete All TIP RX RPT1 setting may differ depending on the way the call was made Example 1 When a Local area call is received JM1ZLK cal...

Страница 62: ...h DSQL the squelch never opens no audio is heard even if a call is received unless the call is addressed to your call sign However when a call including the BK ON signal break in call is received the...

Страница 63: ...U 2 Select DV Set in the SET menu 3 Select EMR 4 Select ON 5 Push MENU Returns to the Standby screen and EMR is displayed Push PTT The TX RX indicator lights red while transmitting L L EMR blinks on a...

Страница 64: ...signals even if this function is ON You can silently wait for calls from others MENU SET DV Set DV Auto Detect 1 Push MENU 2 Select DV Set in the SET menu 3 Select DV Auto Detect 4 Select ON L LTo exi...

Страница 65: ...ply is sent Voice Automatically replies with your own call sign and an Auto Reply message recorded on the microSD card up to 10 seconds L LIf no SD card is inserted or no message is recorded replies w...

Страница 66: ...se it to stop recording L L Information The maximum recording time is 10 seconds Hold the microphone 5 10 cm 2 4 inches from your mouth then speak at your normal voice level Only 1 message can be reco...

Страница 67: ...ved After receiving a call addressed to your call sign the internal GPS receiver is temporarily turned ON for approximately 5 minutes to receive your position data even if GPS Select is set to OFF or...

Страница 68: ...it Parity none Stop 1 bit Flow control Xon Xoff Depending on the PC environment the COM port number used by the ID 52A E may be higher than 5 In that case use an application that can set it to higher...

Страница 69: ...ata to other transceivers that can receive only slow speed data set GPS Data Speed to Slow p 6 4 MENU SET DV Set DV Fast Data GPS Data Speed MENU SET DV Set DV Fast Data Fast Data 1 Push MENU 2 Select...

Страница 70: ...OT use the Digital Call Sign Squelch function when communicating with 2 or more stations because it opens only when receiving a signal addressed to your call sign Therefore the function can be used wh...

Страница 71: ...be downloaded from the Icom website See Updating the repeater list that can be downloaded from the Icom website about how to update the repeater list using a microSD card https www icomjapan com supp...

Страница 72: ...peater s call sign must be entered first D DRequired items for the communication cases Repeater list contents Used as an access repeater Used as a destination repeater Used as an FM repeater Simplex F...

Страница 73: ...er entering push ENT Step 5 Entering the repeater call sign L LWhen Step 2 Selecting the communication type is set to DV Simplex or FM Simplex go to Step 7 Changing the repeater group 1 Select CALL SI...

Страница 74: ...information into the repeater list Step 10 Selecting the Duplex direction L LWhen Step 2 Selecting the communication type is set to DV Simplex or FM Simplex this item is not displayed L L DUP is autom...

Страница 75: ...ing the tone is set to TONE or TSQL 1 Select REPEATER TONE 2 Rotate DIAL to select the repeater tone frequency and then push ENT D D Entering new information into the repeater list Step 15 Selecting t...

Страница 76: ...offset is the time difference between UTC and repeater local time This is a useful function to know the repeater s local time before you make a call p 5 13 1 Select UTC OFFSET 2 Rotate DIAL to set th...

Страница 77: ...displayed 9 Select YES The edited contents are saved to the repeater list and return to the selected repeater group screen L LTo exit the MENU screen push MENU D DDeleting repeater data MENU MEMORY R...

Страница 78: ...e the repeater you want to move is listed 5 Select the repeater to be moved L LDO NOT push ENT 6 Push QUICK 7 Select Move 8 Select the position to insert the repeater you want to move the repeater abo...

Страница 79: ...all sign that you want to add to the repeater list Displays the REPEATER LIST EDIT screen The selected repeater call sign is automatically entered L LIf the selected repeater is already in the repeate...

Страница 80: ...st 4 Select a repeater group where the repeater you set the skip setting is listed 5 Select the repeater to be skipped and then push QUICK 6 Select SKIP L LDisplays SKIP by the selected repeater L LSe...

Страница 81: ...u edit the name L LDO NOT push ENT L LIf you select an already named group the name is overwritten 5 Push QUICK 6 Select Edit Name 7 Enter a group name of up to 16 characters Selectable characters and...

Страница 82: ...he Your Call Sign memory 1 Push MENU 2 Select MEMORY on the second page of the MENU screen 3 Select Your Call Sign 4 Push QUICK on the YOUR CALL SIGN screen 5 Select Add 6 Select NAME 7 Enter a statio...

Страница 83: ...r Call Sign D DDeleting Your Call Sign MENU MEMORY Your Call Sign 1 Push MENU 2 Select MEMORY on the second page of the MENU screen 3 Select Your Call Sign 4 Select a call sign you want to delete L LD...

Страница 84: ...2 Select MEMORY on the second page of the MENU screen 3 Select Your Call Sign 4 Select a Your Call Sign to be moved L LDO NOT push ENT 5 Push QUICK 6 Select Move Your Call Sign 7 Select the position...

Страница 85: ...ano this is JA3YUA through JP3YHH port A for a local call CQ D STAR Hirano this is JA3YUA through JP3YHH port A for a local call CQ D STAR Hirano this is JA3YUA through JP3YHH port A for a local call...

Страница 86: ...D D D PRS 6 12 D D Operating in the D PRS mode 6 12 D D Displayed items 6 13 D D Setting D PRS Position Mobile Base 6 14 D D Setting D PRS Object Item 6 15 D D Setting D PRS Weather 6 16 D D Weather s...

Страница 87: ...hike Editing GPS Memories using a PC is easier than using the transceiver Editing GPS Memories using a PC is easier than using the transceiver GPS Alarm function p 6 27 When a target station comes int...

Страница 88: ...ding on your operating environment If you have difficulties receiving we recommend that you try a different position When GPS Select is set to Manual the icon is not displayed MENU GPS GPS Set GPS Sel...

Страница 89: ...station transmitting position data NMEA0183 received from the internal GPS receiver As of November 2021 The GPS TX mode GPS DV G and GPS A DV A are now called as NMEA DV G and D PRS DVA GPS DV G NMEA...

Страница 90: ...You can check your current location This section is described using received position data L LThe screens are just examples D DDisplaying Position Data 1 Push QUICK 2 Select GPS Position Opens the GP...

Страница 91: ...en GPS Select is set to Manual the compass heading and course direction are not displayed p 6 30 MENU GPS GPS Set GPS Select Depending on the caller s GPS TX Mode and TX format the displayed item s me...

Страница 92: ...red the weather data Weather Base station symbol For a base station Output power Antenna height Antenna gain and Antenna direction are displayed Position Base TX format NMEA L LA symbol or SSID is not...

Страница 93: ...e of the RX screen 1 Push QUICK when the RX screen is displayed 2 Select Display Select MAIN SUB 3 Select the item you want to switch Latest MAIN SUB Displays the target station s latest location info...

Страница 94: ...position compressed into a 6 character code calculated by the longitude and the latitude The locator is simply calculated by dividing the earth s surface into squares It is used to find the location...

Страница 95: ...and No Group 1 Select the screen that you want to save LTo save your own position MY screen LTo save a received position RX screen 2 Push QUICK 3 Select Add To GPS Memory LSee pages 6 22 6 24 for ente...

Страница 96: ...your station The altitude is only displayed when 4 or more satellites are tracked When 3 or less satellites are tracked ft is displayed Longitude Latitude Longitude and Latitude of your station TIP Th...

Страница 97: ...NET PC JA3YUA Z You can check the position on a map site D PRS positions D PRS positions D PRS positions Information from an APRS network DOperating in the D PRS mode To transmit D PRS data follow the...

Страница 98: ...FF Data extension Course Speed Data extension Power Height Gain Directivity Data extension OFF Data extension Course Speed Data extension Power Height Gain Directivity Unproto Address Comment Altitude...

Страница 99: ...in UTC Universal Time Coordinated time p 6 32 8 Setting the Altitude Set whether or not to transmit the altitude data acquired from the GPS receiver p 6 33 NOTE If you transmit with the altitude setti...

Страница 100: ...in the GPS memory you can easily set the position data from the memory Transmitting D PRS data 9 Setting the Data Extension Set the data extension of an Object or Item s information L LSet Data Extens...

Страница 101: ...directly enter the Symbol 5 Selecting the SSID To help identify your station s type select the APRS Automatic Packet Reporting System based SSID after the D PRS data call sign p 6 32 6 Entering a com...

Страница 102: ...higher than 5 Transmitting D PRS data D DConfirming the weather data input You can confirm whether or not the weather data is input into the USB port 1 Set GPS TX Mode to D PRS and TX format to Weath...

Страница 103: ...APRS fi site 1 Display a free APRS related map site on the Internet Example http aprs fi 2 Enter your call sign in the Track callsign field 3 Click Search The icon D PRS symbol is displayed on the ma...

Страница 104: ...n wSSID eUnproto Address rD PRS Data type Position with time stamp Position without time stamp Object Item tObject Name Item Name yData Type Live Object Live Item _ Killed Object Killed Item uTime Sta...

Страница 105: ...set to ON L LThe selectable GPS sentences are RMC GGA GLL VTG GSA and GSV The GGA sentence is set to ON as the default GPS sentence L LTo reset to the default setting push QUICK and then select Defaul...

Страница 106: ...You can confirm the entered message 9 To close the GPS Message screen push MENU NOTE Use the GPS Automatic Transmission function in only the Simplex mode Using the function through a Repeater may inte...

Страница 107: ...t GPS Memory in the GPS menu The previously added GPS Memories are displayed on the GPS MEMORY screen 3 Select No Group 4 Push QUICK 5 Select Add The GPS MEMORY EDIT screen is displayed TIP To edit th...

Страница 108: ...elect LATITUDE 2 Push D pad to move the cursor 3 Rotate DIAL to enter the latitude L L Information Set between 0 00 00 and 90 00 00 You can change the unit MENU SET Display Display Unit Latitude Longi...

Страница 109: ...n save up to 300 Memories in each group 9 Writing the GPS Memory 1 Select Add Write The confirmation dialog is displayed L LIf you edit a previously added GPS Memory select Overwrite 2 Select YES The...

Страница 110: ...ys to delete the Memories Deletes all GPS Memory in a group Deletes a specific GPS Memory NOTE Deleted GPS Memories cannot be restored MENU GPS GPS Memory Example Deleting all in Group E 1 Push MENU 2...

Страница 111: ...U 2 Select GPS Memory in the GPS menu 3 Select the group where the GPS Memory you want to move is saved 4 Select the GPS Memory to move and then push QUICK 5 Select Move DESTINATION blinks at the top...

Страница 112: ...roup or a selected GPS Memory Alarm Area Group Setting plural stations When All Memories or a GPS Memory group is selected Point C Sounds 3 beeps Your location Point A Point B 0 25 0 25 0 25 0 25 N Al...

Страница 113: ...GPS Memories L LInformation When either one of the group s stations enters the set range the alarm sounds 3 times When the transceiver sounds a GPS Alarm GPS ALARM is displayed on the screen and blink...

Страница 114: ...094 yards range it sounds once When it enters within an approximate 500 meters 547 yards range the alarm sounds 3 times When the transceiver sounds a GPS Alarm GPS ALARM is displayed on the screen and...

Страница 115: ...the GLONASS satellites Power Save Default Auto MENU GPS GPS Set GPS Option Power Save Selects whether or not to use the Power Save function for the internal GPS receiver When this function is ON and i...

Страница 116: ...l selected in step 1 Selecting a preset symbol 1 Select a symbol channel L LDO NOT push ENT 2 Push QUICK 3 Select Edit Symbol 4 Select a symbol Sets the symbol into the symbol channel selected in step...

Страница 117: ...he time stamp in the Day Hour and Minute format HMS Transmits the time stamp in the Hour Minute and Second format SSID Default MENU GPS GPS TX Mode D PRS TX Format Position SSID Selects an SSID based...

Страница 118: ...on The saved symbol is transmitted along with the position data while in the D PRS mode L LSee page 6 31 for details of editing a symbol Altitude Default OFF MENU GPS GPS TX Mode D PRS TX Format Posit...

Страница 119: ...Position Default LATITUDE 0 00 00 N LONGITUDE 0 00 00 W ALTITUDE ft MENU GPS GPS TX Mode D PRS TX Format Object Position Displays the position information of the Object Push QUICK to open the Quick Me...

Страница 120: ...Data Extension Default OFF MENU GPS GPS TX Mode D PRS TX Format Object Data Extension Selects whether or not to transmit the Course Speed data or the Power Hight Gain Directivity data with the positi...

Страница 121: ...em Speed Sets the Item s speed to between 0 and 1150 mph If the Speed unit is set to km h set to between 0 to 1850 km h or set to knots set to between 0 and 999 knots L LThis item is displayed when Da...

Страница 122: ...the gain of the Item s antenna to transmit along with the position data L LThis item is displayed when Data Extension is set to Power Height Gain Directivity Select between 0 and 9 dB Directivity Defa...

Страница 123: ...includes a space or not L LSee page 6 32 for details of the SSID The space in call sign is converted to 0 No SSID is added 1 15 Adds an SSID of 1 to 15 to your call sign A Z Adds an SSID of A to Z to...

Страница 124: ...ters p 6 21 NOTE When you do not want to send a message delete the entered message GPS Information MENU GPS GPS Information Displays the GPS satellite direction elevation angle satellite number and re...

Страница 125: ...de is NMEA Compass Displays the caller s direction from your location Latitude Displays the caller s latitude Longitude Displays the caller s longitude GL Displays the grid locator based on the latitu...

Страница 126: ...format is D PRS Object Item Compass Displays the Object Item s direction from your location Symbol Displays the Object Item s D PRS symbol Latitude Displays the Object Item s latitude Longitude Displ...

Страница 127: ...rometric pressure of the caller station s area GPS Time Stamp Displays the time that the caller acquired the position data MEM screen GPS memory position Compass Displays GPS Memory channel s directio...

Страница 128: ...lt OFF MENU GPS GPS Alarm Alarm Select Selects the target positions for the GPS Alarm function OFF Turns OFF the function RX The GPS Alarm sounds when a target the last received position enters your a...

Страница 129: ...GPS GPS Logger Turns the GPS Logger function ON or OFF This function logs the position altitude course speed and number of satellites being used OFF Turns OFF the function ON The transceiver automatic...

Страница 130: ...cally transmits the current position data received from a GPS receiver and any entered GPS message at the set interval OFF Does not automatically transmit the position data When you push PTT the trans...

Страница 131: ...ion 7 2 D D Recording the voice audio 7 2 D D Transmitting the recorded voice audio 7 3 VOICE items 7 4 VOICE TX FUNCTION NOTE See the Basic manual Section 6 for details on how to insert or remove a m...

Страница 132: ...E Record 1 Push MENU 2 Select VOICE 3 Select Record 4 Hold down PTT to record L L Information Hold the microphone 5 10 cm 2 4 inches from your mouth then speak at your normal voice level The maximum r...

Страница 133: ...TX Set Repeat Time Any of the following action cancels the transmission Pushing PTT Turning OFF the transceiver then turning it ON again Pushing any key except for VOL and After the second transmissi...

Страница 134: ...Default ON MENU VOICE TX Set TX Monitor Turns the TX Monitor function ON or OFF OFF The TX voice audio is not heard from the speaker ON The TX voice audio is heard from the speaker VOICE items Single...

Страница 135: ...he file information 8 7 Using the Voice Recorder function 8 9 D D To start recording 8 9 D D Playing back a recorded audio 8 10 D D Deleting an audio folder 8 11 D D Deleting an audio file 8 12 D D Vi...

Страница 136: ...The recording pauses while no signal is received and resumes when a signal is received again The recording continues until you manually stop recording or the card becomes full If the recording file s...

Страница 137: ...d of the previous file is played back Playing the previous file RX CS While the oldest file in the folder is playing back pushing RX CS plays back the same file While the file is paused pushing RX CS...

Страница 138: ...ording on the selected band MAIN band MENU RECORD QSO Recorder Recorder Set REC Operation L LThe default setting is A B Link recording simultaneously starts on the MAIN and SUB bands You can change th...

Страница 139: ...re deleted MENU RECORD QSO Recorder Play Files 1 Push MENU 2 Select RECORD 3 Select QSO Recorder 4 Select Play Files 5 Select the folder to delete L LDO NOT push ENT 6 Push QUICK 7 Select Delete The c...

Страница 140: ...ains the audio file to delete 6 Select the audio file to delete L LDO NOT push ENT 7 Push QUICK 8 Select Delete The confirmation dialog is displayed 9 Select YES The file is deleted L LTo exit the MEN...

Страница 141: ...lay Files 5 Select the folder that contains the audio file to view the information 6 Select the audio file to view the information L LDO NOT push ENT 7 Push QUICK 8 Select File Information 9 Rotate DI...

Страница 142: ...d in the following format yyyymmdd_hhmmss yyyy year mm month dd day hh hour mm minute ss second TX audio file information RX audio file information Operating information TX Recording date and time MY...

Страница 143: ...ording starts 6 Push PTT again to stop L LTo exit the MENU screen push MENU TIP Even if the external microphone or Bluetooth headset is connected the internal microphone s voice audio is recorded when...

Страница 144: ...page 8 16 for details You can fast forward or rewind the file by rotating DIAL The fast forward rewind time is 1 20 of the total file time regardless of the skip time setting If you push CD within the...

Страница 145: ...ecovered MENU RECORD Voice Recorder Play Files 1 Push MENU 2 Select RECORD 3 Select Voice Recorder 4 Select Play Files 5 Select the folder to delete L LDO NOT push ENT 6 Push QUICK 7 Select Delete The...

Страница 146: ...Push MENU 2 Select RECORD 3 Select Voice Recorder 4 Select Play Files 5 Select the folder that contains the audio file to delete 6 Select the audio file to delete L LDO NOT push ENT 7 Push QUICK 8 Se...

Страница 147: ...es 5 Select the folder that contains the audio file to view the information 6 Select the audio file to view the information L LDO NOT push ENT 7 Push QUICK 8 Select File Information L LTo exit the MEN...

Страница 148: ...older Double Click 4 Double click the Voice folder Double Click PC To the card reader microSD card ID 52A E 5 Double click the folder that contains the audio file to play it back Example 20211101 Doub...

Страница 149: ...Recorder Recorder Set RX REC Condition Selects whether or not the squelch status affects the received voice audio recording Always The transceiver always records the receive voice audio regardless of...

Страница 150: ...Record Push ENT to display the VOICE RECORDER screen and then push PTT to start a voice recording While recording push PTT again to stop the recording p 8 9 L LInformation BE SURE to insert a microSD...

Страница 151: ...D D Entering to a blank channel 9 5 Copying Memory content to the VFO 9 6 MEMORY screen 9 7 D D Tree view of the MEMORY screen 9 7 D D Viewing the Memory channel contents 9 7 Copying Memory contents t...

Страница 152: ...hannels Operating frequency Duplex ON OFF Duplex direction DUP or DUP Duplex frequency offset Memory name Scan skip setting Tuning step Operating mode Subaudible tone encoder tone squelch or DTCS sque...

Страница 153: ...used for the A and B bands On the B band if you select a memory channel that is out of the selectable frequency range is displayed and the signal cannot be received TIP To sequentially select a chann...

Страница 154: ...down MW for 1 second A short and a long beep sound 5 Select Write to New CH 6 Push QUICK 7 Select Group Select 8 Select Group 01 9 Rotate DIAL to select Channel 11 10 Push ENT The confirmation dialog...

Страница 155: ...hen select Group Select 3 Push VFO MHz to enter the VFO mode 4 Rotate DIAL to set a frequency to 146 330 MHz 5 Hold down MW for 1 second A short and a long beep sound 6 Select Write to Selected CH 7 P...

Страница 156: ...MR to enter the Memory mode L LFor only the ID 52A pushing MR each time selects the Memory and Weather Channel modes 2 Rotate DIAL to select Channel 11 in Group 01 L LTo select a Memory Group push QUI...

Страница 157: ...you can open the MEMORY screen by holding down MW for 1 second then selecting Manage Memory 3 Select Memory CH 4 Select Group 00 5 Select Channel 01 Channel contents are displayed L LRotate DIAL to sc...

Страница 158: ...lect Group 00 5 Select Channel 01 L LDO NOT push ENT 6 Push QUICK 7 Select Copy 8 Select the destination channel Beeps sound and the contents are copied to the destination channel L LIf the selected c...

Страница 159: ...MENU 2 Select MEMORY 3 Select Memory CH 4 Select Group 00 5 Select Channel 01 L LDO NOT push ENT 6 Push QUICK 7 Select Move 8 Push QUICK 9 Select Group Select 10 Select the destination group 11 Select...

Страница 160: ...MENU 2 Select MEMORY 3 Select Memory CH 4 Select Group 00 5 Select Channel 01 L LDO NOT push ENT 6 Push QUICK 7 Select Insert Beeps sound a blank channel is inserted above the selected channel L LIf y...

Страница 161: ...lect MEMORY 3 Select Memory CH 4 Select Group 00 5 Select Channel 01 L LDO NOT push ENT 6 Push QUICK 7 Select Edit 8 Select NAME 9 Enter a name L LSee page iii on how to enter characters 10 After ente...

Страница 162: ...4 Select a display type L L Freq Name OFF is set as the default TIP There are 5 types of Memory name displays Freq Name OFF Displays only the frequency Freq Normal Name Displays the large font sized...

Страница 163: ...annot be restored Example Clearing channel 01 in group 00 MENU MEMORY Memory CH 1 Push MENU 2 Select MEMORY 3 Select Memory CH 4 Select Group 00 5 Select Channel 01 L LDO NOT push ENT 6 Push QUICK 7 S...

Страница 164: ...ived 10 4 D D Scan Stop Beep function 10 4 VFO Scan 10 5 D D Scan Type 10 5 D D About a Program scan name 10 6 D D About a Program Link scan name 10 6 D D Storing the skip frequencies 10 6 D D Enterin...

Страница 165: ...signals on the preregistered memory channels ALL scan ALL Repeatedly scans all memory channels Memory Groups 00 99 and S Skip CH 00 01 02 98 99 S 03 Empty groups are skipped Jump Scan Selected band s...

Страница 166: ...n does not start when the frequency offset is set to 0 000 00 MHz Tone scan The Tone scan searches for signals with tone frequencies or DTCS codes from stations using the Tone Squelch function L LA To...

Страница 167: ...e The frequencies that are set as PSKIP are skipped during a scan p 10 6 In the Memory mode The frequencies that are set as skip channels PSKIP and SKIP are not scanned p 10 11 L LYou must enter 2 or...

Страница 168: ...rogram Link scan P00 24 Program scan TONE Tone scan For the Tone Squelch scanning L L Information The frequencies that are set as a Skip channel PSKIP are skipped during a scan p 10 6 When Program Ski...

Страница 169: ...Once a frequency is set as a Skip channel the frequency is skipped until you clear the skip setting To clear the skip setting see page 10 11 L LThe skip setting is also cleared when the Memory channel...

Страница 170: ...the MENU screen MENU SET Scan P Scan Edge 1 Push MENU 2 Select Scan in the SET menu 3 Select P Scan Edge 4 Select a blank Program scan range 00 24 L LDO NOT push ENT 5 Push QUICK 6 Select Edit The edi...

Страница 171: ...and select Edit Name at above step 4 To delete the registered Program Scan range from the Program Link select Delete at above step 6 D DAbout the Program Link Scan This item sets the Link function fo...

Страница 172: ...he Lock function ON or OFF The scan continuously runs even if you push MENU or QUICK during a scan You can select a scan type by rotating DIAL while holding down SCAN Release SCAN to start the scan NO...

Страница 173: ...a group 00 99 S SKIP CH 5 Push ENT to turn the Link function ON or OFF is displayed when the function is set to ON L LPush QUICK to quickly turn all the groups ON or OFF L LTo exit the MENU screen pu...

Страница 174: ...p function This function temporarily skips unwanted frequencies or memory channels during a scan for the set period of time or condition without changing the Skip Channel setting 1 While a scan is pau...

Страница 175: ...2 D D Checking the Repeater input signal 11 3 D D 1750 Hz tone burst 11 3 Duplex operation 11 4 D D Setting the frequency offset 11 4 D D Setting the duplex direction 11 4 D D Duplex operation 11 4 Au...

Страница 176: ...epeater 4 Set the offset frequency and the Duplex direction p 11 4 The Duplex icon is displayed 5 Set the Repeater tone Default 88 5 Hz MENU SET DUP TONE Repeater Tone p 12 4 6 Push MENU to exit the M...

Страница 177: ...Select T CALL 5 Push MENU to exit the MENU screen 6 Rotate DIAL to set the frequency received from a repeater 7 Set the offset frequency and the duplex direction p 11 4 The duplex icon is displayed 8...

Страница 178: ...h PTT and transmit will be inhibited p 11 5 D DSetting the duplex direction 1 Push QUICK 2 Select DUP 3 Select the duplex direction OFF For simplex operation the receive and transmit frequencies are t...

Страница 179: ...ve changed the duplex setting MENU SET Function Auto Repeater 1 Push MENU 2 Select Function in the SET menu 3 Select Auto Repeater 4 Select the option to turn ON the Auto Repeater function OFF Turns O...

Страница 180: ...2 D D Selecting an item 12 3 DUP TONE 12 4 Scan 12 5 Scope 12 7 Call Sign 12 8 My Station 12 9 DV Set 12 10 SPEECH 12 13 DTMF T CALL 12 14 QSO RX Log 12 15 Function 12 18 Display 12 25 Sounds 12 29 Ti...

Страница 181: ...he MENU screen and the standby screen ENT Sets an option Goes to the previous tree level Goes to the next tree level Returns to the default setting Selects an item or option Simplified description Sel...

Страница 182: ...er OFF 1 Push MENU 2 Select SET 3 Select Time Set 4 Select Auto Power OFF 5 Select 30min Sets the option then goes back to a tree level The TIME SET screen is displayed L LTo exit the MENU screen push...

Страница 183: ...ou transmit a signal that superimposes the CTCSS tone the other station may hear a short burst of noise from their receiver just after you stop transmitting ON When you transmit a signal that superimp...

Страница 184: ...ary Skip channels are skipped for the set period of time While Scanning The Temporary Skip channels are skipped until the Scan is stopped While Powered ON The Temporary Skip channels are skipped until...

Страница 185: ...sion L LWhen only one Program Scan Edge range is entered or there is no Programmed Scan Edge is left Add is not displayed after pushing QUICK DUP Check During MR Scan Default OFF MENU SET Scan DUP Che...

Страница 186: ...unction is ON OFF Turns OFF the Waterfall display ON Turns ON the Waterfall display Waterfall Speed Default Fast MENU SET Scope Waterfall Speed Selects the waterfall speed Slow Sets the Waterfall spee...

Страница 187: ...symbol 5 Push D pad to move the cursor 6 Repeat steps 4 and 5 to enter the repeater call sign of up to 8 characters including a space Example JP3YHH A 7 After entering push ENT Saves the entered repe...

Страница 188: ...for MY Call Sign entry L LTo select another My Call Sign push D pad to select a call sign and then push ENT on the MY CALL SIGN screen TX Message MENU SET My Station TX Message The transceiver has a t...

Страница 189: ...your own call sign MY No audio reply is sent Voice Replies with your call sign MY and any Auto Reply message recorded on the microSD up to 10 seconds L LThe transmitted audio can be monitored L LIf n...

Страница 190: ...call sign OFF Turns OFF the function ON Automatically sets the repeater call sign DV Auto Detect Default OFF MENU SET DV Set DV Auto Detect Turns the DV mode Automatic Detect function ON or OFF When i...

Страница 191: ...tion is automatically turned OFF when the transceiver is turned OFF EMR AF Level Default 19 MENU SET DV Set EMR AF Level Sets the audio output level when an EMR communication mode signal is received W...

Страница 192: ...dio is muted and the audio is not recorded onto the microSD card OFF The station call sign is not announced ON The station call sign is announced DIAL SPEECH Default OFF MENU SET SPEECH DIAL SPEECH Tu...

Страница 193: ...racters per second 200ms Transmits the DTMF codes at about 200 milliseconds per code 2 5 characters per second 300ms Transmits the DTMF codes at about 300 milliseconds per code 1 6 characters per seco...

Страница 194: ...d in the csv format L LThis function requires a microSD card User supplied OFF The RX History Log function is OFF ON The transceiver makes a DV mode s receive history log on the microSD card The trans...

Страница 195: ...meters Records to one decimal place RF Power LOW Blank TX output power level S meter Blank S0 The relative signal strength of the receive signal in 14 levels RPT Call Sign JP3YHJ JP3YHJ A Repeater cal...

Страница 196: ...s to one decimal place SSID A Caller s SSID if sent 0 1 to 15 A to Z D PRS Symbol Car Icon Converts to text None Code Course 123 Caller s course unit degrees Speed 23 5 Caller s speed unit km h Record...

Страница 197: ...ON MENU SET Function Dial Speed UP Turns the Dial Speed Acceleration ON or OFF The acceleration automatically increases the tuning speed when you rapidly rotate DIAL OFF Turns OFF the function ON Tur...

Страница 198: ...kipped while scanning The selected frequencies are temporarily skipped for faster scanning RX CS Hold down for 1 second to set the last calling station s call sign to TO destination L LIf RX CS Key is...

Страница 199: ...he volume level VOL DOWN Push to decrease the volume level Voice TX Push to transmit the voice audio recorded on the microSD card once Hold down for 1 second to repeatedly transmit the voice audio L L...

Страница 200: ...time OFF Turns OFF the function 1 to 30 min The transmission is cut OFF after the set period of time ends 1 3 5 10 15 or 30 minutes Active Band Default All MENU SET Function Active Band Selects whethe...

Страница 201: ...when using the HS 95 Other Select when using the HS 94 or HS 97 CI V Address Default A6 MENU SET Function CI V CI V Address Sets the CI V address in hexadecimal code L LTo distinguish devices each CI...

Страница 202: ...t temporarily stops recording and logging TIP Download the USB driver and the installation guide from the Icom website https www icomjapan com support USB Serialport Function Default CI V Echo Back OF...

Страница 203: ...an external power source Screen Capture PWR Key Default OFF MENU SET Function Screen Capture PWR Key Assigns the Screen Capture function to OFF does not act as the Screen Capture key ON Pushing captu...

Страница 204: ...ght brightness OFF The backlight immediately goes out after the set period of time in Backlight Timer ON The backlight brightness automatically changes to the Brightness Dim level after the set period...

Страница 205: ...signal ON The indicator is displayed when the position data is included in the received signal L LWhen RX Call Sign is set to OFF the indicator is not displayed even though position data is included i...

Страница 206: ...message at power ON When you set this item to ON Icom logo MY call sign and the model are displayed Voltage Power ON Default ON MENU SET Display Voltage Power ON Selects whether or not to display the...

Страница 207: ...To display such characters in the DR screen or Menu mode set Display Language to Japanese L LWhen this item is set to English Display Language is not displayed When you set the system language of the...

Страница 208: ...ame as the VFO mode audio 5 1 The FM Radio audio output level is lower than the VFO mode audio Earphone Mode Default OFF MENU SET Sounds Earphone Mode Turns the earphone mode ON or OFF While in the ea...

Страница 209: ...signal disappears on the SUB band a beep sounds L LWhen you set this item to Beep or Mute Beep a beep sounds even if no signal is received on the MAIN band Time Set DATE MENU SET Time Set Date Time DA...

Страница 210: ...therwise the data may be corrupted or deleted Load Setting MENU SET SD Card Load Setting Selects the saved data file to load Save Setting MENU SET SD Card Save Setting Saves the setting data onto a mi...

Страница 211: ...and microphone combination when both the Bluetooth headset and the transceiver microphone are used Normal Transmits the audio from the Bluetooth headset or the transceiver microphone whichever PTT is...

Страница 212: ...VOX function ON or OFF The VOX function starts transmission without pushing PTT when you speak into the microphone and then automatically returns to receive when you stop speaking L LTo use the VOX fu...

Страница 213: ...ds ON A beep sounds Custom Key Beep Default OFF MENU SET Bluetooth Set Headset Set Icom Headset Custom Key Beep Sets the beep sound when you push the Custom Key PLAY FWD RWD on the optional VS 3 heads...

Страница 214: ...rarily skipped for faster scanning RX CS Hold down for 1 second to set the last calling station s call sign to TO destination L LIf RX CS Key is set to RX CS List the received call sign is not capture...

Страница 215: ...mware s version number Clone Mode MENU SET Others Clone Clone Mode Enters the clone mode to read or write the CS 52 data from or to the PC L LRestart the transceiver to cancel the clone mode Partial R...

Страница 216: ...13 4 D D AF Output 13 4 D D Headset Function Select 13 4 D D Auto Disconnect 13 5 D D RX Priority Setting LE Device 13 5 D D VOX function 13 5 D D About the Icom headset VS 3 13 6 Editing the install...

Страница 217: ...he transceiver through Bluetooth and using the application you can use the extended D STAR functions such as data transmission and image transmission L LSee page 17 5 for the applications and how to p...

Страница 218: ...Pairing Connect 4 Select Device Search 5 Select Search Headset Displays the usable headsets in the pairing list 6 Select a headset to pair The confirmation dialog is displayed 7 Select YES After conne...

Страница 219: ...D DHeadset Function Select You can select the PTT and microphone combination when either a Bluetooth headset or the transceiver microphone are used L LSee page 12 32 for details MENU SET Bluetooth Se...

Страница 220: ...nt of time the transmitter stays ON after you stop speaking before the VOX switches to receive VOX Time Out Timer screen You can set the VOX Time Out Timer to prevent an accidental prolonged transmiss...

Страница 221: ...mporarily disconnects the Bluetooth connection if no communication or operation is performed for 120 seconds The Power Save function is disabled when the VOX function is ON One Touch PTT screen The On...

Страница 222: ...if you have trouble during Bluetooth operation L LAfter initializing the unit the pairing connect list is deleted but the Bluetooth settings and the unit name remain The Bluetooth settings return to t...

Страница 223: ...ng the PC or mobile device 14 4 Sending the picture 14 5 D D Moving the TX block marker 14 6 D D TX PICTURE SET 14 6 Viewing the pictures 14 7 D D Viewing the RX Picture History 14 7 D D Viewing the T...

Страница 224: ...se File type 1 JPEG The file extension is jpg Picture size 2 640 x 480 320 x 240 or 160 x 120 px File size 200 KB or less File name up to 23 characters except a filename extension 1 The transceiver ca...

Страница 225: ...en a received signal contains picture data When the received signal contains picture data the RX Picture icon is displayed RX Picture icon L LYou can turn OFF the RX Picture icon MENU SET Display RX P...

Страница 226: ...TE If you cannot transfer the picture check the following On the transceiver The transceiver is turned ON The Bluetooth function is ON The transceiver s firmware is the latest version A microSD card i...

Страница 227: ...ed 7 Push ENT 8 Set Picture Size Picture Quality and Receiver L LSee page 14 6 about each setting item 9 To close the TX PICTURE SET screen push MENU Step 2 Sending the picture 1 Push QUICK 2 Select P...

Страница 228: ...again 3 Select the setting item 4 Select an option 5 To close the TX PICTURE SET screen push MENU TIP You can set each item to its default by pushing QUICK and then selecting Default on the Quick Men...

Страница 229: ...h dd day callsign the caller s call sign xx serial number Delete Deletes the selected RX picture history data Delete All Deletes all RX picture history data D DViewing the TX Picture History When you...

Страница 230: ...p 14 7 Otherwise the received picture is not saved in the Picture folder on the card MENU SET SD Card TX RX Picture View 1 Push MENU 2 Select SD Card in the SET menu 3 Select TX RX Picture View 4 Sel...

Страница 231: ...tion 15 8 DTCS code squelch operation 15 9 VOX function 15 10 D D Selecting the headset type 15 10 D D Using the VOX function 15 11 D D Setting the VOX level 15 11 D D VOX related settings 15 12 Weath...

Страница 232: ...the Center mode While stopping a sweep You can select the Band Scope display mode from three modes the Center mode the FIX mode and the Scroll FIX mode Center mode Displays signals around the operatin...

Страница 233: ...D DUsing the Waterfall display On the single band display you can turn the waterfall display ON or OFF TIP If the tuning step is set too wide the signals in the sweep range may not be displayed they...

Страница 234: ...e CH Set 5 Select Set Frequency VFO mode Set Channel Memory mode or Set Repeater DR screen Sets a Home Channel then returns to the standby screen TIP Selecting Clear in Step 4 clears the Home channel...

Страница 235: ...ge iii on how to enter characters L LTo exit the MENU screen push MENU TIP To clear the entered DTMF code push QUICK on the DTMF MEMORY screen then select Clear D DMonitoring the entered DTMF code You...

Страница 236: ...ing the code until all the code is transmitted TIP In the standby screen you can transmit a DTMF code by pushing QUICK selecting DTMF TX and selecting a code D DTransmitting a DTMF code Direct Input 1...

Страница 237: ...TMF T CALL DTMF Speed 1 Push MENU 2 Select DTMF T CALL in the SET menu 3 Select DTMF Speed 4 Select a transmit speed Default 100ms L LTo exit the MENU screen push MENU The image of transmitting the DT...

Страница 238: ...ch function TSQL R Enables the Reverse Tone Squelch function TONE T DTCS R T DTCS is displayed T blinks When you transmit the selected subaudible tone is superimposed on your normal signal When you re...

Страница 239: ...indication DTCS Enables the DTCS Squelch function DTCS R Enables the Reverse DTCS Squelch function DTCS T DTCS blinks When you transmit the selected DTCS code is superimposed on your normal signal Wh...

Страница 240: ...C 2006LS into or from the MIC SP jack TIP You can also use the VOX function with the Bluetooth headset MENU SET Bluetooth Set Headset Set VOX See page 13 5 for details D DSelecting the headset type ME...

Страница 241: ...vel MENU SET Function MIC Gain External MENU SET Function VOX VOX Level 1 Push MENU 2 Select Function in the SET menu 3 Select VOX 4 Select VOX Level 5 While speaking into the microphone rotate DIAL t...

Страница 242: ...MENU screen VOX Delay MENU SET Function VOX VOX Delay The VOX delay is the amount of time the transmitter stays ON after you stop speaking It enables normal pauses in speaking p 12 22 VOX Time Out Tim...

Страница 243: ...alert function NOAA broadcast stations transmit weather alert tones before important weather announcements When the weather alert function is turned ON the selected weather channel is monitored every...

Страница 244: ...tured screen MENU SET SD Card Screen Capture View 1 Push MENU 2 Select SD Card in the SET menu 3 Select Screen Capture View The capture list is displayed The latest screen capture is at the bottom of...

Страница 245: ...roSD card L LSee page 2 5 for detail 2 Insert the microSD card into the transceiver Step 2 Setting the displayed picture Transceiver MENU SET SD Card Opening Picture 1 Push MENU 2 Select SD Card in th...

Страница 246: ...master transceiver then insert it into the sub transceiver 1 Turn OFF the master transceiver 2 Remove the microSD card from the master transceiver 3 Insert the card into the sub transceiver then turn...

Страница 247: ...he Repeater List into the transceiver Except My Station Loads all Memory channels setting on the MENU screen except MY call signs and the Repeater List into the transceiver Repeater List Only Loads on...

Страница 248: ...g the following Memory Channel contents Call Channel contents Radio Memory contents Scan Edge contents Message data GPS memory contents Call sign memories DTMF memory contents Repeater list Bluetooth...

Страница 249: ...16 2 D D Checking the firmware version 16 2 D D Preparation 16 3 D D Unzipping the firmware folder 16 3 Updating the firmware 16 4 UPDATING THE FIRMWARE NOTE See the Basic manual Section 6 for detail...

Страница 250: ...irst format your microSD card using the ID 52A E Then copy the downloaded firmware data from your PC into the ID 52 folder on the card D DChecking the firmware version Check the firmware version on th...

Страница 251: ...e as in the displayed File Download dialog 6 Select the location where you want to save the firmware and then click Save in the displayed File Download dialog Click The file starts downloading The fir...

Страница 252: ...ransceiver 3 Display the SD CARD screen MENU SET SD Card 4 Select Firmware Update 5 After you read and agree with all the precautions select YES Scroll the screen and read all the precautions The conf...

Страница 253: ...D D Required items 17 5 D D Download procedures Android device 17 6 D D Download procedures iOS device 17 6 D D When using a USB cable 17 6 Connecting an Android device to the transceiver through Blu...

Страница 254: ...3150 mAh typical Battery life Approximately 12 hours FM Cables CP 12L cigarette lighter cable With noise filter Fuse Coding FUSE 125V 3A Fuse Voltage Rating 125 Volts Fuse Current Rating 3 Amperes OPC...

Страница 255: ...or Android devices picture utility software ST 4001I For iOS devices picture utility software ST 4001W For Windows picture utility software You can download each manual and guide from the Icom website...

Страница 256: ...ol function Example Assigning the TO DR function to the A key MENU SET Function Remote MIC Key 1 Push MENU 2 Select Function in the SET menu 3 Select Remote MIC Key 4 Select During RX Standby 5 Select...

Страница 257: ...x 6 x x 7 x x 8 x x 9 0 and 10 0 As of November 2021 iOS device You can use the RS MS1I ST 4001I with devices that have iOS version 12 or later iPadOS version 13 or later installed L LThe ST 4001I has...

Страница 258: ...n 6 Touch GET Installation starts After finishing the installation the icon is displayed on the screen D DWhen using a USB cable Android device with the USB host function To a USB port To the USB port...

Страница 259: ...ault ICOM BT ID 52 p 13 7 L LSee the instruction manual of the Android device for details Turn ON Bluetooth with your Android device within the displayed period When the time runs out the transceiver...

Страница 260: ...n entered in the transceiver you should enter it before you connect L LAfter the connection has been made the transceiver displays MMM Connected and the Bluetooth icon is displayed Displayed L LOn the...

Страница 261: ...evice you must pair with it D DPairing with an iOS device This section describes how to pair with an iOS device NOTE You cannot pair with an iOS device in its Settings app To pair with an iOS device u...

Страница 262: ...etooth unit s name to connect Starts to connect L LWhen your call sign has not been entered in the transceiver enter it before you connect L LIf the connection has been made the transceiver displays M...

Страница 263: ...1 1 32 Kamiminami Hirano ku Osaka 547 0003 Japan A7608 5EX 1 2021 Icom Inc Nov 2021 How the World Communicates...

Отзывы: