18
OPTIONS
18-9
D
Required items
• Android
™
device
You can use the RS-MS1A with devices
that have Android
™
4.0 or later installed.
The RS-MS1A has been tested with
the following Android devices available in Japan. (As of
September 2016)
• Samsung Galaxy S3
(NTT docomo SC-06D: Android 4.1.2)
• Samsung Galaxy S3 Progre
(au SCL21: Android 4.0.4/4.1.2)
• Samsung Galaxy S3
α
(NTT docomo SC-03E: Android 4.1.1/4.3)
• Samsung Galaxy S4
(NTT docomo SC-04E: Android 4.2.2/4.3/4.4.2)
• Samsung Galaxy Note
(NTT docomo SC-05D: Android 4.1.2)
• Samsung Galaxy Note3
(NTT docomo SC-01F/au SCL22: Android 4.3/4.4.2)
• Google Nexus 7 (2012)
(Nexus7-16G: Android 4.2.2/4.4.2/4.4.4)
• Google Nexus 7 (2013)
(Nexus7-16G: Android 4.3/4.4.2/4.4.4/5.0.1/5.0.2/
5.1.1)
TIP:
Some function may not work correctly, depend-
ing on the program installed in your Android
™
device
or memory capability, even if you use one of the above
products.
See the instruction manual for details of the operation
or account settings of the Android
™
device.
The screen shots in this manual may differ, depending
on your device’s OS or its version.
Galaxy and Galaxy S are registered trademarks of Samsung Elec-
tronics Co., Ltd.
Google, the Google Logo, Google Play, the Google Play logo, An-
droid and the Android logo are registered trademarks or trademarks
of Google, Inc.
D
Download procedures
q
Turn ON your Android
™
device.
w
Tap “Play Store.”
e
Enter “RS-MS1A” in the “Search Google Play” field.
• Displays “RS-MS1A” in the application list.
r
Tap “
.”
t
Tap “RS-MS1A.”
• Displays the introduction screen of the RS-MS1A.
y
Tap [INSTALL].
u
Tap [ACCEPT] in the “App permissions” window.
• Installation starts.
• After finishing the installation, the RS-MS1A icon is dis-
played on the screen.
RS-MS1A icon
■
Using the RS-MS1A
The RS-MS1A is a freeware application for Android
™
devices.
With the RS-MS1A, you can use the extended D-STAR
functions to exchange image files or text messages, or
display the received D-PRS station data on a map pro-
gram.
To use the RS-MS1A, download it from the Google
™
Play store of your Android
™
device.
D
Connection
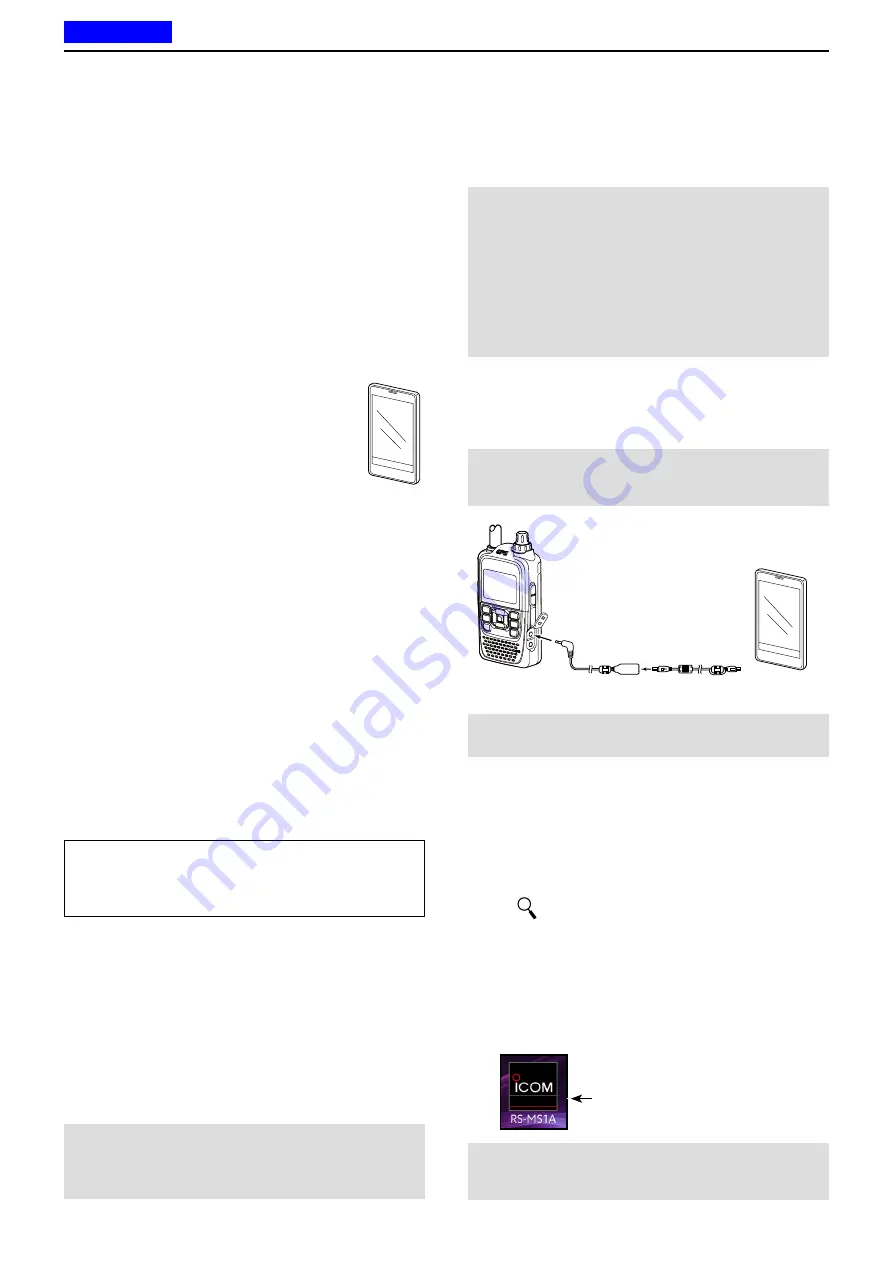
Connect the transceiver to your Android™ device using
the OPC-2350LU, as illustrated below.
MAKE SURE
to turn OFF the transceiver power be-
fore connecting or disconnecting the cable.
To the [DATA] jack
OPC-2350LU (Option)
To a [USB]
port
Android™
device
Transceiver
NOTE:
When the Android
™
device does not work cor-
rectly, increase the distance between the transceiver
and the Android
™
device.
NOTE:
Before starting, be sure to set the following
items in the MENU screen:
• Set the “CI-V (DATA Jack)” option to “ON (Echo Back
OFF).”
( MENU > Function > CI-V >
CI-V (DATA Jack
))
• Set the “CI-V Transceive” option to “ON.”
( MENU > Function > CI-V >
CI-V Transceive
)
Android
®
端末
NOTE:
When the cable is connected, it increases the
power consumption of Android™ device. To avoid this,
disconnect the cable if it is not used.
NOTE:
While operating Dualwatch, and one band is
scanning, if you receive an image file or text data on
the other band, some of that data may be lost.
This does not indicate a transceiver malfunction.
Previous view


