background image

4

RECEIVING AND TRANSMITTING

4-5

Using the Twin PBT

SSB, CW, RTTY and AM modes

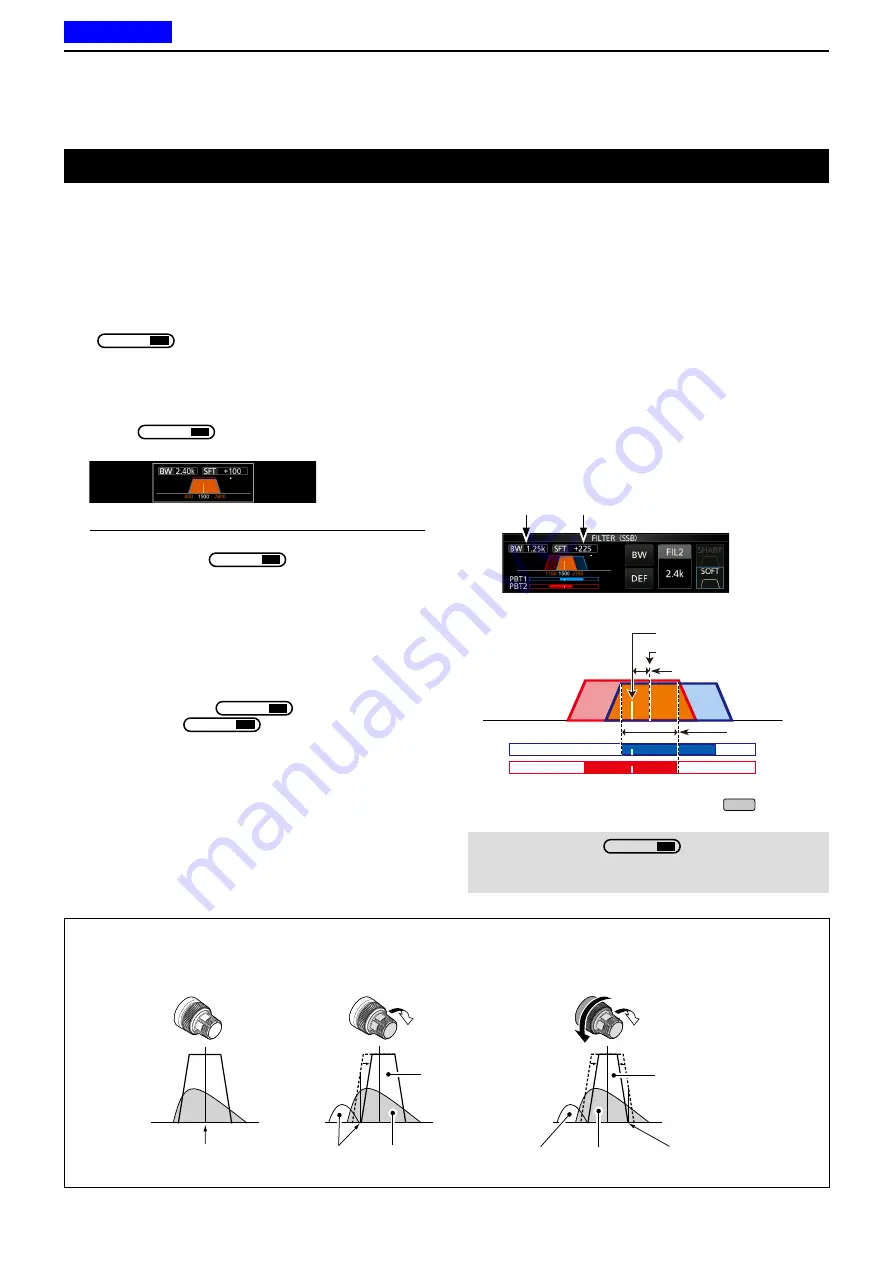
In general, the Twin PBT (Passband Tuning) 

electronically narrows the IF passband width by 

shifting the IF frequency to slightly outside of the IF 

filter passband, to reject interference. The IC-7300 

uses DSP for the PBT function.

You can narrow the IF passband width by rotating 

both 

TWIN PBT

CLR

 inner (PBT1) and outer (PBT2) to 

the opposite direction from each other.

L

 You can see the nearby signal using the Spectrum Scope 

(Section 5).

1.   Rotate 

TWIN PBT

CLR

 inner (PBT1) and outer 

(PBT2) to the opposite direction from each other.


2.   Touch the Filter icon for 1 second to display the 

current passband width and shift frequency.

 •Opens the FILTER screen.
Passband 

width

Shift  

value

FILTER (SSB) screen (while operating Twin PBT)

3.  To close the FILTER screen, push 

EXIT

.

NOTE

: While rotating 

TWIN PBT

CLR

, you  may hear noise. 

This comes from the DSP unit and does not indicate an 

equipment malfunction.

PBT2

PBT1

PBT2

PBT1

PBT2

PBT1

PBT is OFF

Cutting  

lower passband

Cutting both higher and 

lower passbands

IF center frequency Interference Desired  

signal

Passband

Passband

Interference Desired  

signal

Interference

IF center frequency

Passband center frequency

SFT: Shift value

BW:

 Passband width

PBT1
PBT2

Information

L

 • Match both the 

TWIN PBT

CLR

 (inner) (PBT1) and 

outer (PBT2) filters before operating the Twin PBT.

 • Rejects interference of both higher and lower 

passbands.

 • If you rotate the control too much, the received 

audio may not be heard because the passband 

width is too narrow.

 •Displays the passband width and shift value.

 • A dot is displayed to the right of the passband width 

when you rotate 

TWIN PBT

CLR

.

 •

 Hold down 

TWIN PBT

CLR

 for 1 second to clear the 

PBT setting (the dot disappears).

 •

 The PBT is adjustable in 50 Hz steps in the SSB, 

CW, and RTTY modes, and 200 Hz in the AM 

mode. In this case, the center shift value changes 

in 25 Hz steps in the SSB, CW, and RTTY modes, 

and 100 Hz in the AM mode.

 • Rotating both the inner and outer controls to the 

same position shifts the IF left or right.

Previous view

Содержание IC-7300

Страница 1: ...ANS 9 MEMORY OPERATION 8 USING AN SD CARD 7 VOICE TX MEMORY OPERATION 6 VOICE RECORDER FUNCTIONS 5 SCOPE OPERATION 4 RECEIVING AND TRANSMITTING 3 BASIC OPERATION 2 INSTALLATION AND CONNECTIONS 1 PANEL DESCRIPTION 16 SPECIFICATIONS 17 OPTIONS 18 CONNECTOR INFORMATION 19 CONTROL COMMAND ABOUT CE INTRODUCTION HF 50 MHz TRANSCEIVER ...

Страница 2: ...s are also improved about 15dB at 1 kHz frequency separation compared to the IC 7200 A 4 3 inch touch screen color display A built in automatic antenna tuner Multi function control for easy settings SUPPLIED ACCESSORIES L Different types of accessories may be supplied or may not be supplied depending on the transceiver version WORD DEFINITION R DANGER Personal death serious injury or an explosion ...

Страница 3: ...teries and accumulators rechargeable batteries must be taken to designated collection locations at the end of their working life Do not dispose of these products as unsorted municipal waste Dispose of them according to the laws in your area FCC INFORMATION Icom is not responsible for the destruction damage to or performance of any Icom or non Icom equipment if the malfunction is because of Force m...

Страница 4: ...t installed it please install the Adobe Acrobat Reader on the CD or download it from Adobe Systems Incorporated s website Starting the CD 1 Insert the CD into the CD drive 2 Double click Menu exe on the CD Depending on the PC setting the menu screen shown below is automatically displayed 3 Click the desired button to open the file L To close the Menu screen click Quit ABOUT THE SUPPLIED CD The fol...

Страница 5: ...ch screen or advanced search screen Printing out the desired pages Click Print in File menu and then select the paper size and page numbers you want to print The printing setup may differ depending on the printer Refer to your printer s instruction manual for details Select A4 size to print out the page in the equalized size Read Out Loud feature The Read Out Loud feature reads aloud the text in t...

Страница 6: ...isplay Type SET screen Rotate Push The Full and Basic manuals are described based on the following Quotation marks Used to indicate icons setting items and screen titles displayed on the screen The screen titles are also indicated in uppercase letters Example FUNCTION screen brackets Used to indicate keys Routes to the set modes and setting screens Routes to the set mode setting screen and the set...

Страница 7: ... could cause an injury or damage the transceiver R WARNING NEVER operate the transceiver during a lightning storm It may result in an electric shock cause a fire or damage the transceiver Always disconnect the power source and antenna before a storm CAUTION NEVER expose the transceiver to rain snow or any liquids CAUTION NEVER change the internal settings of the transceiver This could reduce trans...

Страница 8: ...en 1 5 D D Multi function menus 1 7 D D MENU screen 1 7 D D FUNCTION screen 1 7 D D QUICK MENU 1 7 Keyboard entering and editing 1 8 D D Entering and editing characters 1 8 D D Keyboard types 1 8 D D Entering and editing 1 8 D D Entering and editing example 1 9 Previous view ...

Страница 9: ... MENU KEY MENU p 1 7 Opens the MENU screen q w e r t y i 0 1 2 3 4 6 7 u o 8 5 9 1 FUNCTION KEY FUNCTION p 1 7 Displays the FUNCTION screen 2 MINI SCOPE KEY M SCOPE p 5 2 Displays the Mini Scope or Spectrum Scope 3 QUICK KEY QUICK p 1 7 Displays the QUICK MENU 4 EXIT KEY EXIT p 1 7 Exits a setting screen or returns to the previous screen 5 AUTO TUNE KEY AUTO TUNE p 4 16 Automatically tunes the ope...

Страница 10: ...e Split function ON or OFF 7 MULTI FUNCTION CONTROL MULTI p 1 7 Displays the Multi function menu for various adjustments or selects a desired item 8 TRANSMIT FREQUENCY CHECK KEY XFC p 4 13 Enables you to monitor the transmit frequency while holding it down in the Split mode 9 TX RX INDICATOR p 3 10 Lights red while transmitting and lights green while receiving 0 NOISE REDUCTION KEY NR p 4 9 Turns ...

Страница 11: ...EMOTE p 2 3 Connects to a PC or other transceiver for external control uEXTERNAL SPEAKER JACK EXT SP p 2 3 Accepts a 4 8 Ω external speaker iKEY JACK KEY p 2 3 Connects to a straight key external electronic keyer or a paddle with 6 35 mm 1 4 stereo plug oSEND CONTROL JACK SEND p 2 3 Connects to control transmit with non Icom external units 0ALC INPUT JACK ALC p 2 3 Connects to the ALC output jack ...

Страница 12: ...screens dialogs readouts and so on that are displayed on the IC 7300 screen Refer to the pages posted beside each item for details o M1 M8 T1 T8 OVF ICON Displays M1 M8 while External Keypad on the CONNECTORS screen is set to ON and using the Memory Keyer function p 4 18 Displays T1 T8 while using the Voice TX memory p 7 4 Displays OVF when an excessively strong signal is received 0 VOICE RECORDER...

Страница 13: ... levels depending on the function you select 3 RF GAIN ICON p 3 10 Appears when AF RF SQL outer is set to the counterclockwise from the 11 o clock position The icon indicates that the RF gain is reduced 4 BK IN F BKIN VOX INDICATOR p 4 15 Appears while the Semi Break in Full Break in or VOX function is ON 5 FREQUENCY READOUT p 3 4 Displays the operating frequency 6 LMT ICON p 13 4 Appears if the p...

Страница 14: ...to turn ON and OFF FUNCTION screen Function name Selected value Lights blue or orange when used SSB SSB D CW RTTY RF POWER RF POWER RF POWER RF POWER MIC GAIN MIC GAIN KEY SPEED TPF COMP CW PITCH MONITOR MONITOR MONITOR FM AM NB NR RF POWER RF POWER LEVEL LEVEL MIC GAIN MIC GAIN DEPTH WIDTH MONITOR MONITOR NOTCH VOX BK IN POSITION GAIN DELAY WIDTH ANTI VOX DELAY VOICE DELAY SHORT P AMP ATT AGC 2 N...

Страница 15: ...5 Illegal characters D DKeyboard types You can select the Full Keyboard or Ten key in Keyboard Type on the FUNCTION screen p 12 7 MENU SET Function Keyboard Type L You can also temporarily switch in the QUICK MENU by pushing QUICK D DEntering and editing Clears the entered character Selects alphabet mode or number mode Enters a space Selects the character type Saves the entry Cancels entry and ret...

Страница 16: ...ou can also open the QUICK MENU by touching this key Opens the QUICK MENU 3 Select Edit Name Rotate Push Opens the MEMORY NAME screen 4 Touch and then touch D 5 Touch again and then touch X 6 Touch SPACE Enters a space 7 Touch s p o and then t 8 Touch SPACE Enters a space 9 Touch ab Opens the entry CHARACTER TYPE screen 10 Touch 12 11 Touch 1 12 Touch ENT to save the entry Returns to the previous ...

Страница 17: ...g 2 2 Front panel connection 2 2 Rear panel connection 2 3 Connecting an external DC power supply 2 4 Connecting the antenna tuner 2 4 FSK and AFSK connections 2 5 Linear amplifier connections 2 6 D D Connecting the IC PW1 IC PW1EURO 2 6 D D Connecting a non Icom linear amplifier 2 6 Previous view ...

Страница 18: ...electric shock Front panel connection MIC Microphone connector SM 50 Option SM 30 Option HM 219 Supplied Using an External Keypad You can control the CW memory keyer Voice memory or RTTY memory keyer transmission from an external keypad by connecting the control circuit to the MIC connector Set the external keypad settings to ON on the CONNECTORS screen to use the external keypad p 12 8 L The exte...

Страница 19: ...n d SP 34 Option Impedance 4 8 Ω Audio level More than 2 5 W at 10 distortion into an 8 Ω load ALC SEND jack Connect with an RCA plug ALC jack connects to the ALC output jack of a non Icom linear amplifier SEND jack is used to control an external non Icom linear amplifier USB port Remotely controls the transceiver using CI V commands Sends the received audio to the PC Inputs modulation Sends the d...

Страница 20: ...t long between 3 5 MHz and 50 MHz NOTE Before connecting be sure to turn OFF the transceiver power L See the AH 4 instruction manual for installation and connection details GND AH 4 GND ANT IC 7300 TUNER HF band long wire antenna Or to an optional AH 2b Control cable PS 126 Non Icom DC power supply PS 126 AC cable DC power cable IC 7300 q w When disconnecting firmly push down the locking tab and t...

Страница 21: ... world index html Support Firmware Updates Software Downloads Transceiver 2 When using the ACC socket or the microphone connector C E B 2 kΩ 2 kΩ 10 kΩ 2 kΩ 2 kΩ 10 kΩ 4 7 kΩ RTS GND 10 kΩ 10 kΩ D Sub 25 D Sub 9 C E B 4 7 kΩ TXD 1 1 2 2 A B C D E 1 2 3 4 5 6 7 8 B E D C F E A D C B SQL q w e r t y u i o 0 1 2 3 When connecting to ACC ACC Trimpot Shield cable Shield cable Shield cable Shield cable ...

Страница 22: ... watts or more If you use an amplifier with a specified drive level of less than 100 watts adjust the IC 7300 s output power to the specified level before transmitting Otherwise the linear amplifier may be damaged RF OUT RF IN ALC SEND ALC SEND ANT GND IC 7300 To an antenna Non Icom linear amplifier R WARNING The maximum signal level of the SEND jack is 16 V 0 5 A DC Use an external unit if your n...

Страница 23: ...g Step function 3 4 D D Changing the Tuning Step 3 4 D D About the 1 Hz step Fine Tuning function 3 4 D D About the 1 4 Tuning function 3 5 D D About the Auto Tuning Step function 3 5 D D Directly entering a frequency 3 5 D D Band Edge Beep 3 6 D D Entering a Band Edge 3 7 RF gain and SQL level 3 10 Dial Lock function 3 10 Basic transmission 3 10 Adjusting the transmit output power 3 10 D D Adjust...

Страница 24: ...ust the volume level Adjusting the volume level 12 oʼclock position outer Maximum counterclockwise inner About the VFO and Memory modes Using the VFO mode VFO mode You can set the desired frequency by rotating MAIN DIAL Memory mode You can enter contents into the memory channels in the MEMORY list Selecting the VFO mode or Memory mode Push V M to select the VFO or Memory mode The IC 7300 has 2 Var...

Страница 25: ...n step 3 is memorized in the top Register 5 By repeating the steps above the Register that a new frequency and operating mode are set in is memorized Selecting the operating mode You can select between the SSB SSB data CW CW reverse RTTY RTTY reverse AM AM data FM and FM data modes 1 Touch the mode icon example USB Mode key Operating mode SSB LSB USB CW CW CW R RTTY RTTY RTTY R AM AM FM FM DATA LS...

Страница 26: ...g steps for each operating mode 1 Select the desired operating mode p 3 3 Example USB 2 Touch the kHz digit for 1 second The TS SSB screen is displayed The Tuning Step function is ON D DUsing the Main Dial 1 Select the desired operating band Example 21 MHz BAND STACKING REGISTER screen 2 Rotate MAIN DIAL L If you cannot change the frequency make sure the Dial Lock function is turned OFF p 3 10 L i...

Страница 27: ... clear the entry and return to the previous screen push EXIT Opens the BAND STACKING REGISTER screen 2 Touch F INP BAND STACKING REGISTER screen F INP screen Example 14 025 4 Touch ENT to set the entered frequency Closes the F INP screen L If you touch ENT when the digits under 100 kHz are not entered 0 will be automatically entered into the digits that are blank Entry examples 14 025 MHz 1 4 0 2 ...

Страница 28: ...10 kHz 1 0 SPLIT 1 025 MHz 1 0 2 5 SPLIT L After entering the Split function is automatically turned ON 2 Touch the MHz digits Example 14 Opens the BAND STACKING REGISTER screen 3 Touch F INP Opens the F INP screen 4 Enter a Memory channel number between 1 and 99 Memory channel 5 L If you want to set the Program Channel number P1 or P2 enter 100 for P1 and 101 for P2 BAND STACKING REGISTER screen ...

Страница 29: ...a default or when entering a new band edge 1 On the FUNCTION set screen select User Band Edge 2 Touch the band edge you want to edit for 1 second Example 5 14 000 000 14 350 000 MHz Rotate Push 3 Edit the lower band edge frequency Example 14 1 4 Touch ENT to save the edited lower band edge frequency 5 Edit the upper band edge frequency Example 14 25 6 Touch ENT to save the edited upper band edge f...

Страница 30: ...d Edge To enter a new band edge first you must delete a preset band edge L Initially all band edges are entered Therefore you must first edit or delete them to enter a new band edge L You cannot enter an overlapped frequency or a frequency that is out of the preset transmit frequency 1 On the FUNCTION set screen select User Band Edge 2 Touch the desired band edge to delete for 1 second Example 1 1...

Страница 31: ...99 MHz L The new band edge will be inserted above the selected band edge 7 Touch ENT to save the entered upper band edge frequency The entered band edge is saved and returns to the previous screen Resetting all band edges to presets The steps below will reset all the band edges to their initial settings All entered settings will be deleted 1 Open the User Band Edge screen 2 Touch any band edge for...

Страница 32: ...prevents frequency changes caused by accidently moving MAIN DIAL LThis function electronically locks the dial Hold down Adjusting the transmit output power Before transmitting monitor your selected operating frequency to make sure you do not cause interference to other stations on the same frequency It is good amateur practice to listen first and then even if nothing is heard ask if the frequency ...

Страница 33: ...Displays the receiving signal strength level Po Displays the relative RF output power SWR Displays the SWR of the antenna at the operating frequency ALC Displays the ALC level When the meter movement shows the input signal level exceeds the allowed level the ALC limits the RF power In such cases decrease the microphone gain level COMP Displays the compression level when the speech compressor is us...

Страница 34: ...ransmission is illegal on any frequencies other than the five shown in the tables below For the USB and USB data modes The FCC specifies center frequencies on the 5 MHz frequency band However the transceiver displays carrier frequency Therefore tune the transceiver to 1 5 kHz below the specified FCC channel center frequency Transceiver displayed frequency FCC channel center frequency 5 33050 MHz 5...

Страница 35: ...operation 4 13 D D Using the Quick Split function 4 13 D D Using the receive and transmit frequencies set to VFO A and VFO B 4 13 Split Lock function 4 14 Setting the transmit filter width 4 14 Operating CW 4 14 D D Setting the CW pitch control 4 14 D D Setting the key speed 4 15 D D About the Break in function 4 15 D D CW Auto Tuning function 4 16 D D About the CW Reverse mode 4 16 D D Electronic...

Страница 36: ... the IF passband width by shifting the IF frequency slightly outside of the IF filter passband D DSSB AM and FM modes Receive Audio Tone Control p 12 3 You can adjust the receive audio bass and treble MENU SET Tone Control TBW RX D DSSB D CW and RTTY modes 1 4 function p 3 5 The dial speed is reduced to 1 4 of the normal speed for finer tuning control D DCW mode Auto Tuning p 4 16 The transceiver ...

Страница 37: ...n ON the Attenuator LPushing P AMPATT turns OFF the Attenuator no icon Displayed when the Attenuator is ON RIT frequency 3 digits RIT function The RIT Receive Increment Tuning function compensates for differences in frequencies of other stations The function shifts the receive frequency up to 9 99 without shifting the transmit frequency 1 Push RIT The RIT function turns ON L When using the Fine Tu...

Страница 38: ...MID or SLOW to select the desired AGC time constant Example MID FUNCTION screen SSB mode 5 Rotate MAIN DIAL to set the time constant L The adjustable time constants are described in the table below 6 To close the AGC SSB screen push EXIT Selectable AGC Time constant unit seconds Mode Default Adjustable time constant SSB 0 3 FAST OFF 0 1 0 2 0 3 0 5 0 8 1 2 1 6 2 0 2 5 3 0 4 0 5 0 or 6 0 2 0 MID 6 ...

Страница 39: ...ate an equipment malfunction PBT2 PBT1 PBT2 PBT1 PBT2 PBT1 PBT is OFF Cutting lower passband Cutting both higher and lower passbands IF center frequency Interference Desired signal Passband Passband Interference Desired signal Interference IF center frequency Passband center frequency SFT Shift value BW Passband width PBT1 PBT2 LInformatio L Match both the TWIN PBT CLR inner PBT1 and outer PBT2 fi...

Страница 40: ...nd width for other modes except for the FM and FM D 8 To close the FILTER screen push EXIT TIP When you set the IF filter to FIL2 or FIL3 in the FM mode the transceiver will transmit in the FM narrow mode Mode IF filter Selectable range steps SSB FIL 1 3 0 kHz 50Hz to 500Hz 50 Hz 600Hz to 3 6kHz 100 Hz FIL 2 2 4 kHz FIL 3 1 8 kHz SSB D FIL 1 3 0 kHz 50Hz to 500Hz 50 Hz 600Hz to 3 6kHz 100 Hz FIL 2...

Страница 41: ...FF to prioritize the receive sensitivity 3 To close the FUNCTION screen push EXIT IP is displayed when ON is selected Displayed SHARP This selection is to emphasize the passband width of the filter The filter has an almost ideal shape factor Signals of the out of passband are extremely filtered out and it gives you better audio quality SOFT The filter shoulders are roundly formed as in analog filt...

Страница 42: ...just the attenuation level and noise width in the NB menu 1 Hold down NB for 1 second Turns ON the Noise Blanker and opens the NB menu 2 Touch the adjusting item Example DEPTH 3 Adjust the level Example 8 Rotate Push LEVEL Default 50 Adjust the level where the Noise Blanker activates between 0 and 100 DEPTH Default 8 Adjust the noise attenuation level to between 1 and 10 WIDTH Default 50 Adjust th...

Страница 43: ...mponents Desired signal CW Notch Filter The IC 7300 has Auto Notch and Manual Notch functions Auto Notch Used in the SSB AM and FM modes Manual Notch Used in the SSB CW RTTY and AM modes D DAuto Notch function Auto Notch automatically filters out beat tones tuning signals and so on Push NOTCH until AN Auto Notch is displayed L Pushing NOTCH changes between AN Auto Notch MN Manual Notch and OFF Dis...

Страница 44: ...e point where the transceiver does not switch to transmit due to the sound from the speaker or other devices L Touching VOICE DELAY selects SHORT MID LONG or OFF VOX GAIN Default 50 Adjust the transmit receive switching threshold level to between 0 and 100 for VOX operation Higher values make the VOX function more sensitive to your voice ANTI VOX Default 50 Adjust the ANTI VOX level to between 0 a...

Страница 45: ...ion is ON you can directly monitor the operating frequency by holding down XFC Rotate Set TX frequency While holding down XFC Monitor function The Monitor function enables you to monitor your transmit audio Use this function to check the voice characteristics while adjusting transmit audio parameters L You can hear the CW sidetone regardless of the Monitor function setting 1 Select the mode that y...

Страница 46: ...SB mode OFF 4 Touch EXIT to close the FUNCTION screen 5 Touch the Multi function meter to display the ALC meter L Touching the Multi function meter sets the meter to Po SWR ALC COMP VD or ID 6 Adjust the MIC GAIN p 3 11 to where the ALC meter reads within the 30 to 50 range of the ALC zone 7 Touch the Multi function meter again to display the COMP meter 8 Push FUNCTION Opens the FUNCTION screen 9 ...

Страница 47: ...xample 21 29000 MHz in the USB mode 2 Hold down SPLIT for 1 second The Quick Split function is turned ON and the VFO A settings are set to VFO B The VFO B frequency is displayed in the bottom right corner of the main screen Displayed VFO B frequency is displayed 3 While holding down XFC set the operating frequency offset between transmit and receive The offset between transmit and receive while ho...

Страница 48: ...SB mode 2 Push FUNCTION Opens the FUNCTION screen 3 Touch TBW L Touching TBW sets the filter width to WIDE MID or NAR Operating CW D DSetting the CW pitch control You can set the received CW audio pitch and the CW side tone to suit your preference without changing the operating frequency 1 Select the CW mode 2 Display the Multi function menu 3 Touch CW PITCH 4 Set the CW pitch to between 300 and 9...

Страница 49: ...i Break in mode the transceiver transmits when keying and then automatically returns to receive after a preset time after you stop keying 1 Select the CW mode 2 Push VOX BK IN to display BKIN L Pushing VOX BK IN selects BKIN Semi Break in F BKIN Full Break in or OFF no indication Rotate 3 To adjust the Break in delay time hold down VOX BK IN for 1 second Opens the BKIN menu 4 Set to where the tran...

Страница 50: ... interference CW mode LSB side CW R mode USB side BFO BFO Interference Desired signal Interference Desired signal TIP Reversing the carrier point The carrier point of the CW mode is LSB by default You can change it to USB in the CW Normal Side item of the OTHERS set screen p 12 6 MENU SET Function CW Normal Side L When this setting is set to USB the CW and CW R modes are reversed D D About the Bre...

Страница 51: ...tyle count up trigger and present number Key set menu p 4 21 You can set the memory keyer repeat time dot dash ratio paddle polarity key type and so on D DMonitoring the CW side tone When the transceiver is in standby and the Break In function is OFF you can listen to the CW side tone without actually transmitting LInformatio L This enables you to match your transmit frequency exactly to another s...

Страница 52: ...e in the CW KEY SET menu p 4 21 1 001 Reduces the contest number counter by 1 001 L You can change or reset the number in Present Number in the KEYER 001 menu p 4 21 EDIT SET Touch to display the EDIT SET screen Count up trigger The count up trigger enables the serial number to be automatically increased after each complete serial number exchange is sent Default M2 Present number counter Count up ...

Страница 53: ... the preset contents are cleared 5 Enter QSL TU DE JA3YUA TEST and then touch ENT to save LSee Keyboard entering and editing p 1 8 for details 6 To close the KEYER screen push EXIT several times Selectable characters Alfabets ABCDEFGHIJKLMNOPQRSTUVWXYZ Symbols Numbers 1234567890 About the symbols Enter to send a string of characters with no intercharacter space Put before a text string such as AR ...

Страница 54: ...en push EXIT several times TIP How to reset to the default setting Touching the item or its option for 1 second displays the Quick menu and then touch Default to reset to the default setting Number Style Default Normal Set the numbering system used for contest serial numbers normal or short morse numbers Select Normal 190 ANO 190 ANT 90 NO or 90 NT Count Up Trigger Default Normal Select which of t...

Страница 55: ...r Repeat time Default 2sec Set the time between Memory keyer transmissions Set to between 1 and 60 seconds Dot Dash Ratio Default 1 1 3 0 Set the dot dash ratio Set to between 1 1 2 8 to 1 1 4 5 in 0 1 steps Keying weight example Morse code K 1 1 3 1 1 2 8 4 5 Default 1 1 3 Setting range 1 1 2 8 to 1 1 4 5 Dash Dash Dot Setting range Space TX RX 0 Key action TX output power Set TX output power Ris...

Страница 56: ...RTTY on the MODE screen L Touching RTTY toggles between the RTTY mode and the RTTY R mode BFO BFO 170 Hz 2125 Hz 170 Hz 2125 Hz RTTY mode Normal RTTY R mode Space Mark Space Mark D DTwin Peak Filter The Twin Peak Filter TPF changes the audio frequency response by boosting the mark and space frequencies for better reception of RTTY signals or for decoding the external AF output on a PC 1 While in t...

Страница 57: ...logging selects the file type or the time stamp LOG VIEW Opens the RTTY DECODE LOG VIEW screen You can check the saved RTTY log files ADJ Opens the THRESHOLD screen You can set the threshold level EXPD SET Touch Selects the Expanded or Normal screen Touch for 1 second Opens the RTTY DECODE SET screen D DSetting the decoder threshold level Adjusting the RTTY decoder threshold level prevents charact...

Страница 58: ...d to return to the RTTY DECODE screen push EXIT RTTY MEMORY screen Transmitting contents are displayed Example RT1 Lights red Lights red Memory Preset characters by default RT1 DE ICOM ICOM K RT2 DE ICOM ICOM ICOM K RT3 QSL UR 599 599 BK RT4 QSL DE ICOM ICOM UR 599 599 BK RT5 73 GL SK RT6 CQ CQ CQ DE ICOM ICOM ICOM K RT7 MY TRANSCEIVER IS IC 7300 ANTENNA IS A 3 ELEMENT TRIBAND YAGI RT8 MY RTTY EQU...

Страница 59: ...RTTY memory contains up to 70 characters 1 Open the RTTY MEMORY screen MENU DECODE TX MEM EDIT 2 Touch the memory for 1 second Example RT3 RTTY MEMORY screen 3 Touch Edit 4 Touch CLR until the characters are cleared QUICK MENU screen 5 Enter the desired characters and then touch ENT to save LSee Keyboard entering and editing p 1 8 for details 6 To close the RTTY DECODE screen push EXIT several tim...

Страница 60: ... log select OFF in step 4 TIP How to reset to the default setting Touching the item or its option for 1 second displays the Quick menu and then touch Default to reset to the default setting D DViewing the RTTY log contents You can check the RTTY log contents 1 Insert an SD card with the desired log p 8 2 2 Open the RTTY DECODE LOG VIEW screen in the RTTY mode MENU DECODE 1 LOG VIEW 3 Select the de...

Страница 61: ... item or its option for 1 second displays the Quick menu and then touch Default to reset to the default setting File Type Default Text Select the file type to save a log onto an SD card to Text or HTML L You cannot change the file type while logging Time Stamp Default ON Select whether or not to add the time stamp date transmission time and reception time in the log ON Adds the time stamp in the l...

Страница 62: ...t the ratio to between 0 and 255 LThe color is displayed in the box above the RGB scale Decode USOS Default ON Turn the letter code decoding capability ON or OFF after receiving a space LUSOS stands for UnShift On Space function ON Decodes as a letter code OFF Decodes as a character code Decode New Line Code Default CR LF CR LF Select the internal RTTY decoder new line code L CR stands for Carriag...

Страница 63: ...ible tone to be accessed Subaudible tones are superimposed on your signal and must be set in advance Do the following steps to set the tone frequency 1 Select the FM mode 2 Push FUNCTION Opens the FUNCTION screen 3 Touch TONE for 1 second FUNCTION screen FM mode Opens the TONE FREQUENCY screen 4 Rotate MAIN DIAL to select the desired subaudible tone frequency TONE FREQUENCY screen Touch for 1 seco...

Страница 64: ...y Example 29 550 00 MHz 4 Push FUNCTION Opens the FUNCTION screen 5 Touch TONE several times to select the Tone squelch mode TSQL is displayed L Touching TONE selects TONE TSQL or OFF FUNCTION screen FM mode 6 Touch TONE again for 1 second Opens the TONE FREQUENCY screen 7 Rotate MAIN DIAL to set the tone frequency TONE FREQUENCY screen Touch for 1 second to reset to the default Selectable tone fr...

Страница 65: ...connections p 2 5 for connection details 2 Select the operating band Example 51 MHz 3 Set the data operating mode to LSB D USB D AM D or FM D Example FM D Data mode 4 Refer to the application software for communication details L When operating in the SSB data mode adjust the device s output level within the ALC zone TIP The carrier point is displayed when operating AFSK in the SSB data mode See th...

Страница 66: ... 5 3 D D Fixed mode 5 3 D D Marker 5 3 D D Touch screen operation 5 4 D D Mini scope screen 5 4 D D Adjusting the Reference level 5 5 D D Sweep speed 5 5 D D Scope set screen 5 6 Audio scope screen 5 9 D D Audio scope set screen 5 9 5 1 Section 5 SCOPE OPERATION Previous view ...

Страница 67: ...s on Center Display frequency moves Key Action 1 2 Selects the Function menus SPAN In the Center mode selects the scope span Selectable spans 2 5 5 0 10 25 50 100 250 and 500 kHz L Touch for 1 sec ond to select the 2 5 kHz span EDGE In the Fixed mode selects the Edge frequencies L You can set the Upper and lower Edge frequencies in the SCOPE SET screen p 5 6 p 5 8 HOLD Touch Sets the Hold function...

Страница 68: ... Displays signals within a specified frequency range The selected frequency band activity can easily be observed using this mode Three Fixed Edge bands can be set for each amateur frequency band covered by the transceiver See page 5 7 for setting details 1 Open the SPECTRUM SCOPE screen MENU SCOPE D DMarker The Marker displays the operating frequency in the SPECTRUM SCOPE screen Marker types RX Ma...

Страница 69: ...e or Waterfall zone 3 Touch the signal in the zoomed area LInformatio L In the Center mode the operating frequency changes to the touched point and the point moves to the screen center In the Fixed mode the operating frequency and marker change to the touched point Touch out of the zoomed area to close the zoomed window 4 To exit the SPECTRUM SCOPE screen push EXIT D DMini scope screen The Mini sc...

Страница 70: ...peed to change the FFT scope refresh speed and the waterfall speed L To change only the waterfall speed select Slow Mid or Fast in the Scope set screen p 5 7 1 Open the SPECTRUM SCOPE screen MENU SCOPE 2 Touch 1 The function menu changes to Menu 2 3 Touch SPEED several times until the desired sweep speed is selected Selectable speeds FAST MID or SLOW L or indicates FAST MID or SLOW L A popup windo...

Страница 71: ...he selected operating mode VBW Default Narrow Select the Video Band Width VBW Narrow Sets the VBW to narrow Wide Sets the VBW to wide L When Wide is selected the line drawn on the receive spectrum becomes wide However the small edge cannot be drawn Averaging Default OFF Set the FFT scope waveform averaging function to between 2 and 4 or OFF OFF The FFT scope screen refreshes at each sweep time Thi...

Страница 72: ...requency using the keypad D D Scope set screen Continued Waveform Color Current Default R 172 G 191 B 191 Set the waveform color for the currently received signals L Touch and select the R Red G Green or B Blue scale and then rotate MULTI to adjust the ratio from 0 to 255 L The color is displayed in the box above the RGB scale Waveform Color Line Default R 56 G 24 B 0 Set the waveform outline colo...

Страница 73: ... 3 500 4 000 MHz Default No 2 3 500 3 575 MHz Default No 3 3 750 3 850 MHz Settable range 2 000 6 000 MHz 6 00 8 00 Default No 1 7 000 7 300 MHz Default No 2 7 000 7 030 MHz Default No 3 7 030 7 200 MHz Settable range 6 000 8 000 MHz 8 00 11 00 Default No 1 10 100 10 150 MHz Default No 2 10 100 10 130 MHz Default No 3 10 130 10 150 MHz Settable range 8 000 11 000 MHz 11 00 15 00 Default No 1 14 00...

Страница 74: ...lect the desired item 4 Rotate MULTI to select the option or set the level and then push MULTI See below for details of the setting items and their options 5 To exit the AUDIO SCOPE screen push EXIT several times FFT Scope Waveform Type Default Fill Select the type of waveform for the FFT scope Fill The full waveform is drawn in color Line Only the waveform outline is drawn FFT Scope Waveform Colo...

Страница 75: ... the previous file 6 3 D D Playing the next file 6 3 D D Moving to the beginning of the previous file 6 3 D D Moving to the beginning of the next file 6 3 D D VOICE PLAYER screen 6 4 Checking the file information 6 4 Checking the folder information 6 5 Deleting a file 6 5 D D Deleting all files 6 5 Deleting a folder 6 6 D D Deleting all folders 6 6 SD Card information 6 6 Playing back the recorded...

Страница 76: ... free space on the SD card has run out When the recording file s content becomes 2 GB the transceiver continues to record but to a new file TIP When the PTT Automatic Recording function is set to ON in the Voice set mode the recording automatically starts when you push PTT p 6 8 TIP About recording After the recording starts a folder and file are automatically created on the SD card L The folder n...

Страница 77: ...pausing touch D DPlaying the previous file Touch to play the previous file L If there are other files in the folder while the oldest file is playing back touch to start playing the beginning of the file D DPlaying the next file Touch to play the next file L If there are other files in the folder while the most recent file is playing back touch to stop the playback D DMoving to the beginning of the...

Страница 78: ... recorded files Play the previous file Play the next file Touch to pause or playback Rewind Forward The file list is displayed 3 Touch the desired file to check for 1 second Rotate Push Opens the QUICK MENU screen 4 Touch File Information 5 To close the PLAY FILES screen push EXIT several times Recording Information Operating frequency operating mode and audio type Receive RX or Transmit TX Operat...

Страница 79: ...s If you want to delete all audio files in the folder at one time select Delete All in step 4 above The selected file is deleted 6 To close the PLAY FILES screen push EXIT several times Checking the folder information The transceiver can display the folder s name number of the files in the folder total capacity of the files and date 1 Open the PLAY FILES screen MENU RECORD Play Files The folder li...

Страница 80: ...the desired folder to delete for 1 second Opens the QUICK MENU screen 3 Touch Delete Delete folder is displayed 4 Touch YES The selected folder is deleted 5 To close the PLAY FILES screen push EXIT several times D DDeleting all folders If you want to delete all folders at one time select Delete All Folders in step 3 above You can delete the recorded audio folders NOTE All the files in the folder a...

Страница 81: ...s displayed as shown to the right Click Open folder to view files The IC 7300 folder is displayed 3 Double click the IC 7300 folder 4 Double click the Voice folder 5 Double click the folder where the file you want to playback is saved Example 20160106 folder 6 To playback the file double click it Example 20160106_120255 wav NOTE The operations while playing back may differ depending on the applica...

Страница 82: ...ording and if you switch between transmit and receive or the squelch status changes between open and closed a new file is automatically created in the same folder and the audio is saved into the new one PTT Auto REC Default OFF Turn the PTT Automatic Recording function ON or OFF OFF The recording does not start even if a signal is transmitted ON The recording automatically starts when a signal is ...

Страница 83: ...uch Default to reset to the default setting You can fast forward or rewind while playing back You can change the skip time in the PLAYER SET screen 1 Open the QSO RECORDER screen MENU RECORD 2 Select Player Set 3 Select Skip Time Rotate Push 4 Select your desired option Options 3sec 5sec 10sec or 30sec 5 To close the RECORD screen push EXIT several times Previous view ...

Страница 84: ...D Playing back 7 2 Entering a recording name 7 3 Transmitting a Voice memory content 7 4 D D Transmitting 7 4 D D Repeatedly transmitting 7 4 D D Adjusting the output level 7 5 VOICE TX SET screen 7 6 7 1 Section 7 VOICE TX MEMORY OPERATION Previous view ...

Страница 85: ...nal keypad pp 2 2 12 8 D DRecording 1 Open the VOICE TX screen in a Voice mode L Voice mode SSB AM or FM modes MENU VOICE L You can select VOICE on the MENU screen only while in a Voice mode 2 Touch REC SET Opens the REC SET screen 3 Touch the REC item Opens the VOICE TX RECORD screen 4 Select the desired Voice memory T1 T8 Touch to open the MIC GAIN adjustment window While Recording Displays the ...

Страница 86: ... Touch the REC item Opens the VOICE TX RECORD screen 4 Touch p or q to display the desired Voice memories T1 T4 or T5 T8 and then touch the memory for 1 second Opens the QUICK MENU screen 5 Touch Edit Name Opens the Name editing screen 6 Enter a name of up to 16 characters L See Keyboard entering and editing p 1 8 for details 7 Touch ENT to save the entered name The Name editing screen closes and ...

Страница 87: ...ts the recorded content LInformatio L The transceiver automatically transmits The Memory Timer counts down is displayed while repeatedly transmitting Repeatedly transmits the recorded content for up to 10 minutes at the interval specified in the Repeat Time item of the VOICE TX SET screen p 7 6 After 10 minutes have passed and all of the recorded content in the memory is transmitted the transceive...

Страница 88: ...erse steps 2 and 3 4 While transmitting rotate MAIN DIAL to adjust the transmit voice level L The transceiver automatically returns to receive when all of the recorded content in the memory is transmitted L Adjusting TX LEVEL too high may result in an over modulation and transmit signal distortion 5 To close the VOICE TX screen push EXIT several times Rotate MAIN DIAL Touch for 1 second to reset t...

Страница 89: ...the memory is transmitted the transceiver automatically returns to receive Range Between 1 and 15 seconds This Set screen is used to set the Automatic Monitor function and the Transmit Repeat Interval 1 Open the VOICE TX screen in a Voice mode L Voice mode SSB AM or FM modes MENU VOICE 2 Touch REC SET Opens the REC SET screen 3 Touch the SET item Opens the VOICE TX SET screen 4 Touch the desired i...

Страница 90: ...n SD card 8 3 Saving the setting data onto an SD card 8 4 D D Saving in the old firmware format 8 4 D D Saving with a different file name 8 5 Loading the saved data files onto an SD card 8 6 Deleting a data file 8 7 Displaying the information 8 7 Backing up the data saved on the SD card onto a PC 8 8 D D About the SD card s folder contents 8 8 D D Making a backup file on your PC 8 9 Previous view ...

Страница 91: ...e to recognize a high capacity card The card will get warm if continuously used for a long period of time The card has a certain lifetime so data reading or writing may not be possible after using it for a long period When reading or writing data is impossible the card s lifetime has ended In that case use a new one We recommend you make a separate backup file of the important data onto your PC p ...

Страница 92: ...orized access to any data that remains 1 Insert an SD card into the card slot 2 Open the SD CARD set screen MENU SET SD Card 3 Select Format Rotate Push SD CARD set screen 4 Touch YES to start formatting LTo cancel formatting touch NO After formatting returns to the SD CARD set screen 5 To close the SET screen push EXIT several times Unmounting an SD card 1 Open the SD CARD set screen MENU SET SD ...

Страница 93: ...the earlier firmware version touch YES 4 Touch ENT 5 Touch YES Saves the data settings L While saving to the card the SD card icon blinks L After saving returns to the SD CARD set screen 6 To close the SET screen push EXIT several times D DSaving in the old firmware format After you update the transceiver s firmware the Save Form item will be added on the SD CARD set screen With this item you can ...

Страница 94: ...ta 1 Open the SAVE SETTING screen MENU SET SD Card Save Setting 2 Select New File Rotate Push SAVE SETTING screen 3 Touch CLR to delete the previously entered character L If you continuously touch CLR all the characters are deleted The character to the left of the cursor is deleted 4 Touch the keyboard to enter a desired name and then touch ENT L See Keyboard entering and editing p 1 8 for details...

Страница 95: ...ded Rotate Push LOAD SETTING screen 3 Select Select 4 Touch the desired loading option is displayed left side of the selected option L The Set mode settings and Memory channel contents are always loaded 5 Touch Load 6 Touch YES Starts the file check L While checking the file Checking the file and a progress bar are displayed L When you select REF Adjust in step 4 The new REF Adjust setting will be...

Страница 96: ... screen 3 Touch Delete LTo delete all files touch Delete All LTo cancel deleting push EXIT Opens the confirmation window 4 Touch YES Deletes the selected file LAfter deleting returns to the SAVE SETTING screen 5 To close the SET screen push EXIT several times Displaying the information You can display the SD card capacity and the time remaining for voice recording 1 Open the SD CARD set screen MEN...

Страница 97: ... in the txt format You can change the file format to html in the RTTY DECODE LOG SET screen p 4 27 5 Setting folder The transceiver s setting data is saved in the dat format 6 Voice folder The recorded QSO audio date folders are created 7 yyyymmdd folder Recorded audio files are saved in the wav format The folder name is automatically created in the following format yyyymmdd yyyy Year mm month dd ...

Страница 98: ...les Displays the IC 7300 folder 3 Right click Removal Disk and then click Copy 4 Open the desired folder to make a backup file and then right click on the folder Then click Paste Pastes the copied SD card data onto the hard disk Example Pasting into the Backup folder in the C drive 5 When removing the SD card from your PC be sure to safety remove it L The screen shot shows when a memory card reade...

Страница 99: ... contents 9 3 D D Entering in the VFO mode 9 3 D D Entering in the Memory mode 9 3 Clearing a memory channel 9 4 Copying the Memory channel contents 9 4 D D Copying to the other memory channel 9 4 D D Copying to the VFO 9 4 Entering a memory name 9 5 About the MEMORY screen 9 5 Memo Pad 9 6 D D Saving the displayed contents into a Memo Pad 9 6 D D Calling up the Memo Pads 9 6 D D Using the Memo Pa...

Страница 100: ...for programmed scans Yes Yes No D DSelecting with the up and down keys 1 Push V M to select the Memory mode 2 Push or to select the desired memory channel L You can also select the memory channel with the microphone UP and DN keys Memory mode Example Memory channel 1 3 To return to the VFO mode push V M again D DSelecting using the keypad 1 Push V M to select the Memory mode 2 Touch the MHz digit ...

Страница 101: ...EMORY screen is displayed 5 Touch MW for 1 second to save the entered contents into the selected channel BLANK disappears or the selected channel s contents are overwritten Memory channel selection Continue You can enter memory channel contents in either the VFO mode or the Memory mode Entering memory channel contents D DEntering in the Memory mode Example Entering 21 280 MHz USB into memory chann...

Страница 102: ... Push or to select the channel to be copied Example memory channel 1 3 Open the MEMORY screen MENU MEMORY 4 Select the desired memory channel to be overwritten Example memory channel 2 and then touch The MEMORY MENU is displayed Rotate 5 Select Memory Write The contents of Memory channel 1 6 Touch Yes A beep sounds and the selected memory contents are copied Returns to the MEMORY screen D D Copyin...

Страница 103: ...ils 6 Touch ENT to save the entered name The MEMORY NAME screen closes and returns to the MEMORY screen The entered name is displayed L The memory name is also displayed on the Standby mode screen Rotate Memory name About the MEMORY screen q w e r t y q Frequency Displays the entered frequency w Operating mode Displays the selected operating mode e Memory menu Touch to display the MEMORY MENU L Yo...

Страница 104: ...her stations You can use the Memo Pads in both the VFO and Memory modes Use Memo Pads instead of relying on hastily scribbled notes that are easily misplaced MPAD D D Calling up the Memo Pads You can call up the saved Memo Pads Push MPAD several times until the desired Pad is displayed L The calling up starts with the most recently saved contents TIP When you call up a Memo Pad the contents that w...

Страница 105: ...Fine Programmed scan operation 10 3 Memory scan and Select Memory scan Memory mode 10 4 D D Memory scan operation 10 4 D D Select Memory scan operation 10 5 D D Setting Select Memory channel 10 5 D D Canceling all Select Memory channel settings 10 5 F scan and Fine F scan VFO and Memory modes 10 6 D D F scan operation 10 6 D D Fine F scan operation 10 6 Tone scan operation 10 7 Previous view ...

Страница 106: ...ith the squelch open For a Programmed scan When the tuning step is 1 kHz or less the scan continues until it is manually stopped it does not pause even if signals are detected The scan pauses when the squelch is closed and then opened The scan resumes after 10 seconds has passed when the Scan Resume function is ON It is cancelled when the function is OFF When the tuning step is 5 kHz or more the s...

Страница 107: ...ing mode in the MODE screen LYou can change the operating mode while scanning 3 Select the desired tuning step in the TS screen LYou can change the tuning step while scanning 4 Open the SCAN screen MENU SCAN 5 Touch PROG to start the Programmed scan Blinks Blinks While programmed scanning L PROGRAM SCAN and the decimal points blink while scanning 6 Touch PROG to cancel the scan 7 To close the SCAN...

Страница 108: ...1 Blank channel 1 2 and 3 show that the channel is specified as a select memory Repeatedly scans all or one of 3 Select Memory channels 1 2 3 L If two or more Memory channels are not designated as a Select Memory channels the Select Memory scan does not start D DMemory scan operation 1 Push V M to select the Memory mode 2 Open the SCAN screen MENU SCAN 3 Touch MEMO to start the Memory scan Blinks ...

Страница 109: ...d the Select Memory scan are switched 4 Touch MEMO to cancel the scan 5 To close the SCAN screen push EXIT Memory scan and Select Memory scan Memory mode Continued D DSetting Select Memory channel 1 Open the SCAN screen L See steps 1 2 in Memory scan operation p 10 4 for details 2 Push or to select the desired Memory channel to be set as the Select Memory channel 3 Touch SELECT to set the Select s...

Страница 110: ...0 kHz 20 kHz 50 kHz 100 kHz 500 kHz or 1 MHz 4 Set the center frequency In the VFO mode Rotate MAIN DIAL In the Memory mode Push or to select the desired Memory channel 5 Touch F to start the F scan Blinks Blinks While F scanning L F SCAN and decimal points blink while scanning 6 Touch F to cancel the scan 7 To close the SCAN screen push EXIT D DFine F scan operation 1 Start the F scan L See steps...

Страница 111: ...E Checks the repeater tone frequency or tone squelch frequency 4 Touch T SCAN to start the Tone scan Blinks While Tone scanning LInformatio L The selected tone frequencies are scanned and SCAN blinks under the frequency readout The audio is muted The scan speed is slow when the squelch is open And the speed is fast when the squelch is closed 5 When the tone frequency is detected the tone scan paus...

Страница 112: ...antenna tuner 11 2 Internal antenna tuner operation 11 2 D D Manual tuning 11 2 D D PTT Tuner start 11 2 About the external antenna tuner 11 3 D D Using the AH 4 or AH 740 11 3 D D Using a user supplied antenna tuner 11 3 Emergency mode Tuner 11 4 Previous view ...

Страница 113: ...tuner TUNE is displayed when the tuner is ON 2 Tune the antenna L To tune the antenna see Manual tuning or PTT Tuner start below D DManual tuning You can manually tune the antenna before transmitting for the first time 1 Hold down TUNER for 1 second to start manual tuning The tuner reduces the SWR to less than 1 5 1 after 2 3 seconds of tuning L While tuning a side tone is heard and TUNE blinks re...

Страница 114: ...2 1 after 2 3 seconds of tuning L While tuning a side tone is heard and TUNE blinks red L If the tuner cannot reduce the SWR to less than 2 1 after 15 seconds of tuning TUNE goes out 3 After tuning TUNE is displayed L When the long wire antenna cannot be tuned TUNE goes out In that case the AH 4 is bypassed and the wire is directly connected NOTE When the wire antenna cannot be tuned confirm wire ...

Страница 115: ...e the only antenna you have has a high SWR you can use the antenna tuner even if the SWR is more than 3 1 1 Open the EMERGENCY screen MENU SET Others Emergency 2 Touch Tuner 3 Touch OK 4 Touch Restart to SET to restart the transceiver is inserted Displayed when the internal antenna tuner is OFF Blinks while tuning Displayed when the internal antenna tuner is ON The transceiver enters the Emergency...

Страница 116: ...2 1 Section 12 SET MODE Set mode description 12 2 D D Entering the Set mode 12 2 Tone Control TBW 12 3 Function 12 4 Connectors 12 7 Display 12 10 Time Set 12 11 SD Card 12 11 Others 12 12 Previous view ...

Страница 117: ...n settings TIP The Set mode is constructed in a tree structure You may go to the next tree level or go back a level depending on the selected item 6 Rotate MULTI to select the desired option and then push MULTI to set it LInformatio L You can also select the option by directly touching the option or or in the screen When you continuously set other items in the same tree level repeat step 6 When yo...

Страница 118: ... are automatically set to 0 FM RX Bass Default 0 FM RX Treble Default 0 Sets the bass or treble level of the receive audio Range 5 5 CW RX HPF LPF Default RTTY RX HPF LPF Default Sets the receive audio high pass filter or low pass filter cutoff frequencies in 100 Hz steps Selectable ranges HPF 100 2000 Hz LPF 500 2400 Hz SSB TX Bass Default 0 SSB TX Treble Default 0 Sets the bass or treble level o...

Страница 119: ... SQL outer control operation Auto While in the AM or FM mode operates as only a squelch control While in the SSB CW or RTTY mode operates as only an RF gain control SQL Operates as only a squelch control LRF gain is fixed at maximum sensitivity RF SQL Operates as an RF gain control and a noise squelch or S meter squelch Only in the FM mode When using as an RF gain squelch control When using as an ...

Страница 120: ... not to save the internal antenna tuner s status after pushing TUNER on each band Manual The internal antenna tuner s status is saved on all bands Auto The internal antenna tuner s status is saved on each band PTT Start Default OFF Turns the PTT Start Tuning function ON or OFF OFF Starts to tune only when TUNER is ON ON When TUNER is ON and the operating frequency is shifted more than 1 starts to ...

Страница 121: ...imately 2 times faster HIGH Approximately 5 times faster when the tuning step is set to 1 kHz or smaller steps Approximately 2 times faster when the tuning step is set to 5 kHz or larger steps MIC Up Down Speed Default Fast Sets the response speed of on the supplied microphone while holding down Slow Slow speed 25 tuning steps second Fast Fast speed 50 tuning steps second Quick RIT TX Clear Defaul...

Страница 122: ...Range 0 100 NOTE The default setting of REF Adjust may differ slightly depending on the transceiver s version Before performing a frequency calibration you have to set Calibration Marker to ON Connectors ACC USB Output Select Default AF Selects the signal output from ACC and USB AF AF signal is output IF A 12 kHz IF signal is output L You can listen to the Digital Radio Mondiale DRM broadcast with...

Страница 123: ...s the entered RTTY memory RT1 RT4 When the RTTY decode screen is opened in the RTTY mode CI V Baud Rate Default Auto Selects the CI V data transfer rate Options 4800 9600 19200 bps or Auto L When Auto is selected the baud rate is automatically set according to the data rate of the connected controller CI V Address Default 94h Selects the CI V address Range 02h 94h DFh L 94h is the default address ...

Страница 124: ...You can control transmit receive and keying from the PC through the USB port Selects the control port to be used for communication between the IC 7300 and PC according to the operating condition OFF Turns OFF the function DTR Uses the DTR terminal on the CI V PC side RTS Uses the RTS terminal on the CI V PC side L You cannot select the terminal which is already selected in the USB SEND item USB Ke...

Страница 125: ...ift value is displayed BW Popup FIL Default ON Selects whether or not to display the IF filter width and shift value when you switch the IF filter by touching the filter icon OFF The IF filter width and shift value are not displayed ON The IF filter width and shift value are displayed Screen Saver Default 60min Sets the Screen Saver function This function activates and automatically turns OFF the ...

Страница 126: ...nsceiver to a power source at least once a month The charging period is two days whether the transceiver s power is ON or OFF Save Form Default Now Ver Selects the format to save the settings onto an SD card Now Ver Saves the settings in the current version format Old Ver x xx x xx Saves the settings in older version format indicated in the parenthesis x xx version SD Card Continued NOTE If you se...

Страница 127: ...emory Keyer RTTY memory User Band Edge REF Adjust Fixed Edges L See Resetting p 14 4 for details All Reset Clears all data and returns all settings to their factory defaults Memory channel contents filter setting and so on will all be cleared so you will need to rewrite your operating settings L See Resetting p 14 4 for details Emergency Sets the Emergency function This function enables you to use...

Страница 128: ...ement 13 2 D D Plot measurement 13 3 Selecting the display type and font 13 3 D D Selecting the display background 13 3 D D Selecting the display font 13 3 Protection function 13 4 REF adjustment 13 4 Displaying my call sign 13 5 Screen Capture function 13 5 D D Capturing a screen 13 5 D D Viewing the captured screen 13 5 Previous view ...

Страница 129: ... SWR of an antenna itself through the internal antenna tuner There are 2 ways to measure SWR one is spot measurement and the other is plot measurement D DSpot measurement 1 Push TUNER to turn OFF the antenna tuner L Perform this step if the antenna tuner is connected and you want to measure the SWR of the antenna itself 2 Select the RTTY or RTTY R mode 3 Set the desired frequency band and a freque...

Страница 130: ...suring The frequency marker and the measurement frequency are displayed Measuring step Number of graph bars Center frequency 8 Push TRANSMIT or hold down PTT on the microphone to transmit The bar graph displays the SWR Frequency marker Measurement frequency Measuring SWR The best match is within this range 1 5 or less 9 Push TRANSMIT or release PTT to stop transmitting 10 Repeat steps 8 and 9 to m...

Страница 131: ...ncy signals REF adjustment NOTE The transceiver has been adjusted and tested at the factory before being shipped out You should not have to re calibrate Before performing a frequency calibration you have to set Calibration Marker to ON Spurious signal waveforms may be displayed while the Calibration Marker is ON L Before performing a frequency calibration set the following items as described in th...

Страница 132: ...ed you can scroll through all the screen captures by rotating MULTI Other options in the capture list 1 While the capture list is displayed push QUICK to display the QUICK MENU 2 Select the desired option File Information Displays the name size and date of the selected screen capture Delete The confirmation dialog is displayed before deleting the file Select YES to delete or select NO to cancel De...

Страница 133: ...on 14 Cleaning 14 2 Replacing fuse 14 2 D D DC power cable fuses 14 2 D D Circuitry fuse 14 2 Touch screen calibration function 14 3 Resetting 14 4 D D Partial reset 14 4 D D All reset 14 4 Troubleshooting 14 5 Previous view ...

Страница 134: ...ry in the body to protect the transceiver DC power cable fuses ATC 25 A 30 A Circuitry fuse ATC 5 A The fuse type differs depending on the transceiver version RWARNING Disconnect the DC power cable from the transceiver before replacing the fuse NEVER use fuses that are not specified CAUTION When you remove a fuse use longnose pliers to protect your fingers and the fuse holders D DDC power cable fu...

Страница 135: ...eat step 3 L When the calibration is complete the transceiver returns to the OTHERS screen dot TIP When the touch screen is not accurate and you cannot access the OTHERS screen Do the following steps to correct the touch screen sensing accuracy 1 Turn OFF the transceiver 2 While holding down MENU and EXIT push POWER to display the Touch Window Calibration screen and then release MENU and EXIT 3 To...

Страница 136: ... 19 RTTY memory p 4 24 User Band Edge p 3 7 REF Adjust p 13 4 Fixed Edges p 5 7 After performing the All reset All reset clears all data and returns all settings to their factory defaults Memory channel contents filter setting and so on will all be cleared so you will need to rewrite your operating settings unless you have a backup When you cannot enter the Set mode If a touch screen operation err...

Страница 137: ...al speaker cable is cut Check the external speaker cable and repair it Sensitivity is too low and only strong signals can be heard The attenuator is activated Turn OFF the attenuator in the FUNCTION screen p 4 3 The squelch is closed Rotate AF RF SQL outer to 12 o clock position to open the squelch p 3 10 The antenna is defective or the coaxial cable connector is shorted or cut Repair the problem ...

Страница 138: ...d down SPEECH to turn the Dial Lock function OFF p 3 10 Programmed scan does not start The same frequencies have been set in scan edge memory channels P1 and P2 Set different frequencies in scan edge memory channels P1 and P2 p 10 3 Memory scan does not start 0 or only 1 memory channel is set Set at least 2 memory channels p 9 3 Select memory scan does not start 0 or only 1 memory channel is desig...

Страница 139: ...G THE FIRMWARE Section 15 General 15 2 D D About the firmware updating 15 2 D D Checking the firmware version 15 2 D D Preparation 15 3 D D Unzipping the firmware file 15 4 Updating the firmware 15 5 Previous view ...

Страница 140: ...mware from the Icom website http www icom co jp world index html D DChecking the firmware version You can check the firmware version in the Set mode 1 Open the INFORMATION screen MENU SET Others Information 2 Touch Version The firmware version is displayed The VERSION screen TIP You also can check the firmware version in the Opening screen when you turn ON the transceiver Rotate Push The firmware ...

Страница 141: ...p world index html L These instructions are based on Microsoft Windows 7 1 Click Support 2 Click the Firmware Updates Software Downloads link 3 Click the desired firmware file link in the IC 7300 group 4 Read Regarding this Download Service carefully and then click Agree General Continued Click Click Click Previous view ...

Страница 142: ...ts downloading The firmware and the firm utility are compressed in a zip format folder Unzip it before use D DUnzipping the firmware folder 1 Right click the downloaded firmware folder zip format Right click menu is displayed 2 Click Extract All After unzipping a folder is created in the same location as the downloaded folder L In the 7300_ folder 7300_ dat is created represents the release number...

Страница 143: ...s 1 Copy the downloaded firmware data into the IC 7300 folder on an SD card or a USB flash drive 2 Insert the SD card into the transceiver s SD CARD slot 3 On the Set mode menu screen display the SD CARD screen MENU SET SD card 4 Select Firmware Update The firmware update agreement screen is displayed 5 Touch Ù or Ú to scroll the screen L Carefully read all the displayed precautions 6 After you re...

Страница 144: ...es it to the main CPU and DSP FPGA L Downloading and loading status are displayed in the dialogs 9 Firmware updating has completed is displayed in the dialog The IC 7300 will automatically restart L After the updating finishes the operating screen is displayed TIP To check the firmware version after the updating see Checking the firmware version p 15 2 for details Previous view ...

Страница 145: ...16 1 Section 16 SPECIFICATIONS D D General 16 2 D D Transmitter 16 2 D D Receiver 16 3 D D Antenna tuner 16 3 Previous view ...

Страница 146: ...cy stability Less than 0 5 ppm 10 C to 60 C 14 F to 140 F Frequency resolution 1 Hz minimum Power consumption Receive Standby 0 9 A Maximum audio 1 25 A Transmit Maximum power 21 0 A Dimensions projections not included 240 W 94 H 238 D mm 9 4 W 3 7 H 9 4 D in Weight approximately 4 2 kg 9 3 Ib D DTransmitter Transmit output power HF and 50 MHz bands SSB CW RTTY FM 2 100 W AM 1 25 W 70 MHz band 2 S...

Страница 147: ... AMP 1 ON 3 0 29 999999 MHz Less than 6 dBμV emf P AMP 1 ON 50 MHz and 70 MHz bands Less than 0 dBμV emf P AMP 2 ON FM BW 7 kHz 60 Modulation 12 dB SINAD 28 0 29 7 MHz Less than 0 dBμV emf P AMP 1 ON 50 MHz and 70 MHz bands Less than 6 dBμV emf P AMP 2 ON Squelch sensitivity threshold SSB Less than 92 dBm 5 6 μV FM Less than 117 dBm 0 3 μV HF band P AMP1 ON 50 MHz band P AMP2 ON Selectivity Filter...

Страница 148: ...17 1 OPTIONS Section 17 Options 17 2 Mounting the MB 118 17 3 Attaching the MB 123 17 3 Previous view ...

Страница 149: ... AH 4 antenna tuner Automatic antenna tuner to tune a long wire antenna for base portable or mobile HF 50 MHz operation AH 740 automatic tuning antenna High performance automatic high speed tuning antenna The optional AH 5NV nvis kit is available AH 5NV nvis kit Use with the AH 740 AH 710 folded dipole antenna Covers 2 to 30 MHz wide frequency range Element length 24 5 m 80 4 ft Coaxial cable supp...

Страница 150: ...8 carefully read PRECAUTIONS p vi and decide the mounting place DO NOT use bolts other than the ones that are supplied with the MB 118 Other bolts longer than 8 mm 0 31 in may damage the internal units Attaching the MB 123 NOTE DO NOT use other than the screws supplied with the MB 123 Rubber feet Push in the center part Rubber feet Carrying handle The optional MB 123 carrying handle with the rubbe...

Страница 151: ...ocket 18 2 D D OPC 599 ACC conversion cable pin assignments 18 3 Microphone connector 18 3 D D External keypad 18 3 KEY jack 18 4 EXT SP jack 18 4 REMOTE jack 18 4 ALC jack 18 4 SEND jack 18 4 PHONES jack 18 4 DC power socket 18 4 Previous view ...

Страница 152: ...0 mV rms 4 13 SQL S Squelch output Grounded when the squelch opens SQL open SQL closed Less than 0 3 V 5 mA More than 6 0 V 100 μA 1 2 3 4 8 7 6 5 9 10 11 12 13 13 pin Rear panel view q brown w red e orange r yellow t green y blue u purple i gray o white 0 black 1 pink 2 light blue 3 light green Color refers to the cable strands of the supplied cable 2 You can change the pin 12 setting in the ACC ...

Страница 153: ...utput varies with the AF control D DExternal keypad A circuit is used to output memory content from 4 memories You can output desired memory content such as that from a CW Memory keyer M1 M4 Voice memory T1 T4 RTTY Memory RT1 RT4 to be transmitted z z Push a switch to send the memory information z z Hold down the switch for 1 second to repeatedly send the memory information L To use the external k...

Страница 154: ...nnecting a PC to REMOTE REMOTE ct 17 9 15 V DC PC mini plug cable Cable RS 232C type IC 7300 ALC Connects to the ALC output jack of a non Icom linear amplifier RCA Plug Control voltage 4 0 V SEND The terminal goes low when the transceiver transmits RCA Plug This terminal is used to control an external non Icom linear amplifier T R control voltage and current must be less than 16 V DC and 0 5 A Con...

Страница 155: ...9 1 Section 19 CONTROL COMMAND Remote control CI V information 19 2 D D CI V connection 19 2 D D Preparing 19 2 D D Data format 19 2 D D Command table 19 3 D D Data content description 19 8 Previous view ...

Страница 156: ...ess data communication speed and transceive function These settings are set in Set mode D DData format The CI V system can be written using the following data formats Data formats differ according to command numbers A data area or sub command is added for some commands ct 17 IC 7300 Connection example using CT 17 PC 9 15 V DC mini plug cable Controller to IC 7300 IC 7300 to controller FE FE 94 E0 ...

Страница 157: ...el 0000 min to 0255 max 03 0000 to 0255 Send read the squelch level 0000 min to 0255 max Cmd Sub cmd Data Description 06 0000 to 0255 Send read the NR level 0000 0 to 0255 100 07 0000 to 0255 Send read inner TWIN PBT position 0000 max CCW 0128 center 0255 max CW 08 0000 to 0255 Send read outer TWIN PBT position 0000 max CCW 0128 center 0255 max CW 09 0000 to 0255 Send read CW pitch 0000 300 Hz 012...

Страница 158: ...d the band edge beep with user setting TX limit ON 0025 00 to 02 Send read the RF SQL Control setting 00 Auto 01 SQL 02 RF SQL Cmd Sub cmd Data Description 1A 05 0026 00 to 05 Send read the TX Delay setting HF 00 OFF 01 10 ms 02 15 ms 03 20 ms 04 25 ms 05 30 ms 0027 00 to 05 Send read the TX Delay setting 50 MHz 00 OFF 01 10 ms 02 15 ms 03 20 ms 04 25 ms 05 30 ms 0028 00 to 05 Send read the TX Del...

Страница 159: ...idth and shifting value display setting when the IF filter is switched 00 OFF 01 ON Cmd Sub cmd Data Description 1A 05 0089 00 to 03 Send read screen saver function 00 OFF 01 15 minutes 02 30 minutes 03 60 minutes 0090 00 01 Send read opening message indication 00 OFF 01 ON 0091 p 19 9 Send read opening message contents up to 10 character 0092 00 01 Send read Power ON Check setting 00 OFF 01 ON 00...

Страница 160: ...e 04 90 NT selection for contest number style 0156 01 to 08 Send read count up trigger channel 01 M1 02 M2 03 M3 04 M4 05 M5 06 M6 07 M7 08 M8 0157 0001 to 9999 Send read present number 0001 1 to 9999 9999 Cmd Sub cmd Data Description 1A 05 0158 0000 to 0255 Send read CW side tone gain 0000 0 to 0255 100 0159 00 01 Send read CW side tone gain limit 00 OFF 01 ON 0160 01 to 60 Send read CW keyer rep...

Страница 161: ... VFO s operating mode and filter 27 00 p 19 12 Read the Scope waveform data Only when Scope ON OFF status Command 27 10 and Scope data output Command 27 20 are set to ON outputs the waveform data to the controller 10 00 01 Send read the Scope ON OFF status 00 OFF 01 ON 11 00 01 Send read the Scope wave data output 4 00 OFF 01 ON 12 00 Send read the Main or Sub scope setting 00 Main only 13 00 Send...

Страница 162: ...004 050007 050010 050011 X X X X LPF Upper edge HPF Lower edge The value of the HPF should be smaller than the LPF HPF 00 Through 01 20 100 2000 Hz LPF 05 24 500 2400 Hz 25 Through Bandscope edge frequency settings Command 1A 050112 050150 1 kHz 0 9 100 Hz 0 fixed 100 kHz 0 9 10 kHz 0 9 10 MHz 0 6 1 MHz 0 9 1 kHz 0 9 100 Hz 0 fixed 100 kHz 0 9 10 kHz 0 9 10 MHz 0 6 1 MHz 0 9 q X 0 X X X X X 0 X X ...

Страница 163: ...it 0 fixed 100 kHz digit 0 9 10 kHz digit 0 9 10 MHz digit 0 9 1 MHz digit 0 9 Direction 00 direction 01 direction q 0 X X X X XX w e 0 r 1 There is no need to enter the transverter offset frequency setting 2 Transverter offset only Fix to 0 for split offset setting Codes for character entries Character codes Letters and Numbers Character ASCII code Character ASCII code A Z 41 5A a z 61 7A 0 9 30 ...

Страница 164: ...X X X X X X X X X X X X X X X X X X X X X X X X X X X X q w 8 7 q w Memory channel numbers 0001 0099 Memory channel 01 to 99 0100 Programmed scan edge P1 0101 Programmed scan edge P2 e Select memory setting LSet 0 for P1 and P2 r i Operating frequency setting See Operating frequency o 0 Operating mode setting See Operating mode 1 Data mode and tone type settings 2 4 Repeater tone frequency setting...

Страница 165: ...Fixed digit 0 Fixed digit 0 q 0 0 X X X w e X Not necessary when setting a frequency UTC Offset setting Command 1A 05 0096 X Shift direction 00 plus 01 minus Offset time 0000 1400 X X X XX Selected or unselected VFO frequency settings Command 25 X X X X X X X X X X 0 0 00 Selected VFO 01 Unselected VFO Operating frequency data Selected or unselected VFO s operating mode and filter settings Command...

Страница 166: ... the scope data is out of range the waveform data u is omitted u Waveform data The transceiver outputs the drawn waveform data The data range or data length of the waveform data is judged by the controller The data range is basically the same as the display size of the scope on the controller Data range 0 160 Data length 475 Center Fixed mode settings Command 27 14 0 0 X X 00 Center mode 01 Fixed ...

Страница 167: ... MHz digit 0 6 1 MHz digit 0 9 1000 MHz digit 0 fixed 100 MHz digit 0 fixed 10 Hz digit 0 9 1 Hz digit 0 9 1 kHz digit 0 9 100 Hz digit 0 9 100 kHz digit 0 9 10 kHz digit 0 9 10 MHz digit 0 6 1 MHz digit 0 9 1000 MHz digit 0 fixed 100 MHz digit 0 fixed Frequency range Lower edge Higher edge Edge number 01 03 L Entry of 100 Hz or smaller digits are ignored q Selectable Frequency ranges Data Frequen...

Страница 168: ...on Marker 12 7 Captured screen viewing 13 5 Capturing a screen 13 5 CD Contents iii Starting the CD iii Center mode 5 3 CENTER Type Display 5 6 CI V Address 12 8 Baud Rate 12 8 Command table 19 3 Connection 19 2 Data format 19 2 Output for ANT 12 8 Preparing 19 2 Transceive 12 8 USB Baud Rate 12 9 USB Echo Back 12 9 USB Port 12 8 USB REMOTE Transceive Address 12 8 Cleaning 14 2 Clock 12 11 Connect...

Страница 169: ... Plus function 4 7 K Key KEY jack about 18 4 Speed setting 4 15 Type Keyer set menu 4 21 Keyboard Characters 1 8 Entering and editing 1 8 Example 1 9 Full Keyboard Layout 1 8 12 7 Types 1 8 12 7 Keyer Function electronic 4 17 Memory edit menu EDIT 4 19 Repeat time 4 21 Set menu CW KEY SET 4 21 Keypad Connecting 18 3 Keypad KEYER 12 8 Keypad RTTY 12 8 Keypad VOICE 12 8 L LEVEL Noise Blanker 4 8 Loa...

Страница 170: ...rded file on a PC 6 7 Voice TX memory 7 2 QSO audio 6 2 Quick recording 6 2 REF adjustment 13 4 REF Adjust Set mode 12 7 Remote control CI V information 19 2 REMOTE jack about 18 4 Repeater Input signal checking 4 30 Tone frequency checking 4 29 Tone frequency setting 4 29 Resetting 14 4 All reset 14 4 Partial reset 14 4 RFG 3 10 RF gain 3 10 RF SQL Control 12 4 Rise Time 4 21 RIT Function 4 3 Mon...

Страница 171: ...Time Stamp Frequency RTTY decode log 4 27 RTTY decode log 4 27 Time RTTY decode log 4 27 Tone scan operation 10 7 Tone squelch operation 4 30 Touch screen iii 1 5 Touch Screen Calibration 12 11 Function 14 3 Maintenance iii Operation Spectrum scope 5 4 Precautions iii Transmitting basic 3 10 Transmit filter width setting 4 14 12 9 Transmit output power adjusting 3 10 Troubleshooting 14 5 Tuner Con...

Страница 172: ...ormation checking 6 5 Voice TX memory Output level 7 5 Recording 7 2 Repeat Time 7 6 VOICE TX SET screen 7 6 Volume level adjusting 3 2 VOX Adjusting 4 10 ANTI 4 10 Function 4 10 Gain 4 10 Turning ON 4 10 W Waterfall Spectrum Scope Display 5 7 Marker Auto hide 5 7 Peak Color Level 5 7 Size Expand Screen 5 7 Speed 5 7 Waveform Spectrum Scope Color Current 5 7 Color Line 5 7 Color Max Hold 5 7 Type ...

Страница 173: ...lated safe distances for different antenna types for different frequency bands Further information can be found at http www arrl org Typical amateur radio installation Exposure distance assumes that the predominant radiation pattern is forward and that radiation vertically downwards is at unity gain sidelobe suppression is equal to main lobe gain This is true of almost every gain antenna today Exp...

Страница 174: ...1 1 32 Kamiminami Hirano ku Osaka 547 0003 Japan A7292 4EX 6 2016 2018 Icom Inc ...

Отзывы: