background image

5

GPS/GPS-A OPERATION

5

5-17


D

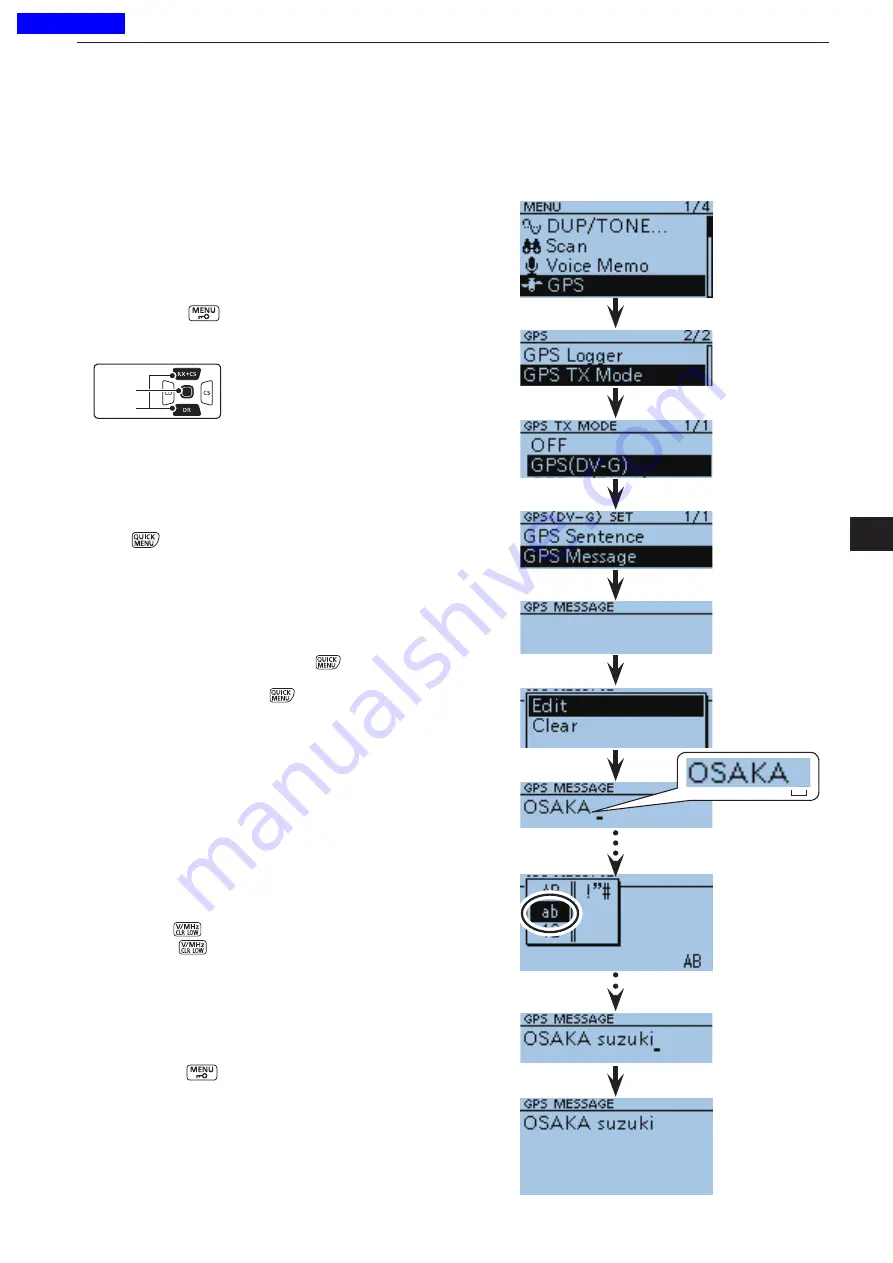
GPS message programming

Enter  a  GPS  message  of  up  to  20  characters  to  be 
transmitted with the position data.

Example: 

Adding


“OSAKA suzuki”

Push [MENU] 


q

 Push D-pad(


w

) to select the root item (GPS), and 

then push D-pad(Ent) to go to the next screen.

D-pad

(

)

(Ent)

  ( MENU > GPS > GPS TX MODE > GPS(DV-G) SET 

GPS Message

)

 Refer to the menu sequence shown directly above,  


e

and push D-pad(

) to select, and then D-pad(Ent) 

to enter, one or more times until the last screen is 
displayed.
Push 


r

.


t

Push  D-pad(

)  to  select  “Edit”  and  then  push  D-

pad(Ent).
The message editing screen appears.


y

Rotate [DIAL] to select the first character.


u

  • The selected character blinks.
  • Push D-pad(

) to move the cursor right or left.

  •  While  selecting  a  character,  push 

  to  change  the 

character to a upper case or lower case letter.

  •  While selecting a digit, push 

 to open the input mode 

selection window.

     Push D-pad(



) to select the desired modes to Upper 

case letters, Lower case letters, Numbers and Symbols.

     To enter symbols, select “!”#,” and then push D-pad(Ent) 

to  display  the  symbol  character  selection  window.  And 
rotate [DIAL] to select the desired symbol character, and 
then push D-pad(Ent).

  •  A space can be selected, even for any input mode se

-

lected.

  •  Push D-pad(

"

) to enter a space to the right of the last 

character. 

     To insert a space to the left of any selected character, 

rotate [DIAL] to select a space to insert it.

  •  Push [CLR] 

 to erase the selected character, or hold 

down [CLR] 

 to continuously erase the characters 

after the cursor.

 Push  D-pad(


i

"

)  to  move  the  cursor  to  the  second 

digit.
 Repeat steps 


o

u

 and 

i

 to enter a group name of up 

to 20 characters, including spaces.

!0

 After entering the name, push D-pad(Ent).

!1 

Push [MENU] 

 to exit the Menu screen.

In the process of 
entering 
“OSAKA”  and  a 
space.

GPS MESSAGE 
screen

Input mode 

selection window

Previous view

Содержание D-STAR ID-31A; D-STAR ID-31E

Страница 1: ...NDEX 11 OTHER FUNCTIONS TROUBLESHOOTING 10 MENU SCREEN OPERATION 9 PRIORITY WATCH 8 SCAN OPERATION 7 MEMORY CHANNEL PROGRAMMING 6 VOICE MEMORY FUNCTION 5 GPS GPS A OPERATION 4 DR MODE ADVANCED 3 DR MO...

Страница 2: ...s APRS is registered trademark of Mr Bob Bruninga WB4APR Adobe and Adobe Reader are registered trademark of Adobe Systems Incorporated All other products or brands are registered trademarks or tradema...

Страница 3: ...may differ depending on the Adobe Reader version Find screen Click to open the printing setup screen Advanced search screen Click to open the find or search screen or advanced search screen Printing...

Страница 4: ...eater operation 1 2 Repeater frequency setting D D 1 2 Checking the repeater input signal D D 1 3 Duplex operation 1 4 Setting the frequency offset D D 1 4 Setting the duplex direction D D 1 5 Off ban...

Страница 5: ...ater See page 10 52 for details Set the duplex offset direction p 1 5 r r DUP or DUP appears Turn ON the repeater tone t t See page 30 on the print ed manual TONE appears The tone frequency can be set...

Страница 6: ...peater input frequency Hold down SQL to listen on the repeater input fre quency While monitoring the TX RX indicator lights green and an S RF meter dot blinks While monitoring the displayed frequency...

Страница 7: ...mode is used when setting the offset frequency Pushing V MHz toggles the tuning digit as shown below TS 1 MHz 10 MHz The frequency changes according to the preset tuning steps See page 23 on the print...

Страница 8: ...gative offset or DUP positive offset and then push D pad Ent OFF For simplex operation the receive and transmit frequencies are the same DUP The transmit frequency shifts down from the re ceive freque...

Страница 9: ...nd then push D pad Ent D pad Ent Push D pad w w to select Auto Repeater and then push D pad Ent Rotate DIAL to select the Auto repeater setting e e U S A version OFF The Auto repeater function is OFF...

Страница 10: ...ter t t output frequency Set the duplex offset direction p 1 5 y y DUP or DUP appears While holding down PTT push SQL to transmit a u u 1750 Hz tone signal If OFF BAND appears check the offset frequen...

Страница 11: ......

Страница 12: ...Set the operating frequency q q Set the call sign p 3 21 w w To begin the digital mode communication except for the DR mode IMPORTANT The repeater list described in this manual may differ from your tr...

Страница 13: ...nction for digital repeater operation The timer limits a con tinuous transmission to approximately 10 minutes Warning beeps will sound approximately 30 seconds before time out and then again immediate...

Страница 14: ...all To call a station through no repeater ID RP2L IC 2820G DG CQCQCQ JA3YUA 430 430 CQCQCQ JA3YUA 430 430 D STAR INTERNET NOTE Programming the repeater list is required for DR mode operation pp 4 21 t...

Страница 15: ...h digital voice and low speed data communica tions including GPS transmission For Local area calls or Gateway calls select your access repeater For Simplex calls select a preset frequency NOTE If the...

Страница 16: ...o select the first digit Example J i i A to Z 0 to 9 and Space can be selected If you make a mistake push CLR to delete the selected character symbol or number Push D pad to enter a space Push D pad t...

Страница 17: ......

Страница 18: ...the RX History 3 15 D D TO Destination setting using the TX History 3 16 D D TO Destination setting using the Direct Input UR 3 17 D D TO Destination setting using the Direct Input RPT 3 18 About UR...

Страница 19: ...CQCQCQ is displayed on TO While holding down PTT speak into the micro y y phone at your normal voice level The TX RX indicator lights red The S RF meter shows the transmit output power level Release P...

Страница 20: ...pad u u to select Hirano430 and then push D pad Ent Hirano430 is displayed on TO While holding down PTT speak into the micro i i phone at your normal voice level The TX RX indicator lights red The S R...

Страница 21: ...ow icon blinks on TO While holding down PTT speak into the micro w w phone at your normal voice level The TX RX indicator lights red The S RF meter shows the transmit output power level Release PTT to...

Страница 22: ...to 40 calls can be stored Example Programming JM1ZLK and TOM into Your Memory using the RX History Hold down q q for 1 second The RX HISTORY screen is displayed Push D pad w w to select RX01 Push e e...

Страница 23: ...ld down CLR to continuously erase the characters after the cursor See page 4 2 for programming details Push D pad o o to move the cursor to the second digit 0 Repeat steps i and o to enter a name of u...

Страница 24: ...s repeater data is stored in the TX His tory You can select the access repeater from the record When you don t know which repeater you can access 5 Search for a repeater using the DR mode scan p 3 12...

Страница 25: ...D pad w w to select FROM and then push D pad Ent Push D pad r r to select Repeater List and then push D pad Ent Push D pad y y to select 11 Japan and then push D pad Ent Push D pad u u to select Hiran...

Страница 26: ...xt level Repeat step e e w until the desired item is selected Push D pad r r to select Internal GPS The transceiver starts to receive your position data Push MENU t t to save and exit the MENU screen...

Страница 27: ...Access repeater setting using the Repeater Search function Continued D D Shows the distance and direction from your position to the repeater Shows the call sign of Hirano430 Hirano430 setting is compl...

Страница 28: ...nd The DR mode is selected Push D pad w w to select FROM and then push D pad Ent Push D pad e e to select TX History and then push D pad Ent Push D pad r r to select Hirano430 and then push D pad Ent...

Страница 29: ...gnal is received The scan resumes the same as other scanning p 10 14 When the transceiver receives a signal from a re e e peater and stops at Hirano430 push CLR The DR mode scan is cancelled Hirano430...

Страница 30: ...ination from the record To directly input the destination station call sign 7 Direct Input UR p 3 17 Directly input the destination station call sign To directly input the destination repeater call si...

Страница 31: ...the station is you can make a call NOTE If the repeater set to FROM Access Re peater has no Gateway call sign you cannot make a gateway call Example Select TOM from the Your Call Sign Hold down q q f...

Страница 32: ...to select RX History and then push D pad Ent Push D pad r r to select TOM and then push D pad Ent TOM is displayed on TO D D TO Destination setting using the RX History JA3YUA this is JM1ZLK through J...

Страница 33: ...t Push D pad e e to select TX History and then push D pad Ent Push D pad r r to select Hirano430 and then push D pad Ent Hirano430 is displayed on TO D D TO Destination setting using the TX History In...

Страница 34: ...input mode se lected Push CLR to erase the selected character or hold down CLR to continuously erase the characters after the cursor Push D pad y y to move the cursor to the second digit Repeat steps...

Страница 35: ...e cursor to the second digit Repeat steps u u t and y to enter a name of up to 8 characters including spaces For example First J then P then 3 then Y then H then H After entering push D pad Ent twice...

Страница 36: ...tched the destination call sign is not registered on a gate way repeater or the registration contents is not matched the destination repeater cannot be accessed a blank MY call sign memory is selected...

Страница 37: ...to TO select Local CQ on the TO SELECT screen to set CQCQCQ The station call sign can also be selected While holding down PTT speak into the micro y y phone at your normal voice level The TX RX indica...

Страница 38: ...set CQ and then just say the call sign of the station you want to talk to Your Call Sign Select a station call sign in the Your Call Sign memory to make a call RX History Select a station call sign in...

Страница 39: ...screen Push D pad t t to select R1 and then push Push D pad y y to select Edit Push D pad Ent to enter the call sign programming u u mode A cursor appears and blinks D pad Ent Rotate DIAL to select t...

Страница 40: ...sign in the RX Histo ry to make a Local Area Gateway call TX History Select a station call sign in the TX Histo ry to make a Local Area Gateway call 3 R2 setting 4 Push D pad to select R2 and then pu...

Страница 41: ...E The R1 setting is set to your access repeater s call sign Calling 5 9 While holding down PTT speak into the micro phone at your normal voice level The TX RX indicator lights red The S RF meter shows...

Страница 42: ...al code squelch D D 4 18 DV mode operation in the Memory mode 4 19 Storing the temporary setting data D D 4 19 Confirming the call sign 4 19 Repeater list 4 20 Repeater list contents D D 4 20 Repeater...

Страница 43: ...lower case letter While selecting a digit push to open the input mode selection window Push D pad to select the desired modes to Upper case letters Lower case letters Numbers and Symbols To enter sym...

Страница 44: ...memory number 1 to 5 To turn OFF the message transmission function select OFF t tAfter selecting push D pad Ent Push MENU y y to exit the MENU screen The message is transmitted with a voice signal The...

Страница 45: ...ssage memory number 1 Push MENU q q Push D pad w w to select the root item My Station and then push D pad Ent Push D pad e e to select TX Message and then push D pad Ent Push D pad r r to select messa...

Страница 46: ...s of the RX history CALLER Shows the call sign of the caller station and any note programmed after the call sign CALLED Shows the call sign of the called station RXRPT1 Shows the call sign of the repe...

Страница 47: ...mit The TX RX indicator lights red BK blinks on a station that receives the break in call Release PTT to receive i i Wait for a reply call from the station After receiving the reply call communicate n...

Страница 48: ...ond The DR mode is selected Push D pad w w to select FROM and then push D pad Ent D pad Ent Push D pad e e to select Repeater List and then push D pad Ent Push D pad r r to select 11 Japan and then pu...

Страница 49: ...then push D pad Ent Push D pad e e to select EMR AF Level and then push D pad Ent Push D pad r r to adjust the EMR audio output level between 0 minimum and 39 maximum in 1 step Default 19 Push MENU t...

Страница 50: ...then push D pad Ent Push D pad e e to select DV Auto Detect and then push D pad Ent Push D pad r r to select ON Push MENU t t to exit the MENU screen When an FM signal is received in the DV mode the...

Страница 51: ...no voice signal is saved the transceiver replies to the call in the same way as the ON option Push MENU t t to exit the MENU screen NOTE The Automatic Reply function is automatically turned OFF when...

Страница 52: ...m 2 to 4 inches from your mouth then speak into the microphone at a normal voice level Only one announcement can be recorded The current contents will be overwritten if you record again Push MENU t t...

Страница 53: ...Function Data Speed Low speed data communication D D operation Set your own call sign UR call sign and the repeater q q call sign Follow the instructions of the data communication w w application sof...

Страница 54: ...ECH and then push D pad Ent Push D pad r r to select ON Kerchunk or ON All ON Kerchunk When a DV call is received and if the call time is short the calling station s call sign is announced ON All When...

Страница 55: ...lect the root item RX CS SPEECH and then push D pad Ent Push D pad r r to select ON Push MENU t t to exit the MENU screen While holding down y y rotating DIAL to select the station call sign After rel...

Страница 56: ...ese Push MENU t t to exit the MENU screen A call sign is announced in the selected language D D Speech alphabet character selection The speech alphabet character can be set to normal code or phonetic...

Страница 57: ...unction Continued D D Speech level selection The speech volume level can be set to between 0 minimum and 9 maximum Default 7 Push MENU q q Push D pad w w to select the root item SPEECH and then push D...

Страница 58: ...ived signal s call sign does not match digital call sign squelch does not open however the S RF meter shows the received signal level NOTE DO NOT use the digital code squelch function when communicati...

Страница 59: ...o and 99 for the digital code squelch function 0 Push MENU to set and exit the MENU screen 1 When the received signal includes a matching code the squelch opens and the audio is heard When the receive...

Страница 60: ...he previously selected channel number blinks and the channel contents are displayed If you continuously hold down S MW the setting is stored into the VFO mode 1 Rotate DIAL to select the Memory channe...

Страница 61: ...ess repeater s input frequency p 4 25 DUP Duplex direction p 4 26 OFFSET FREQ Frequency offset p 4 26 POSITION Position data accuracy level p 4 26 LATITUDE Latitude position of the repeater p 4 27 LON...

Страница 62: ...t the desired repeater group to be programmed and then push D pad Ent The repeater list of the selected repeater group is dis played t Push y Push D pad to select Add and then push D pad Ent REPEATER...

Страница 63: ...ncluding spaces 1After entering the name push D pad Ent 3 Repeater sub name programming 2 Push D pad to select SUB NAME and then push D pad Ent to enter the repeater sub name edit mode 3 Rotate DIAL t...

Страница 64: ...uously erase the characters after the cursor 9 Push D pad to move the cursor to the second digit 0 Repeat steps 8 and 9 to enter a name of up to 8 characters including spaces 1After entering the call...

Страница 65: ...hold down CLR to continuously erase the characters after the cursor 4 Push D pad to move the cursor to the second digit 5 Repeat steps 3 and 4 to enter a name of up to 8 characters including spaces Th...

Страница 66: ...to select YES and then push D pad Ent You can select the programmed repeater as an access repeater FROM 8 Access repeater frequency programming This item appears only when YES is selected in 7 Access...

Страница 67: ...tically set when the ac cess repeater frequency is programmed in 8 Ac cess repeater frequency programming The default value is differ depending on the version If necessary you can change the frequency...

Страница 68: ...D pad to select LONGITUDE and then push D pad Ent to enter the longitude data edit mode A cursor appears and blinks 3 Rotate DIAL to input the longitude data 4 Push to move the cursor backward or pus...

Страница 69: ...the list Push MENU q q Push D pad w w to select the root item DV Memo ry and then push D pad Ent Push D pad e e to select Repeater List and then push D pad Ent Push D pad r r to select the repeater g...

Страница 70: ...ater List and then push D pad Ent Push D pad r r to select the repeater group that in cludes the repeater you want to delete and then push D pad Ent Push D pad t t to select the repeater to be deleted...

Страница 71: ...of the MENU The se lected repeater call sign is automatically programmed If necessary edit the contents pp 4 21 to 4 28 o oPush D pad to select Add To RPT List and then push D pad Ent 0 Push D pad to...

Страница 72: ...at includes the repeater you want to move and then push D pad Ent Push D pad t t to select the repeater to be moved Push y y Push D pad u u to select Move and then push D pad Ent DESTINATION blinks on...

Страница 73: ...y Push D pad u u to select SKIP and then push D pad Ent SKIP appears on the selected repeater Push and select SKIP again then push D pad Ent to cancel the skip setting When SKIP All ON is selected pu...

Страница 74: ...aracter blinks Push D pad to move the cursor right or left While selecting a character push to change the character to a upper case or lower case letter While selecting a digit push to open the input...

Страница 75: ...Push D pad u u to select Detail and then push D pad Ent The REPEATER DETAIL screen is displayed Push D pad Ent to return to the RPT LIST screen i i While in the DR mode and if you set the repeater as...

Страница 76: ...e DIAL to select a desired character u u For example T The selected character blinks Push D pad to move the cursor right or left While selecting a character push to change the character to a upper cas...

Страница 77: ...irst J then M then 1 then Z then L then K 5After entering push D pad Ent 6 Push D pad to select Add Write and then push D pad Ent 7 Push D pad to select YES and then push D pad Ent 8 Push MENU to exit...

Страница 78: ...e to select Your Call Sign and then push D pad Ent Push D pad r r to select the Your call sign you want to delete Push t t Push D pad y y to select Delete and then push D pad Ent u uPush D pad to sele...

Страница 79: ...pad r r to select the call sign you want to move Push t t Push D pad y y to select Move and then push D pad Ent DESTINATION blinks on the upper left of the LCD u uPush D pad to select the destination...

Страница 80: ...programmed repeater list to the default write the ICF file to the transceiver using the CS 31 1 or copy the ICF file to the microSD card 2 and then write to the transceiver 1 See the CS 31 instruction...

Страница 81: ......

Страница 82: ...S data D D 5 13 GPS alarm setting D D 5 14 Transmitting GPS data 5 16 GPS data sentence setting D D 5 16 GPS message programming D D 5 17 Transmitting GPS A data 5 18 D PRS D D 5 18 Operating GPS A D...

Страница 83: ...female To the DATA jack TxD GND RxD Less than 6 0 mm 2 5 mm t o y e w q GPS Receiver Connect w with RxD e with TxD and t with GND NOTE While continuously using the Internal GPS mode the battery in the...

Страница 84: ...S Set GPS Select See page 10 22 for details Push CLR r r to cancel the GPS POSITION screen and return to the operating screen MY Position 1 MY Position 2 Latitude Compass direction Top is North Your c...

Страница 85: ...N QM The grid locator map of Japan Checking GPS Position Continued D D Changing the Grid Locator Grid Locator GL is a location compressed into a 6 character code calculated by the longitude and the la...

Страница 86: ...ion 1 MEM Position screen is displayed Push D pad w w then push D pad Ent to display the Compass Direction menu D pad Ent Push D pad e e to select the compass direction then push D pad Ent Heading Up...

Страница 87: ...RX Position 1 Push r r Push D pad t t to select Add To GPS Memory and push D pad Ent to save The GPS MEMORY EDIT screen is displayed The position information Latitude Longitude is automatically added...

Страница 88: ...quantity of tracking satel lites Altitude The altitude of your station The altitude is only displayed when more than 4 satellites are tracked When less than 3 satel lites are tracked ft is dis played...

Страница 89: ...MENU w Push D pad and D pad Ent to select GPS and then select GPS Memory D pad Ent e Push D pad to select ALL and then push D pad Ent All the previously added GPS memories are dis played r Push t Push...

Страница 90: ...push D pad Ent to display the symbol character selection window And rotate DIAL to select the desired symbol character and then push D pad Ent A space can be selected even for any input mode se lecte...

Страница 91: ...0 00 to 23 59 59 are pro grammable 1 Push D pad D to move the cursor left or right to select and edit the hour minute or second 2 Repeat steps 0 and 1 to enter GPS Memory time 3After entering the time...

Страница 92: ...pad Ent GPS Memory Bank programming 7 6Push D pad to select BANK 7Push D pad Ent then the editing screen appears 8 Push D pad to select a bank between A to Z or select OFF and push D pad Ent Each bank...

Страница 93: ...pad to select the desired modes to Upper case letters Lower case letters Numbers and Symbols To enter symbols select and then push D pad Ent to display the symbol character selection window And rotat...

Страница 94: ...and then push D pad Ent Push D pad r r to select ALL While a specific channel is selected as illustrated to t t the right push Push D pad y y and D pad Ent to select Delete Push D pad u u to select Y...

Страница 95: ...tem u uPush MENU to exit the Menu screen When either one of the stations in a specified group enters its set range the beep sounds three times When the GPS alarm beeps GPS ALARM pops up on the screen...

Страница 96: ...displayed next to the item u uPush MENU to exit the Menu screen When a set station is in the approximate 1 kilome ter range GPS Alarm beeps once and when it is in the approximate 500 meter range beep...

Страница 97: ...tence Lon Lat Alt UTC Date UTC Status 2D 3D COG True SOG knot Others RMC Mode Indicator GGA Number of satellites in use HDOP Geoidal separation Age of Differential GPS data GLL Mode Indicator VTG COG...

Страница 98: ...er While selecting a digit push to open the input mode selection window Push D pad to select the desired modes to Upper case letters Lower case letters Numbers and Symbols To enter symbols select and...

Страница 99: ...ith the steps 1 MY Your own call sign programming p 2 4 2 Receiving GPS data p 5 2 3 Set GPS TX MODE to GPS A p 5 16 4 Transmitting GPS A data setting pp 5 19 to 5 22 Setting is completed Transmission...

Страница 100: ...The default address should be used and editing is not recommended r Push D pad to select Unproto Address and then push D pad Ent The default setting is API31 DSTAR t Push D pad to display the next sc...

Страница 101: ...pad and D pad Ent to select ON Setting GPS A Symbol 6 Select the desired GPS A symbol which represents your operating situation The selected GPS A symbol channel s symbols 1 4 are transmitted along w...

Страница 102: ...Ent 6 Push D pad to select SSID Change the space in call sign to If the space is the last character delete the space instead of changing it to a Example JA3YUA A JA3YUA A 0 No SSID If you use a capita...

Страница 103: ...he desired modes to Upper case letters Lower case letters Numbers and Symbols To enter symbols select and then push D pad Ent to display the symbol character selection window And rotate DIAL to select...

Страница 104: ...TION 5 5 23 Displaying your position using a map D D ping software If you transmit to an I GATE station then enter the call sign information on the internet map website the set GPS A symbol is display...

Страница 105: ...sentences are selected in GPS SEN TENCE menu on page 5 16 5sec cannot be selected Selecting OFF cancels the GPS automatic trans mission The GPS message is also transmitted if pro grammed Push MENU t t...

Страница 106: ...not appear It may take longer or shorter time to receive depending on the environment If you find difficulties receiving we recommend that you change to a better location NOTE The GPS logger function...

Страница 107: ...nterval For example when you are walking and if the time in terval is set to 1sec a lot of position data is stored at almost same place Select the GPS Logger function record interval to suit your trav...

Страница 108: ...To use the card on your PC a card reader may be required The screen appears as shown to the right Click the Open folder to view files option to access t t the card The ID 31 folder appears Double clic...

Страница 109: ...ositioned y Mode Indicator A A Autonomous mode D DGPS E Estimated dead reckoning mode N Data not valid R Almanac data u Check Sum 03 Error detection data started with hex code i End code Blank shows w...

Страница 110: ...now functioning message appears then the GPS position is dis played to start the GPS Logger Only mode Also you can select the GPS Logger Only mode in the GPS Menu p 10 30 MENU GPS GPS LOGGER GPS Logg...

Страница 111: ......

Страница 112: ...while playing D D 6 5 Pause while playing D D 6 5 Playing the previously file D D 6 5 Playing the next file D D 6 5 Pause at the beginning of the previously file D D Fast forward the file 6 5 D D Pau...

Страница 113: ...ceiver automatically creates a new file and continues recording D D When you stop to recording Push q q to enter the Quick Menu screen Push D pad w w to select REC Stop Push D pad Ent to stop voice r...

Страница 114: ...r the Menu screen Push D pad w w to select the root item Voice Memo and then push D pad Ent to go to the next level D pad Ent MENU Voice Memo QSO Recorder Record er Set REC Mode Refer to the menu sequ...

Страница 115: ...nt to play then push D pad Ent to play it back The VOICE PLAYER screen is displayed and the file starts to play back If you want to fast forward or rewind see Operation while playing for details Push...

Страница 116: ...op the file D D Pause at the beginning of the previously file Fast forward the file When the playback is paused anywhere within the file push D pad to return to the beginning of the file and pause Pus...

Страница 117: ...e next level D pad Ent MENU Voice Memo QSO Recorder Player Set Skip Time Refer to the menu sequence show directly above e e and push D pad to select and then D pad Ent to enter one or more times until...

Страница 118: ...ing audio is playing back the audio cat egory is displayed as TX e Playback mark While the audio is playing back the mark is displayed The mark disappears while doing fast forward rewind or pausing r...

Страница 119: ...The file list is displayed The file name is composed yyyy mm dd hh mm ss y year m month d day hh hour mm minute ss sec ond Push D pad r r to select the file that you want to erase then push to enter...

Страница 120: ...e e and push D pad to select and then D pad Ent to enter one or more times until the last screen is displayed The file list is displayed The file name is composed yyyy mm dd hh mm ss y year m month d...

Страница 121: ...to enter one or more times until the last screen is displayed The folder list is displayed The folders are automatically made at recording The folder name uses the following format yyyymmdd y year m m...

Страница 122: ...e and push D pad to select and then D pad Ent to enter one or more times until the last screen is displayed The folder list is displayed The folders are automatically made at recording The folder nam...

Страница 123: ...e next level D pad Ent MENU Voice Memo QSO Recorder Record er Set RX REC Condition Refer to the menu sequence show directly above e e and push D pad to select and then D pad Ent to enter one or more t...

Страница 124: ...o select the OFF item and then push D pad Ent OFF The transceiver records the transmitting and re ceiving audios to the same file ON The transceiver records the transmitting and re ceiving audios to e...

Страница 125: ...last screen is displayed Push D pad r r to select the ON item then push D pad Ent OFF The transceiver does not start to record when the PTT switch is pushed ON The transceiver starts to record when t...

Страница 126: ...is displayed The file list is displayed The file name is composed yyyy mm dd hh mm ss y year m month d day hh hour mm minute ss sec ond Push D pad r r to select the file that you want to verify the i...

Страница 127: ...nce show directly above e e and push D pad to select and then D pad Ent to enter one or more times until the last screen is displayed The folder list is displayed The folders are automatically made at...

Страница 128: ...the root item SD Card and then push D pad Ent Push D pad e e to select SD Card Info and then push D pad Ent to display the SD Card Informa tion D pad Ent The information screen appears Push D pad Ent...

Страница 129: ...he microSD card into the reader If your PC has a microSD card drive insert the card into the drive Click Computer in the Start menu w w Explorer appears Click Removable Disk e e Double click the ID 31...

Страница 130: ...el contents 7 5 Memory or Call channel D D VFO 7 5 Memory or Call channel D D Another memory or Call channel 7 6 Memory bank setting 7 7 Assigning a memory channel to a memory bank D D 7 7 Directly pr...

Страница 131: ...quelch ON OFF Subaudible tone frequency tone squelch frequen cy or DTCS code with polarity Scan skip setting Memory bank Memory name Tuning step UR Station call sign R1 R2 call sign Digital Call sign...

Страница 132: ...e lected Rotate DIAL to select a desired memory channel w w Only programmed memory channels can be selected See page 7 4 for memory programming details DIAL Selecting a call channel Call channels are...

Страница 133: ...s Rotate DIAL to select a desired channel r r Hold down S MW t t for 1 second to save 3 beeps sound Before returning to the VFO mode the programmed memory contents are displayed The Memory channel num...

Страница 134: ...Call channel mode then rotate DIAL to select a desired channel Hold down S MW w w for 1 second to enter the Select Memory write mode and copy the memory contents 1 short and 1 long beep sounds The mem...

Страница 135: ...mode 1 short and 1 long beep sounds The memory channel number blinks DO NOT hold down S MW for more than 2 sec onds If you do the memory contents will be copied to the VFO Rotate DIAL to select the t...

Страница 136: ...etween 00 and 99 A memory channel assigned to another Bank channel is not displayed Push D pad to change the bank group or bank chan nel number 0 Push D pad Ent to exit the Memory bank edit mode 1 Pus...

Страница 137: ...or 1 second to program 3 beeps sound If an already assigned bank channel is selected in step u the memory contents will be overwritten into the memory channel and bank channel The Bank channel number...

Страница 138: ...channels assigned to them are displayed Push D pad Ent t t Rotate DIAL to select a desired bank channel y y Only assigned Bank channels are displayed To return to the Memory channels display repeat st...

Страница 139: ...Quick Menu screen Push D pad r r to select Edit and then push D pad Ent to enter the name programming mode D pad Ent Push D pad t t to select MNAME BNAME or SNAME and then push D pad Ent MNAME is for...

Страница 140: ...e characters to the left of the cursor Push D pad u u to move the cursor to the second digit Repeat steps i i y and u until the desired channel name is programmed Push D pad Ent to save the name and e...

Страница 141: ...h D pad Ent D pad Ent Rotate DIAL to select a desired Display type and r r then push D pad Ent Freq Name OFF Displays only the frequency Freq Displays the large font sized frequency and small font siz...

Страница 142: ...then push D pad Ent The confirmation screen Clear appears D pad Ent t tPush D pad to select YES and then push D pad Ent to clear the contents After clearing the display returns to the Select Memory w...

Страница 143: ......

Страница 144: ...Tuning step for a VFO scan D D 8 3 Skip function D D 8 3 Receive mode for a scan D D 8 3 When a signal is received D D 8 3 Scan name D D 8 3 Scan Stop Beep function D D 8 3 VFO scan 8 4 VFO mode scan...

Страница 145: ...set to link in the PROGRAM LINK item in the MENU screen p 10 16 MENU Scan Program Link Memory scan D D ALL Memory full scan p 8 7 Scans all memory channels MODE Mode memory scan p 8 7 Scans memory ch...

Страница 146: ...used by the scan During a memory or bank scan the receive mode programmed into the channel is used by the scan D D When a signal is received When a signal is received the scan pauses for ap proximate...

Страница 147: ...NE Tone scan For tone squelch scanning Push D pad Ent to start the scan t t If desired rotate DIAL to switch the scanning direction during a scan If desired push FM DV to change the operating mode dur...

Страница 148: ...LINK0 Scan edges Program link When a scan name is assigned When a scan name is assigned the scan type can be set by selecting the scan name from the scan type list Step r on page 8 4 NOTE The scan na...

Страница 149: ...pty memory channel 499 If channel 499 is already programmed the transceiver automatically searches backwards for a blank channel to program If no blank memory channel is found a beep sounds and no ski...

Страница 150: ...uplex scan p 8 2 For the duplex mode TONE Tone scan For tone scanning Push D pad Ent to start the scan r r If desired rotate DIAL to switch the scanning direction during a scan If desired hold down fo...

Страница 151: ...memory channel are displayed DUP Duplex scan p 8 2 For the duplex mode TONE Tone scan For tone scanning Push D pad Ent to start the scan r r To cancel the scan hold down SCAN t t for 1 second Pushing...

Страница 152: ...e is programmed When a bank name is programmed the scan type can be set by selecting the bank name from the scan type list Set e on page 8 8 NOTE The bank name is not displayed during a scan When the...

Страница 153: ...t scanned Push M CALL q q to select the memory mode Rotate DIAL to select the memory channel to be w w set as a skip channel Push e e Push D pad r r to select SKIP and then push D pad Ent OFF Cancel t...

Страница 154: ...mode scan and a VFO frequency D D 9 2 DR mode and a Call channel D D 9 2 DR mode scan and a Call channel D D 9 2 DR mode and a memory channel D D 9 2 DR mode scan and a memory channel D D 9 2 VFO FREQ...

Страница 155: ...a bank scan D D Sequentially checks the bank channels every 5 seconds during a VFO mode scan DR mode and a VFO frequency D D Checks a VFO frequency every 5 seconds while receiving on a repeater in th...

Страница 156: ...d Ent The PRIO icon appears on the screen ON When a signal is received on the priority channel the memory mode is automati cally selected Bell When a signal is received on the prior ity channel the ic...

Страница 157: ...PRIO icon blinks on the screen The scan pause timer and resume settings are the same as for a normal scan When Bell is selected When a signal is received on the priority channel a beep sounds and the...

Страница 158: ...nt Rotate DIAL to select the bank channel to watch u u Push i i Push D pad o o to select PRIO Watch and then push D pad Ent ON When a signal is received on the prior ity channel the memory bank mode i...

Страница 159: ...e PRIO icon blinks on the screen The scan pause timer and resume settings are the same as for a normal scan When Bell is selected When a signal is received on the priority channel a beep sounds and th...

Страница 160: ...h D pad Ent ON When a signal is received on the pri ority channel the Call channel mode is automatically selected The PRIO icon blinks on the screen Bell When a signal is received on the prior ity cha...

Страница 161: ...d The PRIO icon blinks The scan pause timer and resume settings are the same as for a normal scan When Bell is selected When a signal is received on the priority channel a beep sounds and the icon is...

Страница 162: ...ceived on the prior ity channel the memory mode is auto matically selected Bell When a signal is received on the prior ity channel the icon is displayed in the VFO mode Push D pad o o to select ON or...

Страница 163: ...PRIO icon blinks The scan pause timer and resume settings are the same as for a normal scan When Bell is selected When a signal is received on the priority channel a beep sounds and the icon blinks Th...

Страница 164: ...D pad to select PRIO Watch and then push D pad Ent ON When a signal is received on the prior ity channel the memory bank mode is automatically selected Bell When a signal is received on the prior ity...

Страница 165: ...PRIO icon blinks The scan pause timer and resume settings are the same as for a normal scan When Bell is selected When a signal is received on the priority channel a beep sounds and the icon blinks T...

Страница 166: ...signal is received on the prior ity channel the Call channel mode is automatically selected Bell When a signal is received on the prior ity channel the icon is displayed in the VFO mode Push D pad o o...

Страница 167: ...PRIO icon blinks The scan pause timer and resume settings are the same as for a normal scan When Bell is selected When a signal is received on the priority channel a beep sounds and the icon blinks T...

Страница 168: ...pad u u to select PRIO Watch and then push D pad Ent ON When a signal is received on the prior ity channel the memory mode is auto matically selected Bell When a signal is received on the prior ity ch...

Страница 169: ...ected The PRIO icon blinks The scan pause timer and resume settings are the same as for a normal scan When Bell is selected When a signal is received on the priority channel a beep sounds and the icon...

Страница 170: ...push D pad Ent to start the bank scan p 8 8 Push o o 0 Push D pad to select PRIO Watch and then push D pad Ent ON When a signal is received on the prior ity channel the memory bank mode is automatical...

Страница 171: ...ected The PRIO icon blinks The scan pause timer and resume settings are the same as for a normal scan When Bell is selected When a signal is received on the priority channel a beep sounds and the icon...

Страница 172: ...ceived on the priority channel the icon is displayed in the VFO mode Push D pad y y to select ON or Bell and then push D pad Ent The PRIO icon appears and the priority scan VFO frequency and memory sc...

Страница 173: ...e PRIO icon blinks The scan pause timer and resume settings are the same as for a normal scan When BELL is selected When a signal is received on the priority channel a beep sounds and the icon blinks...

Страница 174: ...Ent ON When a signal is received on the prior ity channel the memory bank mode is automatically selected Bell When a signal is received on the prior ity channel the icon is displayed in the VFO mode...

Страница 175: ...esume settings are the same as for a normal scan When Bell is selected When a signal is received on the priority channel a beep sounds and the icon blinks The VFO scan resumes Blinks Appears Appears B...

Страница 176: ...RIO Watch and then push D pad Ent ON When a signal is received on the prior ity channel the VFO mode is automati cally selected Bell When a signal is received on the pri ority channel a beep sounds an...

Страница 177: ...ected The PRIO icon blinks The scan pause timer and resume settings are the same as for a normal scan When Bell is selected When a signal is received on the priority channel a beep sounds and the PRIO...

Страница 178: ...is received on the priority channel a beep sounds and the PRIO icon blinks on the DR mode screen D pad Ent Push D pad u u to select ON or Bell and then push D pad Ent The PRIO icon is displayed and t...

Страница 179: ...he priority scan Push it again to cancel the scan The scan pause timer and resume settings are the same as for a normal scan When Bell is selected When a signal is received on the priority channel a b...

Страница 180: ...sh D pad Ent ON When a signal is received on the priority channel the Call channel mode is auto matically selected Bell When a signal is received on the priority channel a beep sounds and the PRIO ico...

Страница 181: ...ected The PRIO icon blinks The scan pause timer and resume settings are the same as for a normal scan When Bell is selected When a signal is received on the priority channel a beep sounds and the PRIO...

Страница 182: ...riority channel a beep sounds and the PRIO icon blinks on the DR mode screen D pad Ent Push D pad y y to select ON or Bell and then push D pad Ent The PRIO icon is displayed and the priority scan star...

Страница 183: ...the priority scan Push it again to cancel the scan The scan pause timer and resume settings are the same as for a normal scan When Bell is selected When a signal is received on the priority channel a...

Страница 184: ...to select PRIO Watch and then push D pad Ent ON When a signal is received on the priority channel the Call channel mode is auto matically selected Bell When a signal is received on the priority chann...

Страница 185: ...The PRIO icon blinks The scan pause timer and resume settings are the same as for a normal scan When Bell is selected When a signal is received on the priority channel a beep sounds and the PRIO icon...

Страница 186: ...eived on the priority channel a beep sounds and the PRIO icon blinks on the DR mode screen D pad Ent Push D pad u u to select ON or Bell and then push D pad Ent The PRIO icon is displayed and the prio...

Страница 187: ...riority scan Push it again to cancel the scan The scan pause timer and resume settings are the same as for a normal scan When Bell is selected When a signal is received on the priority channel a beep...

Страница 188: ...ems 10 22 Call sign items 10 38 RX History items 10 40 DV Memory items 10 42 My Station items 10 44 DV Set items 10 45 SPEECH items 10 49 DTMF T CALL items 10 50 Function items 10 51 Display items 10...

Страница 189: ...t settings may differ depending on the version Sets the frequency offset for duplex repeater operation Selects the tone frequency used to ac cess the repeaters Selects the DTCS polarity for the DTCS s...

Страница 190: ...elects program scans to be scanned during a the Program Link Scan QSO Recorder REC Start 2 Play Files 2 Recorder Set Player Set PLAY FILES REC Mode RX REC Condition File Split PTT Auto REC Skip Time I...

Страница 191: ...o display the distance and elevation Selects units to display the speed Enters the GPS alarm active range Selects the GPS alarm active range Selects the GPS information from the internal GPS receiver...

Страница 192: ...ess Selects whether to transmit the course and speed data Selects to transmit the current UTC time as a time stamp Turns the altitude transmit option ON or OFF Selects a specified GPS A Symbol to tran...

Страница 193: ...SCRIPTIONS Displays the operating call signs Sets the operating call signs on other than the DR mode Displays the Received Call record Stores station call signs Stores repeater information 1 See page...

Страница 194: ...ON OFF or Voice Selects manually or automatically to transmit low speed data Selects the DV mode RX monitoring when SQL is held down Turns the digital repeater setting function ON or OFF Turns the RX...

Страница 195: ...ow or Fast 0 7 9 DESCRIPTIONS RANGE OR VALUE Default is shown in bold Selects the RX call sign speech function op tion while ON or turns it OFF Turns the RX CS Speech function ON or OFF Selects either...

Страница 196: ...pe when the Key Lock function is turned ON Turns the PTT Lock function ON or OFF Turns the Busy Lockout function ON or OFF Selects the Time Out Timer time op tions VOX VOX VOX Level VOX Delay Headset...

Страница 197: ...ON Backlight Timer 5sec or 10sec DESCRIPTIONS RANGE OR VALUE Default is shown in bold RX Call Sign OFF Auto or Auto RX Hold Selects the call sign display option when receiving a call System Language E...

Страница 198: ...Beep Scope AF Output Standby Beep 0 3 9 In this item set the Sound options OFF or ON OFF or ON OFF or ON OFF or ON OFF ON or ON to me High Tone DESCRIPTIONS RANGE OR VALUE Default is shown in bold Ti...

Страница 199: ...c tions 50 tone frequencies 67 0 254 1 Hz are selectable TSQL Freq Default 88 5 DUP TONE TSQL Freq TSQL TONE Selects the tone frequency for the tone squelch or pocket beep 50 fre quencies 67 0 254 1 H...

Страница 200: ...152 155 156 162 165 172 174 205 212 223 225 226 243 244 245 246 251 252 255 261 263 265 266 271 274 306 311 315 325 331 332 343 346 351 356 364 365 371 411 412 413 423 431 432 445 446 452 454 455 462...

Страница 201: ...esumes 1 to 5 seconds after the signal disap pears HOLD The scan remains paused according to the Pause Timer even if the signal disappears NOTE Rotate DIAL to resume the scan The Resume Timer must be...

Страница 202: ...NK Select banks to be scanned during a Bank Link Scan The Bank Link function provides a continuous Bank Scan which scans all channels in the selected banks Select the desired bank A to Z and then push...

Страница 203: ...ne pair of pro grammed scan edge channels are programmed or no programmed scan channel 00 to 24 is left to add to the selected link channel Adding a program scan link q qPushD pad toselectaprogramscan...

Страница 204: ...character to a upper case or lower case letter While selecting a digit push to open the input mode selection window A space can be selected for any input mode selected Push CLR to erase the selected...

Страница 205: ...lay Files PLAY FILES Performs the following steps to play back the recorded audio onto the mi croSD card Push D pad Ent and folders on the microSD card are displayed These folders contain the stored f...

Страница 206: ...ived voice audio When transmitted while recording When OFF is selected in File Split the recording is paused After finishing the transmission the recording resumes When ON is selected in File Split a...

Страница 207: ...der and the voice signal is saved into the new one PTT Auto REC Default OFF Voice Memo QSO Recorder Recorder Set PTT Auto REC PTT AUTO REC Turn the PTT Automatic Recording function ON or OFF The trans...

Страница 208: ...em While pushing and holding PTT speak into the microphone at a normal q q voice level DO NOT hold the transceiver too close to your mouth or speak too loudly This may distort your speech The recordin...

Страница 209: ...isconnects power to the GPS receiver to con serve battery power When this function is ON and if the GPS receiver cannot receive signal from a satellite for 5 minutes the power save function will turn...

Страница 210: ...on data is received Selected GPS receiver Not connected Connected Searching Connected Received Internal GPS Blinks Appears External GPS Not displayed Blinks Appears No icon appears when Manual is sele...

Страница 211: ...99 0 01 steps Position Format dddmm ss 00 05 to 59 59 0 01 steps Example Your position 35 N 135 E Alarm Area1 setting 0 25 0 25 0 25 0 25 0 25 N Point A Your position Point B Point C Point D Position...

Страница 212: ...nd sounds 3 beeps and the icon blinks when it is in the 500 meter range When the target exits the 500 meter range but is still in the 1 kilometer range the icon continues to blink but no beeps sound E...

Страница 213: ...ing satellites weak signal Reversed characters Example 01 Tracking satellites strong signal SAT Number of tracking satellite between 0 and 12 Altitude ft Non positioning 2D Tracking three satellite Po...

Страница 214: ...r s call sign Latitude The caller s latitude Longitude The caller s longitude DST The caller s distance from your position GL Shows the grid locator based on the latitude and longitude of the caller s...

Страница 215: ...ry banks A Z BANK NAME The name of a GPS memory bank Enter a name of up to 16 alphanumeric characters for each GPS bank The GPS memory bank name can be edited in the QUICK MENU screen p 5 12 GPS memor...

Страница 216: ...ly logged until turning it OFF even if the transceiver power is turned OFF then ON again To use this function 1 You must first insert a microSD card into the transceiver 2 You must select either Inter...

Страница 217: ...GPS logger function is set to ON the GPS logger mode is started immediately after pushing D pad Ent GPS TX Mode Default OFF GPS GPS TX Mode GPS TX MODE Select a GPS transmission mode to send position...

Страница 218: ...in GPS TX Mode Contents of GPS sentence Sentence Lon Lat Alt UTC Date UTC Status 2D 3D COG True SOG knot RMC GGA GLL VTG GSA GSV Sentence Others RMC Mode Indicator GGA Number of satellites in use HDO...

Страница 219: ...hen GPS A DV A or OFF is selected in GPS TX Mode NOTE When no message transmission is desired delete the programmed message in the QUICK MENU screen Unproto Address Default API31 DSTAR GPS GPS TX Mode...

Страница 220: ...HMS or OFF The time stamp is transmitted with the position data in the GPS A mode and UTC Universal Time Coordinated time is used OFF No time stamp is transmitted DHM Transmits the time stamp in the...

Страница 221: ...other symbol by entering a 2 character GPS A code p 10 35 Selecting a GPS A symbol with a 2 character symbol code Push D pad q q to select a desired GPS A Symbol channel between 1 and 4 D pad Ent Push...

Страница 222: ...GPS A Symbol list Sheriff Police Glider Satellite Small Aircraft RecreationalVehicle Hospital Sunny Red Cross Shuttle Jeep Radio House QTH VHF SSTV Truck Aircraft X Bus Node RACES Red Dot ATV Rover G...

Страница 223: ...cludes a space any text or digit after the space will be deleted Example JA3YUA JA3YUA no SSID is added JA3YUA A JA3YUA no SSID is added 1 to 15 Adds an SSID of 1 to 15 to the call sign Even if a call...

Страница 224: ...mittable comment range display In case of up to 28 characters This comment item will be hidden when GPS DV G or OFF is selected in GPS TX Mode GPS Auto TX Default OFF GPS GPS Auto TX GPS AUTO TX Selec...

Страница 225: ...no repeater JP3YHH B while in the DV mode Before starting to set the call sign set the frequency of your access repeater or duplex direction See pages 23 and 30 on the printed manual NOTE When the Dig...

Страница 226: ...to select Gateway CQ and then push D pad Ent Push D pad e e to select 11 Japan repeater group where your destina tion repeater is listed and then push D pad Ent Push D pad r r to select Hamacho430 an...

Страница 227: ...ith D pad RX History number 01 to 40 Message included in the received call Received date Caller station upper Called station lower To display the RX record contents Push D pad q q to select the desire...

Страница 228: ...ude position of the caller station GL Grid Locator Shows the latitude and longitude position data in a short string of characters DISTANCE 2 Shows the distance between you and the caller station GPS A...

Страница 229: ...List REPEATER GROUP You can store repeater information for quick and simple communication when using repeaters The transceiver has a total of 700 repeater memory channels storable in 20 groups 01 to 2...

Страница 230: ...FFSET FREQ 1 Frequency offset to use the access repeater POSITION Position data accuracy level None Approximate or Ex act LATITUDE 2 Latitude position of the repeater LONGITUDE 2 Longitude position of...

Страница 231: ...e 2 5 for MY call sign programming To select a different My Call Sign push D pad to select and then push D pad Ent to set TX Message My Station TX Message TX MESSAGE The transceiver has a total of 5 m...

Страница 232: ...Bass Boost RX BASS BOOST Turn the DV mode received audio Bass Boost function ON or OFF This function is separate from the Boost setting of the RX Bass OFF Turns the function OFF ON This function boost...

Страница 233: ...n this function is set to ON or Voice DV Data TX Default Auto DV Set DV Data TX DV DATA TX Select whether to manually or automatically transmit slow speed data PTT Push PTT to manually transmit the in...

Страница 234: ...ets the call sign of the repeater into R1 or R2 OFF Turns the function OFF Auto Automatically sets the call sign of the repeater into R1 and or R2 DV Auto Detect Default OFF DV Set DV Auto Detect DV A...

Страница 235: ...etting is necessary When an EMR mode signal is received the audio voice will be heard at the specified level even if the volume setting level is set to minimum level or digital call sign digital code...

Страница 236: ...e holding down rotate DIAL to select a call sign from a Received Call Record After selecting release and then the selected station call sign is announced SPEECH Language Default English SPEECH SPEECH...

Страница 237: ...ignal d0 to d DTMF memory channel list DTMF Speed Default 100ms DTMF T CALL DTMF Speed DTMF SPEED Select the DTMF transfer speed 100ms Transfer the DTMF codes at about 100 milliseconds per code 5 char...

Страница 238: ...ed 300 milliseconds 60 seconds 30 milliseconds 300 milliseconds 900 milliseconds 60 seconds 30 milliseconds 30 milliseconds 600 milliseconds 30 milliseconds DV mode 30 milliseconds 300 milliseconds No...

Страница 239: ...rotate DIAL OFF Turns the function OFF ON Turns the function ON Auto Repeater Function Auto Repeater AUTO REPEATER Valid condition Korean U S A version transceivers The auto repeater function automat...

Страница 240: ...WN Normal 2 A Activates the monitor function B Toggles between the VFO mode and memory mode Changes the frequency or memory channel UP Changes the frequency or memory channel DOWN Regardless of the se...

Страница 241: ...ock function ON and OFF To prevent accidental transmissions this function disables PTT OFF Turns the function OFF ON Turns the function ON Busy Lockout Default OFF Function Busy Lockout BUSY LOCKOUT T...

Страница 242: ...mmunication or between the DATA jack and external modules like a GPS receiver and so on to 4800 bps or 9600 bps VOX Default OFF Function VOX VOX VOX Turn the VOX function ON or OFF The function automa...

Страница 243: ...CI V Address CI V ADDRESS To distinguish equipment each CI V transceiver has its own Icom standard address in hexadecimal code The ID 31A E s default address is 84 When 2 or more ID 31A Es are control...

Страница 244: ...play Backlight Timer BACKLIGHT TIMER Select the backlight lighting time period to between 5 and 10 seconds Depending on the Backlight option the backlight lights for this set period and then automatic...

Страница 245: ...l from JM1ZLK NOTE When Auto or Auto RX Hold is selected and if the call sign and name of the caller station is programmed in Your Call Sign screen the programmed name is displayed after showing the c...

Страница 246: ...splays and scrolls the destination station s call sign My Call Sign Displays and scrolls your own call sign Example Shows the target station s call sign NOTE When Your Call Sign is selected and if the...

Страница 247: ...n the transceiver is turned ON displays the voltage of the bat tery or external DC power source on the LCD Example When the voltage of 7 4V NOTE When the voltage is above 15 6V external DC power sourc...

Страница 248: ...et to Japanese Choose your language carefully When the system language of the transceiver is set to Japanese the ID 31A E has the capability to display both English and Japanese charac ters HOWEVER if...

Страница 249: ...beep sounds when a key is pushed NOTE The beep tone sounds regardless of this setting when the power is turned ON a matched tone signal is received if the pocket beep is activated the transceiver is...

Страница 250: ...High Tone Turns the function ON to sound a beep If the signal is addressed to your call sign a high beep sounds The standby beep sounds even when OFF is selected in Key touch beep The standby beep ou...

Страница 251: ...ush w w and to move the cursor and then select between year month and day to change Cursor Rotate DIAL to select each number e e Repeat steps r r w and e to enter the year month and day and then push...

Страница 252: ...tion is OFF Auto The function is ON UTC Offset Default 0 00 Time Set UTC Offset UTC OFFSET Set the time difference between UTC Universal Time Coordinated and the local time to between 14 00 and 14 00...

Страница 253: ...he list when you load the setting file Setting save SD Card Setting save SETTING SAVE Save the setting file SD Card Info SD Card SD Card Info Displays the SD card s free space and its remaining record...

Страница 254: ...uency setting and operation D D 11 7 DTCS squelch operation 11 9 DTCS code setting and operation D D 11 9 Cloning function 11 11 Transceiver to Transceiver cloning D D using a microSD card 11 11 Cloni...

Страница 255: ...to enter the desired DTMF codes Push to move the cursor backward or push to move the cursor forward When the cursor is on the 24th digit the cursor only can be move to backward Push CLR to delete the...

Страница 256: ...nel to be moni tored in DTMF memory screen then push SQL The stored DTMF code sounds DTMF code can also be monitored with the following steps Select the desired memory channel to be monitored in DTMF...

Страница 257: ...return to the operating screen While holding down PTT push SQL to transmit t t the selected DTMF code The transceiver keeps transmission until the all pro grammed DTMF code is transmitted even PTT is...

Страница 258: ...next level 100ms Transfer the DTMF tones at about 100 millisec onds per tone 200ms Transfer the DTMF tones at about 200 millisec onds per tone 300ms Transfer the DTMF tones at about 300 millisec onds...

Страница 259: ...TMF MEMORY screen push w w D pad to select the root item DTMF T CALL and then push D pad Ent to go to the next level DTMF memory channel list d0 to d is displayed Push D pad e e to select the desired...

Страница 260: ...item DUP TONE and then push D pad Ent to go to the next level The selected tone squelch frequency is displayed Rotate DIAL to select a desired tone squelch fre y y quency then push D pad Ent Example...

Страница 261: ...tion Sounds beep when a call is received If TSQLS is selected in step 0 beeps sound for 30 seconds and the icon S blinks when a call with the matched tone signal is received After receiving a call hol...

Страница 262: ...S code screen push D pad t t to select the root item DUP Tone and then push D pad Ent to go to the next level The selected DTCS code is displayed Rotate DIAL to select a desired DTCS code then y y pus...

Страница 263: ...ep 10 beeps sound for 30 seconds and the icon S blinks when a call with the matched DTCS code signal is received After receiving a call hold down PTT within 30 seconds then start conversation or push...

Страница 264: ...d voice memories are not included in the clon ing data To play back the master transceiver s voice memory attach the microSD card to sub transceiver or make a copy onto the sub transceiver s microSD c...

Страница 265: ...he master trans ceiver then attach it to the sub transceiver Turn OFF the master transceiver u u Hold down the master transceiver s Remove the microSD card from the master trans i i ceiver as shown at...

Страница 266: ...D pad to select YES or No When Yes is selected the skip setting p 4 32 of the repeater list is retained 6Push D pad Ent Load file appears 7 Push D pad to select Yes then push D pad Ent to start the fi...

Страница 267: ...from a PC using a microSD card q ID 31 w Gps e Reply r Setting t Voice y yyyymmdd y yyyymmdd Click Click Copy the icf file Click Connections D D Cloning from a PC using an optional data cable Cloning...

Страница 268: ...ONE screen appears At the master transceiver while holding down both r r M CALL and MENU push to se lect cloning master mode CLONE Master screen appears At the master transceiver push PTT t t At the s...

Страница 269: ...the CT 17 instruction manual for details of remote ly control a transceiver or receiver Use the cable described at right No received audio is heard when the supplied control cable coming with CT 17 is...

Страница 270: ...02 Send read CSQL ON DV mode only 18 00 Turning the transceiver power OFF 01 Turning the transceiver power ON 2 19 00 Read transceiver ID 1B 00 see p 11 18 Send read Repeater tone frequency 01 see p 1...

Страница 271: ...0090 0095 VOL15 VOL16 VOL17 VOL18 VOL19 0096 0101 0102 0108 0109 0114 0115 0121 0122 0127 VOL20 VOL21 VOL22 VOL23 VOL24 0128 0133 0134 0140 0141 0146 0147 0153 0154 0159 VOL25 VOL26 VOL27 VOL28 VOL29...

Страница 272: ...TX message setting Command 1F 02 Set the transmit message of up to 20 characters FF stops sending or reading messages DV RX Status setting Command 20 0201 20 0202 Data Function Description bit7 0 Fix...

Страница 273: ...bled 0 0 0 NULL e 0 Call sign of the calling station 8 characters fixed 1 4 Note of the calling station 4 characters fixed 5 2 Call sign of the station that was called 8 charac ters fixed 3 0 Call sig...

Страница 274: ...D 12 3 microSD card removal 12 4 When removing the microSD card D D 12 4 Save setting data onto a microSD card 12 5 Save with a different file name 12 7 Loading the saved data files that are in the m...

Страница 275: ...a to be corrupted or damage the card NEVER drop or apply vibration or impact to the microSD card This will cause the data to be cor rupted or damage the card The microSD card will get warm if used con...

Страница 276: ...ny programmed card make a backup file onto your PC Turn ON the transceiver q q Push MENU w w Push D pad e e to select the root item SD Card and then push D pad Ent Push D pad r r to select Format and...

Страница 277: ...Ent The confirmation screen Unmount OK appears Push D pad r r to select YES then push D pad Ent to unmount When the unmounting is completed Unmount is t t completed is displayed then the screen autom...

Страница 278: ...q Push D pad w w to select the root item SD Card and then push D pad Ent Push D pad e e to select Setting Save and then push D pad Ent Push D pad r r to select New File and then push D pad Ent The FIL...

Страница 279: ...r to select the desired file to be over written and then push D pad Ent Example Selecting Set20110715_01 The confirmation screen Overwrite appears Push D pad t t to select YES and then push D pad Ent...

Страница 280: ...leted If CLR is held down all the characters are de leted Rotate DIAL to select a desired character y y The selected character blinks Push D pad to move the cursor right or left While selecting a char...

Страница 281: ...My Data After entering the name push D pad Ent i i After pushing D pad Ent Save file appears Push D pad o o to select YES and then push D pad Ent to save the setting file While saving a progress bar i...

Страница 282: ...d r r to select the desired file to be load ed and then push D pad Ent Example Selecting Set20110715_01 The FILE LOAD screen appears Push D pad t t to select the desired loading con tent as shown belo...

Страница 283: ...Ent Load file appears i i Push D pad o o to select YES then push D pad Ent to start the file check While checking the file FILE CHECKING and a prog ress bar are displayed 0After checking settings dat...

Страница 284: ...ic reply data is saved Setting folder r r The transceiver s setting data icf file is stored Voice folder t t Recorded date folders are created in the Voice fold er yyyymmdd folder y y Recorded audio f...

Страница 285: ...D card from the PC when Safe u u To Remove Hardware appears The screen shot shows when a memory card reader is connected D D Make a back up file on your PC Windows 7 is used for these instructions If...

Страница 286: ...eater or it s busy Wait for a while and try it again p 3 19 After your call the repeater replies RPT and its call sign The call sign of the called repeater is wrong Correctly set the called repeater c...

Страница 287: ...ger PROBLEM POSSIBLE CAUSE SOLUTION REF Position data cannot be re ceived OFF or Manual is selected in the GPS Set item in the Menu screen Select either Internal GPS or Ex ternal GPS in the GPS Set it...

Страница 288: ...ime 6 6 Checking GPS Information 5 7 Checking GPS Position 5 3 Checking the repeater input signal 1 3 CI V Address 10 56 CI V Baud Rate 10 56 CI V information 11 16 CI V Transceive 10 56 Clearing a DT...

Страница 289: ...setting using the DR mode scan 3 12 FROM Access repeater setting using the preloaded repeater list 3 8 FROM Access repeater setting using the Repeater Search function 3 9 FROM Access repeater setting...

Страница 290: ...call sign setting 3 23 My Station items 10 44 MY Your own call sign programming 2 5 N Name display size setting 4 8 New repeater programming 4 21 O Off band indication 1 5 Offset frequency 10 12 One t...

Страница 291: ...o 10 66 SD Card items 10 66 Selecting a call channel 7 3 Selecting a memory name display 7 12 Setting and clearing skip channel 8 10 Setting and clearing the skip frequencies 8 6 Setting DTMF transfer...

Страница 292: ...setting 3 23 UR Destination call sign programming using the RX History 3 5 Using GPS Logger Only mode 5 29 Using the DTMF memory 11 2 UTC Offset 10 65 V Verifying the file information 6 15 Verifying t...

Страница 293: ...1 1 32 Kamiminami Hirano ku Osaka 547 0003 Japan A 6986 2EX q 2011 2014 Icom Inc...

Отзывы: