background image

Instrucciones de Armadura

Revolt 3 está diseñado para ser fácil de construir, pero sigue siendo una caja de forma pequeño, lo que 
significa que no todos los pasos son evidentes. Hemos incluido los pasos más importantes en este 
manual como una guía de inicio rápido, pero para obtener instrucciones más detalladas, 

escanee el 

código QR o consulte la página de Revolt 3 en Hyte.com

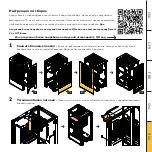
Para obtener instrucciones más detalladas, escanee el código QR

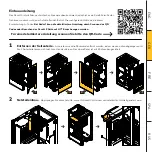
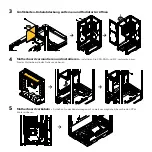
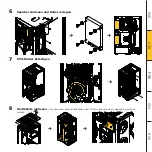
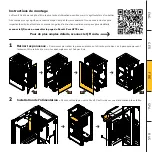
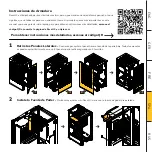
Retire los Paneles Laterales - 

Comience por quitar el panel trasero tirando de la parte baja. Todos los paneles 

se pueden quitar fácilmente a mano. El panel superior está asegurado con 4 tornillos.

1

Instale la Fuente de Poder - 

Omita estos ajustes si su Revolt 3 viene con la fuente de poder preinstalada.

2

EN

G

G

ER

F

R

E

SP

A

R

U

S

Содержание HYTE Revolt 3

Страница 1: ...E X P E R I E N C E P L A Y Premium ITX Case R E V O L T ...

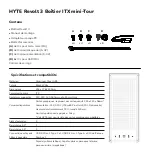
Страница 2: ...er Supply SFX SFX L 700w 80 Plus Gold SFX L Optional CPU Cooler Height Up to 140mm Handle Weight Limit 30lbs 14kg See list of compatible graphics cards on HYTE com 3 1 2 USB 3 2 Gen 2 Type C x1 USB 3 2 Gen 1 Type A x2 Audio Mic Combo x1 Front metal mesh Top Sides Rear magnetic Specs Compatibility A x4 B x4 C x4 D x8 HYTE Revolt 3 Small Form Factor ITX Case Contents Material Color Dimensions Mother...

Страница 3: ...t for more detailed instructions scan the QR code or check out Revolt 3 s page on HYTE com For more detailed instructions scan the QR code Remove Side Panels Start by removing the rear panel by pulling from the bottom The 4 side panels can be removed easily by hand the top panel is secured by 4 screws 1 Install Power Supply Skip these steps if your Revolt 3 comes with its power supply pre installe...

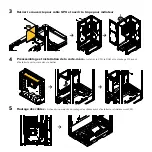
Страница 4: ...d Open Radiator Door 3 Pre Assemble and Install Motherboard Install CPU RAM and M 2 before installing motherboard into case Cable Manage Motherboard Complete as much cable management as possible before installing CPU cooler 5 4 ...

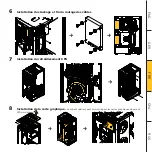
Страница 5: ...Install Storage and Cable Manage 6 Install CPU Cooler 7 Install Graphics Card The top panel can be removed for extra large graphics cards over 320mm 8 ENG GER FRE SPA RUS ...

Страница 6: ... Voltages are present in the power supply Do not open the power supply case or attempt to repair the power supply there are no user serviceable components 3 This product is designed for indoor use only 4 Do not use the power supply near water or in high temperature or high humidity environments 5 Do not install near any heat sources such as radiators heat registers stoves or other apparatus that p...

Страница 7: ...ars HYTE Limited Warranty This product is covered by a limited warranty please visit HYTE com to obtain a full copy of the written warranty or contact us using one of the methods below Support HYTE com HYTE by iBUYPOWER 529 N Baldwin Park Blvd City of Industry CA 91746 USA ENG GER FRE SPA RUS ...

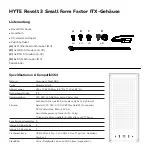
Страница 8: ... SFX L 700 W 80 Plus Gold SFX L optional CPU Kühler Höhe Bis zu 140 mm Gewichtsbegrenzung für den Griff 14kg Siehe Liste der kompatiblen Grafikkarten auf HTYE com 3 1 2 USB 3 2 Gen 2 Typ C x1 USB 3 2 Gen 1 Typ A x2 Audio Mic Combo x1 Vorne Metallgitter oben seitlich hinten magnetisch Spezifikationen Kompatibilität A x4 B x4 C x4 D x8 HYTE Revolt 3 Small Form Factor ITX Gehäuse Lieferumfang Material ...

Страница 9: ...nnen des QR Codes oder Besuchen der Revolt 3 Seite auf HYTE com bezogen werden Für eine detailliertere Anleitung scannen Sie bitte den QR Code Entfernen der Seitenteile Als erstes muss die Rückwand entfernt werden indem sie von unten abgezogen wird Die 4 Seitenteile lassen sich leicht von Hand entfernen Das obere Panel ist mit 4 Schrauben gesichert 1 Netzteileinbau Überspringen Sie diese Schritte ...

Страница 10: ...nen 3 Motherboard vormontieren und installieren Installieren Sie CPU RAM und M 2 Laufwerke bevor Sie das Motherboard in das Gehäuse einbauen 4 Motherboard verkabeln Schließen Sie das Kabelmanagement so weit wie möglich ab bevor Sie den CPU Kühler einbauen 5 ...

Страница 11: ...Speicher einbauen und Kabel verlegen 6 CPU Kühler befestigen 7 Grafikkarte einbauen Für besonders große Grafikkarten über 320 mm kann die obere Abdeckung entfernt werden 8 ENG GER FRE SPA RUS ...

Страница 12: ...en Sie das Gehäuse des Netzteils nicht und versuchen Sie nicht das Netzteil zu reparieren Es gibt keine vom Benutzer zu wartenden Komponenten 3 Dieses Produkt ist nur für die Verwendung in Innenräumen vorgesehen 4 Verwenden Sie das Netzteil nicht in der Nähe von Wasser oder in Umgebungen mit hohen Temperaturen oder hoher Luftfeuchtigkeit 5 Installieren Sie es nicht in der Nähe von Wärmequellen wie...

Страница 13: ... eine vollständige Kopie der schriftlichen Garantie zu erhalten oder kontaktieren Sie uns mit einer der unten aufgeführten Methoden Support HYTE com HYTE by iBUYPOWER 529 N Baldwin Park Blvd City of Industry CA 91746 USA Garantiedauer für Teile Revolt 3 Computergehäuse 3 Jahre SFXL A700GD IBP Netzteil 10 Jahre ENG GER FRE SPA RUS ...

Страница 14: ...d SFX L Optionnelle Hauteur du refroidissement CPU Jusqu à 140mm Limite de poids pour la poignée 14kg Voir HYTE com pour la liste des cartes graphiques compatibles 3 1 2 USB 3 2 Gen 2 Type C x1 USB 3 2 Gen 1 Type A x2 Micro Casque Combo x1 Façade grille métallique Capot supérieur panneaux latéraux panneau arrière magnétique Spécifications et compatibilité A x4 B x4 C x4 D x8 HYTE Revolt 3 Boîtier I...

Страница 15: ...ise d instructions rapides mais pour plus de détails scannez le QR code ou consultez la page du Revolt 3 sur HYTE com Pour de plus amples détails scannez le QR code Retirer les panneaux Commencez par retirer le panneau arrière en le tirant vers le bas Les 4 panneaux peuvent facilement être retirés à la main le capot supérieur est fixé par 4 vis 1 Installation de l alimentation Passez cette étape si...

Страница 16: ...ur radiateur 3 Préassemblage et installation de la carte mère Installez le CPU la RAM et le stockage M 2 avant d installer la carte mère dans le boîtier 4 Routage des câbles Achevez une majorité du routage des câbles avant d installer le refroidissement CPU 5 ...

Страница 17: ...ockage et fin du routage des câbles 6 Installation du refroidissement CPU 7 Installation de la carte graphique Le capot supérieur peut être retiré pour les cartes graphiques de plus de 320mm de long 8 ENG GER FRE SPA RUS ...

Страница 18: ...présentes dans l alimentation Ne pas l ouvri ni essayer de la réparer il n y a aucun composant soumis à entretien par l utilisateur 3 Ce produit est conçu exclusivement pour une utilisation en intérieur 4 Ne pas utiliser l alimentation près de l eau ou lors de hautes températures ou dans des environnements très humides 5 Ne pas installer a proximité d une source de chaleur tels que des radiateurs ...

Страница 19: ...ns Garantie limitée HYTE Ce produit est couvert par une garantie limitée veuillez visiter HYTE com afin d obtenir une copie complète de cette garantie ou contactez nous via l une des méthodes ci dessous Support HYTE com HYTE by iBUYPOWER 529 N Baldwin Park Blvd City of Industry CA 91746 USA ENG GER FRE SPA RUS ...

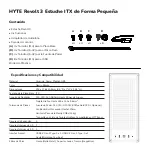
Страница 20: ...oder SFX SFX L 700W 80Plus Gold SFX L Opcional Ventilador del Procesador Hasta 140mm Límite de Peso de la Manija 30lbs 14kg Consulte una Lista de Tarjetas Gráficas Compatibles en HYTE com 3 1 2 USB3 2 Gen 2 Typo C x 1 USB 3 2 Gen 1 Typo A x 2 Audio Microfono Combo x 1 Frente Malla Metal Superior Lados Trasero Magnético Especificaciones y Compatibilidad A x4 B x4 C x4 D x8 HYTE Revolt 3 Estuche ITX d...

Страница 21: ... instrucciones más detalladas escanee el código QR o consulte la página de Revolt 3 en Hyte com Para obtener instrucciones más detalladas escanee el código QR Retire los Paneles Laterales Comience por quitar el panel trasero tirando de la parte baja Todos los paneles se pueden quitar fácilmente a mano El panel superior está asegurado con 4 tornillos 1 Instale la Fuente de Poder Omita estos ajustes...

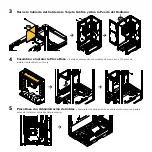
Страница 22: ...3 Ensamblar e Instalar la Placa Base Instale el procesador los modulos de memorias y M 2 antes de instalar la placa base en la caja 4 Placa Base con Administración de Cables Completar la administración de cables tanto como sea posible antes de instalar el enfriador del procesador 5 ...

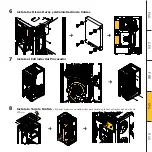
Страница 23: ... Discos Duros y Administración de Cables 6 Instale el Enfriador del Procesador 7 Instale la Tarjeta Gráfica El panel superior se puede quitar para tarjetas gráficas extragrandes de mas de 320mm 8 ENG GER FRE SPA RUS ...

Страница 24: ...en la fuente de poder No abra la caja de la fuente de poder ni intente reparar la fuente de poder no hay componentes que puedan ser reparados por el usuario 3 Este producto está diseñado para uso en interiores únicamente 4 No utilice la fuente de poder cerca del agua o en entornos de alta temperatura o alta humedad 5 No lo instale cerca de fuentes de calor como radiadores rejillas de calefacción e...

Страница 25: ...arantía Limitada de HYTE Este producto está cubierto por una garantía limitada visite HYTE com para obtener una copia completa de la garantía escrita o contáctenos usando uno de los métodos a continuación Support HYTE com HYTE by iBUYPOWER 529 N Baldwin Park Blvd City of Industry CA 91746 USA ENG GER FRE SPA RUS ...

Страница 26: ... SFX SFX L 700w 80 Plus Gold SFX L опционально Процессорный кулер до 140 мм высотой Ограничение по весу для ручки 14кг См список совместимых видеокарт на HTYE com 3 1 шт 2 шт USB 3 2 Gen 2 Type C x1 USB 3 2 Gen 1 Type A x2 комбинированный аудио микрофон x1 передний металлическая сетка Верхний боковые задний сетка с магнитным креплением Характеристики и совместимость A x4 B x4 C x4 D x8 HYTE Revolt...

Страница 27: ...алу работы Для получения более подробных инструкций сканируйте QR код или посетите страницу Revolt 3 на HYTE com Для получения более подробных инструкций отсканируйте QR код Снимите боковые панели Сначала необходимо снять заднюю панель потянув за нее снизу Все 4 боковые панели легко снимаются вручную Верхняя панель крепится 4 винтами 1 Установка блока питания Пропустите эти шаги если ваш Revolt 3 ...

Страница 28: ... сборка и установка материнской платы IУстановите процессор оперативную память и M 2 устройства SSD или карты расширения перед установкой материнской платы в корпус 4 Монтаж кабелей для материнской платы Максимально завершите укладку кабелей пред установкой процессорного кулера 5 ...

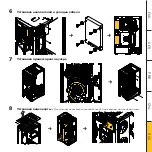
Страница 29: ...Установка накопителей и укладка кабеля 6 Установка процессорного кулера 7 Установка видеокарты Для установки видеокарт длинной более 320 мм верхнюю панель можно снять 8 ENG GER FRE SPA RUS ...

Страница 30: ...блоке питания присутствует высокое напряжение Не открывайте корпус блока питания и не пытайтесь ремонтировать блок питания В нем нет компонентов обслуживаемых пользователем 3 Данный продукт предназначен только для использования в помещении 4 Не используйте блок питания вблизи воды а также в условиях высокой температуры или повышенной влажности 5 Не устанавливайте вблизи источников тепла таких как ...

Страница 31: ...гарантия HYTE На данный продукт распространяется ограниченная гарантия Пожалуйста посетите сайт HYTE com для получения полной копии письменной гарантии или свяжитесь с нами одним из указанных ниже способов Support HYTE com HYTE by iBUYPOWER 529 N Baldwin Park Blvd City of Industry CA 91746 USA ENG GER FRE SPA RUS ...

Страница 32: ...www HYTE com ...
Отзывы: