background image

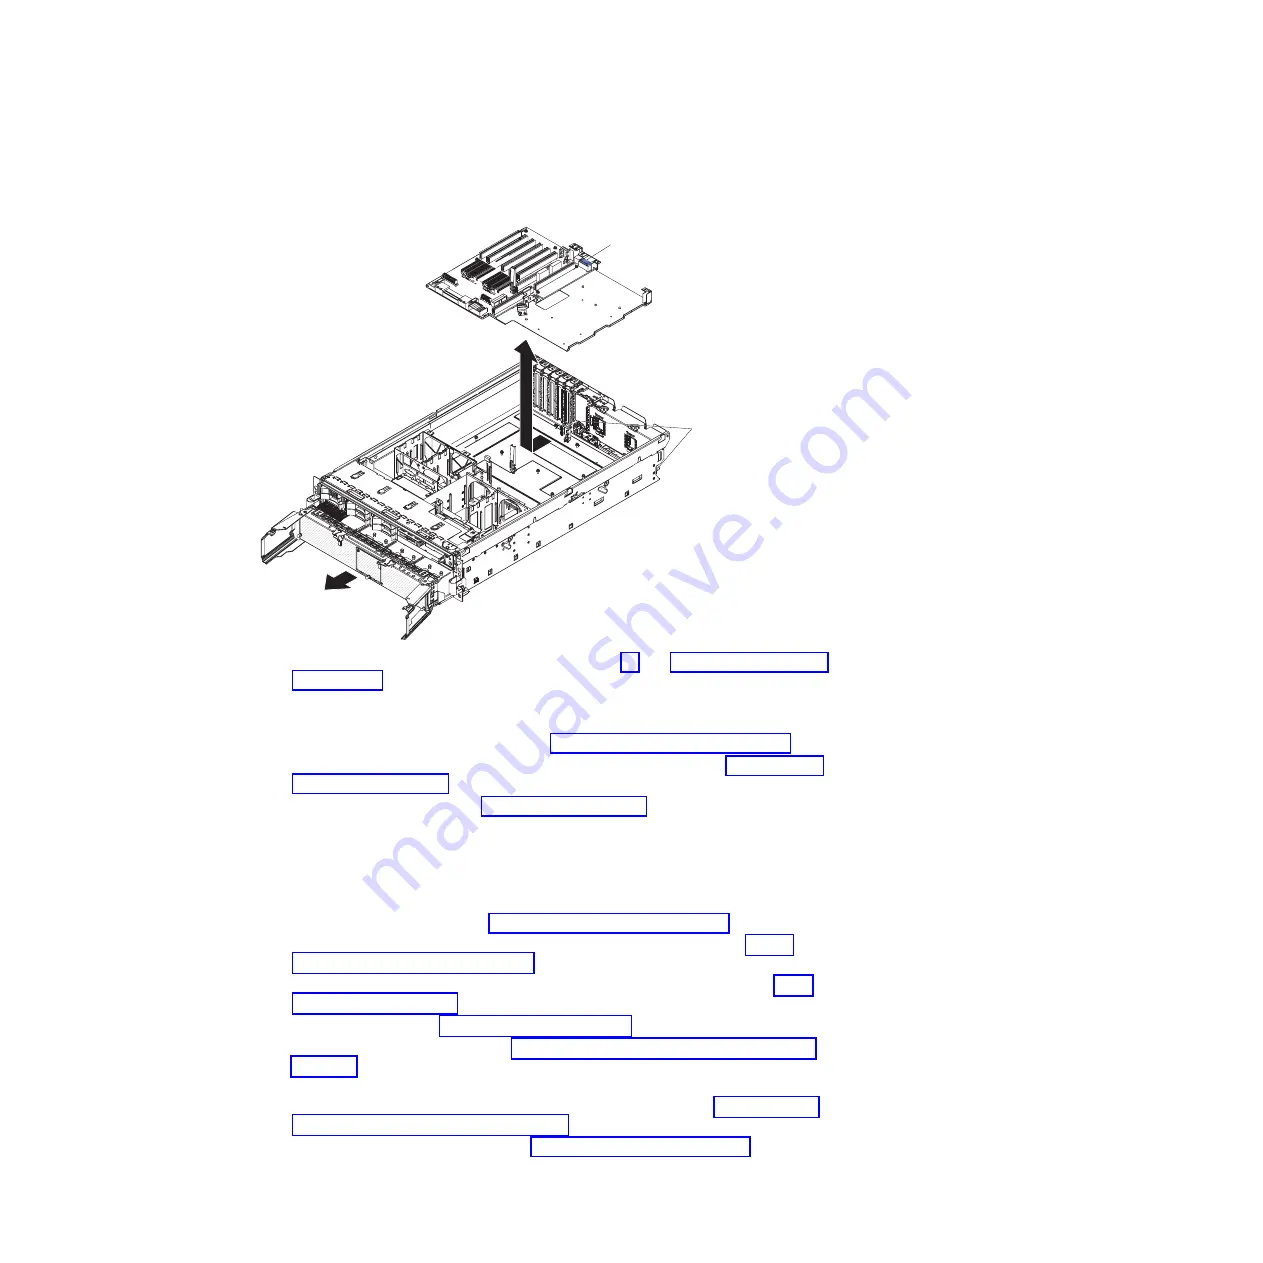
PCI-X


board


assembly


To


remove


the


PCI-X


board


assembly,


complete


the


following


steps:


AC

D

C

Handle

Retainer
screws


1.


Read


the


safety


information


that


begins


on


page


vii


and


“Installation


guidelines”


on


page


117.


2.


Turn


off


the


server


and


peripheral


devices,


and


disconnect


the


power


cords


and


all


external


cables


necessary


to


replace


the


device.


3.


Remove


the


top


cover


and


bezel


(see


“Top


cover


and


bezel”


on


page


131).


4.


Remove


the


power


supplies


and


power-structure


assembly


(see


“Power-supply


structure”


on


page


137).


5.


Remove


the


I/O


board


(see


“I/O


board”


on


page


133).


6.


Remove


all


adapters


and


adapter


dividers,


and


place


the


adapters


on


a


static-protective


surface.


Note:


You


might


find


it


helpful


to


note


where


each


adapter


is


installed


before


removing


the


adapters.


7.


Remove


the


card


guide


(see


“PCI-X


adapter


guide”


on


page


136).


8.


Disconnect


the


PCI-X


switch


card


cable


from


the


PCI-X


board


(see


“PCI-X


switch


card


assembly”


on


page


146).


9.


Disconnect


the


SAS


backplane


power


cable


from


the


PCI-X


board


(see


“SAS


backplane”


on


page


138).


10.


Remove


all


fans


(see


“Hot-swap


fan”


on


page


123).


11.


Remove


the


memory


cards


(see


“Removing


and


replacing


a


memory


card”


on


page


126).


12.


Lift


the


microprocessor-tray


release


latch,


open


the


microprocessor-tray


levers,


and


pull


the


microprocessor


tray


out


of


the


server


slightly


(see


“Removing


and


installing


a


microprocessor”


on


page


141).


13.


Remove


the


power


backplane


(see


“Power


backplane”


on


page


147).


14.


Loosen


the


blue


retainer


screws


on


the


rear


of


the


server.


Chapter


4.


Removing


and


replacing


server


components


145

Содержание System x3950

Страница 1: ...IBM System x3950 Type 8878 and System x3950 E Type 8879 Problem Determination and Service Guide...

Страница 2: ......

Страница 3: ...IBM System x3950 Type 8878 and System x3950 E Type 8879 Problem Determination and Service Guide...

Страница 4: ...recent version of this document is available at http www ibm com servers eserver support xseries index html 13th Edition November 2006 Copyright International Business Machines Corporation 2006 All ri...

Страница 5: ...ostics 13 Diagnostic tools 13 POST 13 POST beep codes 14 Error logs 19 POST error codes 21 Checkout procedure 35 About the checkout procedure 35 Performing the checkout procedure 36 Checkpoint codes t...

Страница 6: ...the cables 120 Removing and replacing Tier 1 CRUs 121 Adapter 121 DVD drive 122 Hot swap fan 123 Hot swap power supply 124 Memory card and memory module DIMM 126 Remote Supervisor Adapter II SlimLine...

Страница 7: ...ervice and support 162 Hardware service and support 162 IBM Taiwan product service 162 Appendix B Notices 163 Trademarks 163 Important notes 164 Product recycling and disposal 165 Battery return progr...

Страница 8: ...vi IBM System x3950 Type 8878 and System x3950 E Type 8879 Problem Determination and Service Guide...

Страница 9: ...tuotteen lue turvaohjeet kohdasta Safety Information Avant d installer ce produit lisez les consignes de s curit Vor der Installation dieses Produkts die Sicherheitshinweise lesen Prima di installare...

Страница 10: ...is not damaged loose or broken and observe any sharp edges 3 Check the power cord v Make sure that the third wire ground connector is in good condition Use a meter to measure third wire ground continu...

Страница 11: ...n the off position v Never assume that power has been disconnected from a circuit Check it to make sure that it has been disconnected v If you have to work on equipment that has exposed electrical cir...

Страница 12: ...ent For example if a caution statement begins with a number 1 translations for that caution statement appear in the Safety Information document under statement 1 Be sure to read all caution and danger...

Страница 13: ...quipment when there is evidence of fire water or structural damage v Disconnect the attached power cords telecommunications systems networks and modems before you open the device covers unless instruc...

Страница 14: ...aser products such as CD ROMs DVD drives fiber optic devices or transmitters are installed note the following v Do not remove the covers Removing the covers of the laser product could result in exposu...

Страница 15: ...ower control button on the device and the power switch on the power supply do not turn off the electrical current supplied to the device The device also might have more than one power cord To remove a...

Страница 16: ...nt that has this label attached There are no serviceable parts inside these components If you suspect a problem with one of these parts contact a service technician Statement 26 CAUTION Do not place a...

Страница 17: ...uctions for setting up the server and basic instructions for installing some optional devices v User s Guide This document is in Portable Document Format PDF on the IBM System x Documentation CD It pr...

Страница 18: ...ements that appear in this document are also in the multilingual Safety Information document which is on the IBM System x Documentation CD Each statement is numbered for reference to the corresponding...

Страница 19: ...approximately 38 5 kg 85 lb when fully configured or 31 75 kg 70 lb minimum Integrated functions v Baseboard management controller v IBM EXA 32 Chipset with integrated memory and I O controller v Ser...

Страница 20: ...LED On some server models each hot swap hard disk drive has an activity LED When this LED is flashing it indicates that the drive is in use Operator information panel This panel contains controls and...

Страница 21: ...er In multi node configurations when this LED flashes during startup it indicates that the server is the primary node When this LED is lit during startup it indicates that the server is a secondary no...

Страница 22: ...e connection on the Ethernet port USB 2 connector Connect a USB device to this connector System serial connector Connect a 9 pin serial device to this connector SP Serial connector Connect a 9 pin ser...

Страница 23: ...is activity between the server and the network Gigabit Ethernet 1 connector Use this connector to connect the server to a network Gigabit Ethernet 1 link LED This LED is on the Gigabit Ethernet 1 conn...

Страница 24: ...power Power on password J9 The default position is pins 1 and 2 Change the position of this jumper to pins 2 and 3 to bypass the power on password check Changing the position of this jumper does not a...

Страница 25: ...d LEDs The following illustration shows the LEDs on the memory card DIMM 1 error LED DIMM 2 error LED DIMM 3 error LED DIMM 4 error LED Light path diagnostics button Light path diagnostics button powe...

Страница 26: ...Microprocessor 2 socket Fan 4 Fan 8 Fan 3 Fan 7 Fan 6 Fan 2 Fan 5 Fan 1 Memory card 1 Memory card 2 Memory card 3 Memory card 4 Light path diagnostics button 1 1 2 2 4 4 3 3 PCI X board connectors Th...

Страница 27: ...ntion LEDs PCI power LEDs Power good LED SAS backplane connectors The following illustration shows the connectors on the SAS backplane Front of SAS backplane Back of SAS backplane SAS hard disk drive...

Страница 28: ...12 IBM System x3950 Type 8878 and System x3950 E Type 8879 Problem Determination and Service Guide...

Страница 29: ...messages and error messages The diagnostic programs are the primary method of testing the major components of the server The diagnostic programs are in read only memory on the server See Diagnostic p...

Страница 30: ...isted in the Action column until the problem is solved v See Chapter 3 Parts listing Type 8878 and 8879 on page 109 to determine which components are customer replaceable units CRU and which component...

Страница 31: ...server each time 2 1 1 Secondary DMA register failed 1 Reseat the I O board 2 Replace the I O board 2 1 2 Primary DMA register failed 1 Reseat the I O board 2 Replace the I O board 2 1 3 Primary inte...

Страница 32: ...order shown restarting the server each time a DIMM b Memory card c Trained service technician only Microprocessor tray d I O board 3 3 3 No operational memory in system Note Make sure you re enable t...

Страница 33: ...owing components one at a time in the order shown restarting the server each time a DIMM b Memory card c Trained service technician only Microprocessor tray One continuous beep Microprocessor error 1...

Страница 34: ...er each time a Trained service technician only Microprocessor tray b I O board Two long and two short beeps Card error 1 Reseat the following components a Microprocessor tray b I O board 2 Replace the...

Страница 35: ...s and messages that were generated during POST The BMC log and the system error log contain messages that were generated during POST and all system status messages from the service processor The follo...

Страница 36: ...s complete the following steps 1 Turn on the server 2 When the prompt Press F1 for Configuration Setup appears press F1 If you have set both a power on password and an administrator password you must...

Страница 37: ...the latest level see Updating the firmware on page 151 2 Reseat the I O board 3 Replace the I O board 101 102 Tick timer internal interrupt internal timer channel 2 1 Reseat the I O board 2 Replace t...

Страница 38: ...place the components listed in step 2 one at a time in the order shown restarting the server each time 163 Real time clock error 1 Run the Configuration Setup Utility program select Load Default Setti...

Страница 39: ...IOS code level see Updating the firmware on page 151 2 Reseat the following components a I O board b Optional Remote Supervisor Adapter II SlimLine 3 Replace the components listed in step 2 one at a t...

Страница 40: ...rver each time 303 Keyboard controller error 1 Reseat the following components a I O board b Keyboard 2 Replace the components listed in step 1 one at a time in the order shown restarting the server e...

Страница 41: ...ed service technician only PCI X board 5 Replace the Remote Supervisor Adapter II SlimLine 6 Trained service technician only Replace the microprocessor tray 1762 Fixed disk configuration error 1 Run t...

Страница 42: ...isted in step 3 one at a time in the order shown restarting the server each time 5962 IDE CD or DVD drive configuration error 1 Run the Configuration Setup Utility program and load the default setting...

Страница 43: ...rver each time a Trained service technician only Microprocessor b Trained service technician only Microprocessor tray 00019501 Processor 1 is not functioning check processor LEDs 1 Reseat the followin...

Страница 44: ...3 b Trained service technician only Microprocessor 3 c Trained service technician only Microprocessor tray 00019504 Processor 4 is not functioning check VRM and processor LEDs 1 Reseat the following...

Страница 45: ...ting the server each time a Trained service technician only Microprocessor 2 b Trained service technician only Microprocessor tray 00019703 Processor 3 failed BIST 1 Reseat the following components a...

Страница 46: ...I O space is available for a PCI adapter 1 If the error code indicates a particular PCI or PCI X slot or device remove that device 2 If the error continues reseat the following components a Each adap...

Страница 47: ...2 one at a time in the order shown above restarting the server each time 00180700 00180800 General PCI error 1 Make sure that no devices have been disabled in the Configuration Setup Utility program...

Страница 48: ...that all microprocessors have the same cache size see Configuration Setup Utility menu choices on page 153 2 Update the BIOS code again see Updating the firmware on page 151 3 Trained service technici...

Страница 49: ...r processor 1 1 Make sure that all microprocessors have the same cache size see Configuration Setup Utility menu choices on page 153 2 Update the BIOS code again see Updating the firmware on page 151...

Страница 50: ...oices on page 153 I9990301 Fixed disk sector error 1 Make sure that a bootable operating system is installed 2 Reseat the following components a Hard disk drive b SAS hard disk drive backplane c I O b...

Страница 51: ...s you must determine whether the failing server is part of a shared hard disk drive cluster two or more servers sharing external storage devices If it is part of a cluster you can run all diagnostic p...

Страница 52: ...Troubleshooting tables on page 37 if necessary see Solving undetermined problems on page 106 v Yes Run the diagnostic programs see Running the diagnostic programs on page 60 If you receive an error s...

Страница 53: ...s CRU and which components are field replaceable units FRU v If an action step is preceded by Trained service technician only that step must be performed only by a trained service technician Symptom A...

Страница 54: ...service technician only that step must be performed only by a trained service technician Symptom Action Not all drives are recognized by the hard disk drive diagnostic test the Fixed Disk test Remove...

Страница 55: ...use or pointing device problems v Follow the suggested actions in the order in which they are listed in the Action column until the problem is solved v See Chapter 3 Parts listing Type 8878 and 8879 o...

Страница 56: ...nts listed in step 3 one at a time in the order shown restarting the server each time USB keyboard mouse or pointing device problems v Follow the suggested actions in the order in which they are liste...

Страница 57: ...nting device does not work 1 Make sure that v The mouse or pointing device USB cable is securely connected to the server the keyboard and mouse or pointing device cables are not reversed and the devic...

Страница 58: ...led the correct type of memory v All banks of memory are enabled The server might have automatically disabled a memory bank when it detected a problem or a memory bank might have been manually disable...

Страница 59: ...cian only Microprocessor 1 b Microprocessor VRM 3 or 4 c Microprocessor tray 5 Trained service technicians only If there is no indication of which microprocessor has failed isolate the error by testin...

Страница 60: ...KVM switch bypass the KVM switch to eliminate it as a possible cause of the problem connect the keyboard cable directly to the correct connector on the rear of the server 2 Make sure that v The server...

Страница 61: ...adable rolling or distorted 1 If the monitor self tests show the monitor is working correctly consider the location of the monitor Magnetic fields around other devices such as transformers appliances...

Страница 62: ...d you must update the configuration 2 Reseat the device that you just installed 3 Replace the device that you just installed An IBM optional device that used to work does not work now 1 Make sure that...

Страница 63: ...er on jumper see I O board internal connectors and jumpers on page 8 if the server starts reseat the operator information panel If the problem remains replace the operator information panel 2 Make sur...

Страница 64: ...suggested actions in the order in which they are listed in the Action column until the problem is solved v See Chapter 3 Parts listing Type 8878 and 8879 on page 109 to determine which components are...

Страница 65: ...erverGuide Setup and Installation CD label for a list of supported operating system versions The operating system cannot be installed the option is not available Make sure that the server supports the...

Страница 66: ...various external and internal components of the server When an error occurs LEDs are lit throughout the server By viewing the LEDs in a particular order you can often identify the source of the error...

Страница 67: ...he release latch on the front of the operator information panel to the left then slide it forward This reveals the light path diagnostics panel Lit LEDs on this panel indicate the type of error that h...

Страница 68: ...4 3 3 The following illustration shows the LEDs on the PCI X board PCI attention LEDs PCI power LEDs Power good LED Remind button You can use the remind button on the light path diagnostics panel to...

Страница 69: ...nents a Power supply b Trained service technician only Power backplane 4 Remove optional devices 5 Replace the components listed in step 3 one at a time in the order shown restarting the server each t...

Страница 70: ...essor tray 4 Replace the following components one at a time in the order shown restarting the server each time a Trained service technician only Failing microprocessor b Trained service technician onl...

Страница 71: ...nd re enabling the memory each time a Memory card b DIMM c Trained service technician only Microprocessor tray NMI A hardware error has been reported to the operating system Note The PCI or MEM LED mi...

Страница 72: ...e Error logs on page 19 2 Reseat the following components a RAID adapter b Hard disk drives c I O board 3 Replace the components listed in step 2 one at a time in the order shown restarting the server...

Страница 73: ...lit Description Action FAN A fan has failed or has been removed Note A failing fan can also cause the TEMP LED to be lit 1 Reinstall the removed fan 2 If an individual fan LED is lit replace the fan 3...

Страница 74: ...Power backplane v Power cord v I O board v PCI X board assembly The following illustration shows the locations of the power supply LEDs A C D C Power supply 1 PS1 DC power LED green AC power LED gree...

Страница 75: ...sure that the microprocessor tray is connected to the power backplane 2 Remove one power supply at a time 3 View the system error log see Error logs on page 19 Lit Lit Off Standby power problem 1 Vie...

Страница 76: ...le in Diagnostic error codes on page 61 If the diagnostic programs do not detect any hardware errors but the problem remains during normal server operations a software error might be the cause If you...

Страница 77: ...top of the screen and then select View Test Log The test log data is maintained only while you are running the diagnostic programs When you exit from the diagnostic programs the test log is cleared T...

Страница 78: ...he BIOS code on the server then rerun the test see Updating the firmware on page 151 001 250 00x Test failed where v x of 0 ECC logic on I O board v x of 1 ECC logic on memory card 1 Check the system...

Страница 79: ...nd run the test again 2 Remove all USB devices and run the test again 3 Reseat the I O board 4 Replace the I O board 020 xxx 000 Failed PCI Interface test 1 Reseat the following components a Trained s...

Страница 80: ...or 1 Update the microcode for the Serial Attached SCSI SAS controller see Updating the firmware on page 151 2 Update the BIOS code see Updating the firmware on page 151 3 Reseat the I O board 4 Replac...

Страница 81: ...dating the firmware on page 151 3 Reseat the I O board 4 Replace the I O board 030 271 001 SRAM access error 1 Update the microcode for the Serial Attached SCSI SAS controller see Updating the firmwar...

Страница 82: ...the server each time 035 253 0nn ServeRAID controller 0nn initialization failure 0nn the controller number 1 The ServeRAID controller might not be configured correctly See the ServeRAID Hardware Main...

Страница 83: ...68 0nn Adapter NVSRAM test error 1 Update the RAID controller firmware see Updating the firmware on page 151 2 Reseat the RAID controller 3 Replace the RAID controller 035 269 0nn Adapter Cache test e...

Страница 84: ...AID controller 035 280 001 Adapter Drive test error Replace the attached drive 035 281 001 Adapter Drive error Replace the attached drive 035 282 001 Adapter Parameters set error 1 Update the RAID con...

Страница 85: ...onents one at a time in the order shown restarting the server each time a Trained service technician only Microprocessor nn b Trained service technician only Microprocessor tray 155 xxx xxx Failed Act...

Страница 86: ...o communicate with ASM It may be busy Run the test again 1 Update the firmware BIOS service processor and diagnostics see Updating the firmware on page 151 2 Run the diagnostic test again 3 Correct ot...

Страница 87: ...Replace the following components one at a time in the order shown restarting the server each time a Trained service technician only Power backplane b I O board c Trained service technician only Micro...

Страница 88: ...ates I2C errors on bus O 1 Reseat the following components a Trained service technician only Operator information panel b I O board 2 Replace the components listed in step 1 one at a time in the order...

Страница 89: ...apter II SlimLine 3 Replace the Remote Supervisor Adapter II SlimLine 166 400 000 ISMP Self Test Result failed tests xxx where xxx flash ROM or RAM 1 Disconnect all server and option power cords from...

Страница 90: ...for the failing LED 180 xxx 001 Failed front LED panel test 1 Reseat the following components a Trained service technician only Operator information panel b I O board c Microprocessor tray 2 Replace t...

Страница 91: ...d Trained service technician only Microprocessor tray 180 xxx 006 Failed memory card LED test 1 Reseat the following components a Memory card b Microprocessor tray c I O board 2 Replace the following...

Страница 92: ...1 4 v B physical bank 1 2 Note Bank 1 DIMMs 1 and 3 Bank 2 DIMMs 2 and 4 v N failing DIMM 1 4 1 Reseat the following components a DIMM N b Memory card C 2 Replace the components listed in step 1 one...

Страница 93: ...l assembly 217 xxx 000 Failed BIOS fixed disk test Note If RAID is configured the fixed disk number refers to the RAID logical array 1 Reseat hard disk drive 1 2 Replace hard disk drive 1 217 xxx 001...

Страница 94: ...1 Reseat the following components a Monitor b I O board 2 Replace the components listed in step 1 one at a time in the order shown restarting the server each time 405 xxx 000 Failed Ethernet test on...

Страница 95: ...manually restore the BIOS code complete the following steps 1 Read the safety information that begins on page vii and Handling static sensitive devices on page 119 2 Turn off the server and peripheral...

Страница 96: ...e SERVPROC Error Code System Complex Powered Up Error Code Error Data Error Data The following table describes the possible system error log messages and suggested actions to correct the detected prob...

Страница 97: ...estarting the server each time 2 5V Calgary HSSIB Power Good Fault 1 Reseat the I O board 2 Reseat the microprocessor tray 3 Trained service technician only Replace the PCI X board 2 5V Calgary PLL Po...

Страница 98: ...ting the server each time a Adapters b Trained service technician only PCI X board c Trained service technician only Power backplane 12V D Bus Fault 1 Reseat the following components a Microprocessor...

Страница 99: ...ed service technician only Replace the PCI X board CPU d IERR detected the system has been restarted Information only if the message remains 1 Trained service technician only Reseat the microprocessor...

Страница 100: ...U setting modified from x to y by user USERID Information only Fan X Failure X of 1 8 1 Make sure that nothing is blocking the fan 2 Check the physical connection and make sure that the fan is correct...

Страница 101: ...t the memory cards 3 Trained service technician only Replace the microprocessor tray Hvtr IB 2 5V Power Good Fault 1 Reseat the microprocessor tray 2 Reseat the memory cards 3 Trained service technici...

Страница 102: ...serted SPINT PCI Bridge B Information only Just an indication of who reported the SPINT first Machine check asserted SPINT Remote CheckStop Information only Just an indication of who reported the SPIN...

Страница 103: ...r if installed 2 Replace the ServeRAID 8i adapter 3 Replace the Super I O board 4 Replace the PCI X board Machine check asserted for PCI X Card or Slot X SPINT 1 Reseat the adapter in slot X 2 Replace...

Страница 104: ...chdog timer to be a higher value consistent with the time it takes to complete POST 2 Disable the POST watchdog Power Good Fault detected by memory card d 1 Reseat the memory cards 2 Reseat the DIMMs...

Страница 105: ...each time a Power supply b Trained service technician only Power backplane Power Supply X AC Power Removed 1 Connect the ac power cord to power supply X 2 Replace power supply X Power Supply X Curren...

Страница 106: ...rvice technician only Reseat the microprocessors 3 Reseat the microprocessor VRMs if any are present 4 Trained service technician only Replace the microprocessor tray QB Vcc PLL Power Good Fault 1 Res...

Страница 107: ...vices that consume an extraordinary amount of power 3 Replace the power backplane System Boot Failed 1 Check the POST BIOS boot checkpoint indicator and see the applicable documentation 2 Make sure th...

Страница 108: ...e suggested actions in the order in which they are listed in the Action column until the problem is solved v See Chapter 3 Parts listing Type 8878 and 8879 on page 109 to determine which components ar...

Страница 109: ...run the Configuration Setup Utility program and enable the DIMM POST reporting memory event DIMM Disabled Failed ECC Test Chassis Number X Memory Card Y Memory DIMM Z 1 Reseat the DIMM 2 If the DIMM w...

Страница 110: ...eceived target parity error on PCI primary Chassis X Slot Y Bus Z Dev ID 0xSSSS Vend ID 0xTTTT Status 0xUUUU DevFun 0xVV 1 If the slot number is greater than 0 complete the following steps a Reseat th...

Страница 111: ...us 0xUUUU DevFun 0xVV 1 If the slot number is greater than 0 complete the following steps a Reseat the adapter b Replace the adapter 2 If the slot number is 0 replace the PCI board Split completion di...

Страница 112: ...dge secondary Received target parity error Chassis X Slot Y Bus Z Dev ID 0xSSSS Vend ID 0xTTTT Status 0xUUUU DevFun 0xVV 1 If the slot number is greater than 0 complete the following steps a Reseat th...

Страница 113: ...UUUU DevFun 0xVV 1 If the slot number is greater than 0 complete the following steps a Reseat the adapter b Replace the adapter 2 If the slot number is 0 replace the PCI board PCI PCI bridge secondary...

Страница 114: ...UU DevFun 0xVV 1 If the slot number is greater than 0 complete the following steps a Reseat the adapter b Replace the adapter 2 If the slot number is 0 replace the PCI board PCI Bus Data Parity Error...

Страница 115: ...is 0 replace the PCI board PCI Bus Parity error in DMA read data buffer Chassis X Slot Y Bus Z Dev ID 0xSSSS Vend ID 0xTTTT Status 0xUUUU DevFun 0xVV 1 If the slot number is greater than 0 complete t...

Страница 116: ...er is 0 replace the PCI board PCI Bus SERR Detected Chassis X Slot Y Bus Z Dev ID 0xSSSS Vend ID 0xTTTT Status 0xUUUU DevFun 0xVV 1 If the slot number is greater than 0 complete the following steps a...

Страница 117: ...the PCI board PCI Bus Internal RAM error on MMIO Store Chassis X Slot Y Bus Z Dev ID 0xSSSS Vend ID 0xTTTT Status 0xUUUU DevFun 0xVV 1 If the slot number is greater than 0 complete the following step...

Страница 118: ...PCI Bus Bad command Chassis X Slot Y Bus Z Dev ID 0xSSSS Vend ID 0xTTTT Status 0xUUUU DevFun 0xVV 1 If the slot number is greater than 0 complete the following steps a Reseat the adapter b Replace the...

Страница 119: ...lot number is 0 replace the PCI board PCI Bus Invalid transaction PM DR Chassis X Slot Y Bus Z Dev ID 0xSSSS Vend ID 0xTTTT Status 0xUUUU DevFun 0xVV 1 If the slot number is greater than 0 complete th...

Страница 120: ...figuration Setup Utility program and enable the DIMM SMI handler reporting Processor Event Unrecoverable error Chassis Number X Processor ID Y Trained service technician only Replace the microprocesso...

Страница 121: ...er are installed and that they are at the latest level v Make sure that the Ethernet cable is installed correctly The cable must be securely attached at all connections If the cable is attached but th...

Страница 122: ...tor pins might cause the server to continually restart or display an F2 checkpoint halt Remove and inspect all memory card connector pins for bent or damaged interface pins Replace all memory cards th...

Страница 123: ...f so what are the error codes What occurs When Where Is the failure repeatable Has the current server configuration ever worked What changes if any were made before it failed Is this the original repo...

Страница 124: ...108 IBM System x3950 Type 8878 and System x3950 E Type 8879 Problem Determination and Service Guide...

Страница 125: ...ied otherwise in Table 3 on page 111 To check for an updated parts listing on the Web complete the following steps 1 Go to http www ibm com servers eserver support xseries index html 2 From the Hardwa...

Страница 126: ...F R O N T 1 2 3 4 5 6 7 8 9 10 11 12 13 14 15 16 17 18 19 20 21 22 23 24 25 26 27 28 110 IBM System x3950 Type 8878 and System x3950 E Type 8879 Problem Determination and Service Guide...

Страница 127: ...ls 39M2699 8 Chassis assembly all models 42D3935 9 Fan 92 mm all models 39M2694 10 Carrier LP media all models 42D3936 11 CD drive 8 24X primary all models 39M3533 11 CD drive 8 24X alternate all mode...

Страница 128: ...Japan 41Y8748 Alcohol wipe China Malaysia 41Y8749 Alcohol wipe Australia UK 41Y8750 Alcohol wipe Korea 41Y8751 Alcohol wipe Hungary 41Y8753 Alcohol wipe Latin America 41Y8754 Alcohol wipe China 41Y875...

Страница 129: ...ociation CSA For units intended to be operated at 115 volts Use a UL listed and CSA certified cord set consisting of a minimum 18 AWG Type SVT or SJT three conductor cord a maximum of 15 feet in lengt...

Страница 130: ...atu Vietnam Wallis and Futuna Yugoslavia Federal Republic of Zaire 13F9997 Denmark 14F0015 Bangladesh Lesotho Macao Maldives Namibia Nepal Pakistan Samoa South Africa Sri Lanka Swaziland Uganda 14F003...

Страница 131: ...icos Islands Canada Cayman Islands Colombia Costa Rica Cuba Dominican Republic Ecuador El Salvador Guam Guatemala Haiti Honduras Jamaica Mexico Micronesia Federal States of Netherlands Antilles Nicara...

Страница 132: ...116 IBM System x3950 Type 8878 and System x3950 E Type 8879 Problem Determination and Service Guide...

Страница 133: ...ction at maximum levels of performance To download firmware updates for your server go to http www ibm com servers eserver support xseries index html select System x3950 or System x3950 E from the Har...

Страница 134: ...safety shields guards labels and ground wires v For a list of supported optional devices for the server see http www ibm com servers eserver serverproven compat us System reliability guidelines To hel...

Страница 135: ...you are ready to install them To reduce the possibility of damage from electrostatic discharge observe the following precautions v Limit your movement Movement can cause static electricity to build u...

Страница 136: ...illustrations show the locations of the input and output connectors on the server Detailed cabling instructions are in the Rack Installation Instructions that come with the server Rear view SP serial...

Страница 137: ...ipheral devices and disconnect the power cords and all external cables necessary to remove or install the adapter 3 Remove the top cover see Top cover and bezel on page 131 4 Disconnect any cables fro...

Страница 138: ...age 120 for cabling instructions 11 Turn on all attached devices and the server DVD drive To remove the DVD drive complete the following steps Retention latch 1 Read the safety information that begins...

Страница 139: ...fan 1 Hot swap fan 5 Hot swap fan 6 Hot swap fan 7 Hot swap fan 8 Fan error LED Hot swap fan 2 Hot swap fan 3 Hot swap fan 4 1 Read the safety information that begins on page vii and Installation guid...

Страница 140: ...utions Statement 8 CAUTION Never remove the cover on a power supply or any part that has the following label attached Hazardous voltage current and energy levels are present inside any component that...

Страница 141: ...hot swap power supply follow all packaging instructions and use any packaging materials for shipping that are supplied to you To install the replacement hot swap power supply complete the following st...

Страница 142: ...be installed for the server to operate correctly To remove the memory card complete the following steps A C D C 1 Read the safety information that begins on page vii and Installation guidelines on pa...

Страница 143: ...n that begins on page vii and Installation guidelines on page 117 2 If you are removing a non hot swap DIMM turn off the server and peripheral devices and disconnect the power cords and all external c...

Страница 144: ...IMM so that the DIMM keys align correctly with the slot DIMM Retaining clip 4 Insert the DIMM into the connector by aligning the edges of the DIMM with the slots at the ends of the DIMM connector Firm...

Страница 145: ...ormation that begins on page vii and Installation guidelines on page 117 2 Turn off the server and peripheral devices and disconnect the power cords and all external cables necessary to replace the de...

Страница 146: ...urn off the server and peripheral devices and disconnect the power cords and all external cables necessary to replace the device 3 Remove the top cover see Top cover and bezel on page 131 4 Grasp the...

Страница 147: ...ins on page Safety on page vii and Installation guidelines on page 117 2 If you are installing or replacing a non hot swap component turn off the server and all peripheral devices and disconnect the p...

Страница 148: ...465 6666 within Canada Outside the U S and Canada call your IBM marketing representative or authorized reseller v After you replace the battery you must reconfigure the server and reset the system da...

Страница 149: ...into the socket until it clicks into place Make sure that the battery clip holds the battery securely 3 Reconnect the 2 SAS signal cables to the I O board 4 Install the top cover see Top cover and bez...

Страница 150: ...able is connected and then disconnect all cables from the I O board and remove the assembly from the server 6 If you are instructed to return the I O board follow all packaging instructions and use an...

Страница 151: ...e operator information panel assembly to the left and gently pull the information panel assembly out of the front panel assembly until it stops 7 Press the retention clips on each side of the informat...

Страница 152: ...eripheral devices and disconnect the power cords and all external cables necessary to replace the device 3 Remove the top cover see Top cover and bezel on page 131 4 Lift the latch mechanism 5 Remove...

Страница 153: ...guide and the tabs on the top of the dividers engage the plastic retainer section of the guide 6 Lower the latch mechanism 7 Install the top cover see Top cover and bezel on page 131 8 Slide the serv...

Страница 154: ...o be pinched or caught on metal protrusions 1 Align the tabs on the power supply structure with the notches on the rear of the chassis then gently lower the structure into the server Make sure that th...

Страница 155: ...ons and use any packaging materials for shipping that are supplied to you To install the replacement SAS backplane complete the following steps 1 Connect the power cable to the replacement backplane 2...

Страница 156: ...s ribbon cable and the USB cable to the I O board 4 Install the top cover and bezel see Top cover and bezel on page 131 5 Slide the server into the rack 6 Connect the cables and power cords see Connec...

Страница 157: ...rocessor To remove the microprocessor tray and a microprocessor complete the following steps F R O N T Heat sink Microprocessor Microprocessor baffle VRM 4 Air baffle F R O N T F R O N T F R O N T 1 R...

Страница 158: ...sink moves back and forth easily the bond is broken 12 Open the microprocessor release lever and remove the microprocessor from the microprocessor socket 13 If you are instructed to return the micropr...

Страница 159: ...M in the connector a Open the retaining clips on each end of the VRM connector b Turn the VRM so the keys align with the slot c Insert the VRM into the connector by aligning the edges of the VRM with...

Страница 160: ...all of the thermal grease is removed 4 Use a clean area of the cleaning pad to wipe the thermal grease from the microprocessor then dispose of the cleaning pad after all of the thermal grease is remov...

Страница 161: ...You might find it helpful to note where each adapter is installed before removing the adapters 7 Remove the card guide see PCI X adapter guide on page 136 8 Disconnect the PCI X switch card cable from...

Страница 162: ...Install the memory cards 6 Install all fans 7 Connect the SAS backplane power cable to the connector on the PCI X board 8 Connect the PCI X switch card cable to the connector on the PCI X board 9 Inst...

Страница 163: ...erials for shipping that are supplied to you To install the replacement PCI X switch card assembly complete the following steps 1 Lower the card into place so that the lips on the bottom of the EMI sh...

Страница 164: ...t the power backplane out of the server 9 If you are instructed to return the power backplane follow all packaging instructions and use any packaging materials for shipping that are supplied to you To...

Страница 165: ...microprocessor on page 141 7 Remove the power supplies and the power supply structure see Power supply structure on page 137 8 Move the retention latch away from the scalability cartridge assembly gr...

Страница 166: ...tall the fans 6 Install the top cover and bezel see Top cover and bezel on page 131 7 Slide the server into the rack 8 Connect the cables and power cords see Connecting the cables on page 120 for cabl...

Страница 167: ...product data VPD code You can select to update the VPD code during the BIOS code update procedure Configuring the server The ServerGuide Setup and Installation CD provides software setup tools and in...

Страница 168: ...bm com servers eserver xseries systems_management ibm_director extensions xpress html Using the Configuration Setup Utility program Use the Configuration Setup Utility program to v View configuration...

Страница 169: ...is choice to view VPD for some server components v Devices and I O Ports Select this choice to view or change assignments for devices and input output I O ports Select this choice to enable or disable...

Страница 170: ...operating system supports Wake on LAN functions you can specify a startup sequence for the Wake on LAN functions If you enable the boot fail count the BIOS default settings will be restored after thre...

Страница 171: ...ange baseboard management controller BMC settings BMC firmware Ver This is a nonselectable menu item that displays the BMC firmware version BMC POST Watchdog Enable or disable the BMC POST watchdog Di...

Страница 172: ...only If you set only a power on password you must type the power on password to complete the system startup and you have access to the full Configuration Setup Utility menu An administrator password...

Страница 173: ...r on password override boot recovery and Wake on LAN bypass jumpers Light path diagnostic Front USB Battery Power on password override Boot recovery Wake on LAN bypass Media backplane Remote Superviso...

Страница 174: ...r remove the BMC MAC address tag so that it does not impede airflow through the front of the server 2 To ensure proper server operation be sure to update the server baseboard management controller fir...

Страница 175: ...operate as logical drives in a disk array The controller comes with a CD that contains the ServeRAID Manager program and the ServeRAID Mini Configuration program which you can use to configure the Ser...

Страница 176: ...160 IBM System x3950 Type 8878 and System x3950 E Type 8879 Problem Determination and Service Guide...

Страница 177: ...new device drivers or to submit a request for information You can solve many problems without outside assistance by following the troubleshooting procedures that IBM provides in the online help or in...

Страница 178: ...ormation about Support Line and other IBM services see http www ibm com services or see http www ibm com planetwide for support telephone numbers In the U S and Canada call 1 800 IBM SERV 1 800 426 73...

Страница 179: ...LUDING BUT NOT LIMITED TO THE IMPLIED WARRANTIES OF NON INFRINGEMENT MERCHANTABILITY OR FITNESS FOR A PARTICULAR PURPOSE Some states do not allow disclaimer of express or implied warranties in certain...

Страница 180: ...the United States and other countries Other company product or service names may be trademarks or service marks of others Important notes Processor speeds indicate the internal clock speed of the mic...

Страница 181: ...found on IBM s Internet site at http www ibm com ibm environment products prp shtml Esta unidad debe reciclarse o desecharse de acuerdo con lo establecido en la normativa nacional o local aplicable IB...

Страница 182: ...on the environment and human health due to the potential presence of hazardous substances in EEE For proper collection and treatment contact your local IBM representative Battery return program This p...

Страница 183: ...nd grounded cables and connectors must be used in order to meet FCC emission limits IBM is not responsible for any radio or television interference caused by using other than recommended cables and co...

Страница 184: ...the limits for Class A Information Technology Equipment according to CISPR 22 European Standard EN 55022 The limits for Class A equipment were derived for commercial and industrial environments to pr...

Страница 185: ...152 configuring hardware 151 configuring your server 151 connector static discharge 5 connectors 6 cable 120 external 120 front 120 rear 120 cover removing 131 CPU BRD LED 57 CPU LED 54 CRUs replacin...

Страница 186: ...bly 139 microprocessor 140 microprocessor board assembly 140 PCI X board assembly 145 PCI X switch card assembly 146 power backplane 147 scalability cartridge assembly 149 G Gigabit Ethernet connector...

Страница 187: ...LED 57 PCI LED 55 PCI X adapter guide replacing 136 PCI X board assembly replacing 145 PCI X switch card assembly replacing 146 pointing device problems 41 POST error codes 21 error log 20 power backp...

Страница 188: ...units 111 ServeRAID configuration programs 159 ServeRAID 8i adapter replacing 130 ServerGuide 151 problems 49 Setup and Installation CD 151 service processor messages 80 service calling for 107 size 3...

Страница 189: ......

Страница 190: ...Part Number 31R1886 Printed in USA 1P P N 31R1886...

Отзывы: