background image

5

US

Workplace Preparation

Positioning the Monitor

Choose a suitable place to position the monitor where it is not near 
fluorescent desk lighting or any equipment that produces 
magnetic fields that could cause interference.
Ensure that the furniture or equipment can support the weight of 
the monitor. Allow at least 2 in. (50 mm) ventilation space around 
the monitor.

Height

The monitor should be positioned so that the top of the screen is 
slightly below your eye level when you sit at your workstation.

Orientation

Choose a position that gives the least reflection from lights and 
windows, usually at a right angle to any windows. Position the 
monitor directly in front of you so that you do not have to twist 
your body. Tilt the monitor to a comfortable viewing angle.

Working Practices

Rest

Take regular breaks. Vary your posture, and stand up and stretch 
occasionally as prolonged use of computer workstations can be 
tiring.

Back

Sit back in the chair and use the backrest.

Hands

Use a light touch on the keyboard, keeping your hands and fingers 
relaxed. Allow a space in front of the keyboard to rest your wrists 
when not typing. Consider using a wristpad.

Eyesight

Working with monitors, in common with any kind of prolonged 
close work, can be visually demanding. Look away from the 
screen periodically and have your eyesight checked regularly.

Screen settings

Set the screen brightness and contrast to a comfortable level.
You may have to adjust this as the lighting changes during the 
day. Many application programs let you select color combinations 
which can help you to view in comfort.

Customizing Your Monitor

You can make numerous adjustments to your monitor using the 
on-screen menu.

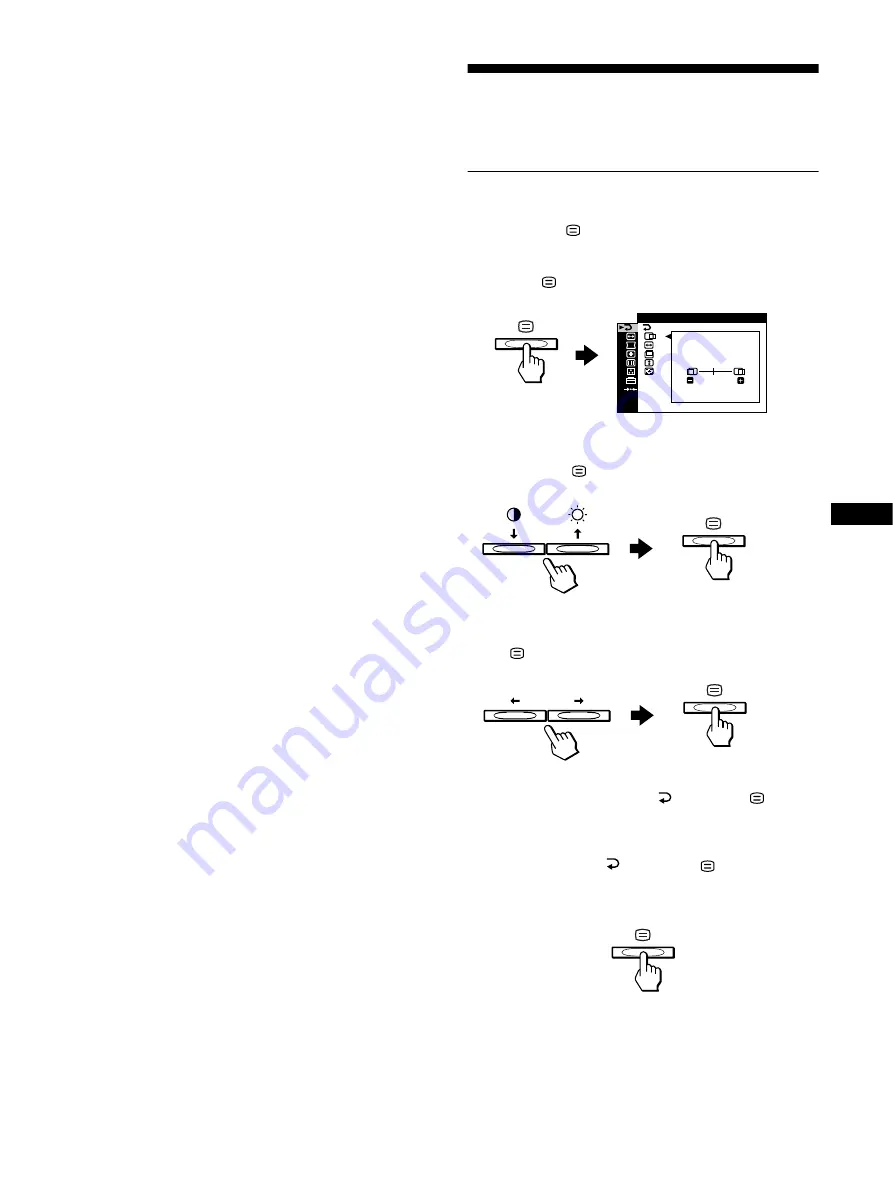
Navigating the menu

x

Using the 

m

/

M

, and 

<

/

,

 buttons

1

Display the menu.

Press the 

 button to display the menu on the screen.

2

Select the menu you want to adjust.

Highlight the desired menu by pressing the 

m

/

M

 buttons. 

Then press the 

 button.

3

Adjust the menu.

Press the 

<

/

,

 buttons to make the adjustment, then press 

the 

 button to activate the adjustment.

If you want to select another menu: 

Press the 

m

/

M

 buttons to select 

 and press the 

 button to 

exit the menu.

4

Close the menu.

Each time you select 

 and press the 

 button, the menu 

exits. If no buttons are pressed, the menu closes automatically 
after about 30 seconds.

EX I T

1 2 8 0 x 1 0 2 4   /     8 5 H z

45

(continued)

Содержание P97

Страница 1: ...P97 Operating Instructions Color Monitor English ...

Страница 2: ...tices References in this publication to IBM products programs or services do not imply that IBM intends to make these available in all countries in which IBM operates Any reference to an IBM product program or service is not intended to state or imply that only IBM s product program or service may be used Any functionally equivalent product program or service that does not infringe any of IBM s in...

Страница 3: ...the picture SIZE CENTER 8 Automatically sizing and centering the picture AUTO 8 Adjusting the shape of the picture GEOMETRY 9 Adjusting the convergence CONVERGENCE 9 Adjusting the picture quality SCREEN 10 Adjusting the color of the picture COLOR 10 Additional settings OPTION 12 Resetting the adjustments RESET 12 Technical Features 13 Preset and user modes 13 Power saving function 13 Troubleshooti...

Страница 4: ...result in a scratched picture tube Clean the cabinet panel and controls with a soft cloth lightly moistened with a mild detergent solution Do not use any type of abrasive pad scouring powder or solvent such as alcohol or benzine Transportation When you transport this monitor for repair or shipment use the original carton and packing materials Use of the Tilt Swivel This monitor can be adjusted wit...

Страница 5: ...s button turns the monitor on and off The power indicator lights up in green when the monitor is turned on and lights up in orange when the monitor is in power saving mode 5 AC input connector page 4 This connector provides ac power to the monitor 6 Video input connector HD15 page 4 This connector inputs RGB video signals 0 700 Vp p positive and sync signals Display Data Channel DDC Standard of VE...

Страница 6: ... 3 Turn on the monitor and computer First turn on the monitor then turn on the computer The installation of your monitor is complete If necessary use the monitor s controls to adjust the picture If no picture appears on your screen Check that the monitor is correctly connected to the computer If NO SIGNAL appears on the screen confirm that your computer s graphics board is completely seated in the...

Страница 7: ...space in front of the keyboard to rest your wrists when not typing Consider using a wristpad Eyesight Working with monitors in common with any kind of prolonged close work can be visually demanding Look away from the screen periodically and have your eyesight checked regularly Screen settings Set the screen brightness and contrast to a comfortable level You may have to adjust this as the lighting ...

Страница 8: ...280x1024 85Hz 45 OPT ON I CONTROL LOCK OFF ON 1280x1024 85Hz OPT ON I LANGUAGE FRANÇA S I DEUTSCH 1 3 ENGL SH I 1280x1024 85Hz EXIT Close the menu BRIGHT CONTRAST page 7 Adjusts the brightness and contrast You can call up this menu directly by pressing the M or 6 m buttons while there is no menu on the screen SIZE CENTER page 8 Adjusts the size and centering GEOMETRY page 9 Adjusts the rotation an...

Страница 9: ...e brightness or contrast 6 If you are using the sRGB mode If you selected the sRGB mode in the COLOR MODE of the COLOR menu the following BRIGHT CONTRAST menu appears on the screen You cannot adjust the contrast 6 nor brightness on this screen If you want to adjust them select a mode other than sRGB in the COLOR MODE of the COLOR menu For more information about using the sRGB mode see Adjusting th...

Страница 10: ...for vertical adjustment Then press the button 4 Press the buttons to adjust the size Automatically sizing and centering the picture AUTO You can easily adjust the picture to fill the screen by using the SIZE CENTER menu 1 Press the button The menu appears on the screen 2 Press the m M buttons to highlight SIZE CENTER and press the button The SIZE CENTER menu appears on the screen 3 Press the m M b...

Страница 11: ...nd letters or lines adjust the convergence These settings are stored in memory for all input signals 1 Press the button The menu appears on the screen 2 Press the m M buttons to highlight CONVERGENCE and press the button The CONVERGENCE menu appears on the screen 3 Press the m M buttons to select the desired adjustment item Then press the button The adjustment bar appears on the screen 4 Press the...

Страница 12: ...itch pattern of the monitor Note The picture may become fuzzy when the CANCEL MOIRE function is activated Adjusting the color of the picture COLOR The COLOR settings allow you to adjust the picture s color temperature by changing the color level of the white color field Colors appear reddish if the temperature is low and bluish if the temperature is high This adjustment is useful for matching the ...

Страница 13: ...y selecting the EXPERT mode 1 Press the button The menu appears on the screen 2 Press the m M buttons to highlight COLOR and press the button 3 Press the m M buttons to select the R red G green or B blue and press the button Then press the buttons to adjust the input signal for both GAIN 6 and BIAS If you want to reset the EXPERT adjustments select 0 RESET in COLOR menu Then select OK in the RESET...

Страница 14: ... POSITION Change the menu s position if it is blocking an image on the screen Press the m M buttons to select OSD POSITION for horizontal adjustment or OSD POSITION for vertical adjustment and press the button Then press the buttons to shift the on screen menu Then press the button Resetting the adjustments RESET This monitor has the following 2 reset methods x Resetting all the adjustment data fo...

Страница 15: ...minute the monitor enters power saving mode Deep sleep is power saving mode defined by the Environmental Protection Agency Troubleshooting Before contacting technical support refer to this section If thin lines appear on your screen damper wires The visible lines on your screen especially when the background screen color is light usually white are normal for the Trinitron monitor This is not a mal...

Страница 16: ...al number Name and specifications of your computer and graphics board 2 The frequencies of the current input signal If the monitor recognizes the frequencies of the current input signal the horizontal and vertical frequencies are also displayed 3 The remedies CHANGE SIGNAL TIMING appears on the screen If you are replacing an old monitor with this monitor reconnect the old monitor Then adjust the c...

Страница 17: ...st the frequency range to the following Horizontal 30 107 kHz Vertical 48 170 Hz If no message is displayed and the 1 power indicator is green or flashing orange Use the Self diagnosis function page 17 Picture flickers bounces oscillates or is scrambled Isolate and eliminate any potential sources of electric or magnetic fields such as other monitors laser printers fluorescent lighting televisions ...

Страница 18: ...visible Adjust the degree of moire cancellation until the moire is minimal page 10 xProblems caused by the connected computer or other equipment Change your desktop pattern Color is not uniform Degauss the monitor page 10 If you place equipment that generates a magnetic field such as a speaker near the monitor or if you change the direction the monitor faces color may lose uniformity White does no...

Страница 19: ...r of seconds between orange flashes of the 1 power indicator and inform your authorized technical support of the monitor s condition Be sure to note the model name and serial number of your monitor Also note the make and model of your computer and graphic board Specifications CRT 0 24 mm aperture grille pitch 19 in measured diagonally 90 degree deflection Trinitron Viewable image size Approx 365 0...

Страница 20: ...5 Hz VESA 5 800 600 37 9 kHz 60 Hz VESA 6 800 600 46 9 kHz 75 Hz VESA 7 800 600 53 7 kHz 85 Hz VESA 8 1024 768 48 4 kHz 60 Hz VESA 9 1024 768 56 5 kHz 70 Hz VESA 10 1024 768 60 0 kHz 75 Hz VESA 11 1024 768 68 7 kHz 85 Hz VESA 12 1152 864 67 5 kHz 75 Hz VESA 13 1152 864 77 5 kHz 85 Hz VESA 14 1280 960 60 0 kHz 60 Hz VESA 15 1280 960 85 9 kHz 85 Hz VESA 16 1280 1024 64 0 kHz 60 Hz VESA 17 1280 1024 ...

Отзывы: