


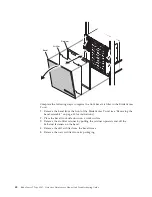


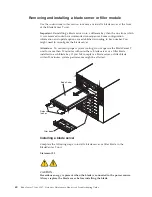

Removing a power module
Complete the following steps to remove a power module or filler panel from the
front of the BladeCenter T unit.
Attention:
To help ensure proper cooling and system reliability, make sure that
you replace a removed power module or filler panel with a power module within
1 minute.
Important:
If you are removing a functional power module, make sure that both
the ac-power LED and the dc-power LED on the remaining power module are lit;
otherwise, shut down the operating systems and turn off all of the blade servers
that are supported by the power module you are removing, before you remove it.
(See the documentation that comes with the blade server for instructions for
shutting down the blade server operating system and turning off the blade server.)
1.
Press the blue release button on the front of the new power module to release
the power-module handle; then, move the power-module handle outward until
it is in the open position (90° from the closed position).
2.
Grip the power-module handle with one hand and slowly pull the power
module out of the bay. Use your other hand to support the bottom of the
power module as you pull the power module out from the bay.
Attention:
Do not carry the power module by only the power-module handle.
You must support the weight of the power module.
3.
Place the power module in a safe location.
4.
Within 1 minute, install either another power module or a filler module into
the selected power-module bay.
Installing a power module
Complete the following steps to install a power module at the front of the
BladeCenter T unit.
Attention:
To help ensure proper cooling and system reliability, make sure that
you replace a removed power-module filler panel with a power module within 1
minute.
1.
Note the orientation of the power module or filler you are removing; then,
remove the filler or power module from the selected power-module bay and set
it aside.
2.
Press the blue release button on the front of the new power module to release
the power-module handle; then, move the power-module handle outward until
it is in the open position (90° from the closed position).
3.
Grip the power-module handle with one hand and support the bottom of the
power module with the other hand.
Attention:
Do not carry the power module by only the power-module handle.
You must support the weight of the power module.
4.
Orient the new power module to the selected power-module bay; then, slide
the power module into the bay until it stops.
5.
Push the power-module handle in until it locks into the latch next to the blue
release button.
6.
Make sure the LEDs on the power module indicate that it is operating correctly.
Make sure that:
v
The input power LED is lit.
Chapter 4. Setting up the BladeCenter T hardware
45
Содержание BladeCenter T
Страница 1: ...BladeCenter T Type 8267 Hardware Maintenance Manual and Troubleshooting Guide ...
Страница 2: ......
Страница 3: ...BladeCenter T Type 8267 Hardware Maintenance Manual and Troubleshooting Guide ...
Страница 16: ...xiv BladeCenter T Type 8267 Hardware Maintenance Manual and Troubleshooting Guide ...
Страница 20: ...xviii BladeCenter T Type 8267 Hardware Maintenance Manual and Troubleshooting Guide ...
Страница 52: ...32 BladeCenter T Type 8267 Hardware Maintenance Manual and Troubleshooting Guide ...
Страница 102: ...82 BladeCenter T Type 8267 Hardware Maintenance Manual and Troubleshooting Guide ...
Страница 126: ...106 BladeCenter T Type 8267 Hardware Maintenance Manual and Troubleshooting Guide ...
Страница 134: ...Taiwan Class A compliance statement 114 BladeCenter T Type 8267 Hardware Maintenance Manual and Troubleshooting Guide ...
Страница 138: ...118 BladeCenter T Type 8267 Hardware Maintenance Manual and Troubleshooting Guide ...
Страница 139: ......
Страница 140: ... Part Number 94Y7061 Printed in USA 1P P N 94Y7061 ...