
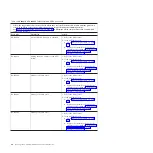

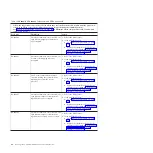
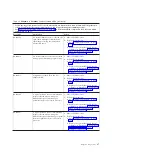
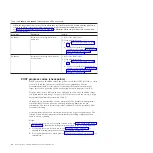


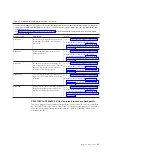
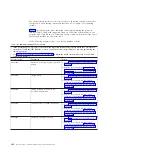


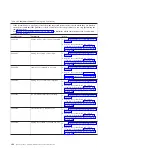


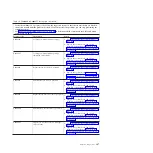


Table 15. C1001F00 to C1645300 checkpoints (continued)
v
If the system hangs on a progress code, follow the suggested actions in the order in which they are listed in
the Action column until the problem is solved. If an action solves the problem, you can stop performing the
remaining actions.
v
See Chapter 3, “Parts listing, Type 7998,” on page 235 to determine which components are CRUs and which
components are FRUs.
Progress code
Description
Action
C1009xAC
ASIC enable machine check step in
progress
1.
Go to “Checkout procedure” on page 186.
2.
Replace the system-board and chassis
assembly, as described in “Replacing the
Tier 2 system-board and chassis assembly”
on page 270.
C1009xB0
ASIC I/O initialization step in progress
1.
Go to “Checkout procedure” on page 186.
2.
Replace the system-board and chassis
assembly, as described in “Replacing the
Tier 2 system-board and chassis assembly”
on page 270.
C1009xB4
ASIC DRAM initialization step in
progress
1.
Go to “Checkout procedure” on page 186.
2.
Replace the system-board and chassis
assembly, as described in “Replacing the
Tier 2 system-board and chassis assembly”
on page 270.
C1009xB8
ASIC memory diagnostic step in
progress
1.
Go to “Checkout procedure” on page 186.
2.
Replace the system-board and chassis
assembly, as described in “Replacing the
Tier 2 system-board and chassis assembly”
on page 270.
C1009xB9
PSI diagnostic step in progress
1.
Go to “Checkout procedure” on page 186.
2.
Replace the system-board and chassis
assembly, as described in “Replacing the
Tier 2 system-board and chassis assembly”
on page 270.
C1009xBB
Restore L3 line delete step in progress
1.
Go to “Checkout procedure” on page 186.
2.
Replace the system-board and chassis
assembly, as described in “Replacing the
Tier 2 system-board and chassis assembly”
on page 270.
C1009xBD
AVP memory test case in progress
1.
Go to “Checkout procedure” on page 186.
2.
Replace the system-board and chassis
assembly, as described in “Replacing the
Tier 2 system-board and chassis assembly”
on page 270.
C1009xC0
Node interface alignment procedure in
progress
1.
Go to “Checkout procedure” on page 186.
2.
Replace the system-board and chassis
assembly, as described in “Replacing the
Tier 2 system-board and chassis assembly”
on page 270.
Chapter 2. Diagnostics
97
Содержание BladeCenter JS22
Страница 1: ...BladeCenter JS22 Type 7998 Problem Determination and Service Guide...
Страница 2: ......
Страница 3: ...BladeCenter JS22 Type 7998 Problem Determination and Service Guide...
Страница 14: ...xii JS22 Type 7998 Problem Determination and Service Guide...
Страница 248: ...234 JS22 Type 7998 Problem Determination and Service Guide...
Страница 286: ...272 JS22 Type 7998 Problem Determination and Service Guide...
Страница 294: ...280 JS22 Type 7998 Problem Determination and Service Guide...
Страница 298: ...284 JS22 Type 7998 Problem Determination and Service Guide...
Страница 308: ...294 JS22 Type 7998 Problem Determination and Service Guide...
Страница 313: ......
Страница 314: ...Part Number 44W2359 Printed in USA 1P P N 44W2359...