background image


6

6

-

-

I

I

N

N

-

-

1

1


M

M

O

O

V

V

I

I

N

N

G

G


H

H

E

E

A

A

D

D


R

R

G

G

B

B

W

W

A

A

+

+

U

U

V

V


Ref.: LMH360LED (15-1901) 


USER MANUAL 

MANUEL D’UTILISATION 

BEDIENUNGSANLEITUNG


MANUAL DE INSTRUÇÕES 

MANUAL DE UTILIZARE 

NAVODILA ZA UPORABO 

HANDLEIDING 


IMPORTANT NOTE: Electric products must not be put into household waste. Please bring them to a recycling centre. Ask your local authorities or 

your dealer about the way to proceed. 

NOTE IMPORTANTE : Les produits électriques ne doivent pas être mis au rebut avec les ordures ménagères. Veuillez les faire recycler là où il existe 

des centres pour cela. Consultez les autorités locales ou votre revendeur sur la façon de les recycler. 

WICHTIGER HINWEIS: Elektrogeräte gehören nicht in den Hausmüll. Sie müssen in speziellen Betrieben recycelt werden. Bringen Sie sie zu einer 

speziellen Entsorgungsstelle für Elektrokleingeräte (Wertstoffhof)! 

BELANGRIJK: De elektrische producten mogen niet naast het huisvuil geplaatst worden. Gelieve deze te laten recycleren daar waar er centra’s hiervoor voorzien 

is. Raadpleeg de plaatselijke autoriteiten of uw verkoper ivm de manier van recycleren. 

NOTA IMPORTANTE: Produtos eléctricos não deverão ser postos em contentores de lixo caseiros. Por favor, deposite-os em contentores para reciclagem. 

Questione as autoridades locais ou onde adquiriu o produto sobre como deverá proceder. 

NOTA IMPORTANTE: Produtos eléctricos não deverão ser postos em contentores de lixo caseiros. Por favor, deposite-os em contentores para reciclagem. 

Questione as autoridades locais ou onde adquiriu o produto sobre como deverá proceder. 

WAŻNA  UWAGA:  Elektryczne  produkty  nie  mogą  być  wyrzucane  wraz  z  odpadami  domowymi.  Prosimy  o  przyniesienie  ich  do  centrum  rec

yklingu. Zapytaj 

sprzedawcę o sposób postępowania.


NOTA IMPORTANTA: Deseurile care provin de la produsele electrice si electronice nu se vor pune la gunoiul menajer. Dezafectarea acestora trebuie sa se faca la 

centrele de colectare special amenajate. Contactati autoritatile locale pentru informatii privind procedura de dezafectare a deseurilor electrice si electronice.

©Copyright LOTRONIC 2014  

LMH360LED 


Page 1 

Содержание LMH360LED

Страница 1: ...ze te laten recycleren daar waar er centra s hiervoor voorzien is Raadpleeg de plaatselijke autoriteiten of uw verkoper ivm de manier van recycleren NOTA IMPORTANTE Produtos el ctricos n o dever o ser...

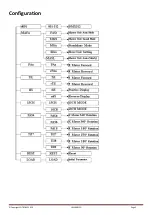
Страница 2: ...Configuration Copyright LOTRONIC 2014 LMH360LED Page 2...

Страница 3: ...pose fixture to rain or moisture Make sure there are no flammable materials close to the unit while operating The unit must be installed in a location with adequate ventilation at least 20in 50cm from...

Страница 4: ...his compartment Remove using a flat head screwdriver Fixture Linking You will need a serial data link to run light shows of one or more fixtures using a DMX 512 controller or to run synchronized shows...

Страница 5: ...ale 3 pin connector of the controller 2 Connect the end of the cable coming from the controller which will have a female 3 pin connector to the input connector of the next fixture consisting of a male...

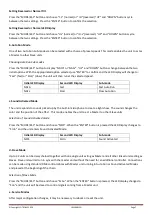
Страница 6: ...the previous option or menu without changing the value press the MODE ESC button After a few seconds the LED Display will back during operation until another button is pressed 4 3 User configurations...

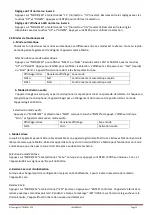
Страница 7: ...s to sounds picked up by the built in microphone to create a light show The sound changes the color and the position of the effect This mode enables the unit to act a Master to other Slave units Selec...

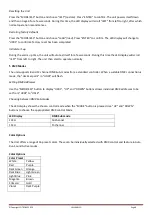
Страница 8: ...supports 8 and 13 channel DMX Sub modes from a standard controller When a suitable DMX connection is made the decimal point in d 001 will flash Setting DMX Addresses Use the MODE ESC button to display...

Страница 9: ...e vous remplacez le fusible utilisez uniquement un fusible qui pr sente exactement les m mes caract ristiques que l ancien S curisez l appareil sur le dispositif de fixation au moyen d une cha ne Ne p...

Страница 10: ...is lame plate Sortez le fusible grill et remplacez le par un autre en tous points identiques Remettez le porte fusible dans son logement et rebranchez l appareil sur le secteur Le fusible se trouve l...

Страница 11: ...u commun peut provoquer une boucle de masse et votre appareil fonctionne d une fa on trange Testez les c bles l aide d un ohm m tre afin de v rifier la polarit et de vous assurer que les broches ne so...

Страница 12: ...dans un ordre croissant ou d croissant ENTER S lection et enregistrement du menu ou de l option dans un menu Appuyez plusieurs reprises sur MODE ESC jusqu ce que vous atteigniez la fonction d sir e Ut...

Страница 13: ...ectacle de lumi re A chaque son enregistr par le microphone l appareil r agit par un changement de couleur et de position Dans ce mode l appareil agit en Ma tre S lection du mode audio Appuyez sur MOD...

Страница 14: ...ns d 001 clignote R glage des addresses DMX Appuyez sur MODE ESC pour afficher d001 R glez les adresses individuelles de d001 d512 au moyen des touches UP et DOWN S lection entre les sous modes DMX L...

Страница 15: ...sind Immer erst das Ger t vom Netz trennen bevor es gewartet oder die Sicherung ersetzt wird Die Sicherung nur durch eine identische ersetzen Das Ger t mit einer Sicherheitskette befestigen Das Ger t...

Страница 16: ...h eine identische Sicherung ersetzen Den Sicherungshalter zur ck ins Geh use setzen und Netz wieder anschlie en Die Sicherung befindet sich im Inneren dieses Fachs Mit einem flachen Schraubendreher en...

Страница 17: ...Pin Buchse Ausgang 5 Pin Stecker Eingang Masse Abschirmung Pin 1 Pin1 Datensignal Pin 2 Pin 2 Datensignal Pin 3 Pin 3 Nicht benutzen Nicht benutzen Nicht benutzen Nicht benutzen Einrichten einer serie...

Страница 18: ...Tasten zwischen den m glichen Optionen umschalten Mit ENTER best tigen LED Display Maximum Pan PA18 180 PA36 360 PA54 540 Einstellung der maximalen TILT Winkel Auf MODE ESC dr cken und t 9 oder t 18...

Страница 19: ...nd NStS w hlen Wenn die ENTER Taste gedr ckt wird wechselt das Display auf SrUn und das Ger t arbeitet im Audiobetrieb Urspr ngliches Display Zweites Display Unterbetriebsart NStS SrUn Ger uschaktivie...

Страница 20: ...dressen Auf MODE ESC dr cken bis d001 erscheint Mit den UP bzw DOWN Tasten die DMX Adresse zwischen d001 und d512 einstellen Wahl zwischen 8 und 13 Kanalbetrieb Das LED Display zeigt die eingestellte...

Страница 21: ...o A unidade deve ser instalada num local com ventila o adequada pelo menos 50cm de superf cies adjacentes Certifique se de que nenhumas das aberturas de ventila o est o bloqueadas Desligue sempre da...

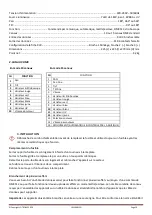
Страница 22: ...Canais DMX Modo de 10 canais Em modo de 15 canais DMX Canal Fun o 1 PAN 2 TILT 3 DIMMER STROBE 4 Vermelho 5 Verde 6 Azul 7 Branco 8 Amarelo 9 UV 10 Velocidade Pan Tilt 3 CONFIGURA O Desligue o cabo de...

Страница 23: ...e na outra ponta uma liga o f mea XLR Configura o de liga o DMX As termina es reduzem erros no sinal De modo a evitar problemas e interfer ncias na transmiss o de sinal sempre aconselh vel ligar a um...

Страница 24: ...ue exista ventila o adequada 4 Instru es de Opera o 4 1 Navega o atrav s o Painel de Controlo O painel de controlo para usar as fun es encontra se directamente por baixo do Display LCD Bot o Fun o MOD...

Страница 25: ...e escolha tl normal ou rt l invertida Os bot es UP e DOWN alternam entre as duas configura es Pressione o bot o Enter para confirmar a selec o Configura o de Display LED Reverso ou Normal Pressione o...

Страница 26: ...ara Son e a unidade ficar a ser controlada pelos sinais provenientes de uma unidade de Master e Modos de Servi o Ap s grandes mudan as de configura o pode ser necess rio reiniciar ou efectuar reset ao...

Страница 27: ...Crimson Violet Dark Purple 1 INTRODUCERE Continutul cutiei 1 x dispozitiv Mini wash 1 x cablul de alimentare Manual de utilizare Despachetarea produsului Imediat ce ati primit aparatul despachetati c...

Страница 28: ...e grave de functionare opriti aparatul si deconectati l de la alimentare Nu incercati sa reparati singuri aparatul Reparatiile efectuate de persoane necalificate pot provoca deteriorarea sau functiona...

Страница 29: ...ve de control setate pe modul de functionare master slave Important Dispozitivele trebuie sa fie legate in serie Distanta maxima recomandata pentru conexiuni de date in serie 500 de metri 1640 ft Numa...

Страница 30: ...al urmatorului dispozitiv format dintr un conector de 3 pini tata 3 Continuati apoi sa conectati asa cum este mentionat mai sus la intrarea urmatorului dispozitiv s a m d Ultimul cablu va fi conectat...

Страница 31: ...nterior fara a schimba valoarea apasati butonul MOD ESC Dupa cateva secunde ecranul LED va reveni la starea normala de functionare pana cand veti apasa un alt buton 4 3 Configuratii utilizator Setarea...

Страница 32: ...onare automata rapida NAFL SloU Functionare automata lenta Modul c Sunet activat Unitatea poate functiona activata de sunetul receptionat de microfonul incorporat pentru a crea un spectacol de lumini...

Страница 33: ...neze normal Modurile f DMX Aparatul suporta 8 si 13 sub moduri DMX ale canalelor de la un dispozitiv de control standard Cand conexiunea DMX a fost efectuata zecimala din optiunea d 001 va palpai Seta...

Страница 34: ...izklju ite iz elektri nega omre ja pred servisiranjem ali zamenjavo varovalke in se prepri ajte da nadomestite z varovalko enake velikosti in tip Zaradi varnosti napravepritrdite z varnostno vrvjo Nik...

Страница 35: ...va varovalke S plo atim izvija em sprostie nosilec varovalke iz ohi ja Odstranite po kodovano varovalko iz dr ala in nadomestiti s povsem enakim tipom varovalke Vstavite zadnji nosilec varovalke na nj...

Страница 36: ...3 Pol 3 Ni v uporabi Ni v uporabi Ni v uporabi Ni v uporabi Nastavitev DMX povezave 1 Pove ite 3 pol vtika DMX kabla DMX na izhod vti nice 3 pol DMX priklju ka krmilnika 2 Pove ite konec kabla ki prih...

Страница 37: ...avigacijo menija Pritisnite ENTER gumb za izbiro trenutne funkcije menija e se elite vrniti na prej njo mo nost ali meni brez spreminjanja vrednosti pritisnite MODE ESC gumb Po nekaj sekundah se bo LE...

Страница 38: ...prava bo nato dela po izbrani hitrosti Za etni LED Zaslon Drugi LED Zaslon Podna in NAFA Fast Hitro samodejno NAFL SloU Po asno samodejno c Zvo na aktivacija Enota se odziva na zvok z vgrajenim mikrof...

Страница 39: ...leve proti desni potem pa za ne normalno delovanje f DMX na in Enota podpira 8 in 13 DMX kanalov iz standardne regulatorja Ko uspostavljena DMX povezava decimal point v d 001 vtripa Nastavitev DMX Ad...

Страница 40: ...ppervlakken Wees zeker dat de ventilatie openingen niet geblokkeerd zijn Verwijder het stopcontact alvorens u het toestel onderhoud of de zekering vervangt Gebruik alleen een zekering met dezelfde spe...

Страница 41: ...ekering en zet een nieuwe zekering met dezelfde specificaties in Plaats de zekeringshouder terug in zijn behuizing en sluit de voedingskabel op een stopcontact aan Aansluiten van meerdere toestellen I...

Страница 42: ...Pin1 Data signaal Pin 2 Pin 2 Data signaal Pin 3 Pin 3 Niet gebruiken Niet gebruiken Niet gebruiken Niet gebruiken Installatie van een DMX seri le data link 1 Sluit het 3 pin stekkereind van de DMX ka...

Страница 43: ...n Na enkele seconden gaat de display terug naar normale aanduiding totdat een andere toets wordt gedrukt 4 3 Gebruiker configuraties Instellen van maximale Pan hoeken Druk op MODE ESC en kies PA18 PA3...

Страница 44: ...C Geluid geactiveerde Modus Het toestel reageert op het geluid dat van de ingebouwde microfoon opgenomen wordt en genereerd een lichtshow Het geluid verandert de kleur en de positie van het effect In...

Страница 45: ...werkt het toestel normaal F DMX Modi Het toestel kan in 8 en 13 kanaal DMX modus werken Indien de DMX aansluiting werkt flitst het decimaalpunt in d 001 Instellen van DMX adressen Druk MODE ESC totda...

Страница 46: ...Imported from China by LOTRONIC SA Avenue Z nobe Gramme 11 1480 Saintes Belgium Copyright LOTRONIC 2014 LMH360LED Page 46...

Отзывы: