background image

7

damage to the generator set.

Before working with batteries, ventilate the area, wear safety glasses, do not 
smoke and always disconnect the negative cable first and reconnect it last.

Use rubber gloves when coming into contact with engine oil.

Always stop the generator set before removing the oil filler cap.

Only qualified maintenance personnel with knowledge of fuels, electricity, and 
machinery hazards should perform maintenance procedures.

Moisture can damage the generator and can lead to an electric shock. Use and 
store in a dry enviroment.

Lubricate all exposed metal parts regularly. See page 20 for maintenance 
schedule.

OTHER SAFETY HAZARDS

To avoid breathing in poisonous carbon monoxide from the exhaust gases, 
adequate ventilation should be provided if the generator set is running in a 
partially enclosed space.

If the generator set is stored outdoors, check all the electrical components on 
the control panel before each use.

Generators vibrate in normal use. During and after the use of the generator, 
inspect the generator as well as extension cords and power supply cords 
connected to it for damage resulting from vibration. Have damaged items 
repaired or replaced as necessary. Do not use plugs or cords that show signs 
of damage such as broken or cracked insulation or damaged blades.

For power outages, permanently installed stationary generators are better 
suited for providing backup power to the home. Even a properly connected 
portable generator can become overloaded. This may result in overheating or 
stressing the generator components, possibly leading to a generator failure.

When this generator is used to supply a building wiring system: Generator must 
be installed by a qualified electrician and connected to transfer equipment as 
a separately derived system in accordance with the National Electrical Code, 
NFPA 70. The generator shall be connected through transfer equipment that 
switches all conductors other than the equipment grounding conductor. The 
frame of the generator shall be connected to an approved grounding electrode.

Содержание GreenPower

Страница 1: ...HYUNDAI PORTABLE INVERTER USER GUIDE ...

Страница 2: ...ndai Power Equipment All Rights Reserved Licensed by Hyundai Corporation Korea HY_UG_EN_1114 The Engine Exhaust from this product contains chemicals known to cause cancer birth defects or other reproductive harm ...

Страница 3: ...ries This user guide covers the safety operation and maintenance procedures for the HY2000si and HY2800sei All information in this publication is based on the latest product information available at the time of approval for printing No part of this publication may be reproduced without written permission If a problem should arise please contact us by using the contact information at the end of thi...

Страница 4: ...re Operating Inspection 9 Fuel Level Check 10 Air Filter Check 11 USING YOUR GENERATOR 12 Initial Startup 12 Operating Your Generator 14 Shutting Off Your Generator 16 Maintaining Your Generator 17 DC Operation 19 MAINTENANCE 20 Maintenance Schedule 20 Changing the Engine Oil 21 Spark Plug Service 22 Transportation and Storage 23 TROUBLESHOOTING 24 SPECIFICATIONS 28 GLOSSARY 30 WARRANTY 32 ...

Страница 5: ... generator indoors When storing gasoline or equipment with fuel in tank Store away from furnaces stoves water heaters or other appliances that have a pilot light or other ignition source because they can ignite OPERATING INSTRUCTIONS Operate the generator according to instructions for safe and dependable service Always perform a pre operation inspection before starting the engine Properly clean an...

Страница 6: ...e abnormally Then disconnect the device and investigate the problem Make sure that the electrical rating of the device does not exceed that of the generator If the power level of the device is between the maximum output power and the running power of the generator the generator should not be used for more than 30 minutes The connections from the generator to the household power supply should be do...

Страница 7: ... each use Generators vibrate in normal use During and after the use of the generator inspect the generator as well as extension cords and power supply cords connected to it for damage resulting from vibration Have damaged items repaired or replaced as necessary Do not use plugs or cords that show signs of damage such as broken or cracked insulation or damaged blades For power outages permanently i...

Страница 8: ...ning Light HY2000si Front Panel HY2800sei Front Panel Choke Lever Primer Bulb Fuel Valve Battery Cover Rear Cover Maintenance Cover Control Panel Fuel Cap Cover Top Maintenance Cover Starter Grip ECON Switch 12V DC Circuit Breakers Low Oil Warning Light Overload Warning Light Output Warning Light Engine Switch Identification of Components ...

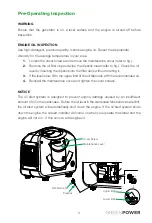
Страница 9: ...r neck without rotating it 3 If the level is low fill to the upper limit of the oil filler neck with the recommended oil 4 Reinstall the maintenance cover and tighten the cover screws NOTICE The oil alert system is designed to prevent engine damage caused by an insufficient amount of oil in the crankcase Before the oil level in the crankcase falls below a safe limit the oil alert system will autom...

Страница 10: ...y from heat spark the open flame Refuel in a well ventilated area with the engine stopped Only handle fuel outdoors Wipe up spills immediately Avoid getting dirt dust or water in the fuel tank Never use an oil gasoline mixture or dirty gasoline Do not use fuel containing alcohol Fuel system damage or engine performance problems will result from the use of fuels that contain alcohol Avoid repeated ...

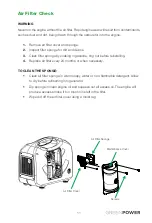
Страница 11: ...e by soaking in gasoline ring out before reinstalling 4 Replace air filter every 24 months or when necessary TO CLEAN THE SPONGE Clean air filter sponge in warm soapy water or non flammable detergent Allow to dry before reinserting into generator Dip sponge in clean engine oil and squeeze out all excess oil The engine will produce excess smoke if too much oil is left in the filter Wipe dirt off th...

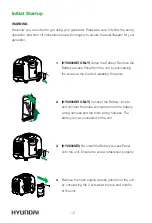
Страница 12: ...ss Panel from the unit by unscrewing the screw at the top and releasing the panel 2 HY2800SEI ONLY Connect the Battery locate and connect the loose connectors from the battery wiring harness and the main wiring harness The battery is now connected to the unit 3 HY2800SEI Re install the Battery Access Panel onto the unit Ensure the screw is fastened properly 4 Remove the main engine access panel fr...

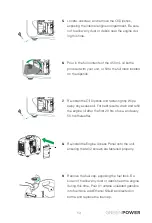
Страница 13: ...l the Oil Dipstick and fasten tightly Wipe away any excess oil For best results drain and refill the engine oil after the first 20 hrs of use and every 50 hrs thereafter 8 Re install the Engine Access Panel onto the unit ensuring that all 2 screws are fastened properly 9 Remove the fuel cap exposing the fuel tank Be sure not to allow any dust or debris near the engine during this time Pour 91 octa...

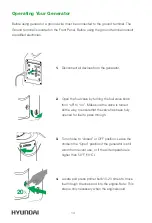
Страница 14: ...e by turning the fuel valve knob from off to on Make sure the valve is turned all the way to ensurethat the valve has been fully opened for fuel to pass through 3 Turn choke to closed or OFF position Leave the chokein the Open position if the generator is still warm from recent use or if the air temperature is higher than 50 F 10 C 4 Locate and press primer bulb 15 20 times to move fuel through th...

Страница 15: ... starts Do not release the pull cord at the end of a pull this will damage the recoil assembly Bring the pull handle back down to the unit by hand 7 Once the generator has started wait at least 30 seconds for it to warm up and then you may slowly open the choke lever until it is fully open or OFF 8 Connect all of your devices to the generator 9 Turn EcoMode switch to On This will reduce the output...

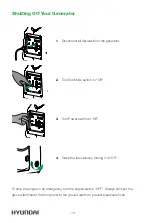
Страница 16: ...rn the engine switch OFF Always connect the ground terminal at the front panel to the ground earth to prevent electrical shock 1 Disconnect all devices from the generator 2 Turn EcoMode switch to Off 3 Turn Power switch to Off 4 Close the fuel valve by turning it to Off ...

Страница 17: ...can be used while the AC power is in use If you use both at the same time be sure not to exceed the total power for AC and DC Before connecting a device to the generator make sure the electrical rating of the device does not exceed the electrical rating of the generator Be sure the device is turned off before plugging in the power cord When the output indicator light green is OFF and the overload ...

Страница 18: ...too much gasoline in the cylinder If this happens wait for 5 to 10 minutes for the engine to cool down before starting The engine will stop automatically when it is out of gasoline When the output indicator light green does not light and the overload indicator light red lights instead set the engine switch to STOP stop the engine at once and then start the engine again If the engine stops and cann...

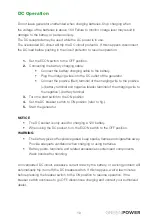
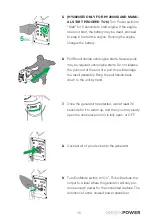
Страница 19: ...l and negative black terminal of the charging wire to the negative battery terminal 3 Turn the start switch to the ON position 4 Set the DC breaker switch to ON position refer to fig 5 Start the generator NOTICE The DC socket is only used for charging a 12V battery When using the DC socket turn the ECON switch to the OFF position WARNING The battery gives off explosive gases keep sparks flames and...

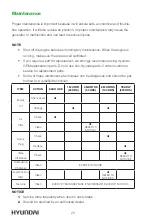
Страница 20: ...s Do not use non Hyundai parts Contact customer service for replacement parts Some of these maintenance techniques can be dangerous and should be per formed by a qualified technician ITEM ACTION EACH USE 1 MONTH 20 HRS 4 MONTHS 50 HRS 6 MONTHS 100 HRS YEARLY 200 HRS Engine Oil Check Level Change Air Filter Check Clean REFER TO NOTICE 1 Spark Plug Check Replace Valve Clearance Check REFER TO NOTICE...

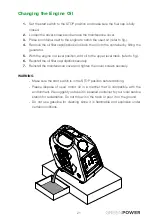
Страница 21: ...l position add oil to the upper level mark refer to fig 6 Reinstall the oil filler cap dipstick securely 7 Reinstall the maintenance cover and tighten the cover screws securely WARNING Make sure the start switch is in the STOP position before draining Please dispose of used motor oil in a manner that is compatible with the environment We suggest you take it in a sealed container to your local serv...

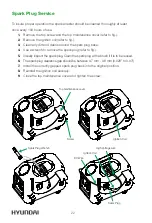
Страница 22: ... Use a wrench to remove the spark plug refer to fig 5 Visually inspect the spark plug Clean the spark plug with a brush if it is to be reused 6 The spark plug clearance gap should be between 0 7 mm 0 8 mm 0 028 to 0 03 7 Install the correctly gapped spark plug back into the original position 8 Reinstall the ignition coil securely 9 Close the top maintenance cover and tighten the screw Spark Plug W...

Страница 23: ...w any remaining fuel to drain into the pot fefer to fig 3 Start the generator and allow fuel remaining in carburetor bowl to be used Once the generator shuts off it can be stored DRAIN OIL 1 Set the start switch to the STOP position and make sure the fuel cap is closed tight 2 Loosen the cover screws and remove the maintenance cover 3 Place a container next to the engine to catch the used oil 4 Re...

Страница 24: ... or lead to hazardous conditions For more information please refer to the troubleshoot guide below WARNING Many troubleshooting procedures present hazards which can result in severe personal injury or death Only trained and experienced service personnel with knowledge of fuels electricity and machinery hazards should perform service procedures Review Safety Precautions A hot generator can cause se...

Страница 25: ...sconnect load before starting 2 Incorrect oil being used Please refer to the oil usage chart on page 29 in your user s guide 3 Fouled spark plug replace with equal or greater quality plug Refer to page 29 in your user s guide for a complete list of spark plug compatibility codes Generator does not produce power No indicator lights or display on front panel 1 Generator circuit breaker off or trippe...

Страница 26: ... local service centre or contact Midland Intl Inc at 1 877 528 3772 Generator overheats Operation is normal when generator is cool overheating occurs within moments of start up 1 Atmospheric temperature high excess of 35 C 2 Insufficient air circulation in vicinity of generator 3 Low oil viscosity use 10W40 when temperatures exceed 30 C 10W30 for temperatures between 0 30 C and 5W40 for temperatur...

Страница 27: ...el Always ensure high oil levels and use oil according to oil usage chart in user guide on page 31 6 Fouled spark plug replace with equal or greater quality plug Refer to page 29 in your user s guide for a complete list of spark plug compatibility codes Thick smoke released from exhaust Exhaust fumes thick and dark 1 Adjust choke lever 2 Incorrect oil being used Use oil according to oil usage char...

Страница 28: ...e 150CC Hyundai Motor START Manual Recoil Manual Recoil and Electric Start OUTLETS Two 120V 21 6A AC One 12V 8 3A DC Two 120V 21 6A AC One 12V 8 3A DC One USB FUEL CAPACITY 4 5 L 4 5 L MAX AC OUTPUT 2200W 2800W FUEL TYPE Unleaded Gasoline Mini mum Octane of 91 Unleaded Gasoline Mini mum Octane of 91 RUNNING TIME 4 2 hours 75 3 7 hours 75 NOISE LEVEL 64dB 7m 65dB 7m FRAME 33 mm Polypropylene 33 mm ...

Страница 29: ...E TEMPERATURE SEASON 5W40 0 below Winter 10W40 20 to 5 Spring Fall 15W40 20 Summer 10W30 25 to 15 All season SPARK PLUG COMPATIBILITY BRAND HY2000SI HY2800SEI NGK CR7HS CR7HS DENSO U20FPR U20FPR CHAMPION RZ10YC RZ10YC BOSCH U24BC U24BC ...

Страница 30: ...R SWITCH It protects DC circuits from being damaged due to overload or short circuit by stopping the flow of electricity between the generator and device DC SOCKET The receptacle used for charging a 12 V battery DIPSTICK It seals off engine oil fill hole and is used for indicating the engine oil level DRAIN PLUG A plug that can be removed to allow the fluid contents of the engine to be drained off...

Страница 31: ...es that the generator is producing power at the receptacles OVERLOAD INDICATOR LIGHT If the generator is overloaded or if there is a short circuit in a connected device the overload indicator light red will go ON It will stay ON and after about four seconds the device will shut off and the output indicator light green will go OFF RECOIL STARTER A pull cord is attached to the engine and you pull th...

Страница 32: ...tart at anytime under any circumstances This limited warranty is valid for residential or recreational applications only and only when the generator receives all necessary preventative maintenance as described in the Hyundai Generators User Guide The repair or replacement of a generator will take place within a reason able period of time during normal business hours All repair and replacement part...

Страница 33: ...used by lack of maintenance as described in the Hyundai User Guides or negligence by using improper or impure motor oil coolant or fuel 3 Damage caused by accidents improper installation or storage 4 Damage caused by water ingestion submersion or external water damage 5 Damage or non performance caused by operation of the generator set in a marine application 6 Damage caused by operation with impr...

Страница 34: ...ONS CALIFORNIA The California Air Resources Board and Midland Power Inc are pleased to explain the emission control system warranty on your Midland Power Inc engine In California new spark ignited small off road equipment engines must be designed built and equipped to meet the State s stringent anti smog standards OTHER STATES U S TERRITORIES AND CANADA In other areas of the United States and in C...

Страница 35: ...ceipt copy If you wish you can confirm your registration by calling customer service at or by e mail at support hyundaipower ca Please allow one week for mail delivery and processing after sending us your registration PLEASE MAIL ALL ITEMS TO Midland Power Inc Product Registration 376 Magnetic Drive Toronto ON M3J 2C4 Canada Product Information Serial Number Model Name Initial Date of Purchase YYY...

Страница 36: ...36 ...

Страница 37: ...r or on the exterior of the packaging Initial Date of Purchase YYYY MM DD Warranty Expiration Add 2 years to initial date of purchase YYYY MM DD Date of Transfer YYYY MM DD NOTE Transfer of ownership does not act as a warranty extension The original 2 Year Warranty is effective as of the Initial Date of Purchase and continues after ownership has transfered New owners should be made aware of expire...

Страница 38: ...38 ...

Страница 39: ...39 Enjoy Be sure to check www hyundaipower ca for updates regarding your generator ...

Страница 40: ......

Страница 41: ...HYUNDAI ONDULEUR PORTATIF MANUEL D UTILISATION ...

Страница 42: ...ghts Reserved Licensée par Hyundai Corporation Korea HY_UG_FR_1114 L échappement du moteur de ce produit contient des produits chimiques reconnus pour causer le cancer des malformations congénitales ou d autres troubles de la reproduction ...

Страница 43: ...nérateur et des batteries Ce guide d utilisation décrit les procédures de sécurité de fonctionnement et d entretien du HY2000si et HY2800sei Toutes les informations de cette publication sont basées sur les informations du plus récent produit disponibles au moment de mettre sous presse Si un problème se présente veuillez nous contacter en suivant les informations à la fin de ce manuel Il est import...

Страница 44: ...t 9 Vérification Du Niveau D essence 10 Vérification Du Filtre À Air 11 UTILISATION DE VOTRE GÉNÉRATEUR 12 Fonctionnement 12 Utilisation De L ensemble Du Générateur 14 Arrêter le moteur du générateur 16 Entretien de votre générateur 17 Pour Un Fonctionnement CC 19 ENTRETIEN 20 Programme d entretien 20 Changer L huile À Moteur 21 Entretien De La Bougie D allumage 22 Transport Et Entreposage 23 DÉPA...

Страница 45: ...générateur à l intérieur INSTRUCTIONS DE FONCTIONNEMENT Faites marcher le générateur selon les instructions pour un service fiable et sécuritaire Faites toujours une inspection pré fonctionnement avant de démarrer le moteur Nettoyez et entretenez l équipement Assurez vous de lire et d assimiler toutes les étiquettes d avertissement L essence est un liquide hautement inflammable et explosif Assurez...

Страница 46: ...FF si l appareil commence à marcher de façon anormale Puis déconnectez le et cherchez le problème Vérifiez que la classification électrique de l appareil n excède pas celle du générateur Si le niveau de puissance de l appareil se place entre la puissance maximale de sortie et la puissance de fonctionnement du générateur celui ci ne devrait pas être utilisé pendant plus de 10 minutes Les connexions...

Страница 47: ...Générateurs vibrent en utilisation normale Pendant et après l utilisation du générateur vérifier le générateur ainsi que les rallonges et les cordons d alimentation reliés à elle pour les dommages résultant des vibrations Faites réparer ou remplacer les parties endommagées si nécessaires Ne pas utiliser des bouchons ou des cordons qui montrent des signes de dommages tels qu une isolation cassée ou...

Страница 48: ...Lumière HY2000si Panneau Avant HY2800sei Panneau Avant Levier étrangleur Poire d amorçage Valve d essence Couvercle de la batterie Couvercle arrière Couvercle d entretien Panneau de contrôle Couvercle d essence Couvercle d entretien Poignée de démarrage Bouton ECON 12 V DC Circuit Breakers Huile Bas Attention Lumière Pret A Utiliser Attention Lumière Surcharge Attention Lumière Bouton marche arrêt...

Страница 49: ...eau d huile en insérant la jauge dans le col du filtre sans la faire tourner 3 Si le niveau est bas remplissez jusqu à la limite supérieure du col du filtre avec l huile recommandée 4 Réinstallez le couvercle d entretien et resserrez les vis NOTE Le système d alerte de niveau d huile est conçu pour prévenir des dommages au moteur causés par une quantité d huile insuffisante dans le carter Avant qu...

Страница 50: ...rder le moteur éloigné des cigarettes des flammes vives de la fumée et ou des étincelles Remplissez dans un endroit bien ventilé et avec le moteur éteint Ne faites le remplissage qu à l extérieur Nettoyez immédiatement toute fuite Évitez que la poussière ou de l eau entre dans le réservoir N utilisez jamais de mélange d huile essence ou de l essence usagée N utilisez pas de carburant contenant de ...

Страница 51: ...du filtre en la plongeant dans de l essence l anneau à l extérieur avant de réinstaller 4 Remplissez le filtre à air tous les 2 ans 24 mois ou si nécessaire POUR NETTOYER L ÉPONGE Nettoyez l éponge dans de l eau savonneuse ou un détergent non inflammable Laissez sécher avant de la replacer Plongez l éponge dans une huile à moteur propre et comprimez la pour en extraire l huile en surplus Le moteur...

Страница 52: ... la batterie de l unité en dévissant la vis en haut du panneau et libérez le panneau 2 POUR LES HY2800SEI Connecter la batterie trouvez et connectez les raccords lâches de la connexion de faisceau de fils et du faisceau principal La batterie est maintenant connectée à l unité 3 POUR LES HY2800SEI Réinstallez le panneau d accès à la batterie Vérifiez que la vis est bien vissée 4 Enlevez le panneau ...

Страница 53: ...errez bien Essuyez tout excès d huile Pour de meilleurs résultats videz et remplissez l huile après 20 h d utilisation et toutes les 50 heures ensuite N enlevez pas la jauge d huile quand le moteur est encore chaud après usage 8 Réinstallez le panneau d accès au moteur sur l unité en vérifiant que les 2 vis sont correctement vissées 9 Enlevez le capuchon de l essence exposant ainsi le réservoir d ...

Страница 54: ...anchés sur le générateur 2 Ouvrez la valve d essence tournez lasur ON Vérifiez que la valve est totalement tournée sur ON 3 Tournez l étrangleur en position fermée Laissez l étrangleur en position ouverte si le générateur est encore chaud après une utilisation récente ou si la température de l air est supérieure à 10 C 50 F 4 Appuyez sur la poire d amorçage 15 20 fois à déplacer le combustible dan...

Страница 55: ... sur la jauge 7 Réinstallez la jauge d essence et serrez bien Essuyez tout excès d huile Pour de meilleurs résultats videz et remplissez l huile après 20 h d utilisation et toutes les 50 heures ensuite N enlevez pas la jauge d huile quand le moteur est encore chaud après usage 8 Réinstallez le panneau d accès au moteur sur l unité en vérifiant que les 2 vis sont correctement vissées 9 Enlevez le c...

Страница 56: ...mode pendant 2 minutes 3 Tournez le commutateur sur OFF 4 Fermez la valve d essence en la tournant sur OFF Arrêter le moteur du générateur Pour arrêter le moteur en cas d urgence tournez le bouton du moteur sur OFF Connectez toujours la mise à terre qui se trouve sur le paneau à la masse terre pour éviter tout choc électrique ...

Страница 57: ...allonges à 60 m pour un câble d une épaisseur de 1 5 mm et 100 m pour un câble de 2 5 mm d épaisseur Gardez le générateur loin des autres câbles électriques comme un réseau de distribution La prise CC peut être utilisée avec la puissance AC Si vous utilisez les deux en même temps assurez vous de ne pas dépasser la puissance totale pour AC et CC Avant de connecter un appareil au générateur vérifiez...

Страница 58: ... utile du générateur Si le niveau d huile tombe sous une limite sécuritaire l indicateur de niveau d huile bas rouge s allumera et le moteur s arrêtera automatiquement Si le moteur s arrête ou si la lumière de bas niveau s allume quand vous tirez la poignée de démarrage vérifiez le niveau d huile du moteur avant d aller plus avant ...

Страница 59: ...atterie à la batterie Branchez le câblage de chargement dans la sortie CC du générateur Connectez le terminal positif rouge du câble de chargement au terminal positif de la batterie et le terminal négatif noir du câble de chargement au terminal négatif de la batterie 3 Tournez le bouton de démarrage sur ON 4 Installez le disjoncteur de surcharge sur ON 5 Démarrez le générateur NOTE La prise femell...

Страница 60: ...e service à la clientèle pour les pièces de rechange Certaines des techniques d entretien peuvent s avérer dangereuses et devraient être faites par un technicien qualifié ARTICLE Action CHAQUE UTILIS 1 Mois 20 h 4 Mois 50 h 6 Mois 100 H chaque ANNÉE 200 h HUILE À MOTEUR Vérifier le niveau Changer FILTRE À AIR Vérifier Nettoyer se référer à notice 1 BOUGIE D ALLUMAGE Vérifier REMPLACER JEU DE SOUPA...

Страница 61: ...au ajoutez de l huile jusqu à la marque de niveau la plus haute 6 Réinstallez le couvercle la jauge sécuritairement 7 Réinstallez le couvercle d entretien et serrez les vis sécuritairement ATTENTION Vérifiez que le bouton de démarrage est sur STOP avant de drainer Veuillez vous débarrasser de l huile usagée d une façon compatible avec l environnement Nous suggérons que vous preniez un contenant sc...

Страница 62: ...ge Voir figure ci dessus 5 Inspectez visuellement la bougie Nettoyez la avec une brosse si vous devez la réutiliser 6 L espace de dégagement de la bougie devrait être entre 0 7 mm et 0 8 mm 0 028 po à 0 03 po 7 Installez la bougie d allumage à l écartement correct dans sa position initiale 8 Réinstallez la bobine d allumage 9 Fermez le couvercle d entretien du haut et serrez les vis Clé de serrage...

Страница 63: ...nt restant se drainer dans le pot Voir figure page suivante 3 Démarrez le générateur et laissez le carburant restant dans le carburateur être utilisé Une fois que le carburateur s éteint il peut être entreposé DRAINER L HUILE 1 Mettez le bouton d allumage sur STOP et vérifiez que le capuchon du carburant est bien fermé 2 Desserrez les vis du couvercle et enlevez le couvercle d entretien 3 Placez u...

Страница 64: ...s conditions dangereuses Pour plus d information veuillez vous référer au guide de dépannage ci dessous ATTENTION Beaucoup de procédures de dépannage présentent du danger et peuvent causer des blessures voire la mort Seul un personnel entraîné et expérimenté avec des connaissances en carburants électricité et les dangers de la machin erie devrait procéder à des réparations Revoyez les Précautions ...

Страница 65: ...arrer 2 Ce n est pas la bonne huile Référez vous au diagramme d utilisation de l huile en page 29 du Manuel de l usager 3 Bougie souillée remplacez la avec une bougie d allumage de qualité égale ou supérieure Voir page 29 du Manuel de l usager pour une liste complète des codes de compatibilité Le générateur ne produit pas de puissance Aucune indication ni lumière ou indicateur sur le panneau avant...

Страница 66: ...c de sortie maximum du générateur Le moteur tourne à un ralenti inhabituellement haut ou bas 1 Le carburateur a besoin de réglage Pour les détails sur la façon d ajuster correctement veuillez contacter votre centre de service lo cal ou Midland au 1 877 528 3772 Le générateur surchauffe Le fonctionnement est normal quand le générateur est froid la surchauffe advient quelques instants après le démar...

Страница 67: ... obstrué par des débris Nettoyez le selon les instructions du Manuel de l usager page 11 4 Ajustez le levier de l étrangleur 5 Pas assez d huile utilisée ou niveau d huile insuffisant Assurez vous toujours d avoir de hauts niveaux d huile et utilisez l huile selon le diagramme dans le Manuel de l usager page 29 6 La bougie d allumage est souillée rem placez la par une bougie de qualité égale ou su...

Страница 68: ...cc 5 3 HP 5500 RPM à 4 temps DÉMARRAGE Manuel Manuel et électrique SORTIES Deux 120 V 21 6 A CA Une 12 V 8 3 A CC Deux 120V 21 6 A CA Une 12V 8 3 A CC USB CAPACITÉ EN CARBURANT 4 5 l 4 5 l MAX CC 2200 W 2800 W FUEL TYPE Essence sans plomb Essence sans plomb TEMPS DE FONCTIONNEMENT 4 heures 20 à l utilisation de 75 de la puissance 3 heures 20 à l utilisation de 75 de la puissance NIVEAU DE BRUIT 64...

Страница 69: ...PE D HUILE TEMPÉRATURE SAISON 5W40 0 et dessous Hiver 10W40 De 20 à 5 Printemps automne 15W40 20 et plus Été 10W30 De 25 V à 15 Toutes les saisons COMPATIBILITÉ DE LA BOUGIE D ALLUMAGE MARQUE HY3000SEI NGK CR7HS DENSO U20FPR CHAMPION RZ10YC BOSCH U24BC ...

Страница 70: ...ège les circuits CC des dommages causés par une surcharge ou un court circuit en arrêtant le flot d électricité entre le généra teur et l appareil PRISE CC La prise utilisée pour charger une batterie de 12 V JAUGE Elle ferme l orifice de l huile de moteur et est utilisée pour indiquer le niveau d huile BOUCHON DE VIDANGE Bouchon qui peut être enlevé pour permettre au contenu fluide du moteur d êtr...

Страница 71: ...nctionne normalement Il indique que le générateur est le pouvoir au niveau des prises LUMIÈRE D INDICATEUR DE SURCHARGE Si le générateur est en surcharge ou s il y a un court circuit dans un appareil connecté cette lumière rouge se mettra sur ON Elle restera sur ON et après environ 4 secondes l appareil s éteindra et la lumière verte ira sur OFF LANCEUR À RAPPEL Un cordon de tirage est attaché au ...

Страница 72: ...s la date de l achat initial et ne redémarre pas à quelque moment que ce soit quelles que soient les circonstances Cette garantie limitée est valable pour les fonctionnements résidentiel et de loisirs seulement et seulement quand le générateur a reçu l entretien préventif nécessaire tel que décrit dans le Guide de l utilisateur des générateurs d Hyundai La réparation ou le remplacement se fera pen...

Страница 73: ...t dans les guides de l utilisateur d Hyundai ou la négligence par utilisation incorrecte ou d huile huile de moteur refroidissant ou carburant impurs 3 Dommages causés par des accidents une installation ou un entreposage incorrects 4 Dommages causés par l absortion d eau la submersion ou des dégâts d eau externes 5 Dommages ou non performance causés par une utilisation marine du générateur 6 Domma...

Страница 74: ...W HYUNDAIPOWER CA WARRANTY PHP Lorsque votre enregistrement est complet votre reçu sera en ligne et facilitera toute future réclamation La preuve de l achat peut être requise pour les réclamations de garantie Gardez un exemplaire du reçu original le code UPC et le numéro de série avec ce Guide SERVICE À LA CLIENTÈLE 1 877 528 3772 gratuit www hyundaipower ca GARANTIE DU SYSTÈME ANTIPOLLUTION Votre...

Страница 75: ...Si vous le désirez vous pouvez confirmer votre enregistrement en appelant le service à la clientèle ou par courriel à support hyundaipower ca Veuillez allouer une semaine pour la livraison du courrier et le traitement VEUILLEZ POSTER TOUS LES ARTICLES À Midland Power Inc Product Registration 376 Magnetic Drive Toronto ON M3J 2C4 Canada Information sur le produit Numéro de série Nom de modèle Date ...

Страница 76: ...ada des normes d émissions pour les moteurs à allumage par étincelle égale ou inférieure à 19 kW TOUS LES ETATS UNIS ET AU CANADA Midland Power Inc doit garantir le système antipollution de votre moteur pour produit mécanique pour la période indiquée ci dessous pourvu qu il n y ait pas d abus de négligence ou un mauvais entretien de votre moteur pour produit mécanique Si une telle condition existe...

Страница 77: ...e propriété Information sur le produit Numéro de série Nom de modèle Le numéro de série se trouve sur le générateur ou à l extérieur de l emballage Date d achat initial AAAA MM JJ Expiration de la garantie Ajoutez deux ans à la date de l achat initial AAAA MM JJ Date du transfert AAAA MM JJ Carte pour le transfert de propriété et de garantie Numéro et nom de la rue Ville Prénom Nom de famille Entr...

Страница 78: ...38 ...

Страница 79: ...39 Profitez en Veuillez vérifier chaque mois sur hyundaipower com les mises à jour éventuelles concernant votre générateur ...

Страница 80: ......
Отзывы: