background image

Installation 

Owner's Manual 


44 


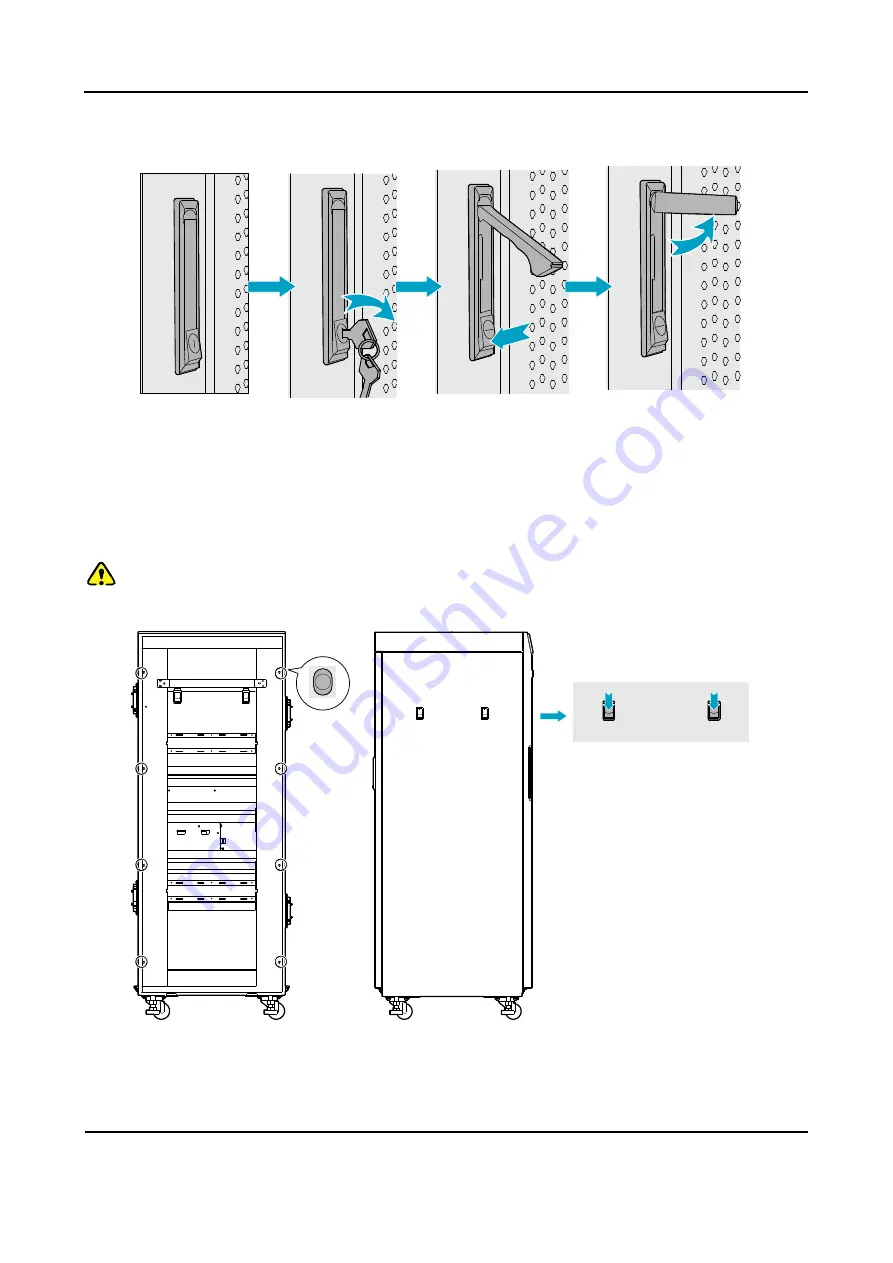
4.  Pull the door knob outwards and open the cabinet door.   


Figure 3-7 Opening the Cabinet Door 

Step 2 

Disassemble the side doors as shown in 

Figure 3-9. 


1.  Remove the eight screws on the frame.   

2.  Press down on the two latches and pull out the side door outwards. 

Caution:   

Care shall be taken to avoid injuries upon pulling out the side door outwards.   


Figure 3-8 Disassembling the Side Door 

Step 3 

Insert the modules into the cartridge (take the BSCU installation for example)   

Содержание DS-6210U5C4

Страница 1: ...DS 6210U5C4 Base Station Owner s Manual Version V00 Release Date Oct 2012 ...

Страница 2: ......

Страница 3: ... Base Station Controller Unit BSCU 16 2 4 1 Function 16 2 4 2 Front Panel 17 2 4 3 LED Indicator 18 2 5 Power Supply Unit PSU 19 2 5 1 Function 19 2 5 2 Front Panel 20 2 5 3 LED Indicator 21 2 6 Interconnect Backboard ICB 22 2 6 1 Front View 22 2 6 2 Rear View 23 2 7 FAN 25 2 7 1 Front Panel 25 2 7 2 LED Indicator 25 2 7 3 Rear Panel 26 2 8 Divider Unit DIU 27 2 8 1 Function 27 2 8 2 Front Panel 2...

Страница 4: ...n 39 3 4 1 Check before Unpacking 39 3 4 2 Unpacking Wooden Case 39 3 4 3 Unpacking Cartons 40 3 4 4 Inspections 41 3 5 Installing the Cabinet 41 3 5 1 Determine the Installation Position 41 3 5 2 Installing the Cabinet 42 3 6 Installing Modules into the Cabinet 43 3 6 1 Module Layout 43 3 6 2 Installation Procedures 43 3 7 Installing Cables 47 3 7 1 Equipment Status 47 3 7 2 Cables 47 3 8 Examina...

Страница 5: ...Owner s Manual Contents iii 4 1 Powering on 52 4 2 Powering off 52 5 Troubleshooting 53 6 Routine Maintenance 54 6 1 Purpose 54 6 2 Tasks 54 A Abbreviations 55 ...

Страница 6: ...r Panel of FAN 26 Figure 2 15 Logical Diagram of DIU 27 Figure 2 16 Front Panel of DIU 27 Figure 2 17 Rear Panel of DIU 28 Figure 2 18 Front Panel of Router 29 Figure 2 19 Rear Panel of Router 30 Figure 2 20 Front Panel of IP E1 32 Figure 2 21 Rear Panel of IP E1 33 Figure 2 22 Logical Diagram of 4 port Combiner 34 Figure 2 23 Rear Panel of COM 34 Figure 3 1 Cable Layout 36 Figure 3 2 Removing the...

Страница 7: ...Owner s Manual Figures v Figure 3 13 Installing the Divider Unit 46 Figure 3 14 Installing the Combiner Unit 47 Figure 3 15 Cable Diagram 47 Figure 3 16 External Cable Connection 48 ...

Страница 8: ...es of ICB 24 Table 2 14 DIP Switch Settings for ICB 25 Table 2 15 Descriptions on FAN Indicators 26 Table 2 16 Descriptions on Rear Panel of FAN 26 Table 2 17 DIP Switch Settings for FAN 27 Table 2 18 Descriptions on Front Panel of DIU 28 Table 2 19 Descriptions on Rear Panel of DIU 28 Table 2 20 DIU Address Settings 29 Table 2 21 Descriptions on Front Panel of Router 29 Table 2 22 Descriptions on...

Страница 9: ...Owner s Manual Tables vii Table 5 1 Troubleshooting 53 ...

Страница 10: ... Manual 8 1 Checking Items in the Package No Item Qty PCS 1 Base Station Controller Unit BSCU 1 2 Channel Unit CHU 4 3 Power Support Unit PSU 2 4 Fan Unit 1 5 Divider Unit DIU 1 6 Combiner Unit COM 1 7 Cabinet Kit 1 Figure 1 1 Packing List ...

Страница 11: ...e Units of 4 carrier Base Station The interface units on the top of the cabinet consist of the antenna connector extended interface board EIB and power supply interface See Figure 2 1 Figure 2 1 Interface Units of 4 carrier Base Station No Name Description 1 Antenna Connector It contains the GPS antenna connector RX antenna ...

Страница 12: ...face Units of 4 carrier Base Station 2 1 1 Antenna Connector The antenna connector is illustrated below Figure 2 2 Antenna Connector of 4 carrier Base Station No Name Description 1 TX Antenna Connector TX RX N connector female 2 RX Antenna Connector RX1 N connector female RX2 RX3 3 GPS Antenna Connector GPS1 N connector female GPS2 Table 2 2 Descriptions on Antenna Connector of 4 carrier Base Stat...

Страница 13: ...male E1 1 DB9 connector female E1 2 DB9 connector female E1 TX2 BNC connector female E1 RX2 BNC connector female 2 Cabinet Expansion Interface AUX Dedicated 72 pin interface 3 Ethernet Interface LAN1 RJ 45 connector LAN2 RJ 45 connector 4 Monitor Interface CAN DB9 connector female RS485 DB9 connector female Table 2 3 Descriptions on EIB of 4 carrier Base Station ...

Страница 14: ...f another cabinet in case of interconnecting two cabinets Monitor Interface The monitor interface includes one CAN BUS interface and one RS485 interface 2 1 3 Power Supply Interface The power supply interface is illustrated below Figure 2 4 Power Supply Interface of 4 carrier Base Station No Name No Name 1 Ground Bar 2 AC Input Breaker 3 AC Input Terminal 4 Surge Protection Device SPD 5 SPD Breake...

Страница 15: ...igure 2 5 Full Configuration for MC 2 3 Channel Unit CHU The CHU logically includes power amplification TX excitation unit baseband signal processing unit and diversity receiver See Figure 2 6 RX Antenna 3 PA TX Excitation Unit Baseband Signal Processing Unit Power Diversity Receiver TX Antenna ICB RX Antenna 2 RX Antenna 1 Figure 2 6 Logical Architecture of CHU 2 3 1 Function The CHU processes an...

Страница 16: ...d D A conversion from carrier baseband signal to RF signal as well as the downlink signal amplification RXB capable of filtering demodulation downward frequency conversion AGC and A D conversion from three path carrier signal to baseband signal as well as uplink signal amplification 2 3 2 Front Panel The front panel of the CHU is illustrated below Figure 2 7 Front Panel of CHU No Name Description ...

Страница 17: ...wered on The CHU is powered on Off The CHU is powered off The CHU is powered off RUN Green Flashing The CHU runs properly Off The CHU does not run properly The CHU is in sleep mode TX Green On Data is present on downlink slot 2 of the CHU Off Data is present on downlink slot 1 of the CHU The CHU is in sleep mode RX Green On Data is present on the uplink of the CHU Data is present on the uplink of ...

Страница 18: ...the CHU will turn to sleep mode 2 4 Base Station Controller Unit BSCU The BSCU logically consists of GPS board main control board synchronizing buffer Ethernet switch micro processor unit and power supply See Figure 2 8 BSCU GPSB GPS Board BSCU MCB Main Control Board Synchronizing Buffer Ethernet Switch RS232 MPU Micro Processor Unit Power Supply CLK CNT LAN1 LAN11 CAN RS 485 DC IN BSCU ICB GPS RS...

Страница 19: ...el of the BSCU is illustrated below Figure 2 9 Front Panel of BSCU No Name Qty Description Description 1 Video graphics array 1 For debugging DB15 connector female 2 USB Interface 4 For debugging A connector female 3 RS232 Interface 1 For debugging DB9 connector male ...

Страница 20: ...U is working in master mode Flashing slowly The BSCU is working in slave mode Off The BSCU is being initialized or malfunctions GPS Green Flashing Functions are disabled locally On Functions are disabled via GPS Off Functions are enabled via GPS ALM Red On The BSCU is alarming Off The BSCU works properly CHU1 4 Green On The link between BSCU and CHU is present Flashing Data is being transmitted or...

Страница 21: ... active BSCU MCB Green On The link between BSCU and MCB is present Flashing Data is being transmitted or received over the link between BSCU and MCB Off The link is abnormal or not connected between BSCU and MCB LAN1 2 Green On The link between BSCU and LNA is present Flashing Data is being transmitted or received over the link between BSCU and LAN Off The link is abnormal or not connected between...

Страница 22: ... other CHU power supply LVCC 13 5V DC 5 Voltage Output for BSCU BSC_V 13 2V DC 6 I O Interface It is connected to 2 BSCUs and outputs three channel signals The first two are used for resetting PSU and the last for installation status of PSU 7 Monitor Interface It is connected to 2 BSCUs It is connected to 2 BSCUs Table 2 9 Descriptions on PSU 2 5 2 Front Panel The front panel of the PSU is illustr...

Страница 23: ...Ds 1 LED indicator 2 ON OFF Switch 1 Power switch Table 2 10 Descriptions on Front Panel of PSU 2 5 3 LED Indicator The PSU indicators are described in Table 2 11 LED Indicator Color Status Description ALM Red Glowing solidly A major alarm exists Flashing A minor alarm exists Off No alarm exists ...

Страница 24: ...C alarm Flashing rapidly The second power module outputs HVCC and LVCC alarm simultaneously Off The second power module is not installed BSC Green Glowing solidly The voltage for the BSC is normal Flashing An alarm is issued due to over voltage or low voltage for the BSC Off The first or second power module is not installed Table 2 11 Descriptions on PSU Indicators Note The power module has two ou...

Страница 25: ...y Description 1 CHU Interface 4 For signal from CHU to ICB 2 BSCU Interface 2 For signal from BSCU to ICB 3 PSU Interface 2 For signal from PSU to ICB Table 2 12 Descriptions on Front Interfaces of ICB 2 6 2 Rear View The rear view and interfaces of the ICB are described below ...

Страница 26: ...connecting two EC cartridges and four IRUs between two cabinets It also works as the signal interface from EIB to ICB in the core network interface board 4 DC Power Inlet 1 DC power input 48V 5 AC Power Inlet 1 AC power input 110V 220V 6 Power Outlet 6 DC power 13 2V for FAN and DIU 7 DIP Switch 1 For setting the cartridge address 8 Monitor Interconnection Interface 2 RS485 bus DB9 connector male ...

Страница 27: ... Table 2 14 DIP Switch Settings for ICB 2 7 FAN The FAN consists of a fan cartridge and a pluggable fan tray and can accommodate six fans In the fan tray three temperature sensors are installed 2 7 1 Front Panel The front panel of the FAN is illustrated below Figure 2 13 Front Panel of FAN 2 7 2 LED Indicator The FAN indicators are described in Table 2 15 Name Color Status Description PWR Red On T...

Страница 28: ...d DIU DB9 connector male female 2 DIP Switch 1 For setting the FAN address For details please refer to Table 2 17 3 Power Inlet 1 1 For connecting ICB 4 Power Inlet 2 1 For connecting ICB 5 CAN Monitor Interface 2 For connecting ICB and DIU DB9 connector male female 6 Ground Interface 1 Table 2 16 Descriptions on Rear Panel of FAN The settings of the DIP switch are described in Table 2 17 No 1 2 3...

Страница 29: ... 8 Divider Unit DIU The DIU is 3U or 1U in height The logical diagram is shown below Band pass Filter LNA Digital Attenuator Power Divider RX RX RX RX CAN RS485 RX RX RX RX Figure 2 15 Logical Diagram of DIU 2 8 1 Function The DIU is to assign the received signal to each transceiver 2 8 2 Front Panel The front panel of the DIU is illustrated below Figure 2 16 Front Panel of DIU ...

Страница 30: ...on Front Panel of DIU 2 8 3 Rear Panel The rear panel of the DIU is illustrated below Figure 2 17 Rear Panel of DIU No Name Qty Description Remarks 1 SWITCH 1 DIP switch 2 RS485 2 Monitor interface 3 CAN BUS 2 Monitor interface 4 PWR 1 Power inlet 5 RXA 1 Diversity RX antenna A N connector female 6 RXB 1 RX antenna B N connector female 7 RXC 1 Diversity RX antenna C N connector female 8 1 Ground i...

Страница 31: ...X X The fourth DIU address Table 2 20 DIU Address Settings 2 9 Router 2 9 1 Function The router is a device that forwards message flow or packet data However if the IP EI is employed no router will be required 2 9 2 Front Panel The front panel of the router is illustrated below Figure 2 18 Front Panel of Router No Name No Name No Name 1 Power Switch 2 Power Socket 3 LEDs 4 USB Interface 5 RESET Bu...

Страница 32: ... 0 4 Fixed Switch Interface 1 5 Fixed Switch Interface 2 6 Fixed Switch Interface 3 7 Fixed Switch Interface 4 8 SIC DSIC Slot Table 2 22 Descriptions on Rear Panel of Router 2 9 4 LED Indicator The router indicators are described in Table 2 23 Name Status Description Front Panel PWR On The router is powered on Off The router is powered off SYS Green Flashing rapidly The router is starting Flashin...

Страница 33: ...sic BOOTROM is present Router Operation Flashing rapidly The router is operating under large traffic load Flashing slowly The router is operating normally Off The router is faulty Rear Panel LINK On A link is present Off No link is present ACT Flashing Data is being transmitted or received Off No data is being transmitted or received Table 2 23 Descriptions on Router Indicators 2 10 IP E1 If a rou...

Страница 34: ...disconnected DUP Full Duplex Half Duplex Indicator On The IP E1 is working in full duplex mode Off The IP E1 is working in half duplex mode 100M Operating Mode and Data TX RX Indicator On A 100 Mbps link is present Flashing Data is being received or transmitted at a rate of 100Mbps 10M Operating Mode and Data TX RX Indicator On A 10 Mbps link is present Flashing Data is being received or transmitt...

Страница 35: ...ignal input 7 75Ω Down TX E1 75ohm unbalanced port E1 signal output 8 120Ω Down E1 120ohm unbalanced port E1 signal input and output 9 75Ω Down RX E1 75ohm unbalanced port E1 signal input Table 2 25 Descriptions on Rear Panel of IP E1 2 11 Combiner COM The combiner is classified into broadband hybrid combiner manual tune cavity combiner and auto tune cavity combiner The broadband hybrid combiner i...

Страница 36: ...put Figure 2 22 Logical Diagram of 4 port Combiner Note This section takes one type of combiner as an example 2 11 1 Function The combiner is used to integrate multiple carriers from the base station sub system into one output port to transmit by an antenna 2 11 2 Rear Panel The rear panel of the COM is illustrated below Figure 2 23 Rear Panel of COM ...

Страница 37: ...n Remarks 1 ANT COM output N connector female 2 CH1 Carrier input 1 N connector female 3 CH2 Carrier input 2 N connector female 4 CH3 Carrier input 3 N connector female 5 CH4 Carrier input 4 N connector female Table 2 26 Descriptions on Rear Panel of COM ...

Страница 38: ... 3 1 Cable Layout The cable layout of base station is shown Figure 3 1 Figure 3 1 Cable Layout 3 2 Safety Information To reduce the chance of accident please read the safety precautions very carefully before installation maintenance and operations ...

Страница 39: ...ipment is well earthed before powering on Turn off the power immediately when water or moisture is found on the cabinet Make sure all switches of power distribution box are set to off before installation each module in the cabinet 3 2 2 Working at Heights Warning Cautions shall be taken to prevent objects from falling during working at heights Safety protection measures e g wearing a hamlet or the...

Страница 40: ...nual Other files Packing List Shipped with the equipment Table 3 1 Technical Files 3 3 2 Personnel Only the adequately trained personnel with satisfactory knowledge of the system can carry out the installation and tuning The number of installation persons is subject to engineering progress and environment 3 3 3 Tools The following tools and meter are required before installation General Tools Claw...

Страница 41: ...ipment and packing materials and take photo If the above check results are good unpack and check the equipment 3 4 2 Unpacking Wooden Case Caution Keep the wooden case far away from intense shock during transportation Never touch the parts with dirty glove during transportation If space permitting carry the wooden case into or near the computer room before unpacking This can prevent the chassis fr...

Страница 42: ... on the bottom cover to avoid bodily injuries Step 5 Using the same method remove the box surrounding the plank Step 6 Remove the foam plate Step 7 Slide the cabinet out of the wooden case slowly 3 4 3 Unpacking Cartons Tool Paper knife To open a carton do as follows Step 1 Check the type and quantity of articles inside the carton according to labels and cut the straps along the seam of the carton...

Страница 43: ...en accept them 3 5 Installing the Cabinet 3 5 1 Determine the Installation Position Determine the installation position of the cabinet according to the installation chart The available space for maintenance should be preserved and be no less than 600mm around the front and back door as shown in Figure 3 3 and Figure 3 4 Figure 3 3 Layout of holes for a Single Cabinet Wheel ...

Страница 44: ...cabinet in the planned position Fix the cabinet by tightening four bolts at the bottom of the cabinet as shown in Figure 3 5 1 Loosen the upper nut counter clockwise by the spanner 2 Loosen the lower nut counter clockwise by the spanner and lift the cabinet to an appropriate height 3 Tighten the upper nut and screw clockwise Figure 3 5 Tightening the Bolt Wheel ...

Страница 45: ...t Wiring Rack C H U C H U C H U C H U B S C U B S C U P S U P S U Wiring Rack FAN Wiring Rack DIU Router IP E1 COM Figure 3 6 of Module Layout 3 6 2 Installation Procedures Step 1 Open the front and back door as shown in Figure 3 7 1 Unlock and remove the key in case of the keyhole in a horizontal position 2 Firmly press PUSH until the door knob is bounced 3 Turn the door knob to the right ...

Страница 46: ...ide doors as shown in Figure 3 9 1 Remove the eight screws on the frame 2 Press down on the two latches and pull out the side door outwards Caution Care shall be taken to avoid injuries upon pulling out the side door outwards Figure 3 8 Disassembling the Side Door Step 3 Insert the modules into the cartridge take the BSCU installation for example ...

Страница 47: ... BSCU along the guide rails smoothly as shown in Figure 3 10 1 3 Perform the step 1 in a reverse way to lock the two ejectors 4 Tighten the two screws on the two ejectors and the board respectively as shown in Figure 3 10 2 Note Loosen the two ejectors and draw out the module in case of removing it during installation Figure 3 10 Installing the BSCU Step 4 Install the FAN as shown in Figure 3 11 ...

Страница 48: ...installation if you have to take out the FAN please first unfasten the screws and then unlock the first panel finally pull the FAN out See Figure 3 12 Step 5 Install the DIU as shown in Figure 3 13 1 Slide the DIU along the guide rails 2 Fasten all screws to fix the DIU Figure 3 13 Installing the Divider Unit Step 6 Install the COM as shown in Figure 3 14 1 Slide the COM along the guide rails 2 Fa...

Страница 49: ...rs 1 Align the side door with the frame and firmly press the latch 2 Fasten the eight screws 3 7 Installing Cables 3 7 1 Equipment Status The equipment shall be in the following status before connecting cables The cabinet has been installed All modules have been installed and the power switch is set to OFF 3 7 2 Cables Cables are described in Table 3 3 and their positions are shown in Figure 3 16 ...

Страница 50: ...o the investigating data on the site RF Jumpers 3 pcs Black 1 2 inch N Male to N Male 3Pcs Table 3 3 Cables Description Figure 3 16 External Cable Connection No Name No Name 1 GPS Antenna Interface 2 RX Interface 3 TX Interface 4 Communication Interface 5 Ground Interface 6 Power Inlet Table 3 4 Descriptions on the interface of external cable connection Note Install the power cable properly Do han...

Страница 51: ...the cabinet should conform to the design drawing 2 All modules should be installed correctly 3 All cables within the cabinet should be connected properly 4 The side door should be installed and the grounding cables should be connected properly 5 All screws should be tightened Be sure to put flat washers and spring washers on all bolts correctly 6 The cabinet should be placed horizontally and order...

Страница 52: ...of the Disconnector in the BSIU is set to ON Step 3 All switches of the PSU are set to ON Step 4 Check whether all modules are powered properly Name Normal Power Indication CHU The PWR indicator on the front panel glows and the ALM indicator goes out BSCU The PWR indicator on the front panel glows and the ALM indicator goes out PSU The PWR indicator on the front panel glows and the ALM indicator g...

Страница 53: ... The equipment room should be clean and tidy 2 No sundries should be placed in the grooves at the bottom of the cabinet or around the cabinet 3 The floor in the equipment room should be free from sundries Table 3 8 Checklist of Environment on Site ...

Страница 54: ...ernal power supply is connected Step 2 The switch of the Disconnector is set to ON Step 3 All switches of the PSU are set to ON 4 2 Powering off Step 1 All switches of the PSU are set to OFF Step 2 The switch of the Disconnector is set to OFF Step 3 Disconnect the external power supply ...

Страница 55: ... Solution The PWR LED does not light up Check the power supply The ALM LED on the PSU glows red Disconnect the power and replace the PSU The ALM LED on the CHU glows red Replace the CHU The ALM LED on the BSCU glows red Replace the BSCU Table 5 1 Troubleshooting ...

Страница 56: ...nance should achieve the following objects Remove all potential troubles to keep the system work properly Ensure all performance and service specifications meet requirements Ensure good collaboration with the entire network Make sure that new equipment or the extended equipment accesses to the network properly 6 2 Tasks Clean the equipment room regularly Check the working status of the base statio...

Страница 57: ...ork CC Call Control CCL Call Control Layer CHB Channel Board CHU Channel Unit COM Combiner CPCI Compact Peripheral Component Interconnect DIU Divider Unit DLL Data Link Layer EC Extended Chassis EIB Extended Interface Board ETSI European Telecommunications Standards Institute FAN Fan Unit GPI General Purpose Input GPIO General Purpose Input Output GPO General Purpose Output GPS Global Positioning ...

Страница 58: ...anagement MPSC Machine Frame Power Support Component MPU Micro Processor Unit PAB Power Amplifier Board PCI Peripheral Component Interconnect PICMG PCI Industrial Computer Manufacture s Group PDT Professional Digital Trunking PSB Package Switch Board PSU Power Support Unit RFDS Radio Frequency Distributing System RT Router RXB Receive Board TDM Time Division Multiplex TMA Tower Mounted Amplifier T...

Страница 59: ...Owner s Manual Routine Maintenance 57 Abbr Full Name VGA Video Graphics Array ...

Страница 60: ...gulations this radio transmitter may only operate using an antenna of a type and maximum or lesser gain approved for the transmitter by Industry Canada To reduce potential radio interference to other users the antenna type and its gain should be so chosen that the equivalent isotropically radiated power e i r p is not more than that necessary for successful communication Le présent appareil est co...

Страница 61: ...n ICES 003 IC Radiation Exposure Statement This equipment complies with IC RF radiation exposure limits set forth for an conjunction with any other antenna or transmitter This equipment should be installed and operated with minimum distance 2 5m between the radiator your body Le present matériel est conforme aux specifications techniques applicables d Industrie Canada Owner s Manual Routine Mainte...

Отзывы: