background image

EN-GB - 20

HYENA E-BIKE SYSTEMS 

Notes

•  The battery is equipped with a Battery Management System (BMS). It is designed to 

protect a fully discharged battery from damage.  
However, in order to maintain the best possible battery performance and lifespan, Hyena 
recommends regularly recharging your battery to at least 80% of the full capacity.

•  The Li-ion batteries gradually lose capacity depending on age and use.  

A significantly reduced operating range after charging can be a sign that the battery 

is reaching the end of its useful life and has to be replaced.

► Charging procedure

•  The battery can always be charged, regardless of the current charge level. 
•  The charging can be interrupted at any moment. Interrupting the charging process will 

not damage the battery. 

•  Please perform charging in environments between 0°C (32°F) and 40°C (104°F).

⚠ 

CAUTION

Always turn off the assist system manually before charging.

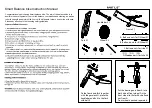
1. Open the cover of the charging socket on the e-bike, or, when installed, the cover on the 

(optional) range extender battery.

2. Connect the charging plug with the charging socket on the battery.


Charging socket on the frame 


  Charging socket on the (optional) range extender 


(when 

installed)

3. Plug the AC plug of the charger into a socket (100V to 240V). The LED on the charger 

will illuminate red while charging.

4. While charging, the charge level indicator on the console will show the charge level of 

the battery. Each illuminated green LED on the console represents approximately 20% 
capacity. The battery is fully charged when the indicator on the charger turns green and 
all green LEDs on the charge level indicator on the console illuminate.

Notes

•  When the range extender is installed, the main battery will be charged to its full capacity 

first, then the range extender will be charged. The charge indicator shows the combined 

charge level.

• 

The e-bike system will power off after reaching full charge (within about six minutes)

.

5. After charging, disconnect the AC plug from the socket and the charging plug from the 

battery.

6. Close the charging socket cover to protect the charging socket.

Содержание Diamant 365

Страница 1: ...Assist system Gen 2 25 32 kmh 20 mph ELECTRIC BICYCLE Owner s manual 365 FX Dual Sport EN GB...

Страница 2: ...h bicycle we make comes with a limited warranty We wish you many carefree and enjoyable rides with your new bicycle However if you experience any problems with your bicycle do not hesitate to contact...

Страница 3: ...with a high pressure washer Any electrical system is sensitive to moisture High pressure water might enter connectors or other parts of the electric system Do not allow a Li Ion battery separately or...

Страница 4: ...9 when transporting regulations may restrict the transport of separate Li Ion batteries in some places Before booking your trip make sure to check ahead with your airline or carrier if it is allowed t...

Страница 5: ...e to the Hyena assist system only This owner s manual is primarily intended for the user to operate the e bike Copyright 2021 HYENA INC All Rights Reserved Assist system Owner s Manual ENGLISH Trek FX...

Страница 6: ...Turning on off the lights if part of the equipment 11 6 Range extender optional 12 6 1 Range extender overview 12 6 2 Technical data of the range extender 12 6 3 Mounting the range extender kit 13 6 4...

Страница 7: ...ike About Warnings Symbols As you read this manual you will see grey warning boxes like this WARNING Text in a grey box with the safety alert symbol will warn you about a situation or behaviour that c...

Страница 8: ...onsole while riding A distracted rider increases the risk of being involved in an accident Riding with the assist system turned off is like riding a normal non electric powered bicycle The assist syst...

Страница 9: ...em overview The Hyena assist system includes the following system parts A Rear hub motor MRC E250F B Console CE EL19A C Battery charger 2A A D E F B C D Torque cadence sensor ST SQ 1 E Electronic cont...

Страница 10: ...your e bike dries fully after riding in wet weather WARNINGS Do not change or modify any assist system components or any components that are part of the bicycle drivetrain Changing components could d...

Страница 11: ...68 F Permitted charging temperature range 0 C 32 F to 45 C 113 F Protection rating IPX5 Weight approx 1 74 kg 3 84 lbs Do not allow the internal battery to suffer any mechanical or physical impacts o...

Страница 12: ...ching on off the assist system selecting the level of riding support turning on off the lights if part of the equipment and using the walk assistance function A B D A UP button Increase assist lever a...

Страница 13: ...ned off is like riding a normal non electric powered bicycle 0 5 sec ON 2 secs OFF 5 4 Selecting an assist level CAUTION For safety reasons always start riding at Level 0 or Level 1 WARNING When learn...

Страница 14: ...USA Canada region As soon as you reach this speed limit the assist system will suspend the riding support and it reactivates automatically when your speed is below the speed limit WARNING Do not use...

Страница 15: ...rds the front of the bike To propel the e bike forward at a slow speed press and hold the UP button Release the UP button to stop the Walk assist function on your e bike Short press the DOWN button to...

Страница 16: ...ront and rear lights are powered by the assist system If the charge indicator is flashing at 9 charge the battery is almost empty Charge the battery At 4 charge the riding support will stop The remain...

Страница 17: ...follow the same rules stated in Chapter 4 Battery handling instructions Item Specification Rated voltage 36 V Nominal capacity 6 6 Ah Energy 250 Wh Operating temperature Charge 0 C 32 F to 45 C 113 F...

Страница 18: ...oles on the mounting plate and downtube then tighten the two M5x12 mm bolts The finished mounting of the range extender mounting plate CAUTION Only use the supplied bolts Bolts too short will not full...

Страница 19: ...ender is attached firmly to the mounting plate Uncover the charging socket cover on the downtube Plug the downtube cable into the charging port on the downtube to connect the in tube battery with rang...

Страница 20: ...he bottom insertion to loosen the lower lock tab from the mounting plate Move the range extender upwards to unhook it from the mounting plate Pick up the range extender towards you to remove it from t...

Страница 21: ...g plate Next turn the lower lock tab of the bottle cage adapter to the bottom insertion of the mounting plate It should snap in and lock in place Make sure the bottle cage adapter is firmly attached t...

Страница 22: ...ery charger s AC plug may come loose from the electrical socket resulting in a risk of fire Do not leave the charger plugged into the e bike for more than 24 hours If the e bike battery is not fully c...

Страница 23: ...r that is installed properly and earthed in accordance with all local codes and ordinances If there is a charging malfunction earthing provides a path of least resistance for electric current to reduc...

Страница 24: ...d charger for damage regularly Never charge the battery or use the e bike if you suspect it to be damaged or broken Make sure the socket and AC plug of the charger are undamaged and dry before connect...

Страница 25: ...the e bike or when installed the cover on the optional range extender battery 2 Connect the charging plug with the charging socket on the battery Charging socket on the frame Charging socket on the o...

Страница 26: ...ll capacity first then the range extender will be charged Charging the range extender separately To charge the range extender battery from the e bike disconnect it first and remove the range extender...

Страница 27: ...the battery is left uncharged then stored without charging it may discharge to such a low state deep discharge that the battery can no longer be charged and must be replaced 8 3 Transportation of an e...

Страница 28: ...longed hills or ride with an excessive load on your e bike the e bike assist system may overheat Turn off the system and let it cool down for at least 10 minutes Speed limitation The assist system s o...

Страница 29: ...not charge consult your local authorised retailer The LED indicator on the charger does not illuminate Turn on the assist system If the battery charges properly the charge level indicators on the con...

Страница 30: ...ing the motor driver battery speed sensor console wiring accessories and packaging should be disposed of in an environmentally correct manner according to local rules Do not dispose of e bikes and the...

Страница 31: ...EN GB 26 Hyena Inc Tel 886 4 23598810 Fax 886 4 23598610 www hyena ebike com Address No 25 Jingke N Rd Nantun Dist Taichung City 408 Taiwan ROC...

Страница 32: ...9 Sherbourne Drive Tilbrook Milton Keynes MK7 8HX United Kingdom Tel 44 1908 360 140 Australia New Zealand Trek Australia New Zealand Customer Service PO Box 1747 Fyshwick ACT2609 Australia For Austr...

Страница 33: ...s For Service and Warranty please contact your local authorised bike shop Refer to our website Support for the latest revision of this manual New features as described in the latest manual may not be...

Страница 34: ...PN 5284737 EN GB Rev 1 Gen 2...

Отзывы: