background image

SIP-6002 User Guide 


4

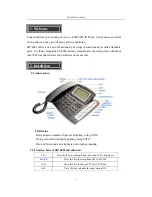
OUT 

Press this key to look over outbound NO. in 6 recently. 

CHECK  

Press this key to gain the NO. from M1-M9. 

UP/DOWN 

Press this key to turn over the inbound NO. in 4 recently. 

BACK 

Press this key to quick dail the outbound NO. in 1. 

RECALL 

Press this key to gain the NO. from M1-M9. 

HOLD  

Press this key to hold a calling. 

PAUSE  

Press this key to pause a calling. 

FlASH 

Quick cut off the call. 

2.3 IP Phone Back and Side Illustrations: 


A:

 Phone port, you can connect an phone. 

B:

 Line port, connect to PSTN line. 

C:

 RJ-45 port, connect to LAN.                 

D:

 Connect to power line. 

Please make sure you have the following items in the product package you received, 


IP-Phone 100 IP phone 


5V power supply  

In addition, you need, 


A Cat-5 Ethernet cable 


An Ethernet port connecting to IP networks 

Please follow the instruction below for IP phone setup: 


Insert one end of Cat-5 Ethernet cable to “LAN” port on the back of IP phone 

and the other end to Ethernet port connecting to IP networks. 


Insert 5V power supply cable into the power plug of IP phone. 


Check and confirm all connections are correct.  

Now you can power on the 5V power supply. 


Содержание SIP-6002

Страница 1: ...SIP 6002 User Guide 1 SIP 6002 User Guide...

Страница 2: ...SIP 6002 User Guide 2 Directory 1 Welcome 3 2 Installation 3 3 Setup Guide 4 4 Additional functions 9 5 Product Use Environment 10...

Страница 3: ...with many other SIP compliant devices and software on the market 2 1 Appearance LED status Red and green indicator light are birghting using VOIP Only green indicator light brighting using PSTN Red an...

Страница 4: ...you can connect an phone B Line port connect to PSTN line C RJ 45 port connect to LAN D Connect to power line Please make sure you have the following items in the product package you received IP Phone...

Страница 5: ...CP SIP proxy server IP address and any registration information User information such as user ID and password 3 1 Setup with Keypad Pressing 00 to enter SIP 6002 setup menu You can use keypad referenc...

Страница 6: ...ure Reboot 79898 Enter 1 to will reboot and all Confirm the datas will return Enter to to the original form cancel 3 2 Setup with Web Browser 1 After you have got your IP phone s IP address you can us...

Страница 7: ...or domain name In FWD case it is http fwdnat pulver com 5082 At bottom of the pager Click Save Changes to apply the changes 3 2 2 Choose STUN server for NAT traversal Under User Account Setup Set User...

Страница 8: ...fwd pulver com At bottom of the pager Click Save Changes button to apply all the changes 3 3 Call features Name Code Description Call forward 31 forward all calls to the target specified after the ac...

Страница 9: ...e key redial 3 sets clock alarm 9 key to store the NO 4 2 Function setting 4 2 1 Setting mode When the unit is under hang up status push SET key to enter setting mode The functions will show on LCD Us...

Страница 10: ...icked up push hold key to enter musical hold hold musical start then put down the handset If Pick up handset again musical stop it will be back handset using status Push speak button musical stop it w...

Отзывы: