background image

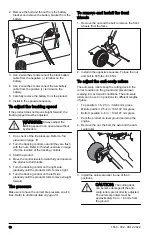
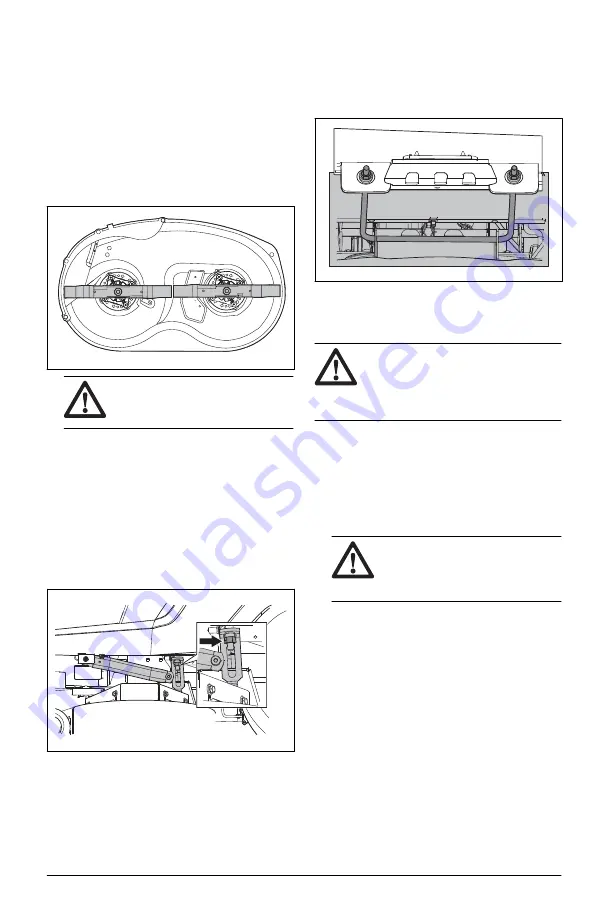
To adjust the parallelism of the

cutting deck

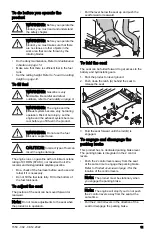
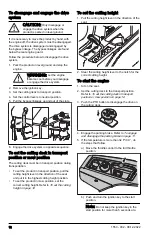
This procedure will set the cutting deck in a standard

position.
1. Make sure that the tire pressure is correct. Refer

to 

Tire pressure on page 18

.

2. Park the product on a level surface.
3. Put the cutting deck in transport position.
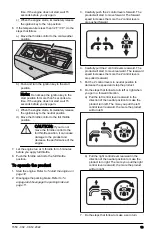
4. Turn the outer blade tips to align with the cutting

deck side to side.

WARNING: 

The blades on the

cutting deck are sharp and can

cause injury. Use protective gloves.

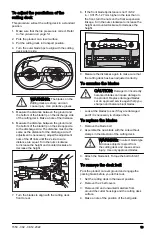
5. Measure the distance between the ground and

the bottom of the blade tip on the discharge side

of the cutting deck. Make a note of the distance.

6. Measure the distance between the ground and

the bottom of the blade tip on the side opposite

to the discharge side. The distance must be the

same as the distance for the discharge side. If

adjustment is necessary, adjust the adjustment

nuts of the lift links until the 2 side to side

distance are equal. Turn the nuts clockwise

to increase the height and counterclockwise to

decrease the height.

7. Turn the blades to align with the cutting deck

front to rear.

8. If the front blade tip distance is not 1/8-1/2

in. / 0.3175-1.27 mm higher in the rear than in

the front, turn the nuts on the front suspension

linkage. Turn the nuts clockwise to increase the

height and counterclockwise to decrease the

height.

9. Measure the distances again to make sure that

the cutting deck has been adjusted correctly.

To examine the blades

CAUTION: 

Damaged or incorrectly

balanced blades can cause damage to

the product. Replace damaged blades.

Let an approved service agent help you

sharpen and balance blunt blades.

• Look at the blades to see if they are damaged

and if it is necessary to sharpen them.

To replace the blades

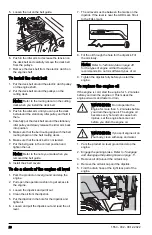
1. Remove the blade bolt.
2. Assemble the new blade with the side without

stamps in the direction of the cutting deck.

WARNING: 

Incorrect blade type

can cause objects to eject from

the cutting deck and cause serious

injury. Use only approved blades.

3. Attach the blade bolt. Torque the bolt to 60-81

Nm.

To remove the deck belt

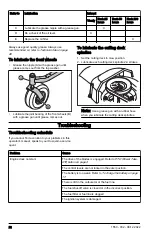
Park the product on level ground and engage the

parking brake before you do this task.
1. Set the cutting deck in the lowest position.
2. Remove the 2 belt covers.
3. Remove dirt and unwanted materials from

around the cutter housings and the cutting deck

surface.

4. Make a note of the position of the belt guide.

1550 - 002 - 08.12.2022

19

Содержание Z 246

Страница 1: ...Z246 EN Operator s manual 2 28 ES MX Manual de usuario 29 57 ...

Страница 2: ...defects or other reproductive harm WARNING Battery posts terminals and related accessories contain lead and lead compounds chemicals known to the State of California to cause cancer and birth defects or other reproductive harm Clean your hands after handling WARNING Engine exhaust and certain vehicle components contain or emit chemicals considered to cause cancer birth defects or other reproductiv...

Страница 3: ...2 Parking brake 3 Tracking control 4 Deck lifting lever 5 Fuses 6 Bypass linkage 7 Fuel shut off valve 8 Fuel tank 9 Throttle control 10 Hour meter 11 Ignition switch 12 PTO button 13 Seat adjustment lever 14 Type plate Steering controls The direction of the product is controlled by the 2 control levers Refer to Product overview on page 3 The control levers can be moved forward and rearward from a...

Страница 4: ... plugs Cold weather control The cold weather control is used for cold starts to supply more fuel to the engine when the temperature is below 32 F 0 C Push the throttle control to the cold weather position when you start a cold engine Refer to Product overview on page 3 for the position of the throttle control PTO Power Take Off button The PTO button engages and disengages the PTO clutch and the cu...

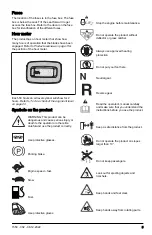
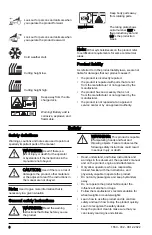
Страница 5: ...t can be dangerous and cause serious injury or death to the operator or others Be careful and use the product correctly Use protective glasses Parking brake Engine speed fast Slow Fuel Use protective gloves Stop the engine before maintenance Do not operate the product without deflector or grass catcher Always use approved hearing protection Do not put your foot here Neutral gear Reverse gear Read ...

Страница 6: ... Used if there is a risk of injury or death for the operator or bystanders if the instructions in the manual are not obeyed CAUTION Used if there is a risk of damage to the product other materials or the adjacent area if the instructions in the manual are not obeyed Note Used to give more information that is necessary in a given situation General safety instructions WARNING Read the warning instru...

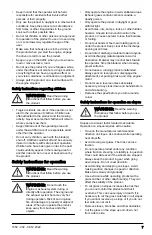
Страница 7: ...you operate the product keep away from bushes and other objects Only operate the engine in well ventilated areas Exhaust gases contain carbon monoxide a deadly poison Only operate the product in daylight or good artificial light Avoid holes ruts bumps rocks or other hidden hazards Uneven terrain could overturn the product or cause operator to lose their balance or footing Do not put hands or feet ...

Страница 8: ...fety devices Do not use the product if protective plates protective covers safety switches or other protective devices are not attached or are defective To do a check of the ignition lock Start and stop the engine to do a check of the ignition lock Refer to To start the engine on page 12 and To stop the engine on page 14 Make sure that the engine starts when you turn the ignition key to start posi...

Страница 9: ... flammable Be careful with gasoline to prevent injury or fire Let the engine become cool before you refuel Do not fill fuel near sparks or naked flames If there are leaks in the fuel system do not start the engine until the leaks are repaired Do not fill above recommended fuel level The heat from the engine and the sun makes the fuel expand and the fuel overflows if the tank is filled too much Sto...

Страница 10: ...e before making any repairs For best performance and safety do maintenance on the product regularly as given in the maintenance schedule Refer to Maintenance schedule on page 14 Electrical shocks can cause injuries Do not touch the cables when the engine is on Do not do a function test on the ignition system with your fingers Let the product become cool before you do maintenance near the engine Th...

Страница 11: ...e Do a check of the fuel level before each use and refuel if it is necessary Do not fill the fuel tank fully Fill to the bottom of the fuel tank neck To adjust the seat The position of the seat can be moved forward or rearward Note Do not make adjustments to the seat when the product is in operation Pull the lever below the seat up and push the seat forward or rearward To fold the seat The seat ca...

Страница 12: ... position during transportation To set the product in transport position pull the cutting height lever in the direction of the seat and put it in the highest cutting height position To set the product in mow position set the correct cutting height Refer to To set the cutting height on page 12 To set the cutting height 1 Pull the cutting height lever in the direction of the seat 2 Steer the cutting...

Страница 13: ...rate the product 1 Start the engine Refer to To start the engine on page 12 2 Disengage the parking brake Refer to To engage and disengage the parking brake on page 11 3 Carefully push the 2 control levers forward The product will start to move forward The forward speed increases the more the 2 control levers are pushed forward 4 Carefully pull the 2 control levers rearward The product will start ...

Страница 14: ... on the product regularly as given in the maintenance schedule Refer to Maintenance on page 14 Do not cut a wet lawn Wet grass can give a bad cutting result Start with a high cutting height and decrease it gradually Use full throttle when you cut the grass Move the product forward at low speed if the grass is high and thick Cut the grass in an irregular pattern When you cut large areas move the pr...

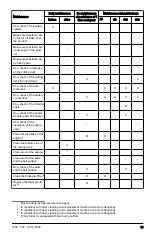
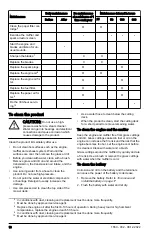
Страница 15: ... cable O Do a check of the caster wheels each 200 hours X X Do a check of the clearance of the engine valve 1 Clean the air intake of the engine 2 O O Clean the bottom side of the cutting deck X Clean around the engine Clean around the belts and the belt pulleys Do a check of the belts and the belt pulleys X X Clean the foam pre filter 3 O O Replace the foam pre fil ter 45 O 1 Must be done by appr...

Страница 16: ...ents or bearings Detergent usually increases the damage Use compressed air to clean the top side of the mower deck Use a water hose to clean below the cutting deck When the product is clean start the cutting deck for a short period to remove remaining water To clean the engine and the muffler Keep the engine and muffler free from grass cuttings and dirt Grass cuttings soaked in fuel or oil on the ...

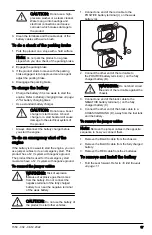
Страница 17: ...mergency start This product has a 12 V system with negative ground The product that is used for the emergency start must also have a 12 V system with negative ground To connect the jumper cables WARNING Risk of explosion because of explosive gas that comes from the battery Do not connect the negative terminal of the fully charged battery to or near the negative terminal of the weak battery CAUTION...

Страница 18: ...arts to move right 6 Turn the tracking control on the left side gradually until the product starts to move straight forward Tire pressure Make sure to have the correct tire pressure on all 4 tires Refer to Technical data on page 26 To remove and install the front wheels 1 Remove the nut and the bolt to remove the front wheels from the forks 2 Install in the opposite sequence Torque the nut and bol...

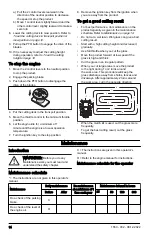
Страница 19: ...ip distance is not 1 8 1 2 in 0 3175 1 27 mm higher in the rear than in the front turn the nuts on the front suspension linkage Turn the nuts clockwise to increase the height and counterclockwise to decrease the height 9 Measure the distances again to make sure that the cutting deck has been adjusted correctly To examine the blades CAUTION Damaged or incorrectly balanced blades can cause damage to...

Страница 20: ...e engine 3 Loosen the dipstick and pull it out 4 Clean the oil from the dipstick 5 Put the dipstick in the hole for the dipstick and tighten it 6 Loosen and pull the dipstick out and read the oil level 7 The oil level must be between the marks on the dipstick If the level is near the ADD mark fill oil to the FULL mark 8 Fill the oil through the hole for the dipstick Fill the oil slowly Note Refer ...

Страница 21: ...an oil can When you lubricate with grease use a chassis or ball bearing grease that prevents corrosion Remove unwanted grease after lubrication Lubricate 2 times a week if you operate the product daily Do not spill lubricant on the drive belts or the grooves of the belt pulleys If you do spill clean with alcohol If the friction between the drive belt and the pulley is not sufficient after you clea...

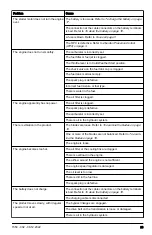
Страница 22: ...k in mow position 2 Lubricate each cutting deck spindle 2 3 strokes Note Use a grease gun with a rubber hose when you lubricate the cutting deck spindles Troubleshooting Troubleshooting schedule If you cannot find a solution to your problems in this operator s manual speak to your Husqvarna service agent Problem Cause Engine does not start The drive of the blades is engaged Refer to PTO Power Take...

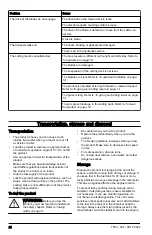
Страница 23: ...ged The spark plug is defective The carburetor is incorrectly set There is air in the hydraulic system There is vibration in the product The blades are loose Refer to To examine the blades on page 19 One or more of the blades are not balanced Refer to To exam ine the blades on page 19 The engine is loose The engine becomes too hot The air filter or the cooling fins are clogged There is overload in...

Страница 24: ...nowledge of local road traffic regulations before transportation of the product in a trailer or on roads Stop the fuel supply of the product Lock the product with approved devices such as straps Use tie down points on the product The parking brake is not sufficient to lock the product during transportation To tow the product WARNING Before you tow the product you must read and understand the safet...

Страница 25: ...ty the fuel tank Start the engine and run it until there is no remaining fuel in the carburetor Note Do not empty the fuel tank and carburetor if a stabilizer has been added Remove the plugs and put about a tablespoon of engine oil into each cylinder Manually turn the engine shaft to apply the oil and put the plugs back on Lubricate all grease nipples joints and axles Keep the product in a clean a...

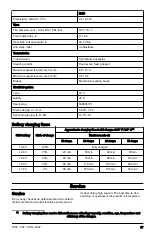
Страница 26: ... Dimensions Length in cm 75 191 Width in cm 41 5 106 Width including Chute Up in cm 48 122 Width including Chute Down in cm 56 142 Height mm 40 102 Weight with empty tanks lb kg 515 233 6 Max gradient degrees 10 Cutting Width in cm 46 117 Cutting Height in cm 1 5 4 3 8 10 2 Cutting deck Deck Construction Stamped Number of blades 2 Blade length in cm 22 8 57 8 Blade Engagement Electromagnetic Clutc...

Страница 27: ...14 75 20 Battery charging times STD battery State of charge Approximate charging time to full charge at 80 F 26 C12 Maximum rate at 50 Amps 30 Amps 20 Amps 10 Amps 12 6 V 100 Fully charged 12 4 V 75 20 min 35 min 48 min 90 min 12 2 V 50 45 min 75 min 95 min 180 min 12 0 V 25 65 min 115 min 145 min 280 min 11 8 V 0 85 min 150 min 195 min 370 min Service Service Do a yearly check at an authorized se...

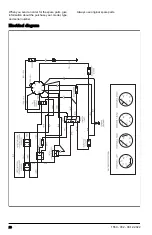
Страница 28: ...When you send an order for the spare parts give information about the purchase year model type and serial number Always use original spare parts Electrical diagram 28 1550 002 08 12 2022 ...

Страница 29: ...lformaciones congénitas u otros daños reproductivos ADVERTENCIA Los postes de batería terminales y accesorios relacionados contienen plomo y compuestos de plomo sustancias químicas que según el Estado de California provocan cáncer y malformaciones congénitas u otros daños reproductivos Límpiese las manos después de su manipulación ADVERTENCIA Los gases de escape del motor y ciertos componentes del...

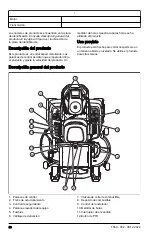
Страница 30: ...or de horas muestra cuántas horas se ha utilizado el producto Uso previsto El producto está hecho para cortar césped solo en un terreno abierto y nivelado No utilice el producto para otras tareas Descripción general del producto 1 2 6 3 4 5 7 8 9 3 11 10 12 13 14 1 Palancas de control 2 Freno de estacionamiento 3 Control de seguimiento 4 Palanca elevadora del equipo 5 Fusibles 6 Varillaje de deriv...

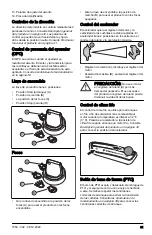
Страница 31: ...focos apagados Control del acelerador El acelerador ajusta el régimen del motor y la velocidad de las cuchillas si están acopladas El acelerador tiene 2 posiciones en los extremos el régimen de ralentí y la aceleración máxima A A B Régimen de ralentí A disminuye el régimen del motor Aceleración máxima B aumenta el régimen del motor PRECAUCIÓN No use el motor en régimen de ralentí A por más tiempo ...

Страница 32: ...sibles Medidor de horas El producto tiene un medidor de horas que muestra cuántas horas de funcionamiento las cuchillas han estado acopladas Consulte la Descripción general del producto en la página 30 para conocer la posición del medidor de horas Cada 50 horas se mostrará un símbolo del nivel de aceite durante 2 horas Consulte Para revisar el nivel de aceite del motor en la página 48 Símbolos en ...

Страница 33: ... ss es la semana de producción Nota Otros símbolos o etiquetas del producto hacen referencia a requisitos de certificación de algunas zonas comerciales Responsabilidad del fabricante Como se menciona en las leyes de responsabilidad del fabricante no nos hacemos responsables de los daños que cause nuestro producto si el producto se repara incorrectamente el producto se repara con piezas que no son ...

Страница 34: ...n camino o atraviese uno No utilice el producto si está cansado bajo la influencia del alcohol o las drogas medicamentos o cualquier cosa que pudiera afectar negativamente su visión estado de alerta coordinación o juicio Estacione siempre el producto en una superficie nivelada con el motor parado Instrucciones de seguridad relacionadas con los niños ADVERTENCIA Lea atentamente las instrucciones de...

Страница 35: ...r el césped en pendientes aumenta el riesgo de que no pueda controlar el producto y de que se vuelque Esto puede provocar lesiones o la muerte Es necesario tener cuidado al cortar el césped en cualquier pendiente Si no puede retroceder para subir una pendiente o si no se siente seguro no la corte Quite las piedras las ramas y otros obstáculos Corte el césped de la pendiente de arriba hacia abajo n...

Страница 36: ...ulte Para comprobar el freno de estacionamiento en la página 45 Silenciador ADVERTENCIA No utilice el producto si el silenciador no está instalado o está defectuoso Un silenciador defectuoso aumenta el nivel de ruido y el riesgo de incendio El silenciador mantiene los niveles de ruido al mínimo y envía los gases de escape lejos del operador Examine el silenciador con regularidad para asegurarse de...

Страница 37: ...s responsable de fijar el producto de forma segura durante el transporte Transporte Utilice rampas de ancho completo cuando cargue y descargue un producto para transportarlo Seguridad de remolque Obedezca las recomendaciones del fabricante sobre los límites de peso para el equipo remolcado y al remolcar en pendientes Utilice únicamente equipos de remolque aprobados por Husqvarna Utilice la barra d...

Страница 38: ...r esté encendido No haga una prueba de funcionamiento del sistema de encendido con los dedos Deje que el producto se enfríe antes de realizar tareas de mantenimiento cerca del motor Las cuchillas son filosas y pueden causar cortes Envuelva las cuchillas con protección o utilice guantes protectores cuando trabaje en las cuchillas No gire el motor si quitó el cable de encendido o la bujía Asegúrese ...

Страница 39: ... combustible completamente Llénelo hasta la parte inferior del cuello del depósito de combustible Para ajustar el asiento La posición del asiento se puede mover hacia adelante o hacia atrás Nota No realice ajustes en el asiento cuando el producto esté en funcionamiento Tire de la palanca que está debajo del asiento hacia arriba y mueva el asiento hacia delante o hacia atrás Para plegar el asiento ...

Страница 40: ...e el sistema de transmisión en secuencia opuesta Para colocar el equipo de corte en la posición de transporte o posición de corte El equipo de corte debe estar en la posición de transporte durante el transporte Para ajustar el producto en la posición de transporte tire de la palanca de altura de corte en la dirección del asiento y colóquela en la posición de altura de corte más alta Para ajustar e...

Страница 41: ...el acelerador a la posición de aceleración máxima puede causar daños al producto y disminuir el rendimiento del motor 7 Deje que el motor marche a aceleración media entre 3 y 5 minutos antes de aplicar la aceleración máxima 8 Presione el acelerador hasta la posición de aceleración máxima Para hacer funcionar el producto 1 Arranque el motor Consulte Para arrancar el motor en la página 40 2 Desacopl...

Страница 42: ...freno de estacionamiento 3 Presione el botón de PTO para desactivar la transmisión de las cuchillas 4 Coloque el equipo de corte en la posición de transporte 5 Mueva el acelerador hasta la posición de aceleración mínima 6 Deje que el motor funcione en ralentí como mínimo durante 1 minuto hasta que esté a la temperatura de funcionamiento normal 7 Coloque la llave de encendido en la posición de para...

Страница 43: ...de esta cionamiento X Revise el nivel de aceite del motor O Revise el sistema de se guridad X Verifique que no haya fu gas de combustible ni de aceite del producto Verifique que el producto no esté dañado Verifique que no haya piezas sueltas Revise si el equipo de corte está dañado Revise los ajustes del equipo de corte X X Revise la presión de los neumáticos X X X X X Revise las conexiones de la ...

Страница 44: ...ltro de aceite del motor O O Reemplace el filtro de combustible O O Reemplace el filtro de ai re de papel 21 O O Realice el mantenimiento cada 300 horas 22 15 En condiciones con polvo la limpieza y el reemplazo se deben realizar con mayor frecuencia 16 En condiciones con polvo la limpieza y el reemplazo se deben realizar con mayor frecuencia 17 Si el producto está equipado con el prefiltro de espu...

Страница 45: ...na 46 2 Enjuague la batería con agua y deje secar PRECAUCIÓN No utilice lavadores a alta presión ni limpieza a vapor Podría entrar agua a los cojinetes y las conexiones eléctricas y causar corrosión lo que puede dañar el producto 3 Limpie los terminales y los extremos de los cables de la batería con un cepillo de alambre Para comprobar el freno de estacionamiento 1 Estacione el producto en una pen...

Страница 46: ...atería 4 Utilice 2 llaves para desconectar el cable rojo de la batería del terminal positivo en la batería 5 Retire con cuidado la batería del producto 6 Vuelva a instalar todo en el orden inverso Para ajustar la velocidad de desplazamiento Si el producto no se mueve en línea recta hacia adelante se debe ajustar la velocidad de desplazamiento ADVERTENCIA Ajuste siempre la velocidad de desplazamien...

Страница 47: ...o de corte Este procedimiento permitirá colocar al equipo de corte en una posición estándar 1 Asegúrese de que la presión de los neumáticos sea la correcta Consulte Presión de los neumáticos en la página 46 2 Estacione el producto sobre una superficie nivelada 3 Coloque el equipo de corte en la posición de transporte 4 Gire las puntas externas de la cuchilla para alinearlas con el equipo de corte ...

Страница 48: ...a 2 Retire las 2 cubiertas de la correa 3 Retire la suciedad y los materiales no deseados alrededor de la cortadora y de la superficie del equipo de corte 4 Tome nota de la posición de la guía de la correa 5 Afloje la tuerca de la guía de la correa 6 Presione el brazo guía para disminuir la tensión en la correa del equipo y retire con cuidado la correa del equipo de las poleas 7 Retire la correa d...

Страница 49: ...acionamiento en la página 39 3 Retire toda la suciedad alrededor del tapón del depósito de aceite 4 Retire el tapón del depósito de aceite y la varilla de nivel 5 Busque la manguera de drenado que se encuentra en la parte trasera derecha del motor 6 Coloque un recipiente debajo de la manguera de vaciado de aceite 7 Retire el tapón de vaciado de aceite 8 Deje que el aceite se termine de verter en e...

Страница 50: ...con una pistola de engrase X B Lubrique la boquilla de engrase en el eje de rueda con una pistola de engrase X C Lubrique la boquilla de engrase con una pistola de engrase X D Compruebe el nivel de aceite X E Reemplace el filtro de aceite X Utilice siempre grasa de buena calidad Utilice siempre el aceite recomendado consulte los Datos técnicos en la página 55 50 1550 002 08 12 2022 ...

Страница 51: ... de problemas Programa de solución de problemas Si no encuentra una solución a sus problemas en este manual de usuario consulte a su taller de servicio de Husqvarna Problema Causa El motor no arranca La transmisión de las cuchillas está activada Consulte Botón de toma de fuerza PTO en la página 31 Las palancas de control no están bloqueadas en la posición exterior La batería tiene muy poca carga C...

Страница 52: ...mbustible incorrecto Hay agua en el combustible El filtro de aire está obstruido Aparentemente el motor no tiene energía El filtro de aire está obstruido La bujía está defectuosa El carburador está mal ajustado Hay aire en el sistema hidráulico Hay vibración en el producto Las cuchillas están sueltas Consulte Para examinar las cuchi llas en la página 48 Una o varias cuchillas se encuentran desequi...

Страница 53: ...ina 42 El equipo de corte está obstruido con césped Consulte Para limpiar el producto en la página 45 Transporte almacenamiento y eliminación de residuos Transporte El producto es pesado y puede causar lesiones por aplastamiento Tenga cuidado cuando lo cargue o descargue de un vehículo o remolque Cargue el producto en reversa por las rampas autorizadas con un ángulo máximo de operación de 10 No le...

Страница 54: ...producto en la página 45 Retire los materiales no deseados del ventilador de refrigeración Repare los daños de la pintura para evitar la corrosión Examine el producto en busca de piezas dañadas o desgastadas y apriete las tuercas y los tornillos sueltos Extraiga la batería Límpiela cárguela y manténgala fría durante el almacenamiento Reemplace el aceite del motor y deseche el aceite residual Vacíe...

Страница 55: ...12 V Dimensiones Longitud in cm 75 191 Ancho in cm 41 5 106 Ancho con la tolva arriba in cm 48 122 Ancho con la tolva abajo in cm 56 142 Altura mm 40 102 Peso con tanques vacíos lb kg 515 233 6 Gradiente máxima grados 10 Ancho de corte in cm 46 117 Altura de corte in cm De 1 5 a 4 De 3 8 a 10 2 Equipo de corte Construcción del equipo Grabado Cantidad de cuchillas 2 Longitud de la hoja in cm 22 8 5...

Страница 56: ...os de carga de la batería Batería STD Estado de car ga Tiempo de caga aproximado para carga completa a 26 C 80 F24 Régimen máximo en 50 amperios 30 amperios 20 amperios 10 amperios 12 6 V 100 Completamente cargada 12 4 V 75 20 min 35 min 48 min 90 min 12 2 V 50 45 min 75 min 95 min 180 min 12 0 V 25 65 min 115 min 145 min 280 min 11 8 V 0 85 min 150 min 195 min 370 min Servicio Servicio Realice un...

Страница 57: ...Cuando envíe un pedido de piezas de repuesto dé información sobre el año de compra modelo tipo y número de serie Utilice siempre piezas de repuesto originales Diagrama eléctrico 1550 002 08 12 2022 57 ...

Страница 58: ...58 1550 002 08 12 2022 ...

Страница 59: ...1550 002 08 12 2022 59 ...

Страница 60: ...Original instructions Instrucciones originales www husqvarna com 1143287 27 2022 12 15 ...

Отзывы: