


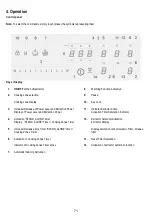


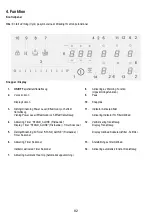


73
Automatic Heat UP
The Automatic Heat UP function allows the set power to be
reached more quickly; with this function it is possible to cook food
faster without the risk of burning it, insofar as the temperature does
not exceed the set level.
This function is available for power levels 1-8 .
Activation:
• from the cooking zone on press
(7)
• a flashing " " is shown in the Display
(2)
which alternates with
the power set in the cooking zone
Increasing the power level of the cooking zone: the Automatic
Heat Up function remains active, with the new temperature setting;
Decreasing the power level of the cooking zone: the Automatic
Heat function is deactivated.
Note:
by selecting another cooking zone at the same time, the
symbol
(7)
will return to being illuminated with a slight
intensity light, and it will be possible to proceed, also for this area,
to activation of the function; the function remains active in the area
where it has already been set, as indicated in the Display
(2)
Warming Function
Warming Function is a control function that allows the maintaining
of heat at a constant temperature, at an optimised power level;
ideal to keep ready-cooked foods warm. The Warming Function is
activated the first time the key
is pressed
The symbol
appears in the display
(2)
of the zone that is
working in the Warming Function
Note:
by selecting another cooking zone at the same time, the
symbol
(8)
will return to being illuminated with a slight
intensity light, and it will be possible to proceed, also for this area,
to activation of the function; the function remains active in the area
where it has already been set, as indicated in the Display
(2)
• Press
(8)
again to deactivate and switch off ,
until
bringing of the level shown in the
Display (2)
to “
”
.
Note:
if there are several zones working in the Warming Function,
first select the desired zone using the
Selection
zone
(2)
;
the function can also be deactivated via the
Selection Bar (3)
,
bringing the
Power Level to
“
”.
Pause
The Pause function allows active functions on the cooktop to be
suspended, bringing the cooking power to zero.
Activation:
• press “ ”
(9)
• a flashing “ ” is shown in the displays
(2)
To deactivate the function:
• press
(9)
the
Selection Bar (3)
lights up
• press/slide on the
Selection Bar (3)
to deactivate the function
Note:
deactivation restores the conditions of the hob before the
pause; the hob continues to work with the same settings previously
set.
Note:
if after 10 minutes the
Pause Function
is not deactivated,
the hob switches off automatically.
Note:
the
Pause Function
does not affect the extraction.
“STAND ALONE” Timer
The Timer function is a countdown independent of the cooking
zones (and the extraction zone).
The timer is activated by pressing the
Zone/Display
(4)
Use the symbols
(5)
to set the duration of the
Timer
,which is displayed in the
Zone/Display
(4)
Note:
wait 10 seconds without pressing any other command,
so that the countdown starts.
The format of the Timer is
.
-
.
for the times
-
for the minutes
Note
: the timer can be set up to a maximum of 1h and 59min.
In the
Zone/Display
(4)
the remaining time will be displayed;
at the end of the countdown, an acoustic signal will sound
Note:
in the display of the countdown, for a time less than 10
minutes, the following format is evident
-
.
minutes
-
seconds
with fixed light point
To switch off the Timer:
• select
Zone/Display
(4)
• set the duration of the
Timer
to
, via
(5)
Note:
If timer is ON and the appliance is switched OFF, the timer
remain ON until it expires.
To reset the timer before, switch ON the appliance again, the timer
will switch OFF.
Cooking Zones Timer
The Cooking Timer Zone function is a countdown that can be set,
also at the same time, on each cooking zone
At the end of the period set, the cooking zones switch off
automatically and the user is notified with a dedicated acoustic
signal.
Activation of the cooking zone timer function
• Touch (press) the
Selection/Display area (2)
(power level
≠
0)
• Press
(6)
relating to the cooking zone
Use the symbols
(5)
to set the duration of the Timer,
which is displayed in the
Zone/Display
(4)
during setting the symbol
(6)
is flashing
Note:
wait 10 seconds without pressing any other command, so
that the Cooking Zone Timer will start.
Note:
by pressing and holding
(6)
, the cooking zone timer
is reset
If desired, repeat the operation for several cooking zones
.
Note :
each cooking zone can have a separate Timer set; the
countdown for the selected cooking zone will be appear on the
display
(4)
;
Содержание QHFB860P
Страница 22: ......
Страница 23: ......
Страница 24: ...1x 1x 1x 2 8 m 4x 1x 1x 1x 1x 2x 1x 8x 4x 4x 1x 1x 4x 2x 3 5x9 5mm 1x ...
Страница 25: ...KIT WINDOW ...
Страница 26: ...A B ...
Страница 27: ...min 50 min 500 min 40 min 40 1 N L A B ...
Страница 28: ...1a 830 515 211 490 805 50 50 60 60 490 211 805 inst A P P 20 60mm ...
Страница 29: ...805 834 519 490 60 r 12 1b 834 519 490 805 50 830 515 211 211 inst B s s 6 5 mm P P 25 60mm 50 50 ...
Страница 30: ...1c 16 ...
Страница 31: ...2 a b b ...
Страница 32: ...2a 1 x 2 8 m inst A ...
Страница 33: ...2b 1 x 2 8 m inst B ...
Страница 36: ...5 4 4x OK ...
Страница 37: ...6 x4 x4 x8 inst B ...
Страница 38: ...7 ...
Страница 39: ...e 7a 1 7a 2 7a 3 7a 4 BACK FRONT a b 1 a a b ...
Страница 40: ...1 1 7a 6 7a 5 ...
Страница 41: ... 600 45 490 60 50 211 550 189 488 89 227 455 7b ...
Страница 42: ... 189 488 210 490 50 600 560 89 227 7b ...
Страница 43: ... 7c ...
Страница 44: ...8 ...
Страница 45: ...9a 3 clack 600 9a 1 9a 2 2x 3 5x9 5mm clack ...
Страница 46: ...e 9a 4 BACK FRONT a b 9a 5 9a 6 a a b ...
Страница 47: ...1 9a 8 9a 7 1 ...
Страница 48: ... 600 clack 9b 1 9b 2 9b 3 9b ...
Страница 49: ...2x 3 5x9 5mm clack 9b 4 9b 5 ...
Страница 50: ...e 9b 6 9b 7 BACK FRONT b a 9b 8 a a b ...
Страница 51: ...9b 10 9b 9 2 1 2 1 2 ...
Страница 52: ...10 94 227 55 218 1 2 3 900 ...
Страница 53: ...11 3 60 441 26 50 R 10 475 5 40 5 ...
Страница 54: ...12 13 H 2x X a X b L o r e m c H ...
Страница 55: ...600 490 60 50 450 560 151 151 183 485 211 13a ...
Страница 56: ...490 50 685 845 560 210 138 183 13a ...
Страница 57: ...13b OK OK N1 E4 N3 N10 N2 E5 ...
Страница 58: ...14 fig 17 fig 16 18 fig 15 ...
Страница 59: ...15 16 b a a b ...
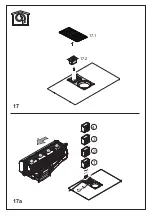
Страница 60: ...17 17a 1 2 3 4 17 1 17 2 1 2 3 4 ...
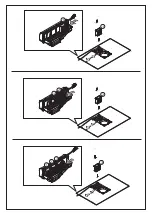
Страница 61: ...1 2 3 1 1 1 2 2 1 2 3 3 ...
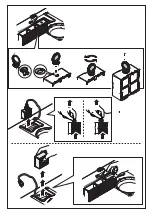
Страница 62: ...17b OK 1 2 3 4 1 2 3 4 4 ...
Страница 63: ......
Страница 64: ...4 3 2 1 2 3 1 2 2 2 3 4 4 3 ...
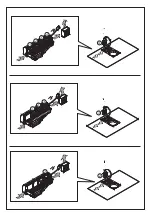
Страница 65: ...17c 1 17c 1 17c 2 1 ...
Страница 66: ...18a ...
Страница 67: ...18b ...
Страница 69: ...OK OK NO NO NO OK NO ...
Страница 126: ...LIB0173376 Ed 12 20 ...