background image

Содержание 966997301

Страница 1: ...English BED EDGER Operator and Parts Manual BE550 966997301 Please read the operator s manual carefully and make sure you understand the instructions before using the machine ...

Страница 2: ... 2010 All rights reserved Printed in U S A ...

Страница 3: ...andle 12 Handle Lock 12 Throttle Lever 12 Depth Control Setting Plate 12 Transport Engaged Lever 12 Engine 13 Operation 14 General 14 Bed Shaping 14 Laying Cable 14 Maintenance 15 Maintenance Schedule 15 Drive Chain 16 Tightening 16 Checking Drive Chain And Sprockets 16 Replacing Drive Chain 17 Cleaning 17 Service 17 Storage 18 Lubrication 19 Lubrication Schedule 19 Troubleshooting 20 REPAIR PARTS...

Страница 4: ...achine s serial number S N Please state the type designation and serial number when ordering spare parts This Operator s Manual belongs to machine with serial number Engine number Use The BE550 is used to lay edging material and to shape landscaping beds The cable layer is used to lay invisible fencing or low wattage wiring in trenches in the soil Insure your machine Contact your insurance company...

Страница 5: ...NFORMATION Xxxx xxx xxxx xx xxxx x xxxx Used in this publication to notify the reader of a risk of material damage particularly if the reader DOES NOT follow the instructions given in the manual Used also when there is a potential for misuse or misassembly Safety Decals and Machine Mounted Instructions DANGER Watch Your Feet 1 WARNING Carbon Monoxide 2 Operation 3 Cutting Head Alignment 4 Operatin...

Страница 6: ...performing any maintenance If the user cannot read this manual it is the responsibility of the machine owner to explain the contents to the user Follow all safety instructions Failure to do so may result in injury to yourself or others Accident prevention regulations other general safety regulations occupational safety rules and traffic regulations must be followed without fail All users shall be ...

Страница 7: ...e machine to use it Local laws may regulate the age of the user People and animals can distract you causing you to lose control of the machine For this reason you should always concentrate and focus on the task at hand Never leave the machine unsupervised with the engine running Make sure that other people are nearby when you are using the machine so that you can call for help should an emergency ...

Страница 8: ...nd secure long hair that can catch in moving machine parts Wear protective shoes or boots It is recommended that the footwear have anti slip with steel toes Never use the machine when barefoot Wear approved ear protection when running the machine Ask your dealer about approved ear protection Observe all safety instructions otherwise you may injure yourself or others around you Make sure that the m...

Страница 9: ...certain vehicle components contain or emit chemicals considered to cause cancer birth defects or other reproductive harm The engine emits carbon monoxide which is a colorless poisonous gas Do not use the machine in enclosed spaces Movement Transport To turn and steer the machine unlock the wheel and pull by the handle Collapse the handle if the machine is so equipped Turn off the engine and allow ...

Страница 10: ... defective or disassembled safety equipment The muffler is designed to maintain sound levels at an approved level and keep direct exhaust away from the user Exhaust gases from the engine are extremely hot and may contain sparks that can cause fires or burn the user Never use a machine with a defective muffler Reduce the risk of fire by removing grass leaves and other debris that may have caught in...

Страница 11: ...Layer Remove unit from box and pallet 1 Fill unit engine with oil Check engine manual 2 for type and viscosity of oil Fill transmission with oil Check engine manual 3 for type and viscosity of oil Transmission Oil Fill Engine Oil Fill ...

Страница 12: ...ply full throttle The engine has a contained centrifugal clutch increasing engine RPM above 2000 will engage the drive Releasing the throttle lever brings engine back to idle speed and disengages drive Depth Control Setting Plate Three depth positions are available 2 3 4 deep Choose a depth position setting and pin axle lock in desired position Place the unit into transport position Pull the clevi...

Страница 13: ...lock in transport position pull left pistol and apply downward pressure When wheels begin to drop release pistol continue downward movement of handle until pin locks axle in transport position Engine Refer to the engine manufacturer s manual ...

Страница 14: ...create either a 1 mental image of the border or paint an edge on the turf Check the machine by following previous 2 instructions Perform all the settings and adjustments on 3 the machine Perform all pre operation checks and 4 adjustments and move machine into position At the place you want to begin laying wire 5 feed out about 3 of wire At approximately 1 behind machine fasten the wire securely to...

Страница 15: ...il 1 l Check the air filter l Clean the air filter 2 l Replace air filter cartridge 2 n Clean sludge reservoir for fuel system n Check and clean the spark plug l Replace the spark plug l Check idle speed n Check and adjust play in valves 3 u Clean fuel tank 3 u Check replace fuel lines as necessary 3 4 u Check throttle cable u Check decals and warning signs u Check wear and tension on the chain n ...

Страница 16: ...in cover 2 and transmission cover DO NOT remove mounting hub from shaft 3 Check that the chain is running in the proper 4 track the sprockets should guide the chain in a straight line Check the chain for cracks heat damage 5 or worn edges If these symptoms appear replace the drive chain see Replacing Drive Chain Check that the tensioning equipment for the 6 chain is not loose and is properly set s...

Страница 17: ...e before the dirt sticks Check before rinsing that the fuel tank lid is properly in place to avoid getting water in the tank Use caution when using high pressure spray because warning decals instruction signs and the engine can be damaged Do not exceed 70 bar 1000 PSI water pressure when cleaning Lubricate the machine after cleaning This is particularly important if the machine is to be stored Oil...

Страница 18: ...chine for worn or damaged 2 parts and tighten any nuts or bolts that may have become loose Change the engine oil dispose of properly 3 Open the fuel valve Empty the fuel tank and 4 the carburetor For specific instructions refer to the Engine Manual Close the fuel valve 5 Remove the spark plug and pour about 6 a tablespoon of engine oil in the cylinder Turn over the engine so that the oil is evenly...

Страница 19: ...ibute the oil onto the chain and sprockets Lubricate the kingpin bushings once a 3 month Grease the bearings on the cutter shaft once 4 a week or every 20 hours NOTE The chain supplied is a quality permalube chain but it MUST be oiled by the user each 20 hours to keep the sprockets and chain lubricated Failing to oil the chain will cause premature failure of the chain and sprockets Check oil in tr...

Страница 20: ... Contamination water or ice in fuel system Clean tank sludge reservoir and empty carburetor Fill the tank with fresh fuel Carburetor problems Contact an authorized service workshop Spark plug Wrong spark plug type Replace the spark plug Build up on electrodes short circuit Check electrode gap and clean or replace spark plug Gasoline or oil on the spark plug Clean the spark plug Air the engine out ...

Страница 21: ... or incorrect fuel Clean tank sludge reservoir and empty carburetor Fill the tank with proper fuel Black exhaust Choke left on Open choke valve Clogged air filter Clean or replace the air filter Carburetor problems Contact authorized service workshop Ignition system Wrong spark plug type Replace the spark plug Build up on electrodes short circuit Check electrode gap and clean or replace spark plug...

Страница 22: ...22 REPAIR PARTS 1 2 3 4 5 6 7 8 9 10 11 12 13 14 15 16 17 18 20 21 22 23 24 25 26 27 28 29 30 31 32 33 34 35 36 37 38 39 40 41 42 43 44 45 46 47 48 36 45 36 45 32 19 33 36 32 32 32 45 FRAME ...

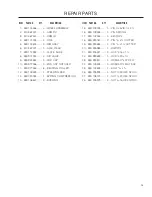
Страница 23: ... 539 109165 22 1 KEY 3 16 SQ x 1 539 102067 23 1 KEY SQ x 539 109159 24 1 KEY 7mm SQ x 33mm 539 109545 25 1 OIL CAP 3 8 539 990206 26 2 HCS 5 16 18 x 539 991003 27 1 HCS 20 x 1 539 976941 28 4 HCS 3 8 16 x 1 539 990669 29 4 HCS 5 16 18 x 1 539 990730 30 1 HCS 3 8 16 x 1 539 108520 31 1 HCS M5 0 8 x 16mm GR 8 8 539 976934 32 11 HCS 5 16 18 x 539 990627 33 7 HCS 5 16 18 x 1 539 990209 34 1 HCS 5 16 ...

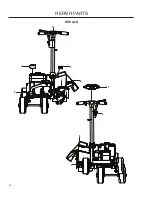
Страница 24: ...24 REPAIR PARTS 1 2 3 4 5 6 7 8 9 10 11 12 13 14 15 1 1 16 14 22 21 20 19 18 17 17 23 27 23 26 28 25 14 WHEELS ...

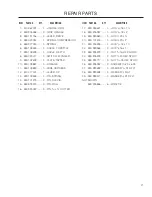
Страница 25: ...LER 539 109525 12 1 STEERING ROD 539 020034 13 1 SPRING COMPRESSION 539 106847 14 2 BUSHING REPAIR PARTS 539 109226 15 1 PIN CLEVIS x 2 539 109526 16 1 PIN SPRING 539 102454 17 4 E RING 539 990037 18 2 PIN 3 32 x COTTER 539 990654 19 2 PIN 5 32 x 1 COTTER 539 976989 20 1 HAIRPIN 539 976941 21 2 HCS 3 8 16 x 1 539 990639 22 1 HCS 20 x 1 539 990517 23 4 WASHER 3 8 STD FLT 539 109333 24 4 WASHER FLAT...

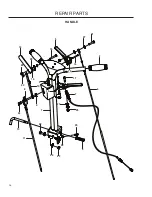
Страница 26: ...26 REPAIR PARTS 1 2 3 4 5 6 7 8 9 10 11 12 13 14 15 16 17 18 19 20 21 22 23 24 25 26 27 28 29 24 25 27 HANDLE ...

Страница 27: ...17401 12 1 LEVER OP 539 109526 13 1 PIN SPRING 539 101213 14 2 PIN CLEVIS 539 923313 15 2 PIN ROLL 539 990037 16 2 PIN 3 32 x COTTER 539 990627 17 1 HCS 5 16 18 x 1 539 976937 18 1 HCS 5 16 18 x 2 539 990580 19 1 HCS 20 x 539 101313 20 1 HCS 20 x 2 539 976935 21 1 HCS 5 16 18 x 1 539 990563 22 2 HCS 3 8 16 x 1 539 976979 23 2 NUT 3 8 16 HEX NYLOC 539 976978 24 2 NUT 20 HEX NYLOC 539 990717 25 3 NU...

Страница 28: ...28 REPAIR PARTS 1 2 3 4 5 6 7 8 9 10 11 DECALS ...

Страница 29: ...N 540 200076 2 1 DECAL DANGER FOOT 539 109899 3 1 DECAL OILING 539 111132 4 1 DECAL DEPTH 539 110854 5 1 DECAL INSTRUCTION 539 917150 6 1 DECAL PATENT PENDING 539 110761 7 1 DECAL GUIDELINE 532 422012 8 1 DECAL HUSQ HOOD 521 971401 9 1 DECAL BE550 532 422009 10 1 DECAL CROWN 510 437401 11 1 DECAL OPERATION ...

Страница 30: ...30 CABLE LAYER SHAPER 1 2 3 4 5 6 7 8 9 10 11 12 13 14 15 16 17 18 13 18 REPAIR PARTS ...

Страница 31: ...9877 6 1 BLADE CABLE 510 367701 7 1 GUARD SHAPER 522 000701 8 1 GUARD w SAFETY DECAL 510 423201 9 1 TUBE WLDMT 510 423301 10 1 PIN SPOOL 539 976988 11 2 HAIRPIN 539 990316 12 2 RHSNB 5 16 18 x 539 990563 13 3 HCS 3 8 16 x 1 539 990580 14 8 HCS 20 x 539 976978 15 8 NUT 20 HEX NYLOC 539 100276 16 2 NUT 5 16 18 UNC WING 539 990598 17 5 WASHER FLAT 539 990118 18 3 WASHER 3 8 SPLT LOCK REPAIR PARTS ...

Страница 32: ...Lubricate machine as described in lubrication schedule Fill the fuel tank and start the engine Check all operating instruments Check decals and information attached to the unit Check the engine speed RPM see Technical Data Check for leakage Inform the customer about The need and advantages of following the service schedule The need and advantages of leaving the machine for service every 300 hours ...

Страница 33: ...SERVICE JOURNAL 33 Action Date stamp signature ...

Страница 34: ...SERVICE JOURNAL 34 Action Date stamp signature ...

Страница 35: ......

Страница 36: ...P N 115124026R1 08 16 10 ...

Отзывы: