Corded Buttonhole (Stretch Fabrics)
When sewing buttonholes in stretch fabrics we recommend
cording the buttonhole to increase the stability and keep the
buttonhole from stretching out.
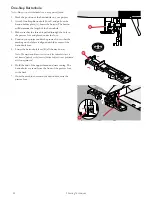
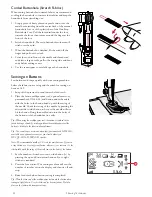
1. Loop a piece of heavy thread or pearl cotton over the
metal bar extending from the center back of the manual
buttonhole foot or of the plastic bar of the One-Step
Buttonhole Foot. Pull the thread tails under the foot,
towards the front, then secure around the finger at the
front of the foot.
2. Stitch a buttonhole. The satin buttonhole columns will
stitch over the cord.
3. When the buttonhole is finished, lift the cord off the
finger and pull out the slack.
4. Cross the cord in front of the needle and thread cord
ends into a large needle, pull to the wrong side and knot
ends before cutting excess.
5. Use the seam ripper to carefully open the buttonhole.
Sewing on Buttons
Sew buttons and snaps quickly with your sewing machine.
Select the fabric you are using and the stitch for sewing on
buttons 1:09.
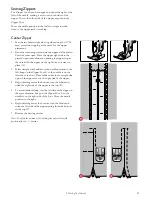
1. Snap off the presser foot and lower the feed teeth.
2. Place the fabric, multipurpose tool (optional accessory,
part number 4131056–01) and button under the ankle
with the holes in the button lined up with the swing of
the needle. Check the swing of the needle by pressing the
mirror side to side button to be sure the needle will not
hit the button. Bring the needle down into the holes of
the button with the handwheel to verify.
Tip: When using the multipurpose tool, the button is stitched to the
fabric leaving a shank. If stitching without the multipurpose tool the
button is stitched to the fabric without distance.
Tip: You can also use a sew-on button foot (part number 412934545),
available as an optional accessory at your local authorized
HUSQVARNA VIKING® retailer.
Note: The recommended width of 3.0 is set for most buttons. If you sew
a tiny button or a very large coat button, decrease (–) or increase (+) the
stitch width until the swing of the needle sews in the holes of the button.
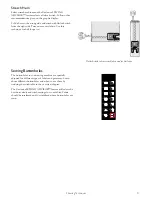
3. Set the number of stitches to sew on the button (A) by
pressing the up and down arrow buttons. Six to eight
stitches is standard.
4. Press the foot control. The sewing machine will sew the
number of stitches set on the display and then tie off and
stop.
5. Raise feed teeth when button sewing is completed.
Tip: Place the thin end of the multipurpose tool under the button when
sewing on light fabrics. Use the thick end for heavier fabrics. Hold in
place on the fabric with transparent tape.
54
5 Sewing Techniques
Содержание Designer Jade 35
Страница 1: ...User s Guide KEEPING THE WORLD SEWING ...
Страница 82: ......


