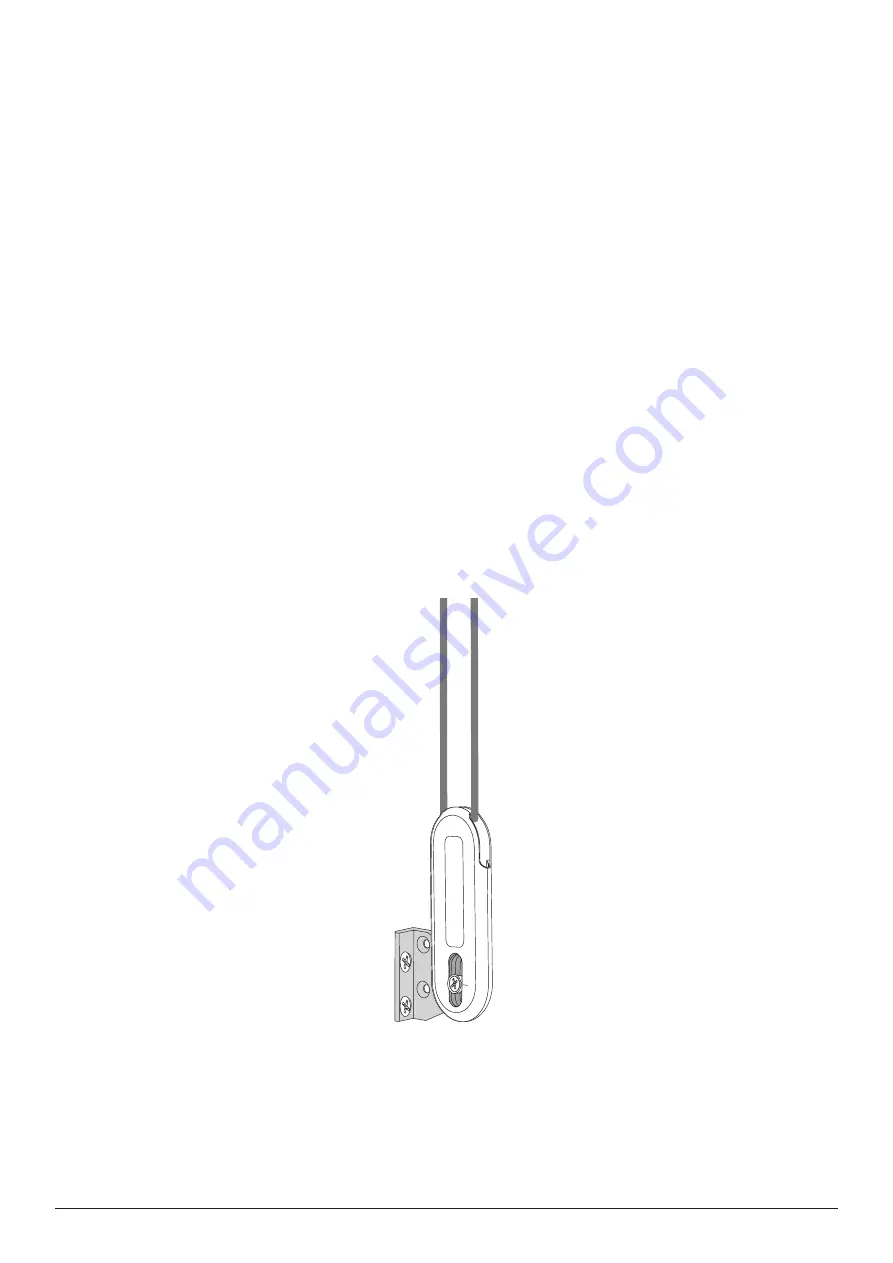
WHISPER
®
Cellular
EasyRise Shades
Installation • Operation • Care
Installation
•
Operation
Care
EasyRise
Shades
05/2013
Страница 1: ...WHISPER Cellular EasyRise Shades Installation Operation Care Installation Operation Ca WHISPER Cellular EasyRiseShades 05 2013 ...
Страница 2: ...Mount the Installation Brackets End Mount 7 Install the Shade 8 Attach Hold Down Brackets Optional 8 Level the Bottom Rail If Necessary 9 Attach the Universal Cord Tensioner s 9 Operation Operate the Shade 14 Troubleshooting 15 Care Removing the Shade If Necessary 17 Cleaning Procedures 17 Child Safety Warning 19 Copyright 2013 Hunter Douglas Limited ABN 98 009 675 709 Registered Trade Marks of Hu...
Страница 3: ...GETTING STARTED 1 Product View Hold Down Bracket Optional Cord Tensioner and Bracket Bottom Up End Cap Installation Brackets Fabric Covered Headrail ...
Страница 4: ...l bit and a 6mm hex driver In addition you will need fasteners designed to work with your specific mounting surface s 6 Hex Head Screws Provided Two 38mm screws are provided per installation bracket Longer 6 Hex Head Screws Not Provided If using spacer blocks use 6 screws long enough for a secure attachment 6 Flat Head Screws Provided If end mounting the shade use two 38mm screws per installation ...
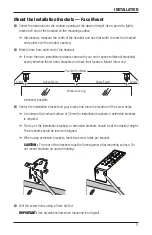
Страница 5: ...and basic window terminology illustrated below Refer to the appropriate page below based on your order Reveal Mount Page 4 Face Mount Page 5 End Mount Page 7 Face Mount Shade mounts outside window opening Reveal Mount Shade fits within window opening Collectively the sill and jambs are called the window casement Molding Head Jamb Sill Jamb Jamb 10mm 20mm Installation Bracket End Mount Brackets Sha...
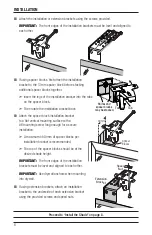
Страница 6: ...ets is 10mm Mark both of the winged screw holes with shallow mounting depths The minimum casement depth for a fully recessed mount is 60mm for 10mm and 20mm cell sizes IMPORTANT The front edges of the brackets must be level and aligned to each other Drill the screw holes using a 3mm drill bit IMPORTANT Use drywall anchors when mounting into drywall Use a level to check that the mounting surface is...
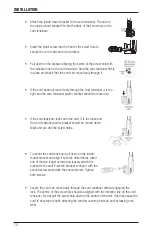
Страница 7: ...ion Mount into wood whenever possible Center the installation brackets on your marks and mark the location of the screw holes A minimum flat vertical surface of 30mm for installation brackets or extension brackets is required The top of the installation brackets or extension brackets should be at the desired height The brackets should be level and aligned When using extension brackets mark two scr...
Страница 8: ... bracket to a flat vertical mounting surface with a 6 mounting screw long enough for a secure installation A maximum of 40mm of spacer blocks per installation bracket is recommended The top of the spacer blocks should be at the desired shade height IMPORTANT The front edges of the installation brackets must be level and aligned to each other IMPORTANT Use drywall anchors when mounting into drywall...
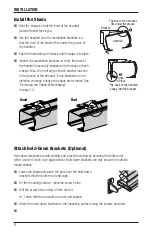
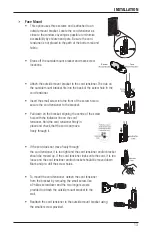
Страница 9: ...must be installed at the same depth and height Mark both screw holes The mounting surface must be vertical and flat not part of an arched curve Minimum mounting depth is 30mm for 20mm and 10mm cell sizes Minimum mounting depth for a fully recessed end mount is 60mm for 20mm and 10mm cell sizes Drill the holes using a 3mm drill bit Attach the end mount installation brackets using the flat head scre...
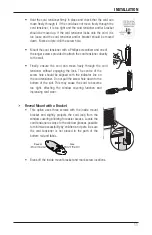
Страница 10: ...ade and reinstall See Removing the Shade If Necessary on page 13 Attach Hold Down Brackets Optional Hold down brackets provide stability and prevent swaying by securing the bottom rail often used in French door applications Hold down brackets can only be used on outside mount shades Lower the shade and place the pins from the hold down brackets into the bottom rail end caps On the mounting surface...
Страница 11: ...hade height and adjustments to level the bottom rail can be made by adjusting the cord on the underside of the bottom rail Locate the ferrule seated in a pocket in the bottom rail Remove the ferrule by pulling on the excess cord If the cord has been trimmed you will need to use needlenose pliers to access it To shorten the cord hold the cord tight under the ferrule Then slide the ferrule up toward...
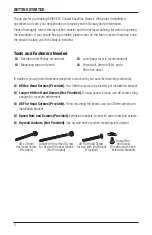
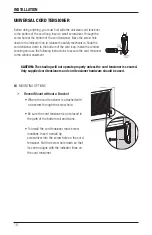
Страница 12: ...ons Insert a small tip screwdriver into the screw hole on the cord tensioner Pull the screw hole down so that its centre aligns with the indicator lines on the cord tensioner MOUNTING OPTIONS Before doing anything you must first slide the universal cord tensioner to the bottom of the cord loop Insert a small screwdriver through the screw hole at the bottom of the cord tensioner Move the screw hole...
Страница 13: ...e freely through the cord tensioner without engaging the lock The centre of the screw hole should be aligned with the indicator line on the cord tensioner Do not pull the screw hole down to the bottom of the slot This may cause the cord to become too tight affecting the window covering function and increasing cord wear Reveal Mount with a Bracket This option uses three screws with the inside mount...
Страница 14: ...be moved up If the cord tensioner locks onto the cord it is too loose and the cord tensioner and or bracket should be moved down Mark and pre drill the screw holes To mount the cord tensioner pull down on the inside mount bracket and align it with the drilled holes Insert one of the two longer screws and loosely attach the bracket to the wall Pivot the bracket to align it with the second screw and...
Страница 15: ...e bracket Pull down on the bracket aligning the centre of the screw hole with the indicator line on the cord tensioner Hold the cord tensioner firmly in place and check that the cord can move freely through it If the cord does not move freely through the cord tensioner it is too tight and the cord tensioner and or bracket should be moved up If the cord tensioner locks onto the cord it is too loose...
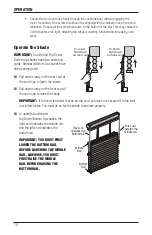
Страница 16: ...s the middle rail and the left cord operates the bottom rail IMPORTANT YOU MUST FIRST LOWER THE BOTTOM RAIL BEFORE LOWERING THE MIDDLE RAIL LIKEWISE YOU MUST FIRST RAISE THE MIDDLE RAIL BEFORE RAISING THE BOTTOM RAIL To Lower Pull down on rear cord To Raise Pull down on front cord Middle Rail Bottom Rail This cord operates the bottom rail This cord operates the middle rail Ensure the cord can move...
Страница 17: ...ail Check that the headrail and installation brackets are level and aligned Shim the installation brackets to level the headrail if necessary Check that cord loops are not pinched or tangled If hold down brackets are used make sure they have been released before operating the shade Problem The shade raises or lowers unevenly or the bottom rail is uneven when fully raised Solution Lower the shade c...
Страница 18: ... See Install the Shade on page 8 Problem The universal cord tensioner has climbed to the headrail Solution Pull down on the spring to relieve tension and pull the universal cord tensioner to the bottom of the cord loop Properly mount the cord tensioner See the instructions in Universal Cord Tensioner Installation on page 10 Problem The universal cord tensioner grabs onto the cord upon operation So...
Страница 19: ...ar light dusting with a feather duster is all the cleaning that is needed in most circumstances Vacuuming CAUTION Do not vacuum blockout fabrics For deeper cleaning vacuum gently with a brush attachment Compressed Air Hair Dryer Cool Setting Use compressed air or a hair dryer on a cool setting to blow dust and dirt off shades Spot Cleaning CAUTION Do not spot clean blockout fabrics or the fabric c...
Страница 20: ...removing from the rinse water fully raise the shade and tilt it to allow excess water to drain off Dry the shade completely in the lowered position Ultrasonic Cleaning CAUTION Do not ultrasonically clean fabric covered valances Do not ultrasonically clean Batiste Sunterra Vintage and all blockout fabrics Some honeycomb fabrics can be ultrasonically cleaned by a professional Specify that a mild det...
Страница 21: ...om being able to remove the cords This pack includes the following child safety devices Universal Cord Tensioner 4152336XXX Cord Tensioner Hardware 4150459000 These safety devices are suitable for installation onto the following surfaces Timber Aluminium Gyproc Spring Toggle Brick Wall Plug NOTE The Spring Toggle and Wall Plug are not included in this pack For the shading to operate properly and y...
Страница 22: ...Notes ...
Страница 23: ...Notes ...
Страница 24: ......