background image

INSTALLATION

11

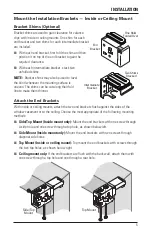
Attach the Universal Valance Clips to the Headrail

With fully recessed inside or ceiling mounts, the universal valance clips must be installed 
before mounting the headrail.


Attach clips 3" to 6" from each end of the headrail. Avoid any internal components.


Space additional clip(s) evenly between the two end clips so that they are no more than 
36" apart.


Do not place the clips where they could interfere with internal headrail mechanisms.


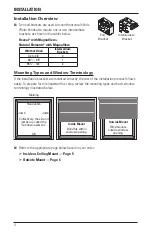
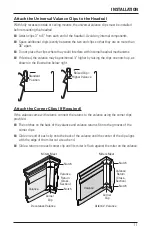
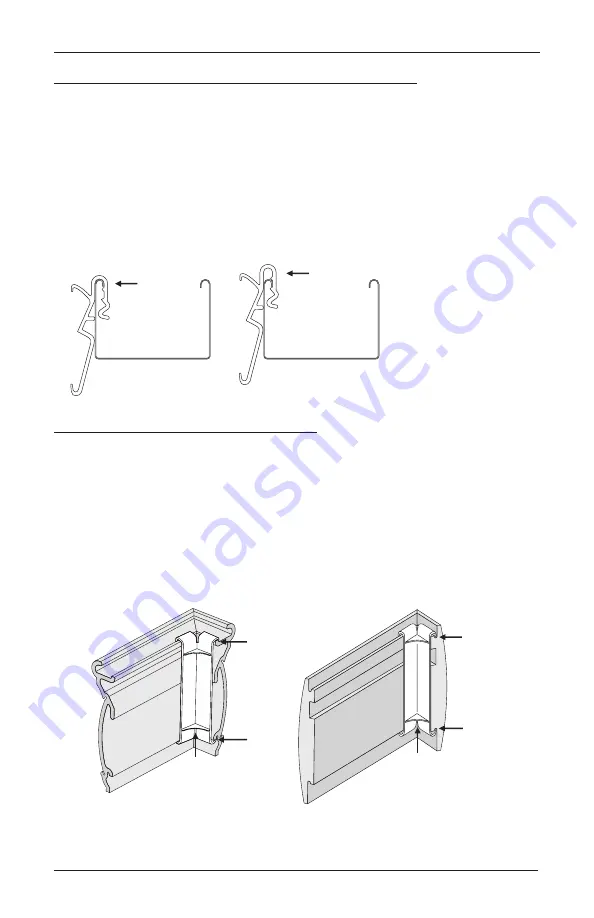
If desired, the valance may be positioned 

1

4

" higher by raising the clips one notch up, as 

shown in the illustration below right.

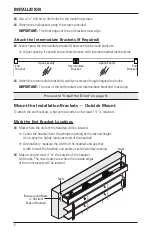
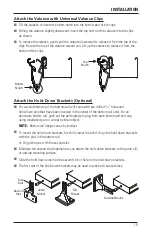
Attach the Corner Clips (If Required)

If the valance came with returns, connect the returns to the valance using the corner clips 
provided.


The notches on the back of the valance and valance returns fit into the grooves of the 
corner clips. 


Slide one end of each clip onto the back of the valance until the center of the clip aligns 
with the edge of the miter cut at each end.


Slide a return onto each corner clip until its miter is flush against the miter on the valance.

Standard

Position

Raised Clip =

Higher Valance

Miters Meet

Valance

Return

(Cross-

Section)

Corner

Clip

Decorative Valance 

Artemis


 Valance 

Valance

Notch

Notch

Miters Meet

Notch

Valance

Return

(Cross-

Section

)

Notch

Valance

Corner

Clip

Содержание Natural Elements

Страница 1: ...Installation Operation Care Aluminum Blinds MagnaView Tilt Feature QTY 1 8802480016F 4 20...

Страница 2: ...ackets Outside Mount 6 Install the Blind 9 Complete the Installation 14 OPERATION Operate the Blind 16 Troubleshooting 17 CARE Removing the Blind If Necessary 19 Cleaning Procedures 19 CHILD SAFETY Co...

Страница 3: ...ets Optional Valance Splice If Required Universal Valance Clips Corner Clips for Valance Returns If Required End Bracket Spacer Block Optional Intermediate Bracket Spacer Block Optional End Bracket Sp...

Страница 4: ...cer Block Optional End Bracket Spacer Block Optional Hold Down Brackets and Pin Optional Intermediate Bracket Spacer Block Optional 2 or 4 Extension Brackets Optional Valance Splice If Required Corner...

Страница 5: ...designed to work with your specific mounting surface s 6 Hex Head Screws Provided Two 11 2 screws are provided per installation bracket Longer 6 Hex Head Screws Not Provided If using spacer blocks us...

Страница 6: ...ant first step review the mounting types and basic window terminology illustrated below Refer to the appropriate page below based on your order Inside or Ceiling Mount Page 5 Outside Mount Page 6 Outs...

Страница 7: ...th inside or ceiling mounts attach the two end brackets flush against the sides of the window casement or to the ceiling Choose the most appropriate of the following mounting methods Side Top Mount In...

Страница 8: ...ll the Blind on page 9 Mount the Installation Brackets Outside Mount To attach the end brackets a flat vertical surface of at least 13 4 is required Mark the End Bracket Locations Mark where the ends...

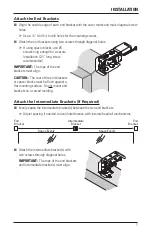
Страница 9: ...end brackets must align CAUTION The rear of the end brackets or spacer blocks must be flush against a flat mounting surface Do not mount end brackets on a curved molding Attach the Intermediate Bracke...

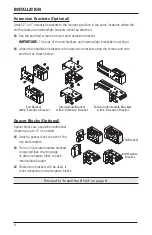
Страница 10: ...rews and nuts provided as shown below Spacer Blocks Optional Spacer blocks are used when additional clearance up to 3 8 is needed Attach a spacer block to each of the two end brackets If one or more i...

Страница 11: ...projection positions When the clips are fully compressed the narrowest projection is 5 8 The widest projection is 7 8 Insert a small flat blade screwdriver into the slot on one side of the magnet mak...

Страница 12: ...e valance groove Twist the clip until it is straight with the clear tabs at the top of the valance There are at least two clips per valance For valances narrower than 36 position clips 51 2 in from th...

Страница 13: ...as shown in the illustration below right Attach the Corner Clips If Required If the valance came with returns connect the returns to the valance using the corner clips provided The notches on the back...

Страница 14: ...the valance where the two halves meet Mount the Headrail Tilt the headrail so that its back lip slides under the front lip of the end brackets and intermediate bracket s Push the headrail against the...

Страница 15: ...ts Close the End Brackets Push the cover down until it snaps over the locking tab on the bottom of the end bracket Open the End Brackets If Necessary To open the end brackets insert a flat blade screw...

Страница 16: ...sition the clips to the top front lip of the headrail until it is level and in position Press the valance gently forward just enough so the clips adhere to the headrail The magnetic valance clips allo...

Страница 17: ...m rail ends For an aluminum bottom rail push out the perforated pin plug from each bottom rail end cap using a ballpoint pen or similar pointed object NOTE Bottom rail design varies by product To moun...

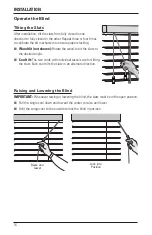
Страница 18: ...the wand to tilt the slats to the desired angle Cord tilt The two cords with individual tassels are for tilting the slats Each cord tilts the slats in an alternate direction Raising and Lowering the...

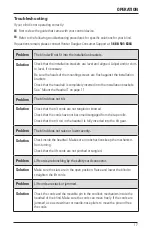
Страница 19: ...m The blind does not tilt Solution Check that the tilt cords are not tangled or knotted Check that the cords have not become disengaged from the tape rolls Check that the tilt rod in the headrail is f...

Страница 20: ...cordlock side of the unit particularly in an inside mount installation Solution Slide the headrail in the end brackets in the opposite direction of the skew and adjust the tabs in the end brackets to...

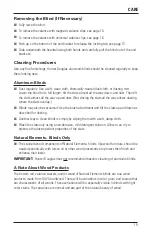
Страница 21: ...ds may also be vacuumed Use the brush attachment and tilt the slats up and down as described for dusting Another way to clean blinds is simply by wiping them with a soft damp cloth Wash the slats only...

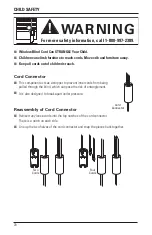
Страница 22: ...er cords from being pulled through the blind which can pose the risk of entanglement It is also designed to break apart under pressure Reassembly of Cord Connector Reinsert any loose cords into the to...

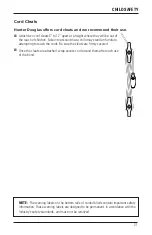
Страница 23: ...a child may stand on furniture attempting to reach the cords Be sure the cleats are firmly secured Once the cleats are attached wrap excess cord around them after each use of the blind NOTE The warni...

Страница 24: ...re covered for 5 years from the date of purchase 1 Contact your original dealer place of purchase for warranty assistance 2 Visit hunterdouglas com for additional warranty information frequently asked...

Отзывы: