background image

Thank you for purchasing Hunter Douglas horizontal blinds. With proper installation and care, 
your new blinds will provide years of beauty.
Please thoroughly review this instruction booklet and the enclosed packing list before 
beginning the installation.

Tools and Fasteners Needed

Flat blade and Phillips screwdrivers

Level (laser level is recommended)

Measuring tape and pencil

Power drill, 

3

32

" drill bits, and 

1

4

" hex driver (or socket wrench with 

1

4

" hex socket)

In addition, you will need fasteners designed to work with your specific mounting surface(s).

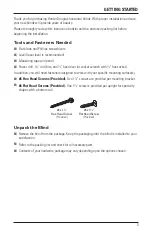
#6 Hex Head Screws (Provided). 

Two 1

1

2

" screws are provided per mounting bracket.

#6 Flat Head Screws (Provided). 

One 1

1

4

" screw is provided per upright for specialty 

shapes with a bottom rail.

Unpack the Blind

Remove the blind from the package. Keep the packaging until the blind is installed to your 
satisfaction.

Refer to the packing list and check for all necessary parts.

Contents of your hardware package may vary depending upon the options chosen.

#6 x 1

1

2

"

Hex Head Screw

(Provided)

#6 x 1

1

4

"

Flat Head Screw

(Provided)

GETTING STARTED

3

Содержание Alternative Wood Blinds

Страница 1: ...Installation Care Wood Blinds and Alternative Wood Blinds Non Operable Specialty Shapes 8802480014F 4 18...

Страница 2: ...ort at 1 888 501 8364 GETTING STARTED Product View Specialty Shape with Bottom Rail 1 Product View Specialty Shape without Bottom Rail 2 Tools and Fasteners Needed 3 Unpack the Blind 3 INSTALLATION In...

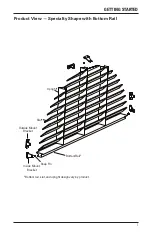
Страница 3: ...Product View Specialty Shape with Bottom Rail Bottom Rail Outside Mount Bracket Inside Mount Bracket Snap Pin Bottom rail slat and upright design vary by product Slat Upright GETTING STARTED 1...

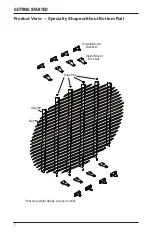
Страница 4: ...Product View Specialty Shape without Bottom Rail Snap Pins Inside Mount Brackets Outside Mount Brackets Upright Slat Slat and upright design vary by product 2 GETTING STARTED...

Страница 5: ...with 1 4 hex socket In addition you will need fasteners designed to work with your specific mounting surface s 6 Hex Head Screws Provided Two 11 2 screws are provided per mounting bracket 6 Flat Head...

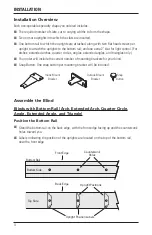
Страница 6: ...for your blind Snap Button One snap button per mounting bracket will be included Assemble the Blind Blinds with Bottom Rail Arch Extended Arch Quarter Circle Angle Extended Angle and Triangle Positio...

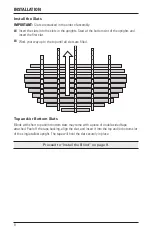
Страница 7: ...he uprights Double check that the slots in all the uprights are facing up IMPORTANT Do not overtighten the flat head screws Install the Slats IMPORTANT Slats are stacked in the order of assembly Inser...

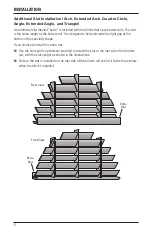
Страница 8: ...ned to help eliminate the light gap at the bottom of the specialty shape If you choose to install this extra slat Use the hook and loop fastener provided to attach the slat to the rear side of the bot...

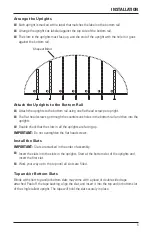
Страница 9: ...and arrange the uprights as labeled Stand the uprights on their back edge so that the slots are face up with the slots angled the same on all uprights Arrange the uprights so that they approximate the...

Страница 10: ...rk your way up to the top until all slots are filled Top and or Bottom Slats Blinds with short top and or bottom slats may come with a piece of double sided tape attached Peel off the tape backing ali...

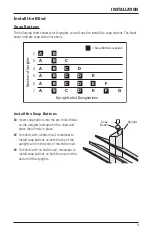
Страница 11: ...ted on the chart and press them firmly in place On blinds with a bottom rail remember to install snap buttons on both the top of the uprights and on the ends of the bottom rail On blinds with no botto...

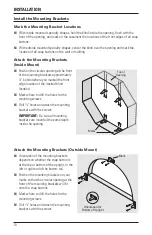
Страница 12: ...the desired blind location Mark where to drill the holes for the mounting screws Drill 1 8 holes and attach the mounting brackets with the screws IMPORTANT Be sure all mounting brackets are mounted th...

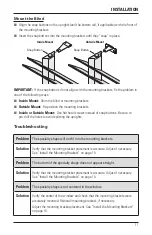
Страница 13: ...Button Snap Button Inside Mount Outside Mount Troubleshooting Problem The specialty shape will not fit into the mounting brackets Solution Verify that the mounting bracket placement is accurate Adjust...

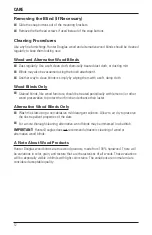
Страница 14: ...ld be treated periodically with lemon oil or other wood preservative to protect their finish and enhance their luster Alternative Wood Blinds Only Wash the slats using a non abrasive mild detergent so...

Страница 15: ......

Страница 16: ...re covered for 5 years from the date of purchase 1 Contact your original dealer place of purchase for warranty assistance 2 Visit hunterdouglas com for additional warranty information frequently asked...

Отзывы: