background image

Digital Video Recorder Quick Start Guide 

19 

No. 

Name 

Function Description 

In the Playback mode: the ring is used to jump 
30s forward/backward in video files.   

In  PTZ  control  mode,  it  can  control  the 
movement of the PTZ camera. 

11 

SLOW DOWN/SPEED UP 

Slow down/speed up in playback mode. 


1.2 Rear Panel 


The rear panel vaires according to different models. Please refer to the actual product. The 
following figures only take examples of several models. 


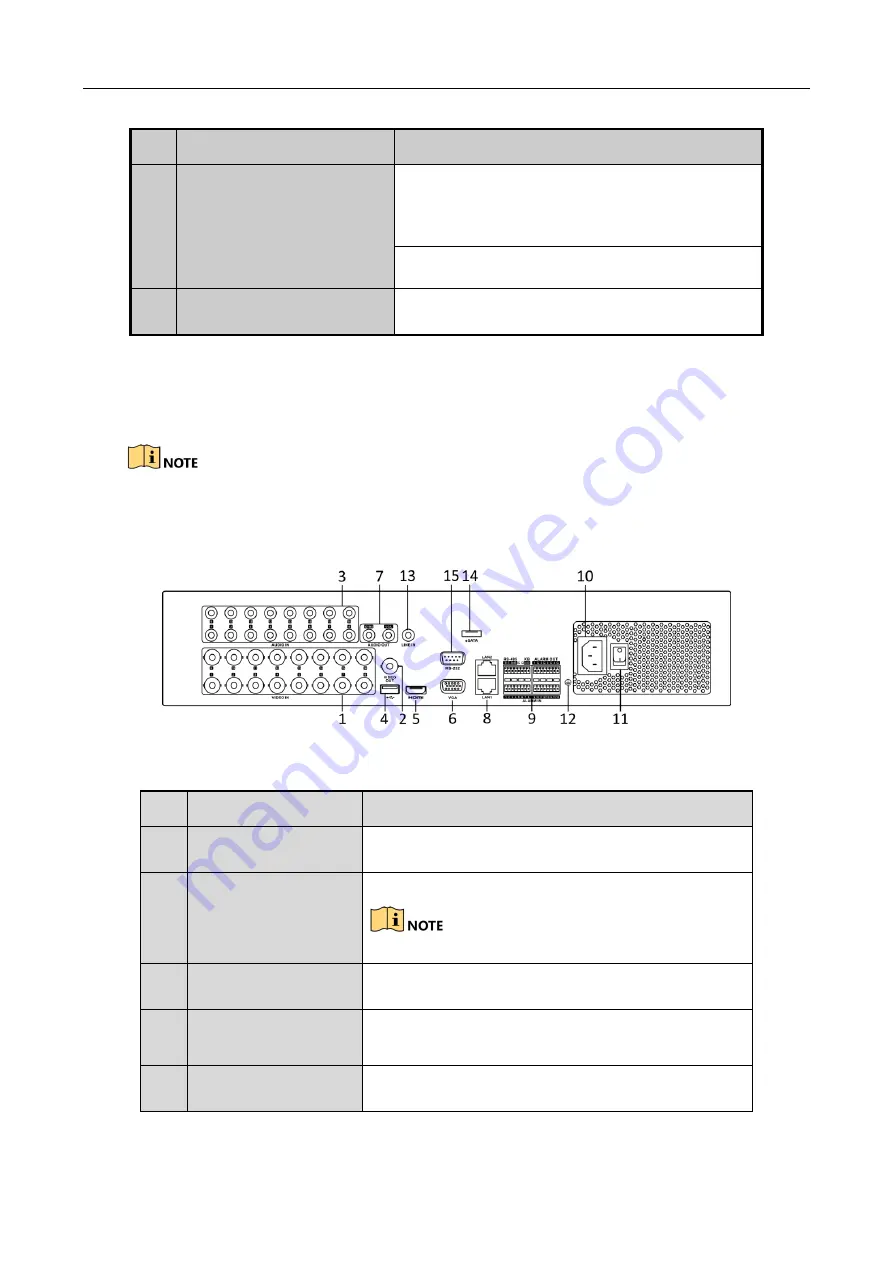
Rear Panel 1


Figure 1-6


Rear Panel 1 

Table 1-6


Description of Rear Panel 1


No.  Item 

Function Description 

VIDEO IN 

BNC interface for TVI and analog video input. 

VIDEO OUT 

BNC connector for video output. 


CVBS output is not provided by certain series DVR. 

AUDIO IN 

RCA connector 

USB Port 

Universal  Serial  Bus  (USB)  port  for  additional 
devices. 

HDMI 

HDMI video output connector. 

Содержание HHR315-16

Страница 1: ...Digital Video Recorder Quick Start Guide ...

Страница 2: ... 4 HDD Storage Calculation Chart 29 Chapter 3 Menu Operation 30 3 1 Menu Structure 30 3 2 Startup and Shutdown 30 3 3 Activating Your Device 31 3 4 Using the Unlock Pattern for Login 33 3 5 Login and Logout 34 3 5 1 User Login 34 3 5 2 User Logout 36 3 6 Configuring the Signal Input 37 3 7 Using the Setup Wizard 38 3 8 Network Settings 38 3 9 Adding IP Cameras 39 3 10 Live View 41 3 11 Recording S...

Страница 3: ...Legal Disclaimer REGARDING TO THE PRODUCT WITH INTERNET ACCESS THE USE OF PRODUCT SHALL BE WHOLLY AT YOUR OWN RISKS OUR COMPANY SHALL NOT TAKE ANY RESPONSIBILITES FOR ABNORMAL OPERATION PRIVACY LEAKAGE OR OTHER DAMAGES RESULTING FROM CYBER ATTACK HACKER ATTACK VIRUS INSPECTION OR OTHER INTERNET SECURITY RISKS HOWEVER OUR COMPANY WILL PROVIDE TIMELY TECHNICAL SUPPORT IF REQUIRED SURVEILLANCE LAWS V...

Страница 4: ...ference 2 This device must accept any interference received including interference that may cause undesired operation EU Conformity Statement This product and if applicable the supplied accessories too are marked with CE and comply therefore with the applicable harmonized European standards listed under the EMC Directive 2014 30 EU the LVD Directive 2014 35 EU the RoHS Directive 2011 65 EU 2012 19...

Страница 5: ... Provides additional information to emphasize or supplement important points of the main text Indicates a potentially hazardous situation which if not avoided could result in equipment damage data loss performance degradation or unexpected results Indicates a hazard with a high level of risk which if not avoided will result in death or serious injury ...

Страница 6: ...m the device turn off the power at once and unplug the power cable and then please contact the service center Preventive and Cautionary Tips Before connecting and operating your device please be advised of the following tips Ensure unit is installed in a well ventilated dust free environment Unit is designed for indoor use only Keep all liquids away from the device Ensure environmental conditions ...

Страница 7: ... blinks yellow when network connection is functioning properly 2 DIRECTIONS The DIRECTION buttons are used to navigate between different fields and items in menus In the Playback mode the Up and Down button is used to speed up and slow down recorded video The Left and Right button will select the next and previous record files In Live View mode these buttons can be used to cycle through channels I...

Страница 8: ...a is being read from or written to HDD and turns yellow when the SHIFT function is realized Tx Rx Flickers yellow when network connection is functioning properly 2 Composite Keys SHIFT Switches between the numeric or letter input and functions of the composite keys 1 MENU Enters numeral 1 Accesses the main menu interface 2 ABC F1 Enters numeral 2 Enters letters ABC Uses the F1 button to select all...

Страница 9: ... Enters numeral 7 Enters letters PQRS Accesses to manual record interface Manually enables disables record 8 TUV PTZ Enters numeral 8 Enters letters TUV Accesses PTZ control interface 9 WXYZ PREV Enters numeral 9 Enters letters WXYZ Multi channel display in live view 0 A Enters numeral 0 Shifts the input methods in the editing text field Upper and lowercase alphabet symbols or numeric input 3 DIRE...

Страница 10: ...switch in Auto switch mode 4 USB Interface Universal Serial Bus USB ports for additional devices such as USB mouse and USB Hard Disk Drive HDD 5 IR Receiver Receiver for IR remote control Front Panel 3 Figure 1 3 Front Panel 3 Table 1 3 Description of Front Panel 3 No Name Function Description 1 POWER ON OFF Power on off switch 2 USB Interface Connect to USB mouse or USB flash memory 3 IR Receiver...

Страница 11: ...blinks in red when data is being read from or written to HDD Tx Rx TX RX indictor blinks in green when network connection is functioning properly 5 DVD ROM Slot for DVD ROM 6 DIRECTION The DIRECTION buttons are used to navigate between different fields and items in menus In Playback mode the Up and Down button is used to speed up and slow down recorded video In All day Playback mode the Left Right...

Страница 12: ...er letters DEF In PTZ Control mode the F1 button can be used to zoom in zoom the PTZ camera The F2 button can be used to cycle through tab pages 4GHI ESC Enter numeral 4 Enter letters GHI Exit and back to the previous menu 5JKL EDIT Enter numeral 5 Enter letters JKL Delete characters before cursor Select the checkbox and ON OFF switch Start stop record clipping in playback 6MNO PLAY Enter numeral ...

Страница 13: ... selection in a menu The inner ring will move the selection up and down the outer ring will move it left and right In Playback mode the inner ring is used to jump 30s forward backward in video files The outer ring can be used to speed up slow down the video In Live View mode it can be used to cycle through different channels In PTZ control mode in can control the movement of the PTZ camera Front P...

Страница 14: ...nel in Live view or PTZ Control mode Input numbers and characters in Edit mode Switch between different channels in Playback mode The light of the button is blue when the corresponding channel is recording it is red when the channel is in network transmission status it is pink when the channel is recording and transmitting 3 Control Buttons DIRECTION The DIRECTION buttons are used to navigate betw...

Страница 15: ...previous menu Arm disarm the device in live view mode REC SHOT Enter the Manual Record setting menu In PTZ control settings press the button and then you can call a PTZ preset by pressing Numeric button It is also used to turn audio on off in the Playback mode PLAY AUTO Enter the Playback menu Auto scan in the PTZ Control mode ZOOM Zoom in the PTZ camera in the PTZ Control setting A FOCUS Adjust f...

Страница 16: ...between channels MENU WIPE R Press the button will help you return to the Main menu after successful login Press and hold the button for 5 seconds will turn off audible key beep In PTZ Control mode the MENU WIPER button will start wiper if applicable In Playback mode it is used to show hide the control interface PREV FOCUS Switch between single screen and multi screen mode In PTZ Control mode it i...

Страница 17: ...red when data is being read from or written to HDD MODEM Reserved for future usage TX RX Flashes blue when network connection is functioning properly GUARD Guard LED turns blue when the device is in armed status at this time an alarm is enabled when an event is detected The LED turns off when the device is unarmed The arm disarm status can be changed by pressing and holding on the ESC button for m...

Страница 18: ... ESC Back to the previous menu Press for Arming disarming the device in Live View mode REC SHOT Enter the Manual Record setting menu In PTZ control settings press the button and then you can call a PTZ preset by pressing Numeric button It is also used to turn audio on off in the Playback mode PLAY AUTO The button is used to enter the Playback mode It is also used to auto scan in the PTZ Control me...

Страница 19: ...U WIPER button will start wiper if applicable In Playback mode it is used to show hide the control interface PREV FOCUS Switch between single screen and multi screen mode In PTZ Control mode it is used to adjust the focus in conjunction with the A FOCUS button PTZ IRIS Enter the PTZ Control mode In the PTZ Control mode it is used to adjust the iris of the PTZ camera 9 Alphanumeric Buttons Switch t...

Страница 20: ...l vaires according to different models Please refer to the actual product The following figures only take examples of several models Rear Panel 1 Figure 1 6 Rear Panel 1 Table 1 6 Description of Rear Panel 1 No Item Function Description 1 VIDEO IN BNC interface for TVI and analog video input 2 VIDEO OUT BNC connector for video output CVBS output is not provided by certain series DVR 3 AUDIO IN RCA...

Страница 21: ... controller For cascading devices the first DVR s D D pin should be connected with the D D pin of the next DVR Connector for alarm input Connector for alarm output 10 Power Supply 100 to 240 VAC power supply 11 Power Switch Switch for turning on off the device 12 GND Ground 13 LINE IN BNC connector for audio input 14 eSATA Connects external SATA HDD CD DVD RW 15 RS 232 Interface Connector for RS 2...

Страница 22: ...work 9 RS 485 and Alarm Interface Connector for RS 485 devices T and T pins connect to R and R pins of PTZ receiver respectively D D pin connects to Ta Tb pin of controller For cascading devices the first DVR s D D pin should be connected with the D D pin of the next DVR Connector for alarm input Connector for alarm output 10 Power Supply 100 to 240V AC power supply 11 Power Switch Switch for turn...

Страница 23: ...nd menu 5 HDMI HDMI video output connector 6 USB Universal Serial Bus USB ports for additional devices 7 Network Interface Connector for network 8 RS 485 Half duplex connector for RS 485 devices 9 Power Supply 12VDC power supply 10 Power Switch Switch for turning on off the device 11 GND Ground needs to be connected when DVR starts up 12 VIDEO OUT BNC connector for video output 13 GND Ground needs...

Страница 24: ...ed Environmental temperature should be within the range of 10 to 55ºC 14 to 131ºF Environmental humidity should be within the range of 10 to 90 2 2 Hard Disk Installation Before you start Before installing a hard disk drive HDD please make sure the power is disconnected from the DVR A factory recommended HDD should be used for this installation 1 2 4 8 SATA hard disks can be installed depending on...

Страница 25: ...ct one end of the data cable to the motherboard of DVR and the other end to the HDD Figure 2 2 Insert Panel Key Step 3 Connect the power cable to the HDD Figure 2 3 Open Panel Lock Step 4 Place the HDD on the bottom of the device and then fasten the screws on the bottom to fix the HDD ...

Страница 26: ...n the back and side Step 2 Install the HDD to the HDD rack using the provided screws and then fasten the screws to fix the HDD Step 3 Connect one end of the data cable to the motherboard of DVR and the other end to the HDD Step 4 Connect the power cable to the HDD Step 5 Re install the cover of the DVR and fasten screws Type III Step 1 Fasten the hard disk mounting handle to the hard disk with scr...

Страница 27: ...p 3 Press the buttons on the two sides of the front panel to open it Step 4 Insert the hard disk along the slot until it is placed into position Step 5 Repeat the above steps to install other hard disks onto the DVR After having finished the installation of all hard disks close the front panel and lock it with the key again ...

Страница 28: ...Digital Video Recorder Quick Start Guide 27 ...

Страница 29: ...om the RS 485 terminal block Step 2 Press and hold the orange part of the pluggable block insert signal cables into slots and release the orange part Ensure signal cables are in tight Step 3 Connect A on PTZ to D on terminal block and B on controller to D on terminal block Fasten stop screws Step 4 Connect pluggable block back into terminal block Make sure both the controller and DVR are grounded ...

Страница 30: ...te Storage Used 96K 42M 128K 56M 160K 70M 192K 84M 224K 98M 256K 112M 320K 140M 384K 168M 448K 196M 512K 225M 640K 281M 768K 337M 896K 393M 1024K 450M 1280K 562M 1536K 675M 1792K 787M 2048K 900M 4096K 1 76G 8192K 3 52G 16384K 7 03G Please note that supplied values for storage space used is just for reference The storage values in the chart are estimated by formulas and may have some deviation from...

Страница 31: ...tect Video Tampering User Video Loss HDD Detect Alarm VCA Normal Event Tag Smart Sub periods External File VCA Search Behavior Search Face Search People Counting Heat Map Alarm Manual Video Quality Diagnostics Video Quality Diagnostics POS RS 232 Figure 3 1 Menu Structure 3 2 Startup and Shutdown Proper startup and shutdown procedures are crucial to expanding the life of the DVR To start your DVR ...

Страница 32: ...nd recording To shut down the DVR Step 1 Enter the Shutdown menu Menu Shutdown Figure 3 2 Shutdown Step 2 Select the Shutdown button Step 3 Click the Yes button 3 3 Activating Your Device Purpose For the first time access you need to activate the device by setting an admin password No operation is allowed before activation You can also activate the device via Web Browser SADP or client software St...

Страница 33: ...oduct Step 2 Click OK to save the password and activate the device Clear text password is supported Click the icon and you can see the clear text of the password Click the icon again and the content of the password restores invisible For the old version device if you upgrade it to the new version the following dialog box will pop up once the device starts up You can click YES and follow the wizard...

Страница 34: ...ure 3 7 Duplicate the Password 3 4 Using the Unlock Pattern for Login For the Admin user you can configure the unlock pattern for device login After the device is activated you can enter the following interface to configure the device unlock pattern Step 1 Use the mouse to draw a pattern among the 9 dots on the screen Release the mouse when the pattern is done Figure 3 8 Draw the Pattern ...

Страница 35: ... patterns match the pattern is configured successfully Step 3 You can use the configured unlock pattern for future login Figure 3 9 Draw the Unlock Pattern 3 5 Login and Logout 3 5 1 User Login Purpose If DVR has logged out you must log in to the device before operating the menu and other functions Step 1 Select the User Name from the drop down list Figure 3 10 Login Step 2 Input Password ...

Страница 36: ...ssword for 7 times the account will be locked for 60 seconds For the operator if you have entered the wrong password for 5 times the account will be locked for 60 seconds Figure 3 11 User Account Protection for the Admin Figure 3 12 User Account Protection for the Operator Step 4 Optional If you forget the password click Forget Password to pop up the Import GUID interface Figure 3 13 Import GUID 1...

Страница 37: ...IP cameras that are connected with default protocol Click Yes to duplicate the password or No to cancel it Figure 3 16 Duplicate the Password If you want to retrieve the password when you forget it you must export the GUID file first Once the password is reset the GUID file becomes ineffective You can export a new GUID file 3 5 2 User Logout Purpose After logging out the monitor turns to the live ...

Страница 38: ... you should configure the analog and IP signal input types Step 1 Enter the Signal Input Status interface Menu Camera Signal Input Status Step 2 Check the checkbox to select different signal input types HD CVBS and IP If you select HD CVBS four kinds of analog signal inputs including HDTVI AHD HDCVI and CVBS can be connected randomly for the selected channel If you select IP IP camera can be conne...

Страница 39: ...the Max IP Camera Number text field For 1 5U 2U series DVR disabling one analog channel will add one IP channel 3 7 Using the Setup Wizard The Setup Wizard can walk you through some important settings of the device By default the Setup Wizard starts once the device has loaded Check the checkbox to enable Setup Wizard when device starts Click Next to continue the setup wizard Follow the guide of th...

Страница 40: ... settings If DHCP is enabled you can check the checkbox of Enable DNS DHCP or uncheck it and edit the Preferred DNS Server and Alternate DNS Server 3 9 Adding IP Cameras Purpose Before you can get live video or record the video files you should add the network cameras to the connection list of the device Before you start Ensure the network connection is valid and correct and the IP camera to add h...

Страница 41: ...ill be encoded with H 265 Enable H 265 option is only applicable to 1 5U 2U 3MP non real time series DVR OPTION 2 Step 1 Click the Custom Adding button to pop up the Add IP Camera Custom interface Figure 3 22 Add IP Camera Step 2 Select the detected IP camera and click the Add button to add it directly and you can click the Search button to refresh the online IP camera manually OPTION 3 You can ch...

Страница 42: ...n information appears at the lower left corner of the screen 3 11 Recording Settings Before you start Make sure that the disk has already been installed If not please install a disk and initialize it You may refer to the user manual for detailed information Purpose Two kinds of record types are introduced in the following section including Instant Record and All day Record And for other record typ...

Страница 43: ...eriods external file search picture Step 1 Enter playback interface Click menu playback or from the right click menu Step 2 Check the checkbox of channel s in the channel list and then double click to select a date on the calendar Step 3 You can use the toolbar in the bottom part of Playback interface to control playing progress Figure 3 24 Playback Interface This enable disable POS overlay functi...

Страница 44: ...nd Google Chrome The supported resolutions include 1024 768 and above Step 1 Open web browser input the IP address of the device and then press Enter Step 2 Login to the device If the device has not been activated you need to activate the device first before login Figure 4 1 Set Admin Password 1 Set the password for the admin user account 2 Click OK to login to the device STRONG PASSWORD RECOMMEND...

Страница 45: ...2 Login Step 3 Install the plug in before viewing the live video and managing the camera Please follow the installation prompts to install the plug in You may have to close the web browser to finish the installation of the plug in Step 4 After login you can perform the operation and configuration of the device including the live view playback log search configuration etc ...

Отзывы: